Showing posts with label Sympathy. Show all posts

Friday, August 16, 2024

Crafty Collaborations Monochromatic Color Challenge Week 33 - Garden Green

Welcome to the Crafty Collaborations Monochromatic Color Challenge Week 33 as we showcase Garden Green from the Regals Collection. For today's card design, I wanted to create one of the most difficult types of cards to make - sympathy cards. It is never easy to lose a loved one and a sympathy card is a way to help provide comfort during this difficult time. 
Garden Green is a beautiful medium green and I thought it would be perfect for my sympathy card design. To create the background for my design, I chose to use one of the designs from the Nests of Winter Designer Series Paper, which is a Sneak Peek from the September-December 2024 Mini Catalog. This striped background has an organic feel to it and the soft watercolor look creates a soothing feeling. For the focal design and sentiment, I chose to use the Quiet Reflection stamp set. There is something so peaceful about the images in this stamp set and I love the font for the sentiments. I wanted to keep this design clean and simple so I chose not to use any embellishments to clutter up the design. 
Products Used:
Quiet Reflection stamp set (item #162689)
Deckled Circles Dies (item #162286)
Nested Essentials Dies (item #161597)
Nests of Winter Designer Series Paper (item #164183)*
Garden Green Cardstock (item #102584)
Basic White Cardstock (item #159276)
Garden Green Classic Ink Pad (item #147089)
Stampin' Dimensionals (item #104430)
*Sneak Peek product from the September-December 2024 Mini Catalog
Measurements:
Garden Green Cardstock
Card Base - 5 1/2" x 8 1/2" (Scored at 4 1/4")
Medium Rectangle die cut with the Nested Essentials Dies
Basic White Cardstock
Layer 1 - 5 1/4" x 4"
Small Rectangle die cut with the Nested Essentials Dies
Medium Circle die cut with the Deckled Circles Dies
Nests of Winter Designer Series Paper
Card Front - 5" x 3 3/4"
I often choose to use clean and simple designs for sympathy cards. At a time when someone is going through pain and loss, it can help to bring peace and share love when most needed. For this card design, I felt that Garden Green was a beautiful color to help create a peaceful design with an organic feel to it. The trees in the stamped image have an almost elegant feel to them and I love how this image looks stamped with Garden Green Classic ink. I framed the image with a Garden Green cardstock layer to help frame it against the striped background. For the sentiment, I stamped the image with Garden Green Classic ink onto Basic White cardstock and die cut it out with one of the Deckled Circles Dies. I adhered the focal image to the card front using Stampin' Dimensionals, placing it to the left side and then added the sentiment circle so that it overlapped slightly with the bottom right corner of the image. The finished card showcases this beautiful green by simply using stamps, paper and ink to provide comfort during a difficult time.
Thank you for taking the time to visit my blog. I hope that my card design will help inspire you to use Garden Green to create your own beautiful projects. This beautiful green is perfect for all occasions and for any time of the year. 

Please take the time to visit this week's Monochromatic Insta Hop and see all the amazing projects created with Garden Green. Just click here to get started. We would appreciate it if you would leave us a comment and let us know what you liked about our projects. I hope to see you back next Friday for Week 34 of the Monochromatic Color Challenge. 

If you live in the U.S. and do not have a Stampin' Up! Demonstrator, please contact me and I would be happy to help you with your creative projects. You may also visit my Online Store to place your order and have it shipped to you. 


Until Next Time

Happy Stamping,

Tricia Butts
Independent Stampin' Up! Demonstrator

Like What You See? Visit My Online Store Here

Visit My Facebook Business Page for Updates & Ideas

Click here to Contact Me


Save 15% Off Select Designer Series Paper
From The 2024-2025 Annual Catalog
Click Below To Shop Now


Friday, January 19, 2024

Crafty Collaborations Monochromatic Color Challenge - Boho Blue

Welcome back to the Crafty Collaborations Monochromatic Color Challenge, with Week 3's color, Boho Blue. I love how soft and pretty this beautiful blue is to create with and today I chose to create a Sympathy card design using one of the designs from the Flight & Airy Designer Series Paper, one of the Level 1 Rewards you can earn free with a qualifying $50 order during Sale-a-bration.
Sympathy cards are probably the hardest card design for me to create. They are so personal and I try to design a card that will provide comfort during a difficult time. For today's card design, I used the monochromatic Boho Blue design from the Flight & Airy Designer Series Paper for the card background because it reminded me of the sky. I love the texture the watercolor background adds to the design, kind of like a moody sky before a storm. The butterfly die cut I chose to use for the focal image is from the new Paper Butterfly Accents in the January-April 2024 Mini Catalog. I created a watercolor wash look using a drop of Boho Blue ink mixed with Clear Wink of Stella to paint the butterfly and to give it that pretty shimmer and soft color. I love how this design turned out and I hope it provides comfort to the person receiving it.
Products Used:
Heartfelt Hexagon Bundle (item #162889)
Cloud Punch (item #157749)
2 3/8" Circle Punch (item #161354)
Painted Texture 3D Embossing Folder (item #154317)
Paper Butterfly Accents (item #162612)
Flight & Airy Designer Series Paper (item #162977) Level 1 
Sale-a-bration Reward
Boho Blue Cardstock (item #161724)
Basic White Cardstock (item #159276)
Boho Blue Classic Ink Pad (item #161650)
Boho Blue Classic Ink Refill (item #161656)
Clear Wink of Stella Glitter Brush (item #141897)
Boho Blue 3/8" Textured Ribbon (item #161631)
Blending Brushes (item #153611)
Stampin' Dimensionals (item #104430)
2023-2025 In Color Dots (item #161620)
Measurements:
Boho Blue Cardstock
Card Base - 8 1/2" x 5 1/2" (Scored at 4 1/4")
Mat Sentiment Layer punched out with the Heartfelt Hexagon Punch
Medium Circle punched out with the 2 3/8" Circle Punch and embossed with the Painted Texture 3D Embossing Folder
Basic White Cardstock
2 Clouds punched out with the Cloud Punch
Sentiment Label punched out with the Heartfelt Hexagon Punch
Flight & Airy Designer Series Paper
Card Front - 5 1/4" x 4"
Paper Butterfly Accents
1 Medium Butterfly Die Cut colored with Boho Blue ink & Clear Wink of Stella 
My vision for this card design was a pretty pale blue butterfly floating amongst the clouds. The designer series paper created the perfect background for the card design and I added a Boho Blue cardstock circle that I embossed with the Painted Texture 3D Embossing Folder to create the textured background for the focal image. I punched out two clouds from Basic White cardstock and gently added some Boho Blue Classic ink around the outside edges using a Blending Brush to add definition. I attached the top cloud to the embossed circle with adhesive and then added the second cloud with Stampin' Dimensionals so that it slightly overlaps the bottom cloud. I attached the water colored butterfly to the top cloud, centering it at a slight angle. To add some subtle bling, I added three Boho Blue Dots to the center of the butterfly.
For the sentiment label, I stamped the sentiment image from the Heartfelt Hexagon stamp set with Boho Blue Classic ink onto Basic White cardstock and punched it out with the coordinating Heartfelt Hexagon Punch. I also punched out a label from Boho Blue cardstock and cut it in half and attached it behind the sentiment label to create a narrow frame. I added a piece of the Boho Blue Texured Ribbon to the card front, towards the bottom right corner and added the sentiment label over the top with Stampin' Dimensionals. I added the focal image about the sentiment and slightly to the left, adhering it to the card front to complete the card design. I love how this card design showcases the variations you can get with this beautiful color using a variety of coordinating products. So what do you think? Are you ready to give Boho Blue a try? 
Thank you for taking the time to visit my blog. I hope that my card design will help inspire you to try using Boho Blue to create your own beautiful projects. This pretty blue has so many wonderful coordinating products to help spark your creativity. Click here to visit my Online Store to see all the wonderful Boho Blue products available. 
Please take the time to visit this week's Crafty Collaborations Monochromatic Color Insta Hop on Instagram and see all the other amazing projects created by my fellow demonstrators. Just click here to get started. 

If you live in the U.S. and do not have a Stampin' Up! Demonstrator, please contact me and I would be happy to help you with your creative projects. You may also visit my Online Store to place your order and have it shipped to you. 

Until Next Time

Happy Stamping,

Tricia Butts
Independent Stampin' Up! Demonstrator

Like What You See? Visit My Online Store Here

Visit My Facebook Business Page for Updates & Ideas

Click here to Contact Me


Get Creative For 2024
With The January-April 2024 Mini Catalog
Click Below To Shop Now

Let's Sale-a-Brate!
Earn Exclusive Free Products With A Qualifying Order
Click Below For More Details


Saturday, August 13, 2022

Ink. Stamp. Share. August Showcase Blog Hop

Welcome to the Ink. Stamp. Share. August Showcase Blog Hop as we share projects we are currently working on. Our amazing Design Team are busy creating projects using products from our current Stampin' Up! catalogs as well as getting ready for the upcoming holidays. I hope our projects and ideas will help you to get excited about creating your own fun projects. 
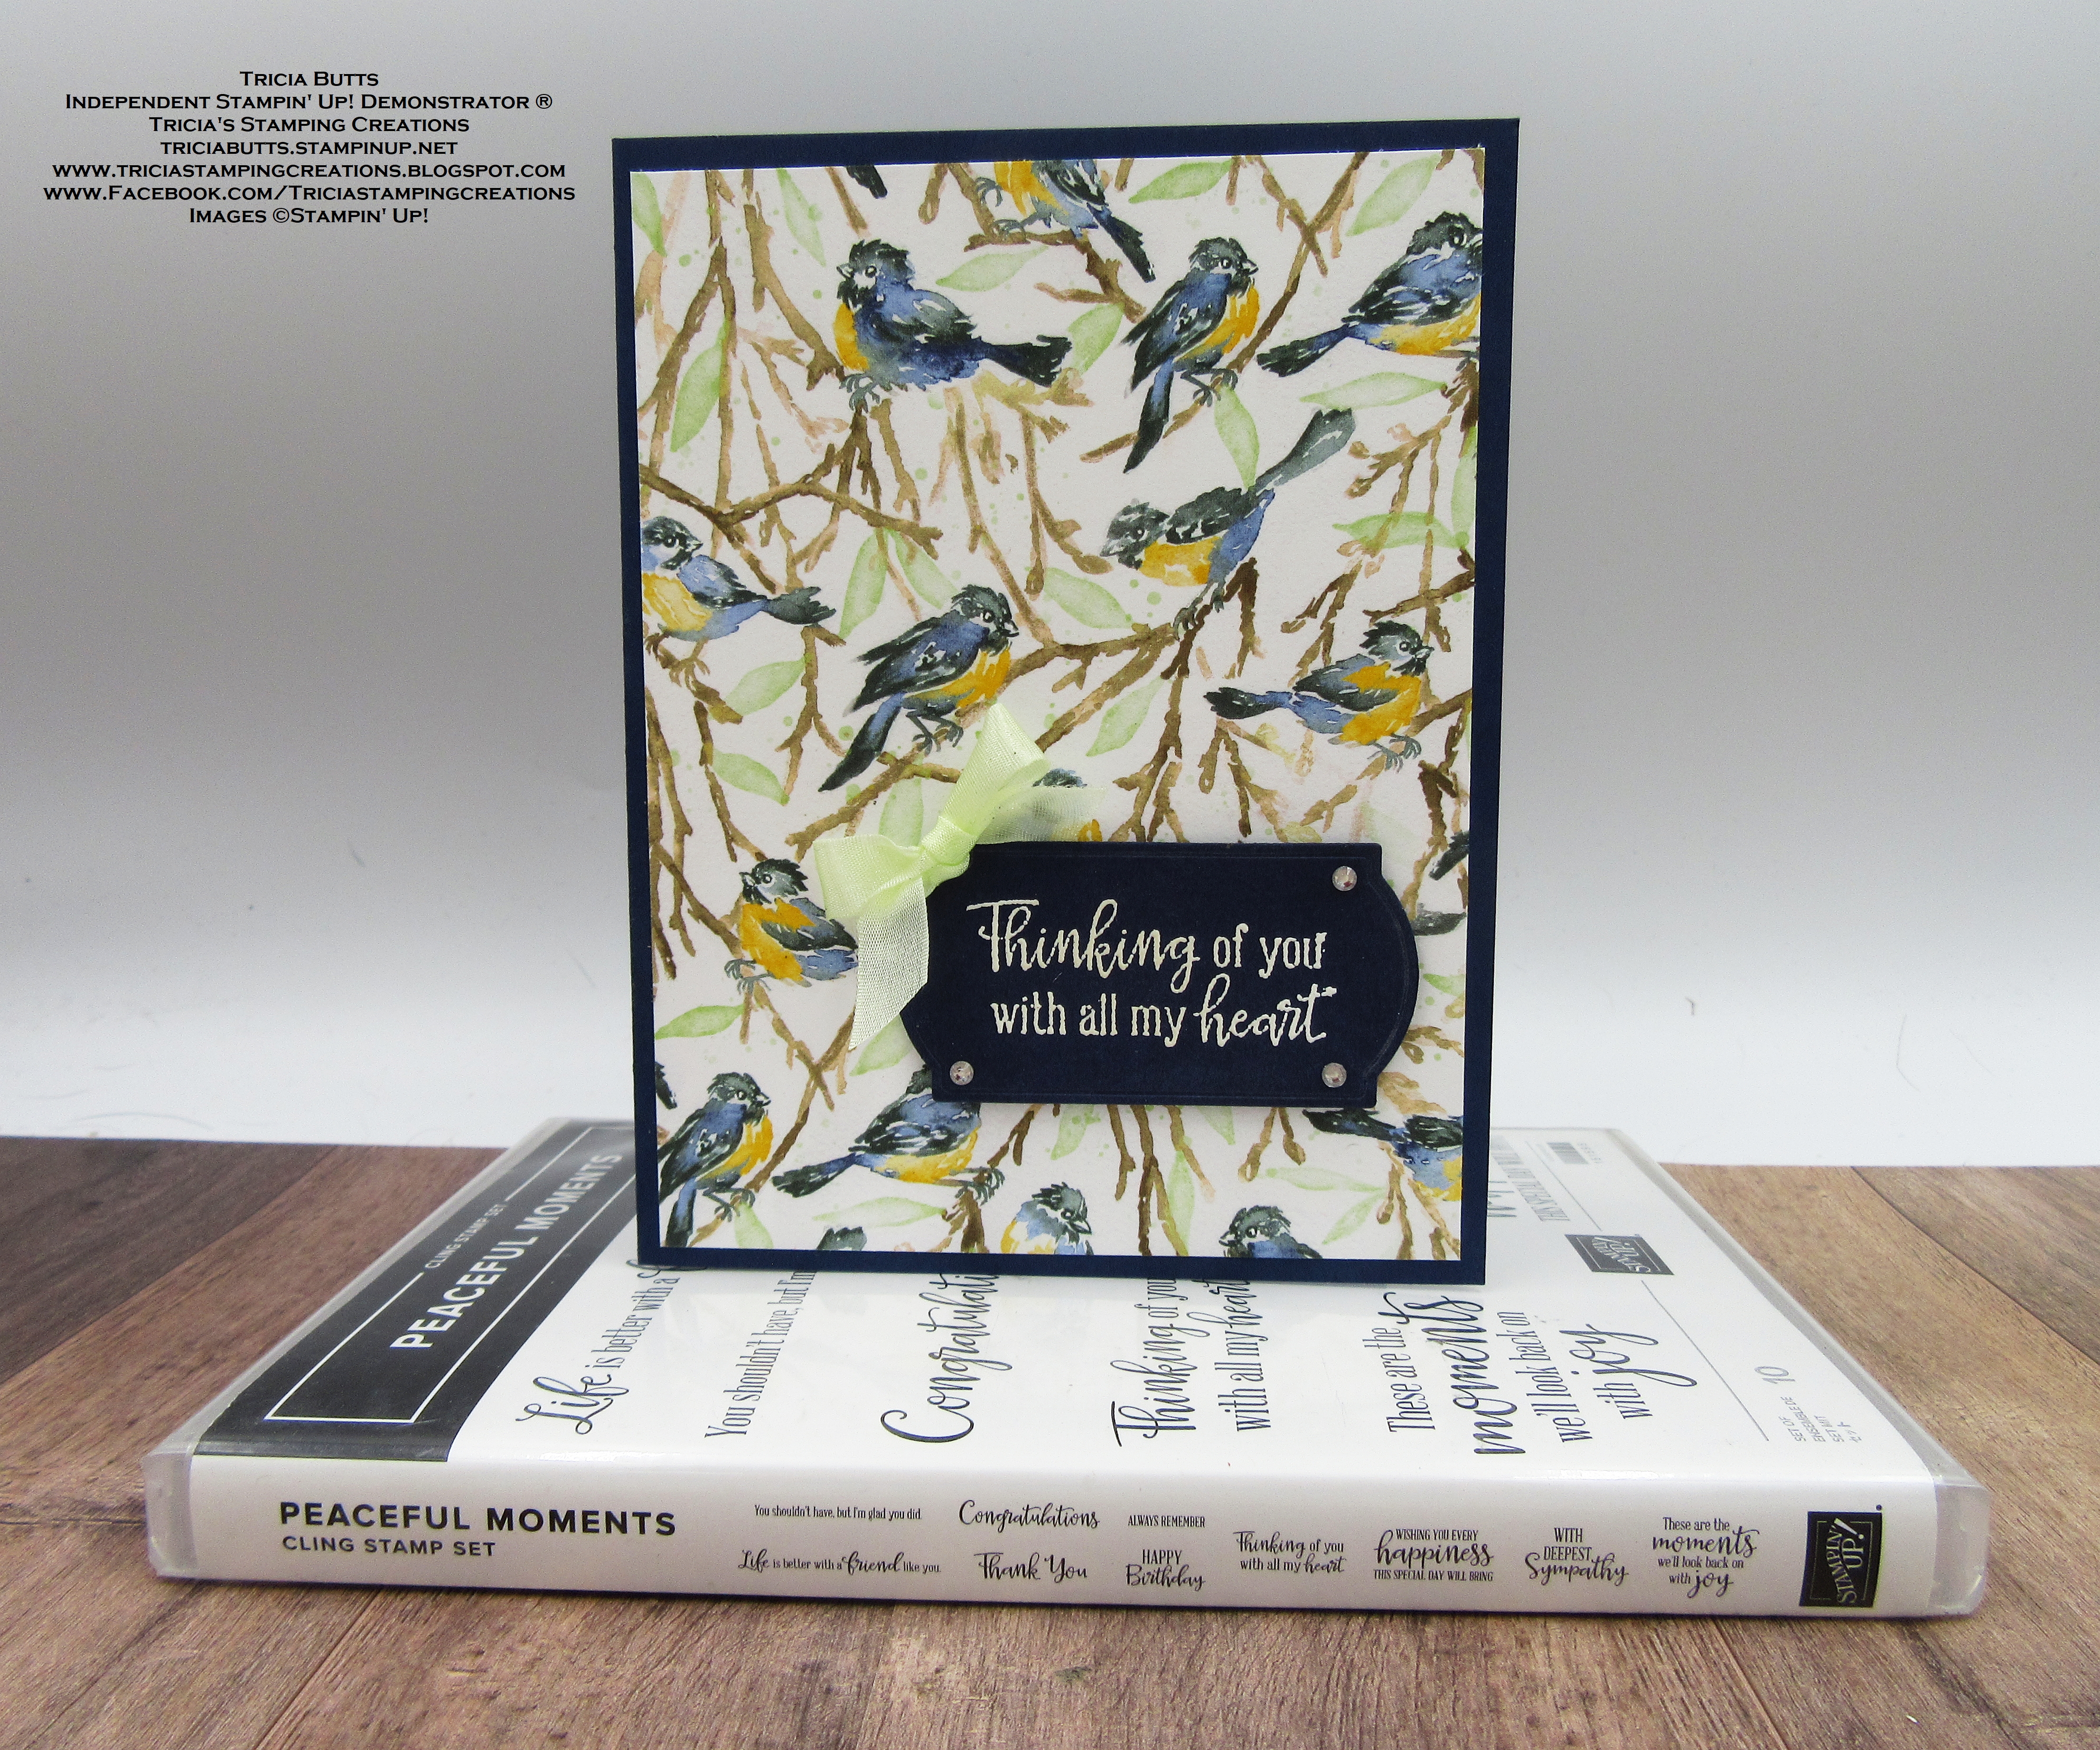
Some of the hardest cards to design and create are sympathy cards and cards providing comfort to people experiencing difficult times. When I saw this beautiful Rings of Love Designer Series Paper, I knew that the designs in this paper pack would work perfectly to create cards from the heart. The design I chose with the bluebirds, was perfect for the card I wanted to create. I love how simple this card design is and how it provides a sense of peace and comfort.
Products Used:
Peaceful Moments stamp set (item #151595)
Painted Labels Dies (item #151605)
Rings of Love Designer Series Paper (item #159939) Sale-a-bration Reward
Night of Navy Cardstock (item #100867)
Versamark Pad (item #102283)
Basics Embossing Powders (item #155554)
Soft Sea Foam 3/8" Seam Binding Ribbon
Basic Rhinestone Jewels (item #144220)
Stampin' Dimensionals (item #104430)
Mini Glue Dots (item #103683)
Measurements:
Night of Navy Cardstock
Card Base - 8 1/2" x 5 1/2" (Scored at 4 1/4")
Sentiment Label die cut with Painted Labels Dies
Rings of Love Designer Series Paper
Card Front - 5 1/4" x 4"
This beautiful clean and simple card design is all about this amazing designer series paper. I just love the sweet little bluebirds and the wonderful colors in this pretty paper. I wanted to make sure that the paper was the star of the show, so I kept the sentiment small and simple. The sentiment label was die cut from Night of Navy cardstock with the Painted Labels Dies and I heat embossed the sentiment with White embossing powder so that it would pop. I kept the embellishments simple as well with a bow tied with the pretty Soft Sea Foam Seam Binding Ribbon and a touch of bling with the small Basic Rhinestone Jewels. This design would work well as a masculine card and you could use some Linen Thread or Baker's Twine instead of the ribbon and forgo the rhinestones for a simpler look.
Thank you for taking the time to visit my blog. I hope that my card design will help inspire you to create your own beautiful projects. There is something for every occasion to help spark your creativity. 
Please take the time to visit with the other Design Team members to see the amazing projects they are sharing on their blogs. Just use the Roll Call List below to follow along our blog hop. We would appreciate it if you would leave us a comment and let us know what you liked about our projects. 

If you live in the U.S. and do not have a Stampin' Up! Demonstrator, please contact me and I would be happy to help you with your creative projects. You may also visit my Online Store to place your order and have it shipped to you. Remember, Sale-a-bration ends August 31st, so don't delay in placing your qualifying order to earn your free Sale-a-bration products. 

Until Next Time

Happy Stamping,

Tricia Butts
Independent Stampin' Up! Demonstrator

Like What You See? Visit My Online Store Here

Visit My Facebook Business Page for Updates & Ideas

Click here to Contact Me


Earn Exclusive Free Products
During Sale-a-bration
Click Below For More Details

Get Creative For The Holidays
With The July-December 2022 Mini Catalog
Click Below To Visit My Online Store


Thursday, November 11, 2021

Stampin' Dreams November Blog Hop In Memoriam

Welcome to the Stampin' Dreams November Blog Hop as we showcase projects with the theme In Memoriam to provide comfort and to remember people we have lost. November 11th is a day of remembrance as we honor those who gave their lives to protect us. We hope our projects will help inspire you to create your own beautiful creations.
Growing up in Australia, November 11th was Remembrance Day and everyone wore a poppy as a sign of respect. I wanted to create a design featuring poppies to reflect this memory and I chose to use the Painted Poppies stamp set with the coordinating Painted Labels Dies to create my card. To add texture to the background, I used the Timeworn Type 3D Embossing Folder for a vintage feel to the design. 
Products Used:
Painted Poppies stamp set (item #151599)
Painted Labels Dies (item #151605)
Peaceful Moments stamp set (item #151595)
Timeworn Type 3D Embossing Folder (item #156505)
Basic Black Cardstock (item #121045)
Basic White Cardstock (item #159276)
Balmy Blue Classic Ink Pad (item #147105)
Granny Apple Green Classic Ink Pad (item #147095)
Memento Tuxedo Black Pad (item #132708)
Versamark Pad (item #102283)
Metallics Embossing Powders (item #155555)
Poppy Parade Stampin' Blends Combo Pack (item #154958)
Granny Apple Green Stampin' Blends Combo Pack (item # 154885)
Simply Elegant Trim (item #155766)
Stampin' Dimensionals (item #104430)
Measurements:
Basic Black Cardstock
Card Base - 8 1/2" x 5 1/2"
Rectangle Layer - 2 1/8" x 3 3/8"
Sentiment Label die cut with the Painted Labels Dies
Basic White Cardstock
Card Front - 5 1/4" x 4" Embossed with the Timeworn Type 3D Embossing Folder
Focal Panel die cut with the Painted Labels Dies
This clean and simple card design has a focal image which provides a pop of color against a black and white background. I stamped the image with Memento Tuxedo Black ink onto the Basic White die cut panel and colored the poppies with the Dark Poppy Parade Stampin' Blends Marker and the stems and leaves with the Light Granny Apple Green Stampin' Blends Marker. I used the small splatter stamp image to create the sky with Balmy Blue Classic ink around the top of the panel and I repeated the process across the bottom with Granny Apple Green Classic ink to create the ground. I framed the focal panel with a rectangle of Basic Black to help make the colors pop against the embossed Basic White bacckground. For the sentiment, I heat embossed the image with Gold embossing powder for a touch of elegance that I thought was appropriate for the card design. I added some Gold Trim behind the sentiment label to coordinate with the embossed sentiment to step up the design. I feel like my card design has captured the fields of poppies associated with the battlefields of Flanders Fields, a tribute to all who were lost in World War I. Lest We Forget.
Thank you for taking the time to visit my blog. I hope that my card design will help inspire you to create your own projects in memory of the people in your life and to remember those who made the ultimate sacrifice to protect our freedoms. 
Now it's time to visit with my fellow Stampin' Up! Demonstrators as they share their wonderful projects to help inspire you. Please click on the links in the Roll Call List below to view their blogs. We would love it if you would leave us a comment and let us know what you enjoyed about our projects.

If you live in the U.S. and do not have a Stampin' Up! Demonstrator, please contact me and I would be happy to help you with your creative projects. You may also visit my Online Store to place your order and have it shipped to you. 

Until Next Time

Happy Stamping,

Tricia Butts
Independent Stampin' Up! Demonstrator

Like What You See? Visit My Online Store Here

Visit My Facebook Business Page for Updates & Ideas

Click here to Contact Me


Explore The Beautiful Eden's Garden Collection

Click Below For More Details


Saturday, September 11, 2021

Stamping Inkspirations September Blog Hop Lifetime Celebrations

Welcome to the Stamping Inkspirations September Blog Hop as we showcase Lifetime Celebrations. Throughout our lives there are special moments and milestones that we celebrate with our family and friends. These may be happy occasions such as birthdays, weddings or a new addition to the family or it may be to remember the loss of someone special. Today we are sharing projects and ideas to help inspire you to create your own projects to celebrate these times.
Today I have decided to create a soft, elegant Sympathy card for my card design. I love the Prized Peony stamp set for creating beautiful special occasion cards. I paired it with the Birch stamp set to create the background and used Stampin' Blends Markers to color the beautiful peony image. The loss of a loved one can be a difficult time but it is also the celebration of a life. I wanted to create a card design that would provide comfort and help honor the loss of a loved one.
Products Used:
Prized Peony stamp set (item #152504)
Birch stamp set (item #149256)
Peony Dies (item #152701)
Stitched Rectangles Dies (item #151820)
Scalloped Contours Dies (item #155560)
Label Me Fancy Punch (item #151297)
Crumb Cake Cardstock (item #120953)
Soft Sea Foam Cardstock (item #146988)
Very Vanilla Cardstock (item #101650)
Crumb Cake Classic Ink Pad (item #147116)
Gray Granite Classic Ink Pad (item #147118)
Versamark Pad (item #102283)
Metallics Embossing Powders (item #155555)
Pale Papaya Stampin' Blends Combo Pack (item #155519)
Soft Sea Foam Stampin' Blends Combo Pack (item #154902)
Pale Papaya 3/8" Open Weave Ribbon (item #155672)
Basic Rhinestone Jewels (item #144220)
Stampin' Dimensionals (item #104430)
Sponge Daubers (item #133773)
Measurements:
Crumb Cake Cardstock
Card Base - 8 1/2" x 5 1/2" (Scored at 4 1/4")
Soft Sea Foam Cardstock
Large Scalloped Rectangle die cut with the Scalloped Contours Dies
Very Vanilla Cardstock
Large Stitched Rectangle die cut with the Stitched Rectangles Dies
Sentiment Label punched with the Label Me Fancy Punch
Stamped Peony image die cut with the Peony Dies
This beautiful card design has a wonderful vintage feeling created by sponging with Sponge Daubers. I stamped the Very Vanilla stitched rectangle with the Birch stamp set using Gray Granite Classic ink and sponged the layer with Crumb Cake Classic ink. I also sponged the outside edge of the front of the card base with Crumb Cake Classic ink to create a vintage look. The image was stamped with Gray Granite Classic ink onto Very Vanilla cardstock and I colored the peony with Light and Dark Pale Papaya Stampin' Blends Markers and the leaves with the Light and Dark Soft Sea Foam Stampin' Blends Markers. I die cut the image with the coordinating die and attached it to the stitched rectangle layer with Stampin' Dimensionals. I added the Pale Papaya Open Weave Ribbon around the bottom of the stitched rectangle layer. For the sentiment label, I heat embossed the image with Gold Embossing Powder onto the Very Vanilla label punched out with the Label Me Fancy Punch. I attached the sentiment label over the top of the ribbon with Stampin' Dimensionals. I attached the stitched rectangle layer to the Soft Sea Foam scalloped rectangle layer and attached it to the Crumb Cake card base with Stampin' Dimensionals. For a touch of bling, I added Basic Rhinestone jewels to finish off the design. This pretty card design would work well as a special birthday card or for a wedding card. I love the beautiful images and sentiments in the Prized Peony stamp set and it is one of my go to stamp sets for special occasions.
Thank you for taking the time to visit my blog. I hope that my card design will help inspire you to create your own special projects to celebrate the special moments in your life. 
Now it's time to visit Jan's wonderful blog and see what she has created. Just click the Next button below or use the Roll Call List to find your way. We would love it if you would leave us a comment and let us know what you liked about our projects. I hope you enjoy the rest of our blog hop. 


If you live in the U.S. and do not have a Stampin' Up! Demonstrator, please contact me and I would be happy to help you with your creative projects. You may also visit my Online Store to place your order and have it shipped to you. Remember to take advantage of Sale-a-bration and earn free, exclusive products with a qualifying order. Sale-a-bration ends September 30th, 2021.

Until Next Time

Happy Stamping,

Tricia Butts
Independent Stampin' Up! Demonstrator

Like What You See? Visit My Online Store Here

Visit My Facebook Business Page for Updates & Ideas

Click here to Contact Me


Time Is Running Out

To Earn Free Exclusive Sale-a-bration Products

Click Below For More Details


Get Creative For The Holidays
With The July-December 2021 Mini Catalog
Click Below To Visit My Online Store

Kick Start Your Christmas Card Making

With The October Peaceful Christmas Paper Pumpkin Kit

Click Below To Subscribe By October 10th