Sunday, April 29, 2018

Retiring Products Blog Hop


It's that time of year! The Last Chance Retirement Lists are out and  we have to say goodbye to some of our favorite Stampin' Up! products. Join us on this fun blog hop as we share creative ideas and projects to inspire you. You may have just visited Rachel's blog or perhaps you are starting your journey here. I hope you enjoy our projects.


Masculine cards are often a challenge, so I decided to showcase the wonderful Guy Greetings stamp set from the 2017-2018 Annual Catalog, which is sadly retiring. The images and sentiments in this stamp set are perfect for a wide variety of occasions and I love the vintage feel of the images. The wonderful thing about this stamp set is that it is available to order in Wood Mount (item #128748) Clear Mount (item #138828) and Photopolymer (item #137178). Something for everyone. 


With Father's Day coming up soon, I thought I would create a clean and simple card design featuring one of the sheets of Eastern Palace Specialty Designer Series paper (Retiring item #144147). I love the Tranquil Tide pattern and how it looks paired with the Dapper Denim cardstock card base. I stamped the vintage car image onto a Very Vanilla cardstock circle that I die cut with the Layering Circles framelits dies and matted it onto a Dapper Denim cardstock (Retiring item # 141414) circle that I die cut using the same dies, just one size larger. I attached the circle to the card base using Stampin' Dimensionals.

The sentiment has been stamped onto a 1"x 4" piece of Very Vanilla cardstock and heat embossed with Copper embossing powder. I then layered it onto a piece of 1 1/4" x 4" piece of Dapper Denim cardstock (Retiring item #141414) and attached it to the card front with Snail adhesive. As you can see, with just a few supplies and a few simple steps, we have a wonderful masculine card ready to give to that special person.


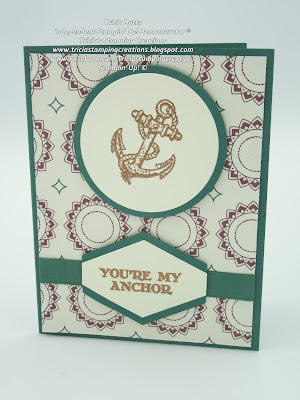
For my second I card, I use a similar layout to create this card. This time I chose Tranquil Tide cardstock for my card base and used the reverse side of the sheet of Eastern Palace Designer Series Paper (retiring item #144147) that I used for the first card. Isn't it amazing how different it makes the card look? 

Once again, I used the Layering Circle Framelits dies to die cut a circle out of Very Vanilla cardstock and Tranquil Tide cardstock. I heat embossed the anchor image onto the Very Vanilla cardstock using Copper embossing powder and I also embossed the sentiment onto a scrap of Very Vanilla cardstock. Using the Tailored Tag Punch, I punched out the sentiment and then punched out another shape from a scrap of Tranquil Tide cardstock. I cut this piece in half and attached one half to the top of the Very Vanilla shape and the other half to the bottom with Snail adhesive.
To finish the card, I cut a piece of Tranquil Tide Finely Woven Ribbon (retiring item #144136) and attached it across the bottom of the designer series paper layer, about an inch from the bottom. I then attached the designer series paper to the card base with Snail adhesive. Using Stampin' Dimensionals, I attached the circle image to the top section of the card and I attached the sentiment, centering it over the ribbon. 

I love that I can create these wonderful masculine cards using just one stamp set and there are so many more amazing possibilities to create with it. The pattern designs in the Eastern Palace Specialty Designer Series paper pack are so versatile and work wonderfully for masculine card designs. I am sad to see it retire. 

I hope you have enjoyed my projects today and I hope it inspires you to start creating your own masculine cards with these amazing retiring products before they disappear forever. 

To see the Last Chance Retirement lists, click the following links:

Now it's time to visit Jamie's blog and see what she is sharing with us today. Just use the links below to navigate your way along the blog hop to see everyone's creative projects. 


Until Next Time.

Happy Stampin',
Tricia Butts
Independent Stampin' Up! Demonstrator ®
Like What you see? Visit My Online Store Here
Visit my Facebook Page 


Saturday, April 28, 2018

Ink & Share Blog Hop Occasions Catalog


This month on the Ink & Share Blog Hop we will be featuring products from the 2018 Occasions Catalog. This catalog is one of my favorites and it was hard to choose which products I would focus on, as there are so many that I love


With Mother's Day just two weeks away and less than 2 months until Father's Day, I chose to showcase the Apron of Love Bundle. I love the fact that this stamp set and coordinating framelit die set can work perfectly for both masculine and feminine projects. Today I will be showing you how I created a Mother's Day card and a Father's Day using this bundle. 

To create the Mother's Day card, I started with a Thick Whisper White card base and added a layer from the Eastern Palace Specialty Designer Series Paper pack (item #144147). I love the Fresh Fig tone on tone stripe of this paper and the texture it provides to this card. The apron was stamped with Fresh Fig Classic ink onto Powder Pink cardstock and die cut with the framelits. I also die cut the neck tie and apron pocket from Powder Pink cardstock. The lace detail around the pocket was created by die cutting a piece of the Fresh Fig striped Designer Series Paper to layer underneath. I stamped the sentiment "Best Ever" with Fresh Fig Classic ink and then added the "Mum/Mom" stamp in Berry Burst Classic ink. (I am from Australia, so I love that the font of this stamp can be interpreted as Mum, which is what I call my wonderful Mum.) 

My favorite part of this card are the cute little baking tools that I die cut from Silver foil. I just love the detail of these adorable die cuts. I attached the tools to the front of the apron with Snail Adhesive and then attached the pocket on top with Stampin' Dimensionals. I layered the apron on top of a Delicate White Doily and attached it to the front of the card. I love all the contrasts of this card that help it to be clean and simple card design feminine card. 

For the Father's Day card, I started with a Night of Navy card base and added a layer of Crumb Cake cardstock that I embossed with the Pinewood Planks 3D Dynamic Textured Impressions Embossing Folder (item #143708). I burnished the cardstock with Crumb Cake Classic ink using a sponge dauber to bring out the texture of the wood grain and give it an aged, worn look. This time I die cut the apron from a piece of True Gentleman Designer Series Paper and die cut the neck time and apron strings from Night of Navy cardstock. I also die cut the rectangular pocket from Night of Navy cardstock and heat embossed the sentiment in Silver embossing powder. The barbecue tools were die cut from Silver foil and attached to the apron with Snail adhesive. I then attached the pocket with Stampin' Dimensionals. The mitts were die cut from Night of Navy cardstock and I embossed them with Simple Stripes Textured Impressions Embossing Folder (item #145648). To finish off the card I attached the apron and mitts to the card front with Snail adhesive. The color combination and wood texture of this card design make it perfect for a masculine card. 

One of the best things about a bundle is the fact that you save 10% compared to when you purchase the stamp set and framelits die separately. However, the bundle price will retire at the end of the Occasions Catalog, on May 31st, 2018. If you love this bundle as much as I do, I recommend that you order it before the bundle price expires.

Thank you for taking the time to view my projects for this month's blog hop. I hope that you will be inspired to try your own creations with this bundle from the Occasions Catalog.  Now it's time to visit Amy Grendel's blog and see what she is sharing this month. Please click the Next Button below to visit her blog or use the Blog Hop Roll Call list below if you get lost.


Blog Hop Roll Call 


Until Next Time.
Happy Stampin',

Tricia Butts
Independent Stampin' Up! Demonstrator ®

Like What you see? Visit My Online Store Here
Visit my Facebook Page 


Friday, April 20, 2018

SBTD Blog Hop April Bundles


It's time for the SBTD (Stampers by the Dozen) Blog Hop for April and this month our theme is Bundles. What are bundles you ask? They are wonderful products that coordinate together to make life easier for us when we create. This may be a stamp set and coordinating set of framelits/thinlets dies or perhaps a stamp set and coordinating punch. The best thing is, that new bundles in the catalog save you 10%. Now that's great news for your budget.

I decided to use one of my very favorite bundles, Magical Day, from the 2018 Occasions Catalog. This bundle has an amazing stamp set and coordinating Framelits dies to make creating stress free and fun. 

For me, the best thing about this bundle is that it is great for guys and girls, young and old. That being said, I had to make a card for the girls and a card for the guys. It was so much fun to play with this bundle and I there is still so much more that I didn't get to play with. 

My card design for the girls features the adorable unicorn image and I love that there is a coordinating framelit die to cut it out. I love when I don't have to fussy cut. I stamped the unicorn with Memento Tuxedo Black ink because I wanted to color the image with my Stampin' Blends. (Don't worry, they will be back in stock in time for the new Catalog June 1st). It was fun to create a rainbow look for the mane and tail and add a little golden highlight to the body and horn. For a little sparkle and shimmer, I also added some Clear Wink of Stella.

The clouds were created using the Silver Embossing Paste (item #145646) and the Pattern Party Decorative Masks (item #144103). It adds a wonderful dimension to the Rich Razzleberry cardstock layer. The card base was created with Powder Pink cardstock and the die cut circle and sentiment were cut from Soft Sky cardstock. I embossed the circle with the Scattered Sequins Dynamic Textured Embossing Folder (item #145649) and colored the raised sequins with Clear Wink of Stella. The sentiment is from the Magic Day stamp set included in the bundle and I heat embossed it with Gold Embossing powder. The final touch of sparkle comes from the Gold sequins found in the Metallics Sequin Assortment (item #144214).  There you have it. A card fit for a unicorn loving princess. 

My card for the guys is a little more edgy. I chose Dapper Denim cardstock for the card base and I embossed a layer of Smoky Slate cardstock with the Brick Wall Textured Impressions Embossing Folder (item #138288). To bring out the texture of the brick wall, I added Smoky Slate Classic ink with a sponge dauber all over the Smoky Slate cardstock. To create the door way for my knight, I used an oval from the Layering Ovals Framelits and added a piece of Basic Black cardstock behind the opening with Stampin' Dimensionals. 

The dragon and the knight images were both stamped on Whisper White cardstock and die cut with the coordinating framelit dies. I love that I don't have to fussy cut any of the images. Once again, I used Memento Tuxedo Black ink and colored the images with my Stampin' Blends markers. Do you see that cute flame coming out of the dragon's mouth? Yes, there is a stamp and coordinating framelit die for this as well. Awesome!  I attached the colored images to my card with Snail adhesive and added a little Clear Wink of Stella for a little shimmer.

The sentiment is also from the stamp set and I heat embossed it with Silver embossing powder onto Dapper Denim cardstock. I then used the framelit that is in the coordinating framelit die set to die cut the sentiment and then die cut a second piece from Daffodil Delight cardstock. I cut the Daffodil Delight piece in half length ways and attached it to the back of the sentiment with Snail adhesive. I then attached it to the card with Stampin' Dimensionals. Finally, I added to Silver sequins from the Metallics Sequin Assortment for a little sparkle. 

I hope that you have enjoyed my two cards and I hope that it inspires you to get this bundle before it disappears. Why you ask? Well this wonderful bundle is retiring and is only available while supplies last until May 31st, 2018. Also on the Retirement List are the Brick Wall Textured Impressions Embossing Folder and 
Dapper Denim cardstock. If you have fallen in love with any of the products used in these cards, I recommend that you place an order ASAP to avoid missing out. 

Now it's time to visit Lyndsay's blog and see what she has created with her bundle for this month's blog hop. Just click the Next Button below to visit her blog or use the Blog Hop Roll Call list below if you get lost.


Blog Hop Roll Call
Tricia Butts       You are here!  

Until Next Time.
Happy Stampin',

Tricia Butts
Independent Stampin' Up! Demonstrator ®

Like What you see? Visit My Online Store Here
Visit my Facebook Page 


Sunday, April 8, 2018

2018 Kre8tors Blog Hop April Color Challenge

Welcome to the 2018 Kre8tors Blog Hop for April and this month's theme is a color challenge featuring Crumb Cake, Powder Pink, Pumpkin Pie, Berry Burst and Wild Wasabi. We have been challenged to use at least 3 of these colors in our project. 

After seeing the inspiration photo for this color combination, I really wanted to try and create a card design that included all 5 colors. I really liked the way the wood grain background looked, so I decided to incorporate it into my card design.


I love the Waterfront stamp set from the 2018 Occasions Catalog and I really liked the idea of using this stamp set to create my card. I die cut an oval from the Stitched Shapes Framelits dies from Whisper White cardstock. I used the various stamps to create the mountains using the Crumb Cake Classic ink and the fields with Wild Wasabi Classic ink in the foreground. Using sponge daubers, I lightly sponged the sky above and around the mountains using Powder Pink Classic ink and then gently sponged the outer edge with Berry Burst Classic ink to create a twilight sky. I created the sun by punching out a small circle from a scrap of paper and using it as a reverse mask, I lightly sponged Pumpkin Pie ink just above the mountains on the right side of the oval. I also lightly sponged the sky to create pale orange highlights in the sky. 


To create the finished card, I used Powder Pink cardstock to create the card base and I embossed a piece of Crumb Cake cardstock using the Pinewood Planks 3D Dynamic Textured Impressions Embossing Folder (item #143708) and gently sponged with Crumb Cake Classic ink to bring out the texture in the embossed cardstock. I attached the stamped oval using Stampin' Dimensionals and I created the sentiment using the Teeny Tiny Wishes stamp set, heat embossed with Gold embossing powder onto Whisper White cardstock. I punched out the sentiment with the Classic Label Punch (item #141491) and matted it with Powder Pink cardstock also punched out with the Classic Label Punch. 

I love the softness of this card design and had a lot of fun playing with the variety of colors to come up with this scenic card. 

I hope that this card design has inspired you to try playing around with this color combination and experiment with them. Now it is time to visit Laura Kate Mackie and see what she has created this month. Just click the Next button below to visit her blog or if you get lost along the way, use the Blog Hop Roll Call list to help you find your way. 


April 2018 Kre8tors Blog Hop Roll Call List

Until Next Time.
Happy Stampin',

Tricia Butts
Independent Stampin' Up! Demonstrator ®


Like What you see? Visit My Online Store Here
Visit my Facebook Page