Showing posts with label Scalloped Contours Dies. Show all posts

Friday, March 1, 2024

Crafty Collaborations Monochromatic Color Challenge Week 9 Tahitian Tide

 
Happy Friday everyone. We are starting off the month of March with the Crafty Collaborations Monochromatic Color Challenge and for Week 9 we are creating with the beautiful Tahitian Tide. This pretty blue lives up to its name with a wonderful tropical feeling to it that has me thinking of holidaying on a tropical island with white sandy beaches and clear blue waters. I guess you could say that this is what influenced me for today's card design.
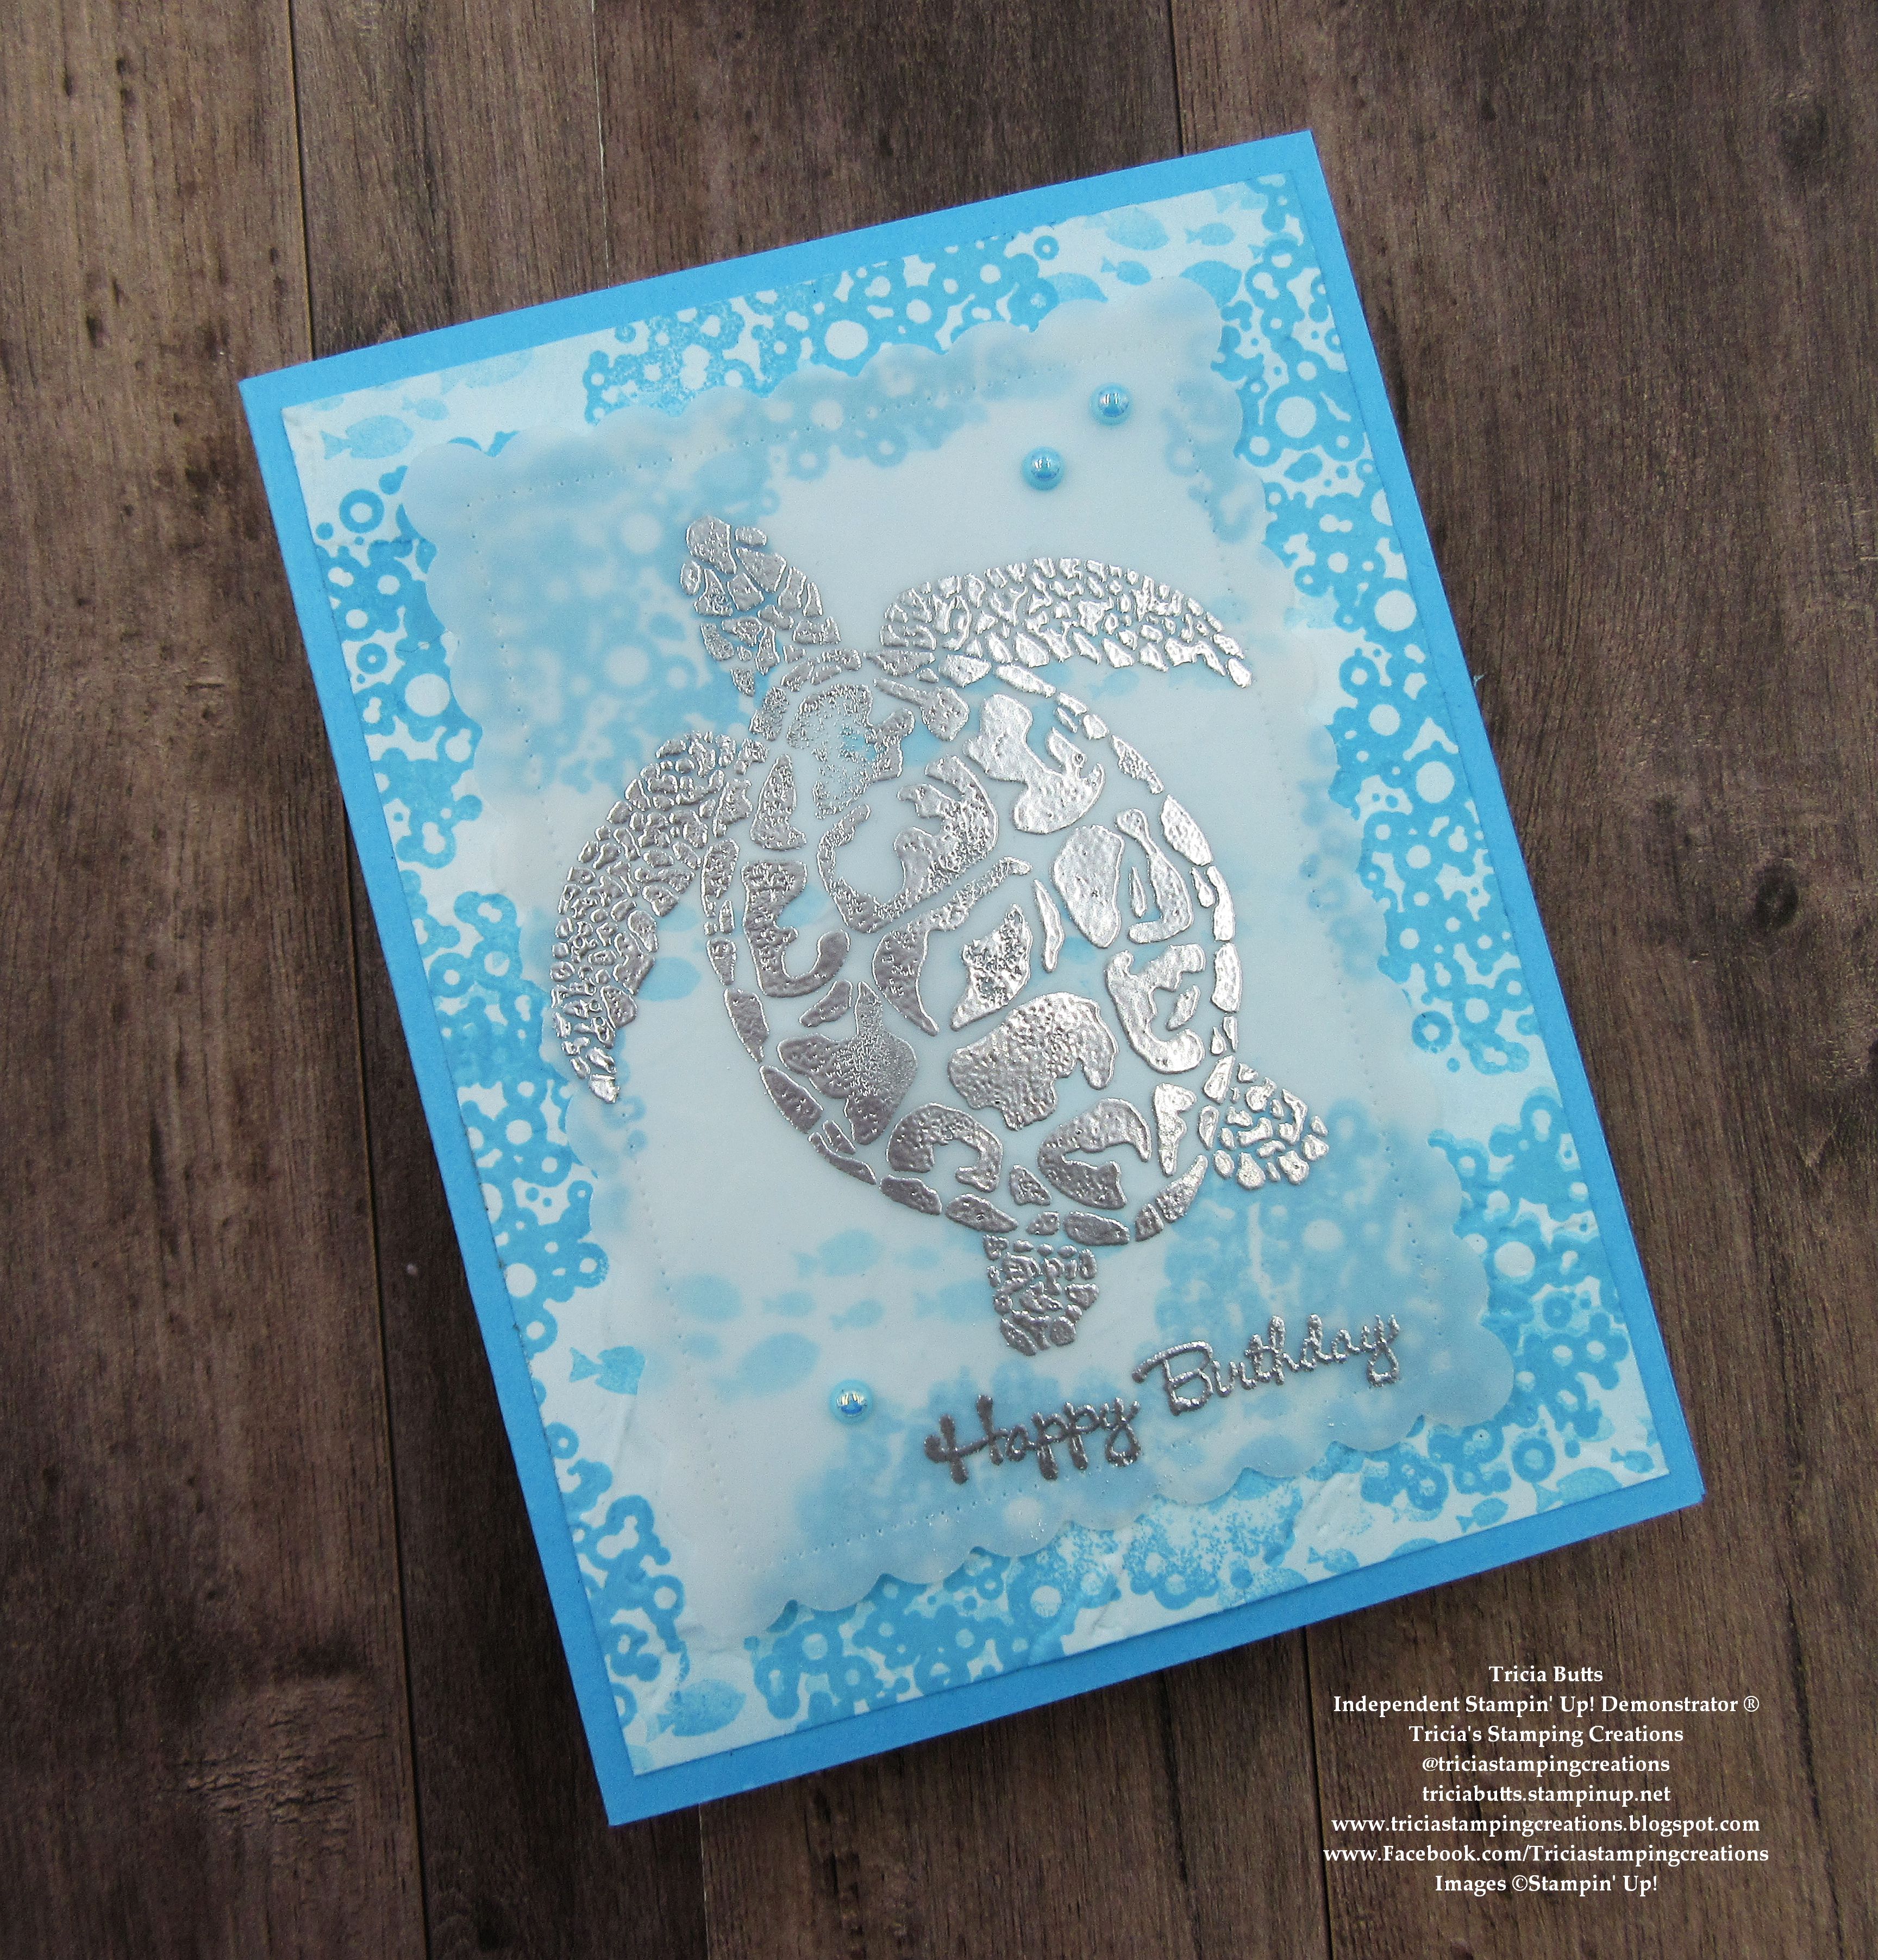
When I started thinking about swimming in the ocean, I thought about what I might find as I explore and it brought to mind sea turtles and how they glide effortlessly through the water. So, I decided to use the Sea Turtle stamp set from the 2023-2024 Annual Catalog to create my card design, showcasing the wonderful shades of this color using Generational stamping and blending to create this pretty background. I added some texture to the background using the Painted Texture 3D Embossing Folder. I love how Silver embossing looks with blue, so I chose to heat emboss the turtle image and sentiment onto Vellum cardstock to create the focal design. 
Products Used:
Sea Turtle stamp set (item #160500)
Go To Greetings stamp set (item #158763)
Scalloped Contours Dies (item #155560)
Painted Texture 3D Embossing Folder (item #154317)
Tahitian Tide Cardstock (item #159261)
Basic White Cardstock (item #159276)
Vellum Cardstock (item #101856)
Tahitian Tide Classic Ink Pad (item #159210)
Versamark Pad (item #102283)
Metallics Embossing Powders (item #155555)
Blending Brushes (item #153611)
2022-2024 In Color Pearls (item #161621)
Measurements:
Tahitian Tide Cardstock
Card Base - 8 1/2" x 5 1/2" (Scored at 4 1/4")
Basic White Cardstock
Card Front - 5 1/4" x 4"
Vellum Cardstock
Focal Layer die cut with the Scalloped Contours Dies
This card is a fun combination of techniques to help you step your design up to the next level. I love how the Silver embossing on the Vellum cardstock pops against the Tahitian Tide tone on tone stamped background. To create the different layers of color for the background, I started by gently blending Tahitian Tide Classic ink onto the Basic White card front to create a soft blue all over background. I then stamped the bubbles image several times around the edges to add some texture and deeper color. For the fish, I stamped off once and then stamped the image onto the cardstock to create a lighter color that gives the impression that the fish are further back to add some depth to the design. To add some additional texture, I embossed the background layer with the Painted Texture Embossing Folder and I like how it gives the appearance of waves in the water. I added the Vellum cardstock to the card front with adhesive behind the embossed turtle so that it doesn't show up. To finish off the design, I added several Tahitian Tide Pearls for a touch of bling. Isn't it so pretty? I love how this card design showcases how beautiful Tahitian Tide looks. Let me know if you are a fan or not of this amazing color in the comments below.
Thank you for taking the time to visit my blog. I hope that my card design will help inspire you to explore this wonderful blue and use it to create your own beautiful projects. There are so many options to choose from.
Please take a moment to visit this week's Monochromatic Insta Hop and see all the amazing projects created using Tahitian Tide. Just click here to get started. We would love it if you would leave us a comment to let us know what you liked about our projects.

If you live in the U.S. and do not have a Stampin' Up! Demonstrator, please contact me and I would be happy to help you with your creative projects. You may also visit my Online Store to place your order and have it shipped to you. 

Until Next Time

Happy Stamping,

Tricia Butts
Independent Stampin' Up! Demonstrator

Like What You See? Visit My Online Store Here

Visit My Facebook Business Page for Updates & Ideas

Click here to Contact Me


Coming Soon To Online Exclusives!
Amazing New Products To Spark Your Creativity
Check It Out on March 5th

Get Ready For Spring
With The January-April 2024 Mini Catalog
Click Below To Shop Now


Monday, May 1, 2023

We Create May Blog Hop May Flowers

Let's celebrate the beginning of a new month with the We Create May Blog Hop, as we showcase the theme, "May Flowers". Our wonderful Design Team members will be sharing their projects and ideas to help inspire you to create your own beautiful floral cards to celebrate Spring. 
For my card design today, I wanted to create a pretty birthday card using the Sending Smiles stamp set and coordinating Sending Dies. I also wanted to showcase some of the new and returning colors that will be in the new 2023-2024 Annual Catalog to create my design. Misty Moonlight is one of my favorite colors and I am so happy it is returning, along with Lost Lagoon, another returning favorite. I paired them with the new 2023-2025 In Color, Boho Blue, which is perfect for Spring flowers and looks beautiful with Daffodil Delight. This card design would look beautiful with so many different color combinations and I can't wait to explore more color combinations. 
Products Used:
Sending Smiles stamp set (item #158701)
Sending Dies (item #159271)
Misty Moonlight Cardstock (item #153081)
Basic White Cardstock (item #159276)
Boho Blue Classic Ink Pad (item #161650)
Lost Lagoon Classic Ink Pad (item #161678)
Daffodil Delight Classic Ink Pad (item #147094)
Misty Moonlight Stampin' Blends Combo (item #153108)
Versamark Pad (item #102283)
Basics Embossing Powders (item #155554)
Iridescent Pearl Basic Jewels (item #158987)
Stampin' Dimensionals (item #104430)
Measurements:
Misty Moonlight Cardstock
Card Base - 8 1/2" x 5 1/2" (Scored at 4 1/4")
Thin Sending Sentiment die cut with the Sending Dies
Sentiment Label die cut with the Sending Dies
Basic White Cardstock
Card Front die cut with the Scalloped Contours Dies
Outline Sending Sentiment Layer die cut with the Sending Dies
3 Flowers stamped and die cut with the Sending Dies
This clean and simple card design is simple to create with the Sending Smiles stamp set and coordinating Sending Dies. I love that I can stamp the flowers and die cut them out and the Sending Sentiment layers beautifully to add a simply Wow factor to your card design. I love how the Misty Moonlight card base frames the focal design and makes it pop. I stamped the leaves and stems with Lost Lagoon Classic ink onto the Scalloped Rectangle layer and added the Boho Blue die cut flowers with Stampin' Dimensionals to give them some dimension. I attached the Sending die cut sentiment with Stampin' Dimensionals to the card front and added the heat embossed sentiment to the card front. To embellish the card, I added two small Iridescent Pearls to the sentiment label and colored one of the small pearls with the Dark Misty Moonlight Stampin' Blends Marker to create the dot for the "i" in Sending. This is such a simple card to create and has a lovely fresh Spring feel to it. I love this color combination of Misty Moonlight, Boho Blue, Lost Lagoon and Daffodil Delight and look forward to using these colors together more in the future. 
Thank you for taking the time to visit my blog. I hope that my card design will help inspire you to create your own beautiful floral cards to send to friends and family. There are so many wonderful possibilities to explore. 
Now it's time to visit Kimberley's blog and see what she has created to share with us. Just click the Next button to visit her blog. We would appreciate it if you would leave us a comment and let us know what you liked about our projects. I hope you enjoy the rest of our blog hop. 


If you live in the U.S. and do not have a Stampin' Up! Demonstrator, please contact me and I would be happy to help you with your creative projects. You may also visit my Online Store to place your order and have it shipped to you. 

Until Next Time

Happy Stamping,

Tricia Butts
Independent Stampin' Up! Demonstrator

Like What You See? Visit My Online Store Here

Visit My Facebook Business Page for Updates & Ideas

Click here to Contact Me


The New 2023-2024 Annual Catalog
Begins May 2nd
Click Below To Shop From My Online Store


Saturday, April 8, 2023

Colour Combo April Blog Hop

Welcome to the Colour Combo April Blog Hop and this month we have been challenged to use Sahara Sand, Shaded Spruce and Sweet Sorbet to create our projects. Our wonderful Design Team members will be sharing their projects and ideas to help inspire you to explore this fun color combination.
This month's color combination was very challenging and I had to carefully look through my stamp sets and supplies before coming up with my design. This color combination would actually have been great for a Christmas card but unfortunately I didn't have any current stamp sets that worked for this type of card. Then I remembered that the retiring Tea Boutique Cards & Envelopes had a wonderful Sweet Sorbet printed card base that would be perfect for this challenge. I decided to use the Silly Goose stamp set for my focal design and a piece of Sahara Sand Designer Series Paper from the Neutrals 6"x6" Designer Series Pack to complete my card design. 
Products Used:
Silly Goose stamp set (item #160866)
Scalloped Contours Dies (item #155560)
Tea Boutique Cards & Envelopes (item #159270)
Neutrals 6"x6" Designer Series Paper (item #159257) Retiring
Basic White Cardstock (item #159276)
Shaded Spruce Classic Ink Pad (item #147088)
Memento Tuxedo Black Pad (item #132708)
Sweet Sorbet Stampin' Blends Combo (item #159224)
Shaded Spruce Stampin' Blends Combo (item #154903)
Neutrals Stampin' Write Marker Assortment (item #147158) Retiring
Clear Wink of Stella Glitter Brush (item #141897)
Basic Pearls Jewels (item #144219)
Stampin' Dimensionals (item #104430)
Measurements:
Tea Boutique Cards & Envelopes
Sweet Sorbet Card Base (and matching envelope)
Neutrals Designer Series Paper (Sahara Sand Polka Dot)
Large Scalloped Rectangle die cut with the Scalloped Contours Dies
Basic White Cardstock
Medium Scalloped Rectangle die cut with the Scalloped Contours Dies
Balloon stamped with the Silly Goose stamp set and fussy cut with Paper Snips
This fun card design is simple to create and requires minimal coloring. I stamped the goose and sentiment images onto the Basic White scalloped rectangle with Memento Tuxedo Black ink and stamped the balloon image onto a scrap of Basic White cardstock and fussy cut it out with Paper Snips. To add some color to the goose, I used the Sahara Sand Stampin' Write Marker and blended it with Clear Wink of Stella to add a touch of shimmer. I colored the balloon with the Sweet Sorbet Stampin' Blends Markers and added the fussy cut balloon on top of the original balloon with Stampin' Dimensionals to pop it up. I added some Clear Wink of Stella to the balloon to add a little sparkle. For the hat, I used Shaded Spruce and Sweet Sorbet Stampin' Blends Markers and I added some grass to the bottom of the rectangle with Shaded Spruce Classic ink. I adhered the Basic White rectangle to the Sahara Sand Designer Series Paper with Stampin' Dimensionals and then added these layers to the card base to assemble to the card. I colored several Basic Pearls with the Light Shaded Spruce Stampin' Blends Marker and added them to the card front to finish off the design. 
Thank you for taking the time to visit my blog. I hope that my card design will help inspire you to give this color combination a try to create your own beautiful projects. There are so many ways you can mix and match your crafting supplies to create your own beautiful designs. 
Please take the time to visit with my fellow Design Team members by using the Roll Call List below to visit their blogs. We would appreciate it if you would leave us a comment and let us know what you liked about our projects. I hope you enjoy the rest of our blog hop. 

If you live in the U.S. and do not have a Stampin' Up! Demonstrator, please contact me and I would be happy to help you with your creative projects. You may also visit my Online Store to place your order and have it shipped to you. 
 

Until Next Time

Happy Stamping,

Tricia Butts
Independent Stampin' Up! Demonstrator

Like What You See? Visit My Online Store Here

Visit My Facebook Business Page for Updates & Ideas

Click here to Contact Me


Save Up To 60% On Select Retiring Products
From The Last Chance List
Click Below To Place Your Order


Wednesday, March 8, 2023

ICS March Blog Hop Birthday Bash

It's time to hop along with the ICS March Blog Hop with our theme this month, "Birthday Bash". Birthday cards are one of the most popular cards we create and send to family and friends, so it makes sense to share fun ways to create wonderful cards to celebrate this special occasion. Our Design Team members will be sharing their projects and ideas to help inspire you to create your own beautiful creations to share with the people you love. 
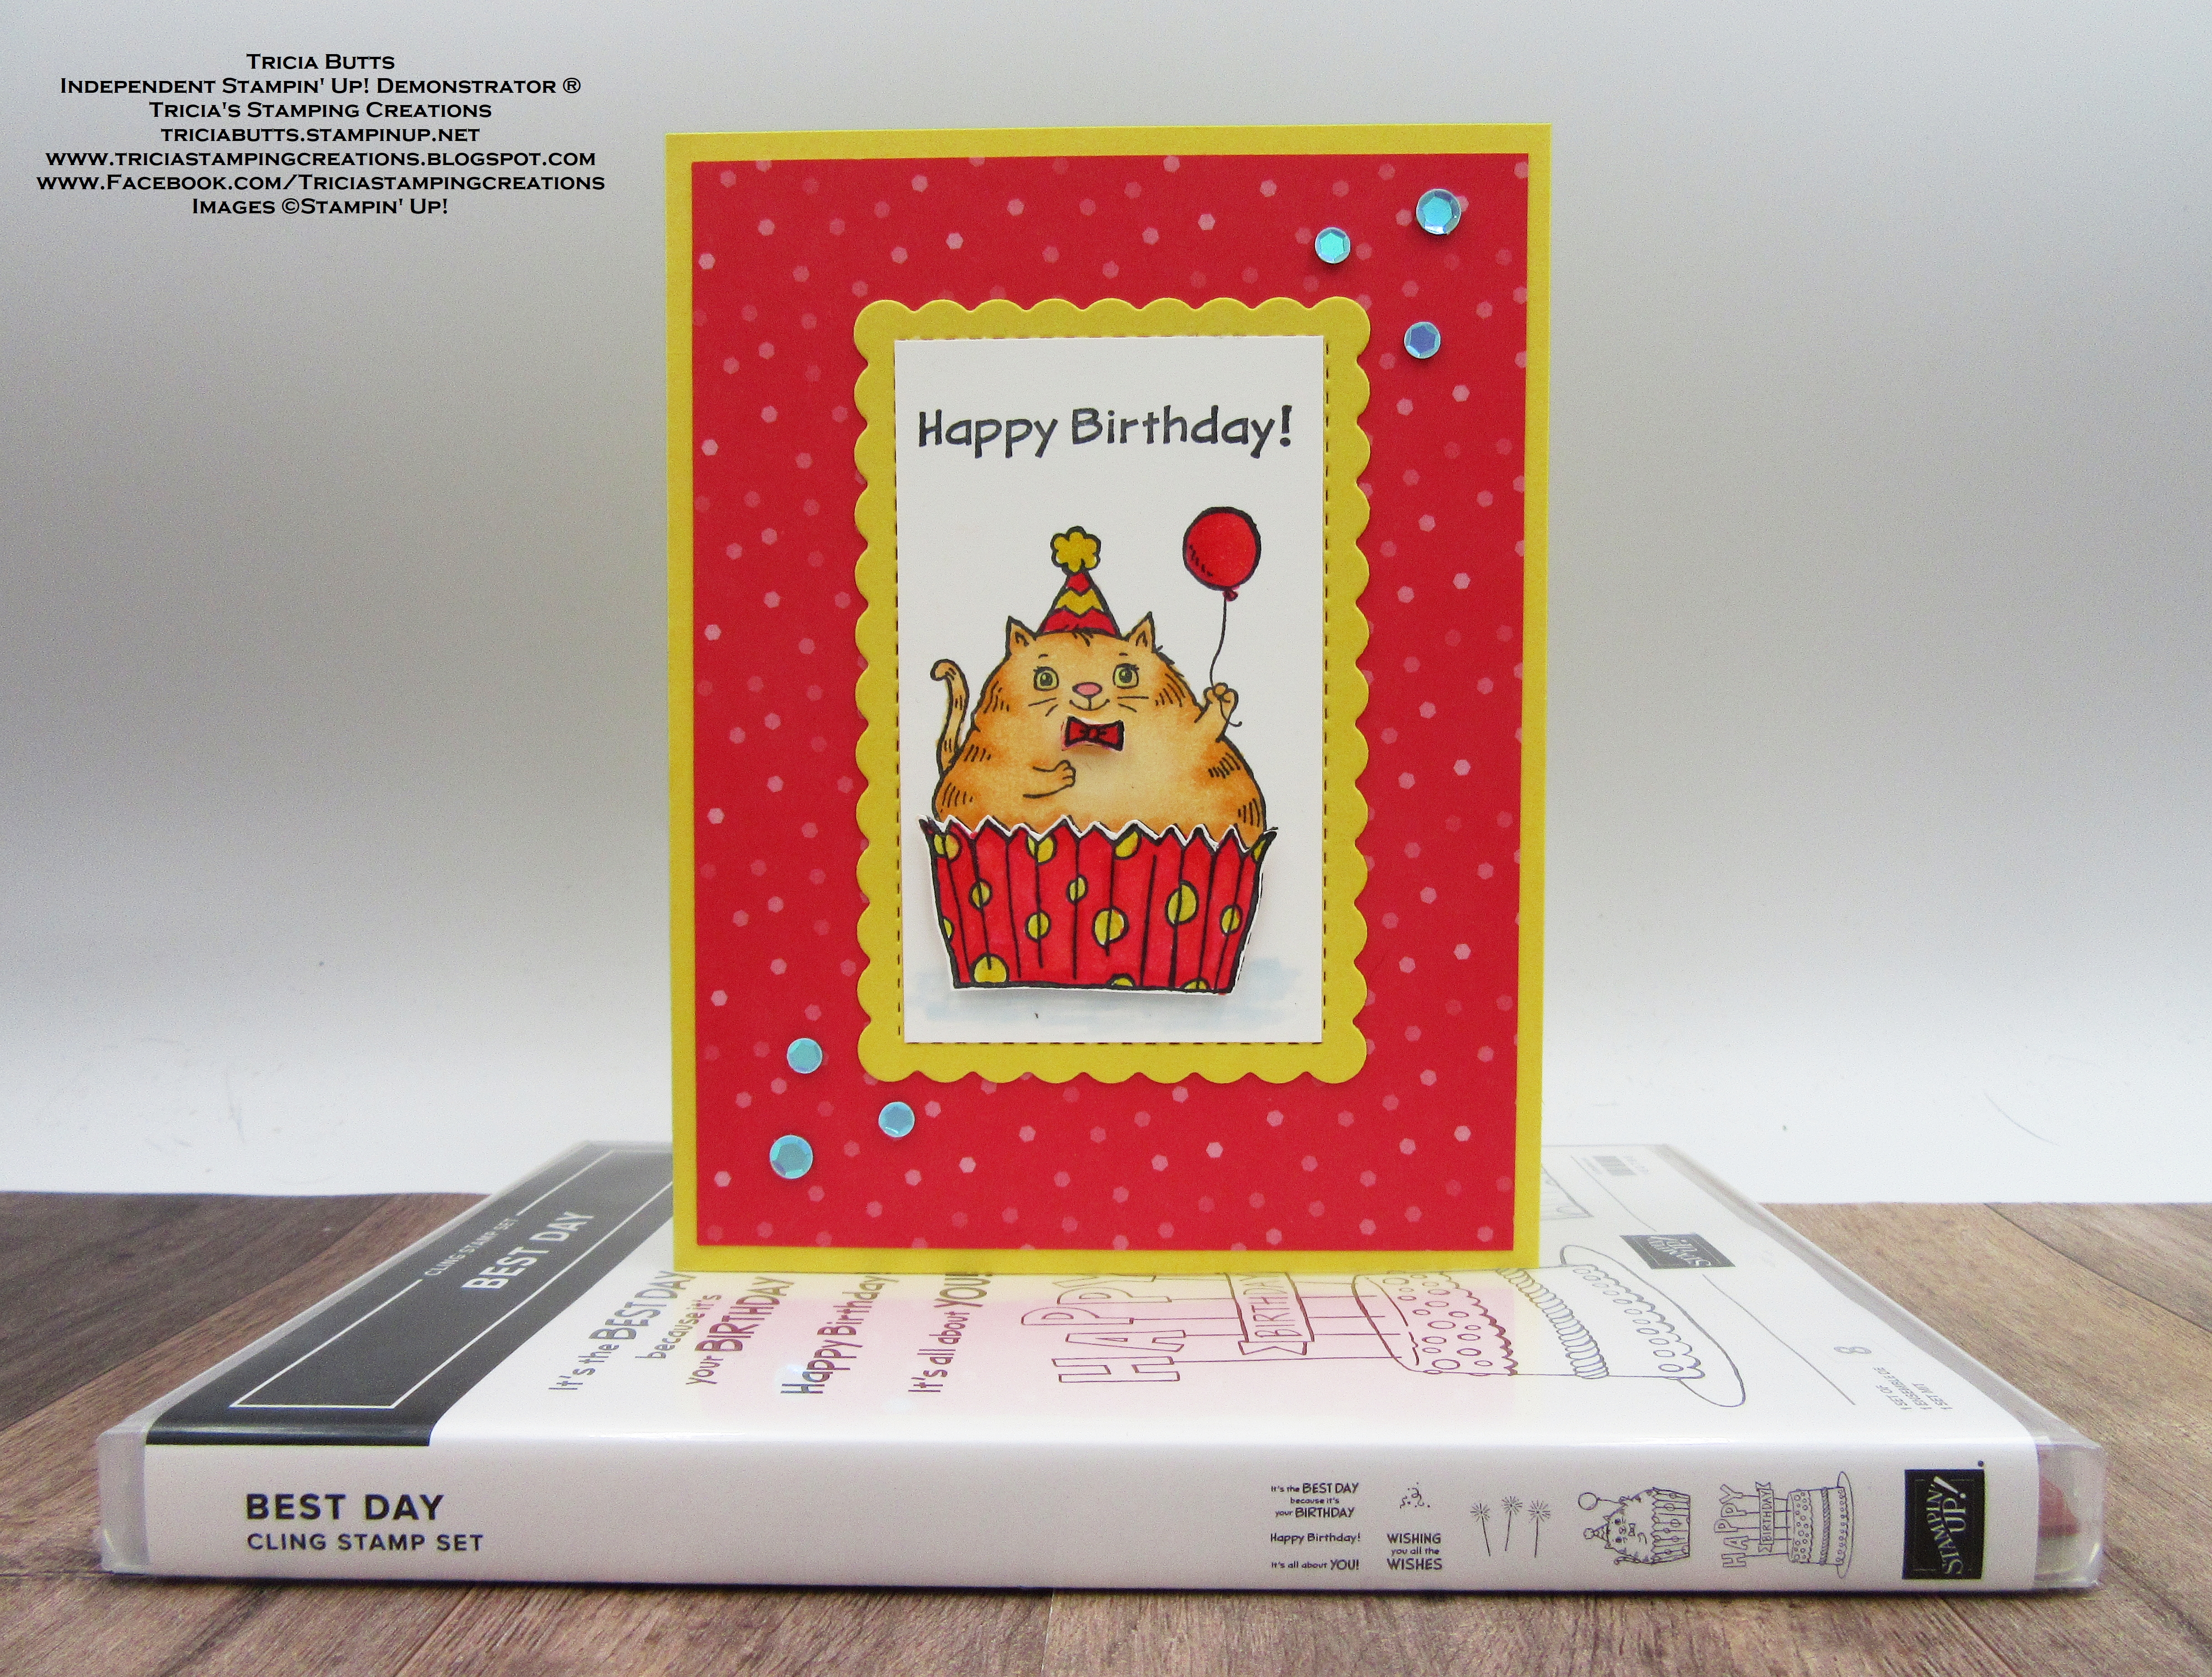
The inspiration for my birthday card today is my son's cat, Toka. He is an adorable fluff ball and I knew as soon as I saw this stamp set that I had to get it because it reminded me of him. Toka is a little on the round and cuddly side, not unlike this adorable feline and I had a lot of fun recreating the color of his fur for this card design. My son's favorite color is red so that was the color inspiration for this design. I love how it turned out and now the challenge will be to put this birthday card somewhere safe until the end of the year and then find it again to give to my son for his birthday. Wish me luck!
Products Used:
Best Day stamp set (item #160798)
Scalloped Contours Dies (item #155560)
2022-2024 In Color 6"x6" Designer Series Paper (item #159253)
Daffodil Delight Cardstock (item #119683)
Basic White Cardstock (item #159276)
Memento Tuxedo Black Pad (item #132708)
Daffodil Delight Stampin' Blends Combo Pack (item #154883)
Pale Papaya Stampin' Blends Combo Pack (item #155519)
Pumpkin Pie Stampin' Blends Combo Pack (item #154897)
Sweet Sorbet Stampin' Blends Combo Pack (item #159224)
Balmy Blue Stampin' Blends Combo Pack (item #154830)
Clear Wink of Stella Glitter Brush (item #141897)
Pastel Adhesive Backed Sequins (item #160387)
Mini Stampin' Dimensionals (item #144108)
Measurements:
Daffodil Delight Cardstock
Card Base - 8 1/2" x 5 1/2" (Scored at 4 1/4")
Scalloped Rectangle die cut with the Scalloped Contour Dies
2022-2024 In Color 6"x6" Designer Series Paper (Sweet Sorbet)
Card Front - 5 1/4" x 4"
Basic White Cardstock
Rectangle - 2 1/16" x 3 3/8"
Stamped and fussy cut cupcake base and bow tie using the Best Day stamp set
For my card design, I wanted a bright and cheerful color combination to help bring my sweet kitty to life. Toka is a beautiful buff ginger tabby cat, so I chose to use Pale Papaya and Pumpkin Pie Stampin' Blends Markers to create the color of his fur. For the card design, I chose Daffodil Delight cardstock for the card base and the frame for the focal design and added Sweet Sorbet Designer Series Paper for a bright splash of color. For the cupcake base and bow tie, I stamped the images separately on a scrap piece of Basic White cardstock with Memento Tuxedo Black ink and colored them with Sweet Sorbet and Daffodil Delight Stampin' Blends Markers before fussy cutting them out with Paper Snips. I attached both the cupcake base and bow tie to the focal image with Mini Stampin' Dimensionals to pop them up, lining them up with the stamped image. I used the Light Balmy Blue Stampin' Blends Marker to add some shadow below the cupcake base to help ground the image. For a touch of bling, I added several Balmy Blue Pastel Adhesive Backed Sequins to finish off this cute birthday card design. 
Thank you for taking the time to visit my blog. I hope that my card design will help inspire you to explore the wonderful products that Stampin' Up! has to offer to help inspire you to create your own beautiful projects. 
Now it's time to visit Sharon's blog and see what wonderful ideas she has to share with us. Just click on the Next button below to visit her blog and see her beautiful projects. We would love it if you would leave us a comment and let us know what you liked about our projects. I hope you enjoy the rest of our blog hop. 


If you live in the U.S. and do not have a Stampin' Up! Demonstrator, please contact me and I would be happy to help you with your creative projects. You may also visit my Online Store to place your order and have it shipped to you. 

Until Next Time

Happy Stamping,

Tricia Butts
Independent Stampin' Up! Demonstrator

Like What You See? Visit My Online Store Here

Visit My Facebook Business Page for Updates & Ideas

Click here to Contact Me


Explore Your Creativity
With The January-April 2023 Mini Catalog
Click Below To Visit My Online Store

Celebrate Paper Pumpkin's 10 Year Anniversary
With The 10 Years Of Growth Kit
Click Below To Subscribe By March 10th

Online Exclusives Are Now Available
While Supplies Last
Click Below To Place Your Order


Monday, August 1, 2022

We Create August Blog Hop Sale-a-Bration Coordination

Let's start off the new month with the We Create August Blog Hop. This month we are showcasing Sale-a-bration Coordination as we celebrate the final month of Sale-a-bration for 2022. There are so many amazing products that you can earn free with a qualifying order during Sale-a-bration that can be found in the new July-December 2022 Mini Catalog. We will be sharing projects to help you see all the wonderful possibilities when you combine products from these catalogs. 
Halloween is one of my favorite holidays, so it was an easy choice for my card design today. I love the new Bewitching Bundle from July-December 2022 Mini Catalog and I thought the hats and boots would work well not only as a fun Halloween card but also as a sassy birthday card. The Silver & Gold 6"x6" Specialty Paper from the Sale-a-bration Catalog, makes a great background and I love how easy it is to blend colors with blending brushes to transform it. For my color combination, I chose Gorgeous Grape and Parakeet Party for a bright and fun look. I kept the embellishments simple, adding some Gold stars punched out with the Witch Hat Builder Punch. 
Products Used:
Bewitching Bundle (item #159857)
Best Witches stamp set (item #159860)
Layering Circles Dies (item #151770)
Scalloped Contours Dies (item #155560)
Silver & Gold 6"x6" Specialty Paper (item #159941) Sale-a-bration Reward
Gold & Rose Gold 6"x6" Metallic Specialty Paper (item #156844)
Parakeet Party Cardstock (item #159259)
Basic White Cardstock (item #159276)
Gorgeous Grape Classic Ink Pad (item #146987)
Fresh Freesia Classic Ink Pad (item #155613)
Parakeet Party Stampin' Blends Combo Pack (item #159220)
Daffodil Delight Stampin' Blends Combo Pack (item #154883)
Versamark Pad (item #102283)
Basics Embossing Powders (item #155554)
Clear Wink of Stella Glitter Brush (item #141897)
1 1/2" Metallic Mesh Ribbon (item #153550)
Classic Matte Dots (item #158146)
Stampin' Dimensionals (item #104430)
Blending Brushes (item #153611)
Measurements:
Parakeet Party Cardstock
Card Base - 8 1/2" x 5 1/2" (Scored at 4 1/4")
Large Scalloped Circle die cut with the Layering Circles Dies
Scalloped Sentiment Label die cut with the Scalloped Contours Dies
Basic White Cardstock
Large Circle die cut with the Layering Circles Dies
Scrap piece for the stamped and punched Witch's Hat using the Bewitching Bundle
This card design is so much fun and can be used for so much more than Halloween. I love the bright color combination of Gorgeous Grape with Parakeet Party and the gold polka dots and punched stars add a wonderful sparkle. The Witch's Hat is easy to stamp and punch out with the Bewitching Bundle and I colored the polka dots and band with Parakeet Party Stampin' Blends Markers to add a pop of color. For the boots, I heat embossed the image using Black embossing powder to add some shine and then I colored the stripes on the stockings with Parakeet Party and Daffodil Delight Stampin' Blends Markers. I added a piece of the Metallic Mesh Ribbon behind the focal circle to add some sparkle and texture to the design. For the sentiment, I heat embossed the image with Black embossing powder to coordinate with the boots. For the background, I blended Fresh Freesia and Gorgeous Grape Classic inks onto a piece of the Gold polka dot paper from the Silver & Gold Specialty Paper to help make the focal image pop. I love how this card design turned out and how well the specialty paper coordinated with the Bewitching Bundle.
Thank you for taking the time to visit my blog. I hope that my card design will help inspire you to explore the wonderful possibilities available during Sale-a-bration.
Now it's time to visit Cheryl's blog and see what she has to share with us. Just click the Next button below to visit her blog. We would appreciate it if you would leave us a comment and let us know what you liked about our projects. I hope you enjoy the rest of our blog hop. 


If you live in the U.S. and do not have a Stampin' Up! Demonstrator, please contact me and I would be happy to help you with your creative projects. You may also visit my Online Store to place your order and have it shipped to you. 

Until Next Time

Happy Stamping,

Tricia Butts
Independent Stampin' Up! Demonstrator

Like What You See? Visit My Online Store Here

Visit My Facebook Business Page for Updates & Ideas

Click here to Contact Me


Earn Exclusive Free Products
During Sale-a-bration
Click Below For More Details

Get Creative For The Holidays
With The July-December 2022 Mini Catalog
Click Below To Visit My Online Store

Enjoy Some Summer Crafting
With The August Paper Pumpkin Kit
Click Below To Subscribe By August 10th