Tuesday, October 27, 2020

PPP October Blog Hop Joy To The World


It's time to hop along with the PPP October Blog Hop as we showcase alternative projects using the Joy To The World Paper Pumpkin Kit. You will be visiting with talented Stampin' Up! Demonstrators as they share their amazing alternative ideas to help inspire you to think outside the box. 
Today I decided to create another Spanner Panel Fold card design using the supplies in the October Paper Pumpkin kit. I am in love with this fancy fold technique and if you visited my blog on Sunday, you would have seen my Halloween version here. I chose the color combination for this design from the colors in this month's kit which included Just Jade, Cherry Cobbler, Whisper White and Gold Foil and they are perfect for this Christmas card design.
Supplies Used:
October Paper Pumpkin Kit Joy To The World
Layering Circles Dies
Layering Ovals Dies
Greenery Embossing Folders
Just Jade cardstock
Cherry Cobbler cardstock
Whisper White cardstock
Banner Pick A Punch
Basic Rhinestone Jewels
Dark Cherry Cobbler Stampin' Blends Marker
Measurements:
Just Jade cardstock card base - 8 1/2" x 5 1/2"
1 1/4" x 5" strip embossed with the leaf embossing folder from the Greenery Embossing Folder
Scored at 4 1/4" and cut at 1 1/4" from each side up to the score line on the front of the card
Whisper White cardstock
5 1/4" x 4" (inside panel)
1" x 4" - 2 strips embossed with the leaf embossing folder from the Greenery Embossing Folders
Embossed Whisper White Panel (from the kit) - cut to 2 3/4" x 4" for front center panel
Cherry Cobbler cardstock 
1" x 4" - 4 strips embossed with the leaf embossing folder from the Greenery Embossing Folders
Cherry Cobbler cardstock for scalloped circle and scalloped oval die cuts
This card was so much fun to design and I added some texture to the panels on the front and inside the card using the leaf embossing folder from the Greenery Embossing Folders. For the two Whisper White cardstock strip panels, I colored the embossed area with Just Jade Classic ink using an old Clear Wink of Stella Glitter Brush and then created a watercolor wash look to fill in the background. For the Cherry Cobbler cardstock strips, I embossed them as well and added them to the back of the narrow panels to hide the sentiment strip along the bottom and to the sides of the inside Whisper White panel. 
To decorate this card, I used the elements in the kit, including the French version of Joy in Gold Foil as the main sentiment of the wreath. I love that we have these sentiments in different languages and it provides so many great options. I colored several of the small Basic Rhinestone Jewels using the Dark Cherry Cobbler Stampin' Blends Marker and added them to the wreath for a touch of bling and I added two of the small Basic Rhinestones to the inside sentiment banner. This fun fold is so easy to create and turns an ordinary card base into a Wow card with just two simple cuts. 
Thank you for taking the time to visit my blog today. I hope that my alternative fancy fold card design inspires you to try creating your own wonderful projects using the supplies in this kit. There are so many wonderful possibilities to try. 

Now it's time to visit Charmane's blog and see what wonderful alternative projects she has to share with us this month. Just click the Next button below to visit her blog. We would love it if you would leave us a comment and let us know what you enjoyed about our projects. I hope you enjoy the rest of our blog hop. 

If you live in the U.S. and do not already have a Stampin' Up! Demonstrator, please contact me and I would be happy to help you with your creative projects. If you are not already a Paper Pumpkin subscriber, please click the link below to sign up by November 10th to receive the November Kit. 


Until Next Time

Happy Stamping,

Tricia Butts
Independent Stampin' Up! Demonstrator

Like What You See? Visit My Online Store Here

Visit My Facebook Business Page for Updates & Ideas

Click here to Contact Me


Final Days To Save 15% 

On Select Designer Series Paper

Click Below To Visit My Online Store


Create Wonderful Holiday Projects
With The November Paper Pumpkin Kit
Click Below To Subscribe By November 10th

Create Beautiful Projects For The Holidays
With Products From The August-December 2020 Mini Catalog
Click Below To Visit My Online Store

Sunday, October 25, 2020

3D Paper Trimmer October Blog Hop Halloween


Welcome to the 3D Paper Trimmer October Blog Hop as we showcase Halloween as our theme this month. You will be visiting with talented Stampin' Up! Demonstrators as the share ideas and projects to help inspire you to make the most of your Paper Trimmer. 
Today I am sharing a fun fold that I discovered on the Splitcoast Stampers website in their tutorial section. This fun fold is called a Spanner Panel Fold and I followed the directions provided by Wendy Lee that you can find here. The Stampin' Up! Paper Trimmer makes it simple to create the base and layers of this card design and I had a lot of fun creating it. For this design, I used the Magic In This Night Designer Series Paper (item #153517) with the Ghoulish Goodies stamp set (item #153362) as well as the Banner Year stamp set (item #153464) and the Little Treats Bundle (item #155204). All of these amazing products can be found in the August-December 2020 Mini Catalog. 
Products Used:
Magic In This Night Designer Series Paper (item #153517)
Ghoulish Goodies stamp set (item #153362)
Banner Year stamp set (item #153464)
Little Treats Bundle (item # 155204)
Layering Circles Dies (item #151770)
1 1/2" Metallic Mesh Ribbon (item #153550)
Iridescent Pearls (item #153549)
Cobwebs 3D Embossing Folder (item #153578)
Blackberry Bliss cardstock (item #133675)
Basic Black cardstock (item #121045)
Granny Apple Green cardstock (item #146990)
Whisper White cardstock (item #100730)
Black Glitter Paper (item #153518)
Frost White Shimmer Paint (item #147046)
Blackberry Bliss Classic Ink Pad (item #147092)
Memento Tuxedo Black Ink Pad (item #132708)
Measurements:
Blackberry Bliss cardstock card base 
(scored at 4 1/4" Cut at 1 1/4" from each side up to the score line)
Blackberry Bliss cardstock layer 
2 3/4" x 4" Embossed with the Cobweb 3D Embossing Folder 
Magic In This Night Designer Series Paper - 4 strips 1" x 4"
Whisper White cardstock layer - 5 1/4" x 4"
Basic Black cardstock - 1 strip 1 1/4" x 5" (add the Metallic Ribbon to the front and back)
Basic Black cardstock - 2 strips 1" x 4" embossed with Cobweb 3D Embossing Folder to attach to the back side of card front
Black Glitter Paper - to die cut spiders using the Little Treat Box Dies
Blackberry Bliss cardstock - to die cut tags using the Little Treat Dies
Granny Apple Green cardstock - die cut 2 circles for sentiments
Whisper White cardstock - die cut 2 small circles for sentiments
The thing I love best about this card is all the wonderful layers to the design. The front layers combine the beautiful designer series paper with the embossed panel that I highlighted using the Frost White Shimmer Paint with a Sponge Dauber to make the spider's web shimmer. I attached the metallic ribbon embellished panel across the front of the center panel and attached it to the back of the two narrow panels. I then used the two black embossed cardstock layers over the top to hide where it was attached. The spiders were die cut from the beautiful Black Glitter Paper using the die from the Little Treat Box Dies and I added them to the center panel and embellished them with the Iridescent Pearls. The inside panel was decorated with two of the designer series paper strips onto a Whisper White cardstock panel and I stamped the sentiments using Blackberry Bliss Classic Ink and stamped the spiders with Memento Tuxedo Black Ink. The sentiments were stamped with Memento Tuxedo Black Ink onto Whisper White circles and layered onto Granny Apple Green circles. The tags were die cut from Blackberry Bliss cardstock using the die from the Little Treat Box Dies and layered underneath the sentiment labels and attached to the Basic Black cardstock strip with Stampin' Dimensionals. I used the Iridescent Pearls to embellish the sentiment label on the front. 
This Spanner Panel card was so much fun to create and I loved mixing and matching different products to decorate the different layers. It's a great way to transform a traditional card base into something amazing and magical with just a couple of cuts with your Paper Trimmer. I can't wait to try this fun fold for other occasions. 
Thank  you for taking the time to visit my blog today. I hope that my fun fold card design will inspire you to use your Paper Trimmer to create cards beyond the traditional.
Now it's time to visit Elisabeth's blog and see what amazing ideas she has to share with us. Just click the Next button below to visit her blog. We would love it if you would leave us a comment and let us know what you enjoyed about our projects. I hope you enjoy the rest of our blog hop. 

If you live in the U.S. and do not already have a Stampin' Up! Demonstrator, please contact me and I would be happy to help you with your creative projects. You may also visit my Online Store to place your order and have it shipped to you. 

Until Next Time

Happy Stamping,

Tricia Butts
Independent Stampin' Up! Demonstrator

Like What You See? Visit My Online Store Here

Visit My Facebook Business Page for Updates & Ideas

Click here to Contact Me


Time Is Running Out To Stock Up On Your Favorite Designs

Last Days To Take Advantage Of The 15% Off Select Designer Series Paper Sale

Click Below To Visit My Online Store 


Create Wonderful Holiday Projects
With The November Paper Pumpkin Kit
Click Below To Subscribe By November 10th

Create Beautiful Projects For The Holidays
With Products From The August-December 2020 Mini Catalog
Click Below To Visit My Online Store


Saturday, October 24, 2020

Ink. Stamp. Share. October Monthly Blog Hop Fall & Halloween


Welcome to the Ink. Stamp. Share. October Monthly Blog Hop as we showcase projects and ideas with the theme of Fall and Halloween. You will be visiting with talented Stampin' Up! Demonstrators from around the world as they share their creations to help inspire you. 
For my card design, I chose to create a Fall themed card design to celebrate Thanksgiving. I love the wonderful colors and designs in the Gilded Autumn Specialty Designer Series Paper (item #153520) and combined the striped pattern with the Banner Year Bundle (item #155214) and the Gather Together Bundle (item #153036) from the August-December 2020 Mini Catalog. My card design was inspired by a technique shared by fellow New Zealand demonstrator, Jacque Williams, and I loved the flow of the circles as a contrast for the striped background. This design has a wonderful masculine feel to it and could easily be adapted to use as a birthday card or other occasion for the men in your life. 
Products Used:
Gilded Autumn Specialty Designer Series Paper (item #153520)
Banner Year Bundle (item #155214)
Gather Together Bundle (item #153036)
Layering Circles Dies (item #151770)
Stitched Shapes Dies (item #152323)
Gilded Gems (item #152478)
Linen Thread (item #104199)
Gold Embossing Powder (item #109129)
Cajun Craze cardstock (item #119684)
Early Espresso cardstock (item #119686)
Mint Macaron cardstock (item #138337)
Very Vanilla cardstock (item #101650)
Cajun Craze Classic Ink Pad (item #147085)
Measurements:
Early Espresso cardstock card base - 8 1/2" x 5 1/2" 
(scored at 4 1/4")
Gilded Autumn Designer Series Paper layer - 5 1/4" x 4"
Circles (Die Cut with Layering Circles Dies)
Early Espresso cardstock circle 
-1 circle measurement 2 7/8"
Cajun Craze cardstock Circles 
- 1 circle measurement 2 5/8"
- 1 circle measurement 1 5/8"
Mint Macaron cardstock Circles
-1 circle measurement 2 5/8"
- 1 circle measurement 1 5/8"
Circle Die Cuts (Die Cut with Stitched Shapes Dies)
- 2 Very Vanilla Circles (die cut with the 2nd largest Stitched Circle Die)
- 1 Very Vanilla Circle (die cut with the smallest Stitched Circle Die)
Early Espresso cardstock 1/2" Strip (for sentiment)
The most complicated part of creating this card is the layering and cutting of the circles. One stack of circles layers the Early Espresso large circle, Mint Macaron larger circle, Very Vanilla large stitched circle and the small Cajun Craze circle. I attached them using Tombow Multi Purpose Glue to make it easier to slide them into place. You need to have them aligned towards the right side to create the design. For the second stack of circles, I layered the larger Cajun Craze circle, the second large stitched Very Vanilla Circle and the small Mint Macaron circle. Once again, I aligned them to the right side and attached them with glue. I then cut both layered circles in half, cutting through all layers to cut them both in half. I attached the bottom half of the larger circle onto the right side of the card front and then attached the bottom half of the smaller circle (flipping it upside down) so that it aligns with the colors of the larger circle, to create the wavy swirl design. I heat embossed the sentiment from the Banner Year stamp set onto the 1/2" strip of Early Espresso cardstock and used the Banners Pick A Punch on the right end of the strip. I trimmed it to fit just slightly shorter than the width of the card front and attached it with Stampin' Seal Adhesive. 
To complete the card design, I stamped the two pumpkins image from the Gather Together stamp set using the Cajun Craze Classic Ink Pad and colored the images with Stampin' Blends Markers. I die cut them using the coordinating Gathered Leaves Dies. I attached the pumpkins to the small Very Vanilla stitched circle with Mini Stampin' Dimensionals and then attached the circle to the card front with a combination of Stampin' Seal Adhesive along the bottom of the circle and Mini Stampin' Dimensionals across the top. I lined the Very Vanilla circle up so that it fit inside the small Cajun Craze half circle and over the top of the end of the sentiment banner. To embellish the card, I added a small bow tied with Linen Thread to the base of the small Very Vanilla circle and added Gilded Gems to add a touch of gold to coordinate with the embossed sentiment.
Thank you for taking the time to visit my blog today. I hope that my card design will give you ideas to help you create wonderful Fall themed cards with this beautiful designer series paper and to experiment with different shapes to create wonderful designs. 

Now it's time to visit Jill's wonderful blog and see what ideas she has to share with us. Just click on the Next button below to visit her blog or use the Roll Call List below to find your way. We would love it if you would leave us a comment and let us know what you enjoyed about our projects. I hope you enjoy the rest of our blog hop. 


Roll Call

Jo Blackman

Kim Price

Annette Elias

Rebecca-Jo Unwin

Tracie St-Louis

Alison Carter

Karen Egan

Kirsty Pattrick

Kristie Meeker Wilson

Libby Fens

Susan Simpson

Cindy Mitchell-Clark

Gez Carpenter

Tricia Butts

Jill Chapman

Mo Rootes

Rochelle Laird-Smith


If you live in the U.S. and do not already have a Stampin' Up! Demonstrator, please contact me and I would be happy to help you with your creative projects. You may also visit my Online Store to place your order and have it shipped directly to you. 

Until Next Time

Happy Stamping,

Tricia Butts
Independent Stampin' Up! Demonstrator

Like What You See? Visit My Online Store Here

Visit My Facebook Business Page for Updates & Ideas

Click here to Contact Me


Time Is Running Out To Stock Up On Your Favorite Designs
Last Days To Save 15% On Select Designer Series Paper
During The Month Of October
Click Below To Visit My Online Store

Create Wonderful Holiday Projects
With The November Paper Pumpkin Kit
Click Below To Subscribe By November 10th

Create Beautiful Projects For The Holidays
With Products From The August-December 2020 Mini Catalog
Click Below To Visit My Online Store


Friday, October 16, 2020

SBTD October Blog Hop Holiday Gifts

It's time to hop along with the SBTD November Blog Hop as we showcase Holiday Gifts as our theme this month. You will be visiting with talented Stampin' Up! Demonstrators as they share their ideas and projects to help inspire you. 
Today I am sharing with you two cute little Christmas treat holders created using the Little Treats Bundle paired with the Toile Tidings Designer Series Paper, both from the August-December 2020 Mini Catalog. I love the traditional colors of this designer series paper and the pattern is very festive and perfect for a little holiday gift for someone special. 
Products Used:
Little Treats Bundle (item #155204)
Toile Tidings Designer Series Paper (item #153520)
Real Red cardstock (item #102482)
Garden Green cardstock (item #102584)
Very Vanilla cardstock (item #101650)
Whisper White cardstock (item #100730)
Real Red Classic Ink Pad (item #147050)
Garden Green Classic Ink Pad (item #147089)
Gold 3/8" Metallic Edge Ribbon (item #144146)
Whisper White 1/2" Faux Linen Ribbon 
(from The Flowers For Every Season Ribbon Combo Pack 
Item # 153620)
Real Red Stampin' Blends Combo (item #154899)
Whisper White Embossing Powder (item #109132)
Basic Rhinestone Jewels (item #144220)
Measurements:
Toile Tidings Designer Series Paper - 12" x 6" 
(large enough to cut both treat holders with die from the Little Treat Box Dies)
Real Red cardstock - for tag die cut 
Garden Green cardstock 
- For tag die cut
Very Vanilla cardstock 
- For present stamped die cut and scalloped oval die cuts
Whisper White cardstock - for Santa hat stamped die cut
These cute treat holders are so simple to create and so much fun to decorate. I love that the images in the Little Treats stamp set coordinate with the Little Treat Box Dies to make it simple to create all the elements for these treat holders. The wonderful thing about the designs in the Toile Tidings Designer Series Paper is that one side is Real Red and the other side is Garden Green, so I was able to die cut the pieces for both boxes from one 12" x 6" piece. The boxes are easy to assemble and need minimal adhesive. The elements for each treat box are basically the same with the only difference being the Santa Hat image stamped with Real Red Classic ink an the Present image stamped with Garden Green Classic ink. I heat embossed the sentiment onto each tag using Whisper White Embossing Powder and I I used Basic Rhinestone Jewels for a touch of bling. 

For the ribbon, I used the Gold Metallic Ribbon for the Garden Green treat holder and I used a piece of Whisper White Faux Linen Ribbon for the Real Red treat holder, that I colored using the Dark Real Red Stampin' Blends Marker, to color the ribbon to coordinate. These treat holders can be used to hold candy or a small gift like jewelry. I love that the Little Treats Bundle has images and dies to create wonderful treat holders for a variety of occasions beyond Christmas. 
Thank you for taking the time to visit my blog today. I hope that project inspires you to create your own gifts for the holidays for your family and friends. There are so many wonderful possibilities to explore. 

Now it's time to visit Judi's blog and see what wonderful ideas she has to share with us this month. Just click on the Next button to visit her blog. We would love it if you would leave us a comment and let us know what you enjoyed about our projects. I  hope that you enjoy the rest of our blog hop. 


If you live in the U.S. and do not already have a Stampin' Up! Demonstrator, please contact me and I would be happy to help you with your creative projects. You may also visit my Online Store to place your order and have it shipped to you. 

Until Next Time

Happy Stamping,

Tricia Butts
Independent Stampin' Up! Demonstrator

Like What You See? Visit My Online Store Here

Visit My Facebook Business Page for Updates & Ideas

Click here to Contact Me


Stock Up On Your Favorite Designs
Save 15% On Select Designer Series Paper 
Click Below To Visit My Online Store


Enjoy Creating With The November Paper Pumpkin Kit
Click Below To Subscribe By November 10th

Create Your Own Wonderful Projects For The Holidays
With The August-December 2020 Mini Catalog
Click Below To Visit My Online Store


Wednesday, October 14, 2020

New At SU October Blog Hop Feeling Festive

Welcome to the New At SU October Blog Hop as we explore this month's theme of Feeling Festive. Now is a wonderful time to create fun projects ready for all the wonderful holidays that we celebrate over the next few months. You will be visiting with wonderful Stampin' Up! Demonstrators as they share their projects and ideas to help inspire you for the upcoming holidays. 
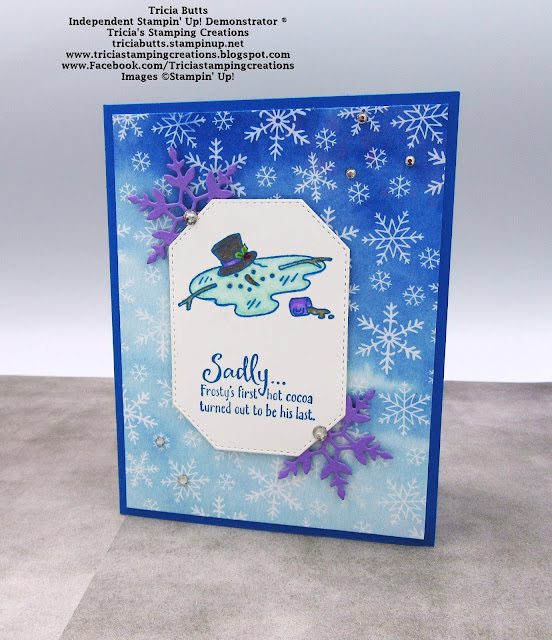
My card today is a fun Winter themed design that could be used for a variety of occasions. I love the whimsy of the images and sentiments in the Don't Stop Believin' stamp set and it pairs beautifully with the designs in the Snowflake Splendor Designer Series Paper.
Products Used:
Don't Stop Believin' stamp set (item #153332)
Snowflake Splendor Designer Series Paper (item #153512)
So Many Snowflakes Dies (item #153560)
Hippo & Friends Dies (item #153585)
Highland Heather cardstock (item #146986)
Pacific Point cardstock (item #111350)
Whisper White cardstock  (item #100730)
Pacific Point Classic Ink Pad (item #147098)
Stampin' Blends Markers
Basic Rhinestone Jewels (item #144220)
Measurements:
Pacific Point cardstock card base - 8 1/2" x 5 1/2" 
(Scored at 4 1/4")
Snowflake Splendor Designer Series Paper layer  
5 1/4" x 4"
Whisper White cardstock 
label die cut (using the Hippo & Friends Dies)
Highland Heather cardstock 
snowflake die cuts (using the So Many Snowflakes Dies)
This clean and simple card design is easy to assemble. The images were stamped onto the Whisper White cardstock label with Pacific Point Classic ink and I colored the image with Stampin' Blends Markers. I attached the snowflakes to the back of the label with Stampin' Seal Adhesive and attached the label to the designer series paper layer with Stampin' Dimensionals. I embellished the snowflakes and the background layer with Basic Rhinestones to add a touch of bling to the design. Most of the products used to create this card can be found in the August-December 2020 Mini Catalog. The Snowflake Splendor Designer Series Paper is currently on sale and you can save 15% during the month of October. 
Thank you for taking the time to visit my blog today. I hope that my card design inspires you to explore the wonderful products in the August-December 2020 Mini Catalog to help you create your own amazing holiday projects.

Now it's time to visit Rochelle's amazing blog to see what she has to share with us this month. Just click the Next button below or use the Roll Call List to find your way. Please leave us a comment and let us know what you enjoyed about our projects. I hope that you enjoy the rest of our blog hop. 

If you live in the U.S. and do not already have a Stampin' Up! Demonstrator, please contact me and I would be happy to help you with your creative projects. You may also visit my Online Store to place your order and have it shipped to you. 

Until Next Time

Happy Stamping,

Tricia Butts
Independent Stampin' Up! Demonstrator

Like What You See? Visit My Online Store Here

Visit My Facebook Business Page for Updates & Ideas

Click here to Contact Me


Stock Up On Your Favorite Designs
Save 15% On Select Designer Series Paper
During The Month Of October
Click Below To Visit My Online Store


Enjoy Creating With The Sweet November Paper Pumpkin Kit
Click Below To Subscribe By November 10th


Create Your Own Wonderful Projects For The Holidays
With Products From The August-December 2020 Mini Catalog
Click Below To Visit My Online Store