Tuesday, April 27, 2021

Paper Pumpkin Possibilities April Blog Hop So Cool

Welcome to the Paper Pumpkin Possibilities April Blog Hop as we showcase alternative projects using the So Cool kit. You will be visiting with talented Stampin' Up! Demonstrators as they share their ideas and projects to help inspire you to think outside the box to create your own unique creations.
One of my favorite things about the April Paper Pumpkin kit is that it was designed especially for families to enjoy some creative therapy. The wonderful bright Summer colors are a welcome change and the theme for this kit is perfect for kids to enjoy. For my card design today, I decided to share a fun alternative card design using a fun technique that kids will love to learn. When my kids were young, they loved learning how to heat emboss and to watch the "magic" as the embossing powder changed from powder to smooth and shiny. The Emboss Resist technique is a great way to show kids how to add color to their projects and watch as the embossed stamped images magically appear as they resist the sponged colors. For this card design, I used the supplies from this month's kit with the addition of some cardstock and Classic ink pads I had on hand and my embossing supplies. This card design is a fun way for kids to explore their creativity and see beyond the projects in the So Cool Kit.
Products Used:
Paper Pumpkin April 2021 So Cool Card Kit
Coastal Cabana Cardstock (item #131297)
Flirty Flamingo Cardstock (item #141416)
Basic White Cardstock (item #159276)
Coastal Cabana Classic Ink Pad (item #147097)
Flirty Flamingo Classic Ink Pad (item #147052)
Daffodil Delight Classic Ink Pad (item #147094)
Versamark Pad (item #102283)
White Embossing Powder (item #109132)
Heat Tool (item #129053)
Sponge Daubers (item #133773)
Measurements:
Coastal Cabana Cardstock
Card Base - 8 1/2" x 5 1/2" (Scored at 4 1/4")
Flirty Flamingo Cardstock
Layer 1 - 5 1/4" x 4"
Basic White Cardstock
Background Layer - 5" x 3 3/4" 
The secret to creating this card design is in the embossing. Using Versamark ink, I stamped the popsicle image onto the Basic White layer to create a background design and added White Embossing Powder to the stamped images. With the Heat Tool on the 2nd Level, I heated the embossing powder until it turned shiny and white. Once it had cooled, I used Sponge Daubers to sponge the colors onto the Basic White cardstock, in a swirling motion to add a soft layer of color. I used a tissue to wipe over the cardstock and remove the ink from the embossing, so that it would stand out against the sponged background. The embossing resists the sponged ink, hence the name Embossed Resist Technique. To complete the card design, I stamped the sentiment onto one of the labels from the kit using the Bermuda Bay Ink Spot. I attached it to the Silver Glimmer rectangle and added one of the Popsicle stickers to create the focal image for the card. I wrapped the Bumblebee Bakers Twine around the bottom of the card front twice and tied a bow on the left side. Using Stampin' Dimensionals from the kit, I added the focal image to the card front over the top of the Bakers Twine. I adhered the card front to the Flirty Flamingo layer with adhesive and attached it to the card base with Stampin' Dimensionals. I love how this card design uses the supplies in the kit to create a stepped up card design that introduces a fun technique. 
Thank you for taking the time to visit my blog. I hope that my card design helps inspire you to explore the wonderful possibilities in this amazing kit. Paper Pumpkin is a great way to enjoy some creative therapy without the stress. 
Now it's time to visit Elizabeth's blog and see what wonderful projects she has to share. Just click the Next button below to visit her blog. We would love it if you would leave us a comment and let us know what you like about our projects. I hope you enjoy the rest of our blog hop. 
If you live in the U.S. and do not have a Stampin' Up! Demonstrator, please contact me and I would be happy to help you with your creative projects. You may also visit my Online Store to place your order. Remember to subscribe by May 10th to receive the Batter Up May Paper Pumpkin Card kit and enjoy some creative therapy. Just click on the link below to sign up.

Until Next Time

Happy Stamping,

Tricia Butts
Independent Stampin' Up! Demonstrator

Like What You See? Visit My Online Store Here

Visit My Facebook Business Page for Updates & Ideas

Click here to Contact Me


Until Next Time

Happy Stamping,

Tricia Butts
Independent Stampin' Up! Demonstrator

Like What You See? Visit My Online Store Here

Visit My Facebook Business Page for Updates & Ideas

Click here to Contact Me


Create Fun Cards For The All Stars In Your Life
With The May Paper Pumpkin Kit
Click Below To Subscribe By May 10th

Final Days To Take Advantage 
Of The Last Chance Products Sale
Click Below To Visit My Online Store

Create Beautiful Projects For Spring
With Products In The January-June 2021 Mini Catalog
Click Below To Shop In My Online Store


Saturday, April 24, 2021

3D Paper Trimmer April Blog Hop Mother's Day


Welcome to the 3D Paper Trimmer April Blog Hop as we celebrate Mother's Day. You will be visiting with talented Stampin' Up! Demonstrators from around the world as they share their amazing projects to help inspire you. 
Today I am sharing a simple fun fold that is easy to create with Stampin' Up!'s Paper Trimmer (item #152392). The Book Binder Fold is a great way to showcase pretty paper and today I chose to use the beautiful Fine Art Floral Designer Series Paper (item #154558) to decorate my card and I used the Strong & Beautiful stamp set for the wonderful sentiments. 
Products Used:
Strong & Beautiful stamp set (item #148732) - Retiring
Fine Art Floral Designer Series Paper (item #154558)
Tasteful Labels Dies (item #152886)
Merry Merlot Cardstock (item #146979)
Basic White Cardstock (item #159276)
Versamark Pad (item #102283)
Mossy Meadow Stampin' Blends Combo Pack (item #154890)
Gold 3/8" Metallic Edge Ribbon (item #144146) - Retiring
Gold Glitter Enamel Dots (item #152155) - Retiring
Tear & Tape Adhesive (item #138995)
Measurements:
Merry Merlot Cardstock
Card Base - 4 1/4" x 11" (Scored at 4 1/4" and 5 1/2')
Sentiment Label die cut with Tasteful Labels Dies
Fine Art Floral Designer Series Paper
Front Panel - 4" x 4"
Spine Panel - 1" x 4"
Basic White Cardstock
Inside Panel - 4" x 4"
This card is very simple to assemble and your Paper Trimmer does all the hard work for you. I used my trimmer to cut and score my card base as well as the designer series paper and the inside layer. For the ribbon, I used the Light Mossy Meadow Stampin' Blends Marker to color two pieces. I used the longer piece to tie a knot around the top layer of the card base and then I used Tear & Tape Adhesive to stick down the book binding panel to the bottom of the card base. I used the second piece of the ribbon as an embellishment under the sentiment label. The pretty Fine Art Floral Designer Series Paper is the star of this card design, and I love the beautiful colors and bold floral design. I wanted the sentiment label to compliment it and not over power it, so I embossed the label with Gold embossing powder to coordinate with the gold trim on the ribbon. 

Thank you for taking the time to visit my blog. I hope that my card design will help inspire you to create your own beautiful projects to celebrate the special women in your life. There are so many wonderful possibilities to explore.

Now it's time to visit Sonja's wonderful blog and see what beautiful projects she has to share with us. Just click the Next button below to visit her blog. Please leave us a comment and let us know what you liked about our projects. We appreciate your support. I hope you enjoy the rest of our blog hop. 


If you live in the U.S. and do not have a Stampin' Up! Demonstrator, please contact me and I would be happy to help you with your creative projects. You may also visit my Online Store to place your order and have it shipped to you. 

Until Next Time

Happy Stamping,

Tricia Butts
Independent Stampin' Up! Demonstrator

Like What You See? Visit My Online Store Here

Visit My Facebook Business Page for Updates & Ideas

Click here to Contact Me


Time Is Running Out!
Click Below To Shop For Your Favorite Retiring Products
From The Last Chance Products Sale

Create Fun Cards For The All Stars In Your Life
With The May Paper Pumpkin Kit
Click Below To Subscribe By May 10th

Celebrate Spring
With The January-June 2021 Mini Catalog
Click Below To Shop In My Online Store


Stamping With Friends April Blog Hop Mother's Day

Welcome to the Stamping With Friends April Blog Hop as we share projects inspired by upcoming holidays in the month of May. These holidays may be something well know or an occasion you have not heard of before. It's a fun way to create and send cards to the people we love to let them know that we are thinking of them. 
When I think of May, I automatically think of Mother's Day. As children, we would make handmade cards and gifts at school for our mothers and the tradition continues as we get older, although we tend to substitute the handmade gifts and cards for something special from a store. My Mum lives in Australia and one of the challenges I find with living in the U.S. is that it is very difficult to find a card with "Mum" on it instead of "Mom", which is more common here. So I love the opportunity to create my Mum a beautiful, handmade, one of a kind card that is special for her. Today I chose to use products from the Love You Always Suite in the January-June 2021 Mini Catalog. I chose to use one of the designs from the True Love Designer Series Paper (item #154281) with the Forever And Always Bundle (item #156200). This pretty paper is so easy to color with Stampin' Blends Markers and you can customize with your choice of colors. 
Products Used:
Forever & Always Bundle (item #156200)
True Love Designer Series Paper (item #154281)
Stitched Be Mine Dies (item #151814) - Retiring
Playful Alphabet Dies (item #152706)
Mint Macaron Cardstock (item #138337)
Basic White Cardstock (item #159276)
Gold Foil Sheets (item #132622)
Versamark Pad (item #102283)
Mint Macaron Stampin' Blends Combo Pack (item #154889)
Flirty Flamingo Stampin' Blends Combo Pack (item #154884)
Balmy Blue Stampin' Blends Combo Pack (item #154830)
Clear Wink of Stella Glitter Brush (item #141897)
Gold Glitter Enamel Dots (item #152155) - Retiring
Measurements:
Mint Macaron Cardstock
Card Base - 8 1/2" x 5 1/2" (Scored at 4 1/4")
Basic White Cardstock
Layer 1 - 5 1/4" x 4"
Heart die cut with Stitched Be Mine Dies
Background Love die cut with Always Dies
True Love Designer Series Paper
Background Layer - 5" x 3 3/4" - Colored With Stampin' Blends Markers
Gold Foil
Detailed Love die cut with Always Dies
MUM letters die cut with Playful Alphabet Dies
This clean and simple card is easy to assemble and is nice and flat to make it suitable for mailing. I love coloring with Stampin' Blends Markers and this beautiful paper is perfect for this technique. I added Clear Wink of Stella to the colored images for a touch of shimmer to step up the background. The Gold Foil lettering adds a lovely elegant touch to the design and Gold Glitter Enamel Dots are the perfect embellishment to finish off the design. This card design would work well for a variety of occasions and you can change the look and feel of the card simply by changing the colors. 
Thank you for taking the time to visit my blog today. I hope that my Mother's Day card will help inspire you to create your own beautiful cards to help celebrate this special occasion for the wonderful women in your life. Coloring is a wonderful way to relax and unwind and provides you with the ability to customize your card designs to suit any occasion.
Now it's time to visit Donna's beautiful blog and see what she has created for us this month. Just click the Next button below to visit her blog. We would appreciate it if you would leave us a comment and let us know what you enjoyed about our projects. I hope you enjoy the rest of our blog hop. 

Roll Call List
If you live in the U.S. and do not have a Stampin' Up! Demonstrator, please contact me and I would be happy to help you with your creative projects. You may also visit my Online Store to place your order and have it shipped to you. 

Until Next Time

Happy Stamping,

Tricia Butts
Independent Stampin' Up! Demonstrator

Like What You See? Visit My Online Store Here

Visit My Facebook Business Page for Updates & Ideas

Click here to Contact Me


Time Is Running Out!
The Last Chance Products Sale Ends May 3rd, 2021
Click Below To Shop For Your Favorite Products 
Before They Disappear

Create Fun Cards For The All Stars In Your Life
With The May Paper Pumpkin Kit
Click Below To Subscribe By May 10th

Get Creative This Spring
With The January-June 2021 Mini Catalog
Click Below To Visit My Online Store


Ink. Stamp. Share. April Monthly Blog Hop Sketch Challenge

Welcome to the Ink. Stamp. Share. April Monthly Blog Hop and this month we have a sketch challenge to help spark our creativity. You will be visiting with wonderful Stampin' Up! Demonstrators from around the world as they share their tips and ideas to help inspire you. 
Sketches are a wonderful starting point when you need inspiration for a card design. It is like a road map that helps you to plan your layout and you choose what colors and images you want to use to create your own unique version. 
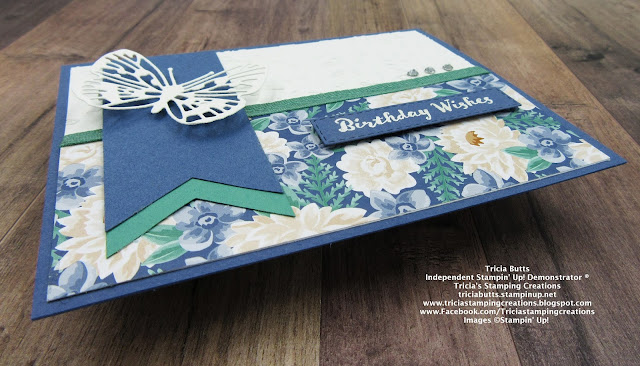
For my card design, I chose to use one of the pretty papers from the Flowers For Every Season 6"x6" Designer Series Paper (item #152486) for the lower half of the background and I chose colors from this paper to create my card design. For the decorative element, I chose to use one of the detailed butterflies from the Brilliant Wings Dies (item #155523) and the sentiment is from the Itty Bitty Birthdays stamp set, which is one of my go-to sentiment stamp sets for birthdays. 
Products Used:
Itty Bitty Birthdays stamp set (item #148618) - Retiring
Flowers For Every Season 6"x6" Designer Series Paper 
(item #152486) - Retiring 
Banner Triple Punch (item #138292) - Retiring
Brilliant Wings Dies (item #155523)
Meadow Moments Embossing Folders (item #153126)
Stitched Rectangles Dies (item #151820)
Misty Moonlight Cardstock (item #153081)
Just Jade Cardstock (item #153079)
Basic White Cardstock (item #159276)
Versamark Pad (item #102283)
White Embossing Powder (item #109132) - Retiring
Just Jade 1/4" Ribbon (item #153621) - Retiring
Basic Rhinestone Jewels (item #144220)
Measurements:
Misty Moonlight Cardstock
Card Base - 8 1/2" x 5 1/2" (Scored at 4 1/4")
Banner - 1 1/2" x 4" (One end punched with the Banner Triple Punch)
Sentiment Label die cut with one of the Stitched Rectangles Dies
Just Jade Cardstock
Banner - 1 /2" x 4" (One end punched with the Banner Triple Punch)
Basic White Cardstock
Background Layer - 5 1/4" x 4" Embossed with one of the Meadow Moments Embossing Folders
Detailed Butterfly die cut with the Brilliant Wings Dies
Flowers For Every Season Designer Series Paper
Layer - 2" x 5 1/4"
By following the layout of the sketch, it is easy to assemble this card to create a pretty clean and simple design. I embossed the Basic White cardstock layer to add texture and added the designer series paper layer to the bottom of this background layer. I added a piece of Just Jade 1/4" Ribbon to cover the seam of the designer series paper and provide the element in the sketch. For the banners, I used the Banner Triple Punch to create a banner on one end of the Misty Moonlight and Just Jade strips and then trimmed the length so that the Misty Moonlight piece was approx. 3 1/2" long and the Just Jade piece was approx. 3 3/4" long. I layered them and attached them to the left side of the card front, adding the detailed Basic White butterfly as the element in the sketch. For the sentiment, I heat embossed the image with White Embossing Powder onto a piece of Misty Moonlight cardstock and die cut it with one of the Stitched Rectangles Dies and added it to the card front with Stampin' Dimensionals. To finish off the design, I added three Basic Rhinestone Jewels for a touch of bling. This card design would work well for a variety of occasions and you could adapt it to work other designer series paper patterns to create a completely different look. There are so many wonderful possibilities to explore when using a sketch. 
Thank you for taking the time to visit my blog. I hope that my card design will help inspire you to try creating your own beautiful projects using this fun sketch challenge. A sketch layout can be a wonderful way to help get you started when you are experiencing a creative block and they help to provide a road map for your own beautiful creations.
Now it's time to visit Mo's wonderful blog and see what beautiful projects she has to share with us using this sketch. Just click the Next button below to visit her blog or use the Roll Call List below to find your way. We would love it if you would leave us a comment and let us know what you enjoyed about our projects. I hope you enjoy the rest of our blog hop. 

Roll Call
If you live in the U.S. and do not have a Stampin' Up! Demonstrator, please contact me and I would be happy to help you with your creative projects. You may also visit my Online Store to place your order and have it shipped to you.

Until Next Time

Happy Stamping,

Tricia Butts
Independent Stampin' Up! Demonstrator
Like What You See? Visit My Online Store Here

Visit My Facebook Business Page for Updates & Ideas

Click here to Contact Me


Available While Supplies Last!
Shop For Your Favorite Retiring Products
From The Last Chance Products Sale
Click Below To Visit My Online Store

Step Up To The Plate
With The May Paper Pumpkin Kit
Click Below To Subscribe By May 10th

Celebrate Spring 
With The January-June 2021 Mini Catalog
Click Below To Shop In My Online Store