Friday, July 30, 2021

Silver To Silver Elite July Blog Hop Fun Folds


Welcome to the Silver to Silver Elite July Blog Hop as we showcase Fun Fold card designs to help inspire you to try something new. You will be visiting with talented Stampin' Up! Demonstrators as they share their ideas and projects. 
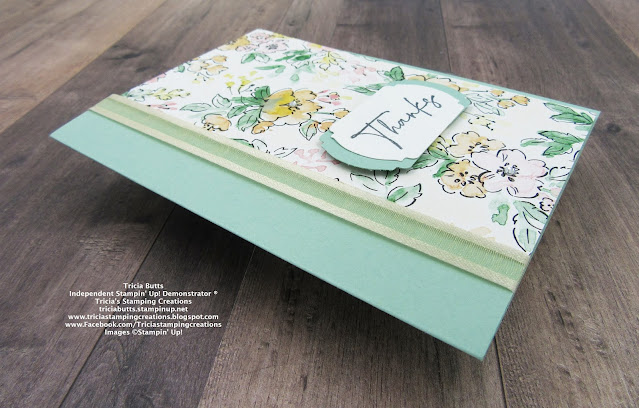
This simple fun fold design is a great way to showcase your beautiful designer series paper. So often we hate to cover up one side of the paper because both sides are so pretty, so this fun fold allows both pretty patterns to be on display. I chose to use the lovely Hand-Penned Designer Series Paper for this card design and I paired it with the coordinating Hand-Penned Petals stamp set. I chose colors from the designer series paper to create this design that included Mint Macaron cardstock and the pretty Pale Papaya Open Weave Ribbon. 
Products Used:
Hand-Penned stamp set (item #155070)
Hand-Penned Petals Designer Series Paper (item #155499)
Label Me Fancy Punch (item $151297)
Mint Macaron Cardstock (item #138337)
Basic White Cardstock (item #159276)
Mint Macaron Classic Ink Pad (item #147106)
Memento Tuxedo Black Pad (item #132708)
Pale Papaya 3/8" Open Weave Ribbon (item #155672)
Basic Rhinestone Jewels (item #144220)
Stampin' Dimensionals (item #104430)
Measurements:
Mint Macaron Cardstock
Card Base - 5 1/2" x 5 1/4" (Scored at 4 1/4")
Hand-Penned Designer Series Paper
Label punched with the Label Me Fancy Punch
Front Panel - 5 1/2" x 4"
Basic White Cardstock
Inside Panel - 5 1/4" x 4"
Sentiment Label punched with the Label Me Fancy Punch
This fun fold card is so simple to assemble and can be created with any of the beautiful designs in this pretty designer series paper pack. I attached a piece of the Pale Papaya Open Weave Ribbon along the narrow panel of the Mint Macaron card base and attached it to the back side with adhesive. I then attached the designer series paper panel so that it attaches to the back side of this panel so that it is flush against the score line. I stamped the Basic White cardstock with one of the floral images using Mint Macaron Classic ink and attached it to the inside of the card. To decorate the front of the card, I stamped the sentiment with Memento Tuxedo Black ink onto Basic White cardstock and punched it out with the Label Me Fancy Punch. I also punched out a label from Mint Macaron cardstock and cut it in half to attach to the back of the sentiment label to create a frame. I attached the sentiment label to the card front with Stampin' Dimensionals. To finish off the design, I added several small Basic Rhinestones for a touch of bling. This fun fold is a wonderful way to use up your pretty designer series paper and show off both sides of the paper. 
Thank you for taking the time to visit my blog. I hope that my fun fold card design will help inspire you to explore creating your own projects to send to family and friends. Using designer series paper to create your projects is a wonderful way to step up your designs.
Now it's time to visit Eva's blog and see what Fun Fold she has to share with us. Just click the Next button below to visit her blog or use the Roll Call List below to find your way. We would love it if you would leave us a comment and let us know what you like about our projects. I hope you enjoy the rest of our blog hop. 

Janice Piechowiak – Creating Treasures with Janice

Linda Moore – Moore Fun Stamping and Creating with Linda

Nedine Hunter DuPree – Craft Lounge Creations

Libby Fens – libbystamps

Kelly Taranto – The Late Night Stamper

Karen Egan – Crafty Karen Designs

Tricia Butts – Tricia’s Stamping Creations

Eva Dietz – Homemade with Heart – Stampin’ with Eva

Diane Marie – Creative Stamping

Cathy Rocca – FromTheStampStudio

Sue Kremer – NorthStar Stamper

Tracy Byers – Cards, Crafts and Stamps with Tracy

Laurie Bradshaw – Craft Coach Laurie

Nancy Reynolds – Stampin’ With Nutsy

Xenia Stanford – Heritage Stamp Arts

If you live in the U.S. and do not have a Stampin' Up! Demonstrator, please contact me and I would be happy to help you with your creative projects. You may also visit my Online Store to place your order and have it shipped to you. Remember, you have just a few days left to take advantage of the designer series paper sale and save 15% on select paper packs including the pretty Hand-Penned Designer Series Paper. 

Until Next Time

Happy Stamping,

Tricia Butts
Independent Stampin' Up! Demonstrator

Like What You See? Visit My Online Store Here

Visit My Facebook Business Page for Updates & Ideas

Click here to Contact Me


Final Days To Stock Up & Save 15%

During The Designer Series Paper Sale

Click Below To Visit My Online Store


Share A Box Of Hope
With The August Paper Pumpkin Kit
Click Below To Subscribe By August 10th

Explore Your Creativity
With The Kits Collection
Click Below To Visit My Online Store


Tuesday, July 27, 2021

Paper Pumpkin Possibilities July Blog Hop The Adventure Begins


Welcome to the Paper Pumpkin Possibilities July Blog Hop as we showcase alternative project ideas using The Adventure Begins Kit. You will be visiting with talented Stampin' Up! Demonstrators as they share their ideas and projects to help inspire you to think outside the box.
The July Paper Pumpkin kit would have to be one of my all time favorites. I just love the designs and colors for these fun fold designs. This meant that it was very difficult for me to cut up any of the card bases for my alternate card design. So instead, I decided to cut up one of the beautiful coordinating envelopes to create the background of my card design. For my focal image, I chose the sweet bear from the Count On Me stamp set from the 2021-2022 Annual Catalog. It's one of my favorite stamp sets and I thought it was a perfect fit for this card.
Products Used:
Paper Pumpkin July Kit The Adventure Begins
Count On Me stamp set (item #155647)
Misty Moonlight Cardstock (item #153081)
Basic White Cardstock (item #159276(
Memento Tuxedo Black Pad (item #132708)
Versamark Pad (item #102283)
Metallics Embossing Powders (item #155555)
Crumb Cake Stampin' Blends Combo Pack (item #154882)
Poppy Parade Stampin' Blends Combo Pack (item #154958)
Measurements:
Misty Moonlight Cardstock
Card Base - 8 1/2" x 5 1/2" (Scored at 4 1/4")
Basic White Cardstock
Layer 1 - 5 1/4" x 4"
Stamped bear image from the Count On Me stamp set
Sentiment Strip - 1/2" x 4"
Envelope 
3 Strips - 1 1/4" x 5" cut from the front & top panel of the envelope
From the moment I saw the envelopes, I knew that I needed to find a way to create a background with the beautiful designs. I carefully pulled the envelope apart and then cut off the top of the envelope, a  strip above the white label area and a strip below the white label. I trimmed each piece to create 3 strips measuring 1 1/4" x 5". I attached each strip to the Basic White cardstock layer so that it created a flow from the ground up to the sky. 
For the focal image, I stamped the bear image onto a piece of Basic White cardstock with Memento Tuxedo Black ink and colored the bear with the Crumb Cake Stampin' Blends Markers and the heart with the Poppy Parade Stampin' Blends Markers. I fussy cut the image out ready to attach to the card front. For the sentiment, I heat embossed one of the sentiments from the exclusive stamp set from the kit with Gold embossing powder onto a Basic White 1/2" strip. I trimmed the right end at an angle and attached it to the card front. Using Stampin' Dimensionals from the kit, I attached the bear image to the card front over the left side of the sentiment strip. To complete the design, I added three of the yellow colored sequins to add a touch of bling. 
Thank you for taking the time to visit my blog. I hope that my alternative card design will help spark your creativity to create your own wonderful projects with this kit. I love being able to combine products from the 2021-2022 Annual Catalog with the kit supplies to create something fun and unique.
Now it's time to visit Elizabeth's blog and see what alternative ideas she has to share with us. Just click the Next button below to visit her blog. Please leave us a comment and let us know what you liked about our projects. I hope you enjoy the rest of our blog hop. 

If you live in the U.S. and do not have a Stampin' Up! Demonstrator, please contact me and I would be happy to help you with your creative projects. You may also visit my Online Store to place your order and have it shipped to you. 

Until Next Time

Happy Stamping,

Tricia Butts
Independent Stampin' Up! Demonstrator

Like What You See? Visit My Online Store Here

Visit My Facebook Business Page for Updates & Ideas

Click here to Contact Me


Stock Up & Save 15%
During the Designer Series Paper Sale
Click Below To Visit My Online Store

Share A Box Of Hope
With The August Paper Pumpkin Kit
Click Below To Subscribe By August 10th

Explore Your Creativity
With The Kits Collection
Click Below To Visit My Online Store


Sunday, July 25, 2021

Share It Sunday July Blog Hop

Welcome to the Share It Sunday July Blog Hop as we share projects we are currently working on to help spark your creativity. You will be visiting with talented Stampin' Up! Demonstrators as they share their projects and ideas to help inspire you.
Today I am sharing two cards I created with new products from the July-December 2021 Mini Catalog and the August-September 2021 Sale-a-bration Catalog. I love playing with new products and experimenting with new color combinations, so I decided to a version of a One Sheet Wonder but I only used half a sheet of Basic White cardstock, measuring 8 1/2" x 5 1/2". The Delicate Dahlias stamp set has a wonderful variety of images so I stamped the Basic White cardstock to create a pretty background. I also used one of the images from the Gorgeous Leaves stamp set to add texture to the design. The colors I chose were Highland Heather, Fresh Freesia, Soft Sea Foam, Mint Macaron and Just Jade. I chose Thick Basic White cardstock to create the card bases to help make the stamped backgrounds pop. 
Products Used:
Delicate Dahlias stamp set (item #156601) Sale-a-bration Reward 
Gorgeous Leaves stamp set (item #153365) 
July-December 2021 Mini Catalog New Product
Tailor Made Tags Dies (item #155563)
Basic White Thick Cardstock (item #159229)
Basic White Cardstock (item #159276)
Just Jade Cardstock (item #153079)
Highland Heather Classic Ink Pad (item #147103)
Fresh Freesia Classic Ink Pad (item #155611)
Soft Sea Foam Classic Ink Pad (item #147102)
Mint Macaron Classic Ink Pad (item #147106) 
Just Jade Classic Ink Pad (item #153115)
Versamark Pad (item #102283)
Metallics Embossing Powders (item #155555)
Fresh Freesia 3/8" Open Weave Ribbon (item #155615)
Basic Rhinestone Jewels (item #144220)
Stampin' Dimensionals (item #104430)
Measurements:
Thick Basic White Cardstock
2 Card Bases - 8 1/2" x 5 1/2" (Scored at 4 1/4")
Basic White Cardstock
8 1/2" x 5 1/2" - stamped background design
Cut to create 2 card fronts - 3 3/4" x 5" & 3 3/4" x 4 3/4"
2 Sentiment Labels die cut with Tailor Made Tags Dies
Just Jade Cardstock
2 Tags die cut with Tailor Made Tags Dies
Card 1 (Horizontal)
I took the 5" x 3 3/4" stamped piece and attached it to the Thick Basic White cardstock. I heat embossed the sentiment with Silver embossing powder onto the Basic White Label and then attached it to the Just Jade Label with adhesive. Using a piece of Fresh Freesia Ribbon, I tied a knot to embellish the tag. I attached the tags to the card front with Stampin' Dimensionals and finished off the design with some Basic Rhinestones for a touch of bling. 
Card 2 (Vertical):
I centered the 4 3/4" " x 3 3/4" stamped background to the Thick Basic White card base. The reason for this strange measurement is that I made a mistake when cutting and accidently cut it a 1/4" shorter on the long side. Note to self: pay more attention when cutting. 
I created the sentiment labels the same as for the first card design and attached them to the card front with Stampin' Dimensionals. Once again, I added Basic Rhinestones for a touch of bling. 
These clean and simple cards are great for a variety of occasions and this technique is a wonderful way to play with new products and explore new color combinations. 
Thank you for taking the time to visit my blog. I hope that my card design helps inspire you to create your own wonderful designs to share with family and friends. The One Sheet Wonder technique is a fun way to play with paper, stamps and ink to create beautiful cards.
Now it's time to visit the other amazing Stampin' Up! Demonstrators taking part in today's blog hop. Just click the links in the Roll Call List below to see their amazing projects. We would appreciate it if you would leave us a comment and let us know what you enjoyed about our creations.
 
If you live in the U.S. and do not have a Stampin' Up! Demonstrator, please contact me and I would be happy to help you with your creative projects. You may also visit my Online Store to place your order and have it shipped to you. The new July-August 2021 Mini Catalog and August-September 2021 Sale-a-bration Catalog will be available beginning August 3rd. 

Until Next Time

Happy Stamping,

Tricia Butts
Independent Stampin' Up! Demonstrator

Like What You See? Visit My Online Store Here

Visit My Facebook Business Page for Updates & Ideas

Click here to Contact Me


Stock Up & Save 15%

During The Designer Series Paper Sale

Click Below To Visit My Online Store


Share A Box Of Hope
With The August Paper Pumpkin Kit
Click Below To Subscribe By August 10th

Explore Your Creativity
With The Kits Collection
Click Below To Visit My Online Store


Saturday, July 24, 2021

3D Paper Trimmer July Blog Hop Vacation

Welcome to the 3D Paper Trimmer July Blog Hop and this month our theme is Vacation. Here in the U.S. it is Summer time and the perfect time to go on vacation. You will be visiting with talented Stampin' Up! Demonstrators from around the world as they share their ideas and projects to help inspire you.
When I think of vacation time, I think of the ocean and the chance to relax and read a good book. So today I thought I would share this cute Corner Bookmark that I created using the Sailing Home stamp set and coordinating Smooth Sailing Dies. I was inspired by the fellow Stampin' Up! Demonstrator, Debbie Henderson, from her You Tube video here and she gives wonderful instructions to create this fun bookmark. I love how it slides onto the corner of the page to help you keep your place when reading your favorite book.
Products Used:
Sailing Home stamp set (item #149457)
Smooth Sailing Dies (item #149576)
2020-2022 In Color 6"x6" Designer Series Paper (item #155230)
Misty Moonlight Cardstock (item #153081)
Sahara Sand Cardstock (item #121043)
Pear Pizzazz Cardstock (item #131201)
Basic White Cardstock (item #159276)
Copper Foil Sheets (item #142020)
Misty Moonlight Classic Ink Pad (item #153118)
Sahara Sand Classic Ink Pad (item #147117)
Versamark Pad (item #102283)
Metallics Embossing Powders (item #155555)
Stampin' Dimensionals (item #104430)
Mini Stampin' Dimensionals (item #144108)
Tear & Tape Adhesive (item #154031)
Measurements:
Misty Moonlight Cardstock
4" x 4" Square - mark at the 2" point on three sides and score diagonally as per the video 
Sentiment Label die cut with the Smooth Sailing Dies
Basic White Cardstock
2 Squares - 3 3/4" x 3 3/4" mark at the 1 7/8" mark on three sides and cut as per the video
2 1/2" x 2 1/2" Square - cut in half diagonally to create two triangles (one for the top of the front)
Just Jade Designer Series Paper
3 1/2" x 3 1/2" square - mark at the 1 3/4" mark on three sides and cut as per the video (back piece)
2 1/4" x 2 1/4" square - cut diagonally to create two triangles (one triangle for the top of the front)
Sahara Sand Cardstock
Rope border piece die cut with Smoothly Sailing Dies
Anchor heat embossed with Copper Embossing Powder and die cut with Smooth Sailing Dies
Pear Pizzazz Cardstock
Seaweed die cut with Smooth Sailing Dies
Copper Foil Sheet
Helm die cut with Smooth Sailing Dies
This fun bookmark is easy to assemble with Debbie's wonderful video here. The trickiest part is the scoring and cutting of the diagonal measurements, which you can do with the Paper Trimmer. I had so much fun decorating using the stamp images from the Sailing Home stamp set and creating the die cuts with the Smooth Sailing Dies. The Copper Foil and Copper embossing powder help step up the design without the need for ribbon or embellishments that might fall off or damage the book.  
Thank you for taking the time to visit my blog. I hope that my bookmark inspires you to create your own vacation themed projects with the amazing products in the 2021-2022 Annual Catalog.
Now it's time to visit Natalie's blog and see what she has to share with us. Just click the Next button below to visit her blog. We would love it if you would leave us a comment and let us know what you liked about our projects. I hope you enjoy the rest of our blog hop. 


If you live in the U.S. and do not have a Stampin' Up! Demonstrator, please contact me and I would be happy to help you. You may also visit my Online Store to place your order and have it shipped to you. 

Until Next Time

Happy Stamping,

Tricia Butts
Independent Stampin' Up! Demonstrator

Like What You See? Visit My Online Store Here

Visit My Facebook Business Page for Updates & Ideas

Click here to Contact Me


Stock Up & Save 15%

During The Designer Series Paper Sale

Click Below To Visit My Online Store


Share A Box Of Hope
With The August Paper Pumpkin Kit
Click Below To Subscribe by August 10th

Explore Your Creativity
With The Kits Collection
Click Below To Visit My Online Store