Showing posts with label Heartfelt Hexagon Bundle. Show all posts

Wednesday, February 14, 2024

Inspire. Create. Share. February Blog Hop It's A Love Thing

Let's celebrate Valentine's Day with the Inspire. Create. Share February Blog Hop as we showcase the theme, It's a Love Thing. There are so many occasions throughout the year to show some love to the people in our lives. Our wonderful Design Team will be sharing their ideas and projects to help inspire you to create your own beautiful projects to send to the people you care about. 
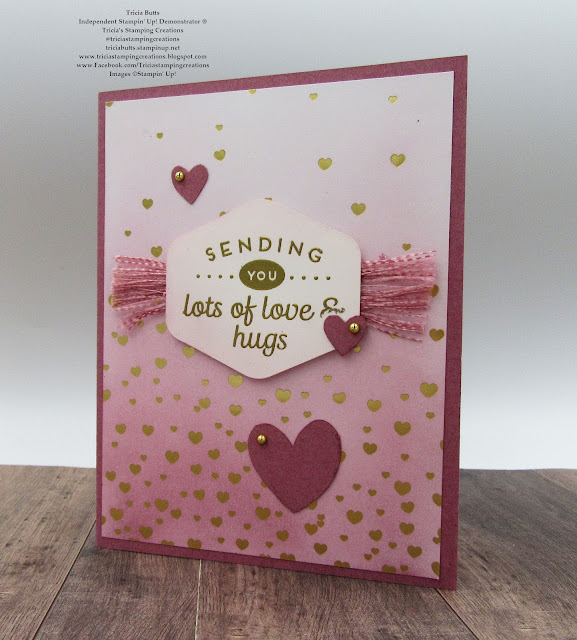
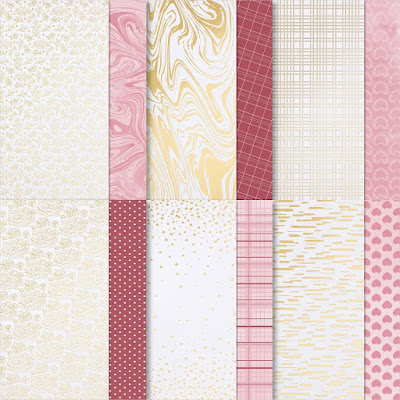
My card design today is one that could be sent out any time of the year as a way to send some love to someone special. I paired the beautiful Most Adored Specialty Designer Series Paper with the Heartfelt Hexagon Bundle to create a lovely clean and simple card design.  I blended some soft color onto the designer series paper layer to create an ombre effect, using Bubble Bath and Moody Mauve Classic ink pads. I love the subtle gold accents that help step up the design without being to over the top. 
Products Used:
Heartfelt Hexagon Bundle (item #162889)
Bee Builder Punch (item #162553)
Most Adored Specialty Designer Series Paper (item #162976)
Level 1 Sale-a-bration Reward
Moody Mauve Cardstock (item #161721)
Basic White Cardstock (item #159276)
Bubble Bath Classic Ink Pad (item #155611)
Moody Mauve Classic Ink Pad (item #161649)
Versamark Pad (item #102283)
Metallics Embossing Powders (item #155555)
Blending Brushes (item #153611)
Moody Mauve 3/8" Textured Ribbon (item #161630)
Festive Pearls (item #159963)
Stampin' Dimensionals (item #104430)
Measurements:
Moody Mauve Cardstock
Card Base - 8 1/2" x 5 1/2" (Scored at 4 1/4")
Hearts punched out with the Bee Builder Punch
Basic White Cardstock
Sentiment Label stamped and punched out with the Heartfelt Hexagon Bundle
Most Adored Designer Series Paper
Card Front - 5 1/4" x 4"
To create this pretty card design, I added some Bubble Bath Classic ink to the designer series paper layer using a Blending Brush, blending from the top down to the center. Once I had the color intensity I was looking for, I blended Moody Mauve Classic ink with another Blending Brush, moving from the bottom up to the center, blending the two colors together in the middle to create the ombre look. I gently wiped the designer series paper to remove any ink on the Gold embossed hearts. For the sentiment label, I heat embossed the sentiment with Gold embossing powder onto Basic White cardstock and punched out the sentiment with the coordinating Heartfelt Hexagon Punch. I took a piece of Moody Mauve Textured Ribbon and gently frayed both ends, leaving a section in the middle to apply adhesive to add it to the center of the card front. I added the sentiment label over the top of the ribbon with Stampin' Dimensionals and then added several Moody Mauve hearts punched out with the Bee Builder Punch. To finish off the design, I added several Gold Pearls from the Festive Pearls to coordinate with the rest of the card design. I love how pretty this card looks and how simple it was to create. 
Thank you for taking the time to visit my blog. I hope that my card design will help inspire you to create your own love notes to send to the people you care about. There are so many wonderful options to explore. There is still time to earn the beautiful Most Adored Specialty Designer Series Paper for free with a qualifying order during Sale-a-bration. You have until February 29th, so place your order soon to avoid disappointment. 
Now it's time to visit Charmane's blog and see what she has created to share with us. Just click on the Next button to visit her blog. We would love it if you would leave us a comment and let us know what you liked about our projects. I hope you enjoy the rest of our blog hop.


If you live in the U.S. and do not have a Stampin' Up! Demonstrator, please contact me and I would be happy to help you with your creative projects. You may also visit my Online Store to place your order and have it shipped to you. 

Until Next Time

Happy Stamping,

Tricia Butts
Independent Stampin' Up! Demonstrator

Like What You See? Visit My Online Store Here

Visit My Facebook Business Page for Updates & Ideas

Click here to Contact Me


More Sale-a-bration Products Now Available
To Earn Free With A Qualifying Order
Click Below For More Details

Get Creative In 2024
With The January-April 2024 Mini Catalog
Click Below To Shop Now


Friday, January 19, 2024

Crafty Collaborations Monochromatic Color Challenge - Boho Blue

Welcome back to the Crafty Collaborations Monochromatic Color Challenge, with Week 3's color, Boho Blue. I love how soft and pretty this beautiful blue is to create with and today I chose to create a Sympathy card design using one of the designs from the Flight & Airy Designer Series Paper, one of the Level 1 Rewards you can earn free with a qualifying $50 order during Sale-a-bration.
Sympathy cards are probably the hardest card design for me to create. They are so personal and I try to design a card that will provide comfort during a difficult time. For today's card design, I used the monochromatic Boho Blue design from the Flight & Airy Designer Series Paper for the card background because it reminded me of the sky. I love the texture the watercolor background adds to the design, kind of like a moody sky before a storm. The butterfly die cut I chose to use for the focal image is from the new Paper Butterfly Accents in the January-April 2024 Mini Catalog. I created a watercolor wash look using a drop of Boho Blue ink mixed with Clear Wink of Stella to paint the butterfly and to give it that pretty shimmer and soft color. I love how this design turned out and I hope it provides comfort to the person receiving it.
Products Used:
Heartfelt Hexagon Bundle (item #162889)
Cloud Punch (item #157749)
2 3/8" Circle Punch (item #161354)
Painted Texture 3D Embossing Folder (item #154317)
Paper Butterfly Accents (item #162612)
Flight & Airy Designer Series Paper (item #162977) Level 1 
Sale-a-bration Reward
Boho Blue Cardstock (item #161724)
Basic White Cardstock (item #159276)
Boho Blue Classic Ink Pad (item #161650)
Boho Blue Classic Ink Refill (item #161656)
Clear Wink of Stella Glitter Brush (item #141897)
Boho Blue 3/8" Textured Ribbon (item #161631)
Blending Brushes (item #153611)
Stampin' Dimensionals (item #104430)
2023-2025 In Color Dots (item #161620)
Measurements:
Boho Blue Cardstock
Card Base - 8 1/2" x 5 1/2" (Scored at 4 1/4")
Mat Sentiment Layer punched out with the Heartfelt Hexagon Punch
Medium Circle punched out with the 2 3/8" Circle Punch and embossed with the Painted Texture 3D Embossing Folder
Basic White Cardstock
2 Clouds punched out with the Cloud Punch
Sentiment Label punched out with the Heartfelt Hexagon Punch
Flight & Airy Designer Series Paper
Card Front - 5 1/4" x 4"
Paper Butterfly Accents
1 Medium Butterfly Die Cut colored with Boho Blue ink & Clear Wink of Stella 
My vision for this card design was a pretty pale blue butterfly floating amongst the clouds. The designer series paper created the perfect background for the card design and I added a Boho Blue cardstock circle that I embossed with the Painted Texture 3D Embossing Folder to create the textured background for the focal image. I punched out two clouds from Basic White cardstock and gently added some Boho Blue Classic ink around the outside edges using a Blending Brush to add definition. I attached the top cloud to the embossed circle with adhesive and then added the second cloud with Stampin' Dimensionals so that it slightly overlaps the bottom cloud. I attached the water colored butterfly to the top cloud, centering it at a slight angle. To add some subtle bling, I added three Boho Blue Dots to the center of the butterfly.
For the sentiment label, I stamped the sentiment image from the Heartfelt Hexagon stamp set with Boho Blue Classic ink onto Basic White cardstock and punched it out with the coordinating Heartfelt Hexagon Punch. I also punched out a label from Boho Blue cardstock and cut it in half and attached it behind the sentiment label to create a narrow frame. I added a piece of the Boho Blue Texured Ribbon to the card front, towards the bottom right corner and added the sentiment label over the top with Stampin' Dimensionals. I added the focal image about the sentiment and slightly to the left, adhering it to the card front to complete the card design. I love how this card design showcases the variations you can get with this beautiful color using a variety of coordinating products. So what do you think? Are you ready to give Boho Blue a try? 
Thank you for taking the time to visit my blog. I hope that my card design will help inspire you to try using Boho Blue to create your own beautiful projects. This pretty blue has so many wonderful coordinating products to help spark your creativity. Click here to visit my Online Store to see all the wonderful Boho Blue products available. 
Please take the time to visit this week's Crafty Collaborations Monochromatic Color Insta Hop on Instagram and see all the other amazing projects created by my fellow demonstrators. Just click here to get started. 

If you live in the U.S. and do not have a Stampin' Up! Demonstrator, please contact me and I would be happy to help you with your creative projects. You may also visit my Online Store to place your order and have it shipped to you. 

Until Next Time

Happy Stamping,

Tricia Butts
Independent Stampin' Up! Demonstrator

Like What You See? Visit My Online Store Here

Visit My Facebook Business Page for Updates & Ideas

Click here to Contact Me


Get Creative For 2024
With The January-April 2024 Mini Catalog
Click Below To Shop Now

Let's Sale-a-Brate!
Earn Exclusive Free Products With A Qualifying Order
Click Below For More Details


Saturday, January 6, 2024

Ink. Stamp. Share. January Showcase Blog Hop

It's time for our first Ink. Stamp. Share. Showcase Blog Hop for 2024 and I can't wait to show you what new products I have been creating with recently. With the launch of the new January-April 2024 Mini Catalog and 2024 Sale-a-bration Catalog, there is so much to choose from. My fellow Design Team members will be sharing their projects and ideas to help get you creating in 2024. 
I have a guilty obsession. I am addicted to designer series paper. Seriously, I cannot resist a pretty pack of paper. So I have been working on ways to cut up my designer series paper and create clean and simple cards with it before my ever growing stash overwhelms me. Can anyone else relate? For this pretty card design, I paired the Heartfelt Hexagon Bundle with the beautiful Flight & Airy Designer Series Paper, which is a Level 1 Sale-a-bration Reward that you can earn free with a qualifying $50 order. The hardest part about creating with this pretty paper is deciding which side to use. I wanted to showcase the paper design as much as possible, so I chose to add a simple sentiment from the Heartfelt Hexagon stamp set and added some simple embellishments to complete the design. 
Products Used:
Heartfelt Hexagon Bundle (item #162889)
Flight & Airy Designer Series Paper (item #162977) Sale-a-bration Level 1 Reward
Misty Moonlight Cardstock (item #153081)
Versamark Pad (item #102283)
Basics Embossing Powders (item #155554)
Baker's Twine Three Color Pack (item #162759)
Iridescent Rhinestone Basic Jewels (item #158130)
Stampin' Dimensionals (item #104430)
Mini Glue Dots (item #103683)
Measurements:
Misty Moonlight Cardstock
Card Base - 5 1/2" x 8 1/2" (Scored at 4 1/4")
Sentiment Label punched out with the Heartfelt Hexagon Punch
Flight & Airy Designer Series Paper
Card Front - 5 1/4" x 4"
This clean and simple layout is easy to duplicate and would work well for any piece of designer series paper. It's a great way to create a bunch of cards for a variety of occasions to restock your card stash. I chose to use Misty Moonlight cardstock for the card base and sentiment label because I liked the way it made the card front pop. I heat embossed the sentiment onto the Misty Moonlight cardstock with White embossing powder and punched it out with the coordinating Heartfelt Hexagon Punch. I love the elongated shape of this punch which makes it perfect for so many sentiments for all occasions. To decorate the card front, I tied a simple bow with the Flirty Flamingo Baker's Twine from the new Baker's Twine Three Color Pack that is a part of the new Lighter Than Air Suite in the January-April 2024 Mini Catalog. I love being able to mix and match different products to make the most of my supplies. I used a Mini Glue Dot to attach the bow to the top left corner of the sentiment label and then added two of the small Iridescent Rhinestone Basic Jewels for a little bling. I added the sentiment to the center of the card front with Stampin' Dimensionals to pop it up. This card design would work well for so many occasions and it is a wonderful way to bring joy to someone's life. 
Thank you for taking the time to visit my blog. I hope that my card design will help inspire you to get creative and make your own beautiful projects to share with family and friends. During Sale-a-bration you can earn Free products with a qualifying order for even more creative possibilities. 
Please take a moment to visit with my fellow Stampin' Up! Demonstrators using the Roll Call List below to see their wonderful projects. We would appreciate it if you would leave us a comment and let us know what you enjoyed about our projects.

If you live in the U.S. and do not have a Stampin' Up! Demonstrator, please contact me and I would be happy to help you with your creative projects. You may also visit my Online Store to place your order and have it shipped to you. 

Until Next Time

Happy Stamping,

Tricia Butts
Independent Stampin' Up! Demonstrator

Like What You See? Visit My Online Store Here

Visit My Facebook Business Page for Updates & Ideas

Click here to Contact Me


Explore Your Creativity In 2024
With The New January-April 2024 Mini Catalog
Click Below To Visit My Online Store

Sale-a-bration Is Here!
Earn Exclusive Free Products With A Qualifying Order
Click Below For More Details


Wednesday, December 13, 2023

Around The World On Wednesday December Blog Hop Watercolor Smooshing

 
It's time for our last Around The World On Wednesday Blog Hop for 2023 and this month's theme is so much fun. Our Design Team has been given the challenge to create our projects using the Watercolor Smoosh technique. If you love to get your fingers inky, then this technique is for you. Our Design Team members will be sharing their projects and ideas to help inspire you to give this technique a try.
One of my favorite things about stamping, is getting my fingers inky. For today's technique, it was the perfect excuse to get messy and play with stamps, ink and paper. For my color combination, I chose to use Orchid Oasis, Tahitian Tide and Fresh Freesia Classic Ink Pads. For my card base and sentiment, I used Basic Black cardstock to help make the background pop. A little heat embossing with White and Black embossing powders helped step up this pretty card design. 
Products Used:
Heartfelt Hexagon Bundle (item #162889)
Magical Meadow stamp set (item #162134)
Basic Black Cardstock (item #121045)
Basic White Cardstock (item #159276)
Fresh Freesia Classic Ink Pad (item #155611)
Tahitian Tide Classic Ink Pad (item #159210)
Orchid Oasis Classic Ink Pad (item #159214)
Versamark Pad (item #102283)
Basics Embossing Powders (item #155554)
Classic Matte Dots (item #158146)
Tear & Tape Adhesive (item #154031)
Stampin' Dimensionals (item #104430)
Stampin' Spritzers (item #126185)
Measurements:
Basic Black Cardstock
Card Base - 8 1/2" x 5 1/2" (Score at 4 1/4")
Sentiment Label punched out with the Heartfelt Hexagon Punch
Basic White Cardstock
Card Front - 5 1/4" x 4" Colored with the Watercolor Smoosh Technique using Orchid Oasis, Tahitian Tide and Fresh Freesia Classic Ink Pads
I am sure there are a lot of different ways to do the Watercolor Smoosh technique, but for me, I used the technique I learned from fellow Stampin' Up! Demonstrator, Ruth Trice, during a recent online class I took with her.  We had so much fun and got very inky as we explored so many different color combinations. To create this fun background, I used a Clear vinyl cutting mat from my kitchen for my work surface and added color to the surface using the different colored ink pads, covering an area comparable to the size of an 8 1/2" x 11" piece of Basic White cardstock. I alternated the colors on the mat so that when I spritzed it with water (using a Stampin' Spritzer), it created this pretty, watery pattern where the colors gently blended together in places. When I was happy with how the colors looked, I placed the piece of Basic White cardstock down on top of the mat, allowing the ink colors to soak into the cardstock. I gently smoothed out the back of the cardstock with my hands to move the ink around underneath and allow even coverage over then entire sheet. I then carefully lifted the cardstock up off the mat and set it aside to dry. As the ink on the cardstock dried, the colors did lighten up to create a soft and pretty watercolor background with the blues and light purple blended together. 
Once completely dry, I cut a piece for my card front to the size of 5 1/4" x 4". I heat embossed one of the detailed foliage images from the Magical Meadow stamp set using Black embossing powder to the top left and bottom right corners. For the sentiment label, I heat embossed the image with White embossing powder onto Basic Black cardstock and punched it out with the Heartfelt Hexagon Punch. To assemble the card, I used Tear & Tape Adhesive on the back of the card front to make sure that it adhered flat and even to the Basic Black card base. I attached the sentiment label to the center of the card front with Stampin' Dimensionals and added several Matte Black Dots to complete the card design. I just love how this card turned out and how beautiful the background turned out with this fun technique. 

Thank you for taking the time to visit my blog. I hope that my card design will help inspire you to try this fun technique to create your own beautiful projects. There are so many wonderful possibilities to explore with different color combinations to create unique backgrounds.  
Now it's time to visit Bree's blog and see what she has created with this fun technique. Just click on the Next button below or use the Roll Call List to find your way. Please leave us a comment and let us know what you liked about our projects. We would love to hear from you. 

Roll Call List

If you live in the U.S. and do not have a Stampin' Up! Demonstrator, please contact me and I would be happy to help you with your creative projects. You may also visit my Online Store to place your order and have it shipped to you. 

Until Next Time

Happy Stamping,

Tricia Butts
Independent Stampin' Up! Demonstrator

Like What You See? Visit My Online Store Here

Visit My Facebook Business Page for Updates & Ideas

Click here to Contact Me


One Day Only - December 14th
Free Shipping On Orders of $75 Or More
Click Below To Shop From My Online Store

Stock Up On Your Favorite Retiring Products
During The Last Chance Retirement Sale
Click Below To Visit My Online Store


Shop The Latest Additions
To The Online Exclusives
Click Below To Shop Now


Wednesday, October 18, 2023

New At SU October Blog Hop Sketch Challenge Heartfelt Hexagon

Welcome to the New At SU October Blog Hop and this month we have a Sketch Challenge to help spark your creativity. Our wonderful Design Team will be sharing their projects and ideas using products from the September-December 2023 Mini Catalog to help inspire you to create your own wonderful projects with this sketch.
For my card, I wanted to create a pretty floral design combining the new Heartfelt Hexagon Bundle with the Abundant Beauty Decorative Masks. I had recently created a project using Shimmery White Embossing Paste colored with Balmy Blue ink and I used the left over paste on a piece of Basic White cardstock for a future project. Today as I was working out my design, I realized that it would make the perfect background for my card design. For the flowers I went with pretty pinks and the leaves are bright green and I love how they pop against the Balmy Blue background. A little Gold embossing for the sentiment and I was able to create a pretty card design using the sketch for today's challenge. 
Products Used:
Heartfelt Hexagon Bundle (item #162889)
Abundant Beauty Decorative Masks (item #162331)
Foursquare Decorative Masks (item #161285)
Balmy Blue Cardstock (item #146982)
Basic White Cardstock (item #159276)
Bubble Bath Classic Ink Pad (item #161664)
Fresh Freesia Classic Ink Pad (item #155611)
Daffodil Delight Classic Ink Pad (item #147094)
Lemon Lime Twist Classic Ink Pad (item #147145)
Parakeet Party Classic Ink Pad (item #159208)
Balmy Blue Ink Refill (item #147168)
Versamark Pad (item #102283)
Metallics Embossing Powders (item #155555)
Shimmery White Embossing Paste (item #145645)
Pastel Adhesive Backed Sequins (item #160387)
Stampin' Dimensionals (item #104330)
Palette Knives (item #142808)
Measurements:
Balmy Blue Cardstock
Card Base - 8 1/2" x 5 1/2" (Scored at 4 1/4")
Strip - 1" x 4"
Basic White Cardstock
3 Flowers created with the Abundant Beauty Decorative Masks
5 Leaves created with the Abundant Beauty Decorative Masks
Sentiment Label stamped and punched out with the Heartfelt Hexagon Bundle
Sometimes when I design cards, I have a set design in mind. Today's card was more of an organic flow as I started with the embossed background and worked forward from there to come up with the finished design. To create the background, I mixed a couple of drops of Balmy Blue ink with some Shimmery White Embossing Paste and applied it over the mask from the Foursquare Decorative Masks onto a piece of Basic White cardstock. Note: the embossing paste dries very quickly, so make sure to clean your masks and palette knives as soon as you are finished with some warm soapy water to remove any traces of the paste before it hardens.
I loved being able to transform these flowers from traditional sunflowers to soft and pretty pink daisies using the Abundant Beauty Decorative Masks. I used a combination of Bubble Bath and Fresh Freesia to create the petals and Daffodil Delight and Lemon Lime Twist for the centers. For the leaves, I used a combination of Lemon Lime Twist and Parakeet Party. I fussy cut the flowers and leaves ready to arrange them on the card front. I stamped small leaves using images from the Heartfelt Hexagon stamp set onto the embossed card front using Parakeet Party Classic ink. I attached the Balmy Blue cardstock strip across the front of the card front and then attached the card front to the Balmy Blue card base. For the sentiment label, I stamped and heat embossed the image with Gold embossing powder and punched it out with the coordinating Heartfelt Hexagon Punch. I added the sentiment to the Balmy Blue strip with Stampin' Dimensionals and then added the flowers and leaves around it to create the final design. To complete the card, I added some Balmy Blue Pastel Adhesive Backed Sequins for a touch of bling. 
Thank you for taking the time to visit my blog. I hope that my card design will help inspire you to create your own beautiful projects to share with family and friends. There are so many wonderful options to explore in the September-December 2023 Mini Catalog.
Please take the time to visit with the Design Team and their wonderful projects by clicking on the links in the Roll Call List. We would appreciate it if you would leave us a comment and let us know what you enjoyed about our projects.
If you live in the U.S. and do not have a Stampin' Up! Demonstrator, please contact me and I would be happy to help you with your creative projects. You may also visit my Online Store to place your order and have it shipped to you. 


Until Next Time

Happy Stamping,

Tricia Butts
Independent Stampin' Up! Demonstrator

Like What You See? Visit My Online Store Here

Visit My Facebook Business Page for Updates & Ideas

Click here to Contact Me


Celebrate Stampin' Up!'s 35th Anniversary
With Your Choice Of Starter Kit
Click Below For More Details

Get Creative For The Holidays
With The September-December 2023 Mini Catalog
Click Below To Visit My Online Store