Tuesday, January 26, 2021

PPP January Blog Hop Sending Hearts

Welcome to the PPP January Blog Hop as we showcase alternative project ideas showcasing the Sending Hearts Kit. You will be visiting with talented Stampin' Up! Demonstrators as they share their projects and ideas to help inspire you to think outside the box. 
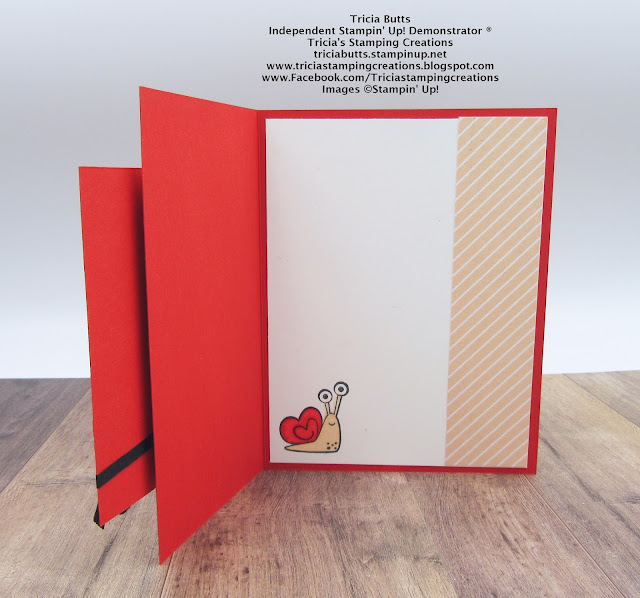
For my alternative card design this month, I decided to create this simple fun fold using mainly supplies from the Sending Hearts Kit combined with a Poppy Parade cardstock card base and a piece of Basic White cardstock for the inside of the card. The images and sentiment are from the exclusive stamp set included in this wonderful kit. 
Products Used:
Paper Pumpkin January Sending Hearts Kit
Poppy Parade Cardstock (item #119793)
Basic White Cardstock (item #159276)
Memento Tuxedo Black Ink Pad (item #132708)
Poppy Parade Stampin' Blends Combo Pack (item #154958)
Petal Pink Stampin' Blends Combo Pack (item #154893)
Matte Black Dots (item #154284)
Measurements:
Poppy Parade Cardstock 
- Card Base- 7 1/4" x 5 1/2" (scored at 3")
- Layer 3 1/2" x 3 3/4"
Petal Pink Stripe Background Layer (from one of the card bases included in the kit)
- Front Panel 2 3/4" x 5 1/4"
- Inside Panel 1 1/4" x 5 1/4"
Basic White Cardstock
- Inside Layer 5 1/4" x 4"
This clean and simple fun fold is easy to assemble and fun to create. To create the front panel, I attached one of the pieces of Petal Pink striped cardstock. I used the heart panel included in the kit for the focal image on the front of the card and attached it to a panel of Poppy Parade cardstock. I stamped the detailed heart image with Poppy Parade Classic ink to create the background the cute snail. I stamped the snail image onto a scrap of Basic White cardstock with Memento Tuxedo Black ink and colored the image with Poppy Parade and Petal Pink Stampin' Blends Markers. I fussy cut the snail and added it to the heart with Stampin' Dimensionals. Using a piece of the Black Ribbon included in the kit, I tied a bow around the bottom of the panel and attached the sentiment on top of it with Stampin' Dimensionals, just under the snail. I then attached the panel to the card front with Stampin' Dimensionals. To embellish the card front, I added three of the Petal Pink hearts from the kit to the stamped heart image and two of the small Matte Black Dots to the sentiment label. For the inside of the card, I added the Petal Pink Striped panel to the Basic White cardstock layer on the right side. I then stamped the snail image with Memento Tuxedo Black ink and colored the image with Poppy Parade and Petal Pink Stampin' Blends Markers to match the snail on the front of the card. I attached the panel to the inside of the card to complete the design. I love how a few simple changes can really step up a card design and make it extra special for the person receiving it. 
Thank you for taking the time to visit my blog today. I hope that my card design will help inspire to explore creating fun folds with this amazing kit to step up your cards. 

Now it's time to visit Elizabeth's blog and see what creative alternative projects she has to share with us. Just click the Next button below to visit her blog. We would love it if you would leave us a comment and let us know what you liked about our projects. I hope you enjoy the rest of our blog hop. 
If you live in the U.S. and do not have a Stampin' Up! Demonstrator, please contact me and I would be happy to help you with your creative projects. You may also visit my Online Store to place your order and have it shipped to you. 

Until Next Time

Happy Stamping,

Tricia Butts
Independent Stampin' Up! Demonstrator

Like What You See? Visit My Online Store Here

Visit My Facebook Business Page for Updates & Ideas

Click here to Contact Me


February's Paper Pumpkin Kit
Helps Provide Comfort During Life's Trying Times
Click Below To Sign Up For This Beautiful Card Kit
By February 10th

Craft Away The Winter Blues
With The Wonderful Products
In The January-June 2021 Mini Catalog
Click Below To Visit My Online Store

Earn Free Exclusive Products
During Sale-a-bration
Click Below To Visit My Online Store


Saturday, January 23, 2021

3D Paper Trimmer January Blog Hop My Favorite Sale-a-bration Products


It's time to hop along with the 3D Paper Trimmer January Blog Hop as we explore projects created using our Favorite Sale-a-bration products from the 2021 Sale-a-bration Catalog. You will be visiting with wonderful Stampin' Up! Demonstrators from around the world as they share their ideas to help inspire you.
Sale-a-bration is one of my favorite times of the year and trying to pick just one favorite from all the amazing Sale-a-bration products was so hard. So today I am sharing two of my favorite products that I used to create this cute little gift bag that works for so many occasions. I chose the beautiful Oh So Ombre 6"x6" Designer Series Paper (item #155225), a Level 1 Reward which is free with a qualifying USD$50 order and combined it with the stunning A Touch Of Ink stamp set (item #155233) which is a Level 2 Reward, free with a USD$100 order. Both of these products are so versatile and work well together or separately to create a wide variety of projects. 
Products Used:
Oh So Ombre 6"x6" Designer Series Paper (item #155225) Level 1 Sale-a-bration Reward
A Touch Of Ink stamp set (item #155233) Level 2 Sale-a-bration Reward
Stitched Shapes Dies (item #152323)
Layering Circles Dies (item #151770)
Granny Apple Green Cardstock (item #146990)
Basic White Cardstock (item #159276)
Memento Tuxedo Black Ink Pad (item #132708)
Rococo Rose Classic Ink Pad (item #150080)
Rococo Rose Stampin' Blends Combo Pack (item #154900)
Whisper White 5/8" Polka Dot Tulle Ribbon (item #146912)
Basic Pearl Jewels (item #144219)
Measurements:
1 Sheet of Oh So Ombre 6"x6" Designer Series Paper
Score at 1", 2 3/4", 3 3/4" & 5 1/2" on one side
Turn once and score at 1"
Basic White Cardstock 
- For circle die cut with Stitched Shapes Dies
-For stamped image for the butterfly from A Touch of Ink stamp set
Granny Apple Green Cardstock - For scalloped circle die cut with Layering Circles Dies
I found the directions for this cute little gift bag on a video on You Tube by Stampin' Up! Demonstrator, Angie Juda, and thanks to her wonderful instructions, I was able to come up with my own version using these products. You can find the video here. The Oh So Ombre Designer Series Paper has so many beautiful colors and designs to choose from and I choose to use the Granny Apple Green circle design paper for my bag. To decorate the bag I stamped the butterfly background image onto Basic White cardstock and then stamped the  outline image with Memento Tuxedo Black ink on top of the background image. I fussy cut the image using Paper Snips and added Stampin' Dimensionals to the back. I stamped the sentiment on the bottom of the stitched Basic White circle with Memento Tuxedo Black ink and attached the butterfly to the circle above the sentiment. I added the Basic White circle to the Granny Apple Green scalloped circle and attached it to the front of the gift bag, about an inch from the bottom. To decorate the circle, I added three small Basic Pearls that I colored using the Dark Rococo Rose Stampin' Blends Marker. To complete the gift bag, I tied a piece of the Whisper White Polka Dot Ribbon around the top with a bow to close the bag. I love the way this gift bag turned out and I can't wait to create more ready for Valentine's Day. 
Thank you for taking the time to visit my blog today. I hope that my gift bag inspires you to explore the wonderful products in the 2021 Sale-a-bration Catalog to help spark your creativity. There are so many options to try. 
Now it's time to visit Sigrid's blog and see what wonderful projects she has to share with us this month. Just click the Next button below to visit her blog. We would love it if you would leave us a comment and let us know what you liked about our projects. I hope you enjoy the rest of our blog hop. 


If you live in the U.S. and do not have a Stampin' Up! Demonstrator, please contact me and I would be happy to help you with your creative projects. You may also visit my Online Store to place your order and  have it shipped to you. 

Until Next Time

Happy Stamping,

Tricia Butts
Independent Stampin' Up! Demonstrator

Like What You See? Visit My Online Store Here

Visit My Facebook Business Page for Updates & Ideas

Click here to Contact Me


Celebrate The New Year
With The January-June 2021 Mini Catalog
Click Below To Visit My Online Store

Earn Free Exclusive Products
During Sale-a-bration
Click Below To Visit My Online Store

February's Paper Pumpkin Kit
Helps Provide Comfort During Life's Trying Times
Click Below To Subscribe By February 10th


Ink. Stamp. Share. January Monthly Blog Hop New Mini & Sale-a-bration Catalogs

Welcome to the Ink. Stamp. Share. January Monthly Blog Hop as we showcase products from the new January-June 2021 Mini Catalog and 2021 Sale-a-bration Catalog. You will be visiting with talented Stampin' Up! Demonstrators from around the world as they share their projects and ideas to help inspire you to create your own projects. 
With Valentine's Day less than a month away, I thought I would share these cute cards created with the new Sweet Little Valentines Cards & More (item #154287) and the Snailed It Bundle (item #156255) from the January-June 2021 Mini Catalog. I love how the images in the Snailed It Bundle can step up this card pack and with some simple embellishments to make sweet little love notes. 
Products Used:
Snailed It Bundle (item #156255) 
Sweet Little Valentines Cards & More (item #154287)
Whisper White 5/8" Polka Dot Tulle Ribbon (item #146912)
Gold Glitter Enamel Dots (item #152155)
Stampin' Dimensionals (item #104430)
Mini Stampin' Dimensionals (item #144108)
The wonderful thing about the Sweet Little Valentines Cards & More is that it includes card bases, a decorative layer and envelopes to create 10 cards. There are four different designs that you can choose from to decorate your card bases and I love the bright, cheerful colors. I used Stampin' Dimensionals to attach the decorative layers to the card bases to add some dimension to the designs. For the Pool Party "You Are Loved" card, I added two Melon Mambo cardstock hearts that I die cut using the Snail Dies from the Snailed It Bundle. I attached them to the card with Mini Stampin' Dimensionals and decorated them with small Gold Glittered Enamel Dots for a touch of bling. 
For the Hearts card, I added a snail die cut that I stamped with the image from the Snailed It stamp set and die cut with the coordinating Snail Dies as well as a Melon Mambo cardstock heart. I colored the snail image with the Calypso Coral and Melon Mambo Stampin' Blends Combo Packs and I colored around the edges using the Petal Pink Stampin' Blends Combo Pack and added it to the card with Mini Stampin' Dimensionals. I added a piece of Whisper White Polka Dot Tulle Ribbon around the base of the decorative card layer and tied a simple knot onto the ribbon with a separate piece. I added the small Melon Mambo heart to the card front with a Mini Stampin' Dimensional so that it overlaps the two larger hearts. For a touch of bling, I added Gold Glittered Enamel Dots to complete the card design.  
Thank you for taking the time to visit my blog. I hope that my cards help inspire you to explore the amazing new products in the new January-June 2021 Mini Catalog and 2021 Sale-a-bration Catalog. There are so many wonderful options to help spark your creativity and so many ways to combine products to come up with fun project ideas. 
Now it's time to visit Gez's wonderful blog and see what she has to share with us. Just click the Next button below or use the Roll Call List to find your way. We would love it if you would leave us a comment and let us know what you enjoyed about our projects. I hope you enjoy the rest of our blog hop. 


Roll Call

Laura Mackie

Libby Fens

Sue McDonald

Nicole Mahler

Sue Allen

Karen Egan

Rebecca-Jo Unwin

Stacey Marsh

Mo Rootes

Kim Price

Cindy Mitchell-Clark

Sharon Dalton

Tracie St-Louis

Alison Carter

Tricia Butts

Gez Carpenter

Jill Chapman

Rochelle Laird-Smith

Jo Blackman

Donna Coffman

Deb Naylor

Donna Lester

Victoria Littlewood

Annette Elias

Dana Sullivan

Susan Simpson


If you live in the U.S. and do not have a Stampin' Up! Demonstrator, please contact me and I would be happy to help you with your creative projects. You may also visit my Online Store to place your order and have it shipped to you. 

Until Next Time

Happy Stamping,

Tricia Butts
Independent Stampin' Up! Demonstrator

Like What You See? Visit My Online Store Here

Visit My Facebook Business Page for Updates & Ideas

Click here to Contact Me


Celebrate The New Year

With The January-June 2021 Mini Catalog

Click Below To Visit My Online Store


Earn Free Exclusive Products
During Sale-a-bration
Click Below To Visit My Online Store

February's Paper Pumpkin Kit
Helps Provide Comfort To People During Trying Times
Click Below To Sign Up For This Beautiful Kit By February 10th


Wednesday, January 13, 2021

New At SU January Blog Hop Love & Hearts

Welcome to the New At SU January Blog Hop as we showcase projects with the theme of Love & Hearts. It's hard to believe that Valentine's Day is just a month away, so now is the perfect time to start creating projects for the people you love. You will be visiting with talented Stampin' Up! Demonstrators from around the world as they share their ideas and projects to help inspire you. 
One of my favorite new bundles in the January-June 2021 Mini Catalog, is the Kangaroo & Company Bundle (item #156269) and I thought it was perfect for this month's blog hop. I paired it with the beautiful Oh So Ombre 6"x6" Designer Series Paper (155225), which is a Level 1 Sale-a-bration Reward that you can earn Free with a qualifying order. This pretty clean and simple card design makes a wonderful Valentine's Day card but would also work for other occasions such as Mother's Day. 
Products Used:
Kangaroo & Company Bundle (item #156269)
Oh So Ombre 6"x6" Designer Series Paper (item #155225) Sale-a-bration Level 1 Reward
Stitched Be Mine Dies (item #151814)
Rococo Rose Cardstock (item #150882)
Rococo Rose Stampin' Blends Combo Pack (item #154900)
Flirty Flamingo Stampin' Blends Combo Pack (item #154884)
Crumb Cake Stampin' Blends Combo Pack (item #154882)
Ivory/Bronze Stampin' Blends Combo Pack (item #154922)
Memento Tuxedo Black Ink Pad (item #132708)
Versamark Pad (item #102283)
Gold Embossing Powder (item #109129)
Clear Wink of Stella Glitter Brush (item #141897)
Gold Glitter Enamel Dots (item #152155)
Mini Stampin' Dimensionals (item #144108)
Stampin' Dimensionals (item #104430)
Measurements:
Rococo Rose Cardstock
- Card Base 8 1/2" x 5 1/2" (Scored at 4 1/4")
- For Heart die cut with Stitched Be Mine Dies
White Cardstock
- Background Layer 5 1/4" x 4"
- For stamped and die cut images using the Kangaroo & Company Bundle
- For Heart die cut with Stitched Be Mine Dies
Oh So Ombre 6"x6" Designer Series Paper Layer - 5" x 3 3/4"
This pretty card design is easy to create and I love how the images from the Kangaroo & Company stamp set look when colored with Stampin' Blends Markers. The Rococo Rose Oh So Ombre Designer Series Paper makes a beautiful background for the card and I used the Light Rococo Rose Stampin' Blends Marker to color around the edges of the kangaroos so that they blended in. I used Mini Stampin' Dimensionals to pop up the hearts for the kangaroos to hold and also to pop up the sentiment heart to overlap the Rococo Rose cardstock heart. To embellish the card, I added three Gold Glitter Enamel Dots to decorate the sentiment hearts and I colored the hearts that the kangaroos are holding with Clear Wink of Stella to add a touch of shimmer. 
Thank you for taking the time to visit my blog today. I hope that my card design helps inspire you to create your own beautiful projects from the heart for the people you care about. There are so many wonderful possibilities in the new January-June 2021 Mini Catalog and 2021 Sale-a-bration Catalog to choose from to help spark your creativity. 
Now it's time to visit Loni's wonderful blog and see what she has to share with us this month. Just click the Next button below or use the Roll Call List below to find your way. Please leave us a comment and let us know what you liked about our projects. I hope you enjoy the rest of our blog hop. 

Roll Call List

Tricia’s Stamping Creations - Kangaroo & Company

Creative Juice by Loni - Treasures of Life

Sugar & Scraps - Heartfelt

Gifted Hands, Ink! - Love Always & Many Hearts Dies

As the Ink Dries - Lots of Hearts

Stamping Flair - Always in My Heart

Carterie Plus - Heartfelt

Scraphexe - Lots of Hearts/Ganz viel Herz

A Little Kinder - Lots of Hearts

24/7 Inkspiration - Love You Always

Stampin’ Scrapper - Forever & Always


If you live in the U.S. and do not have a Stampin' Up! Demonstrator, please contact me and I would be happy to help you with your creative projects. You may also visit my Online Store to place your order and have it shipped to you. 

Until Next Time

Happy Stamping,

Tricia Butts
Independent Stampin' Up! Demonstrator

Like What You See? Visit My Online Store Here

Visit My Facebook Business Page for Updates & Ideas

Click here to Contact Me


Celebrate The New Year
With The January-June 2021 Mini Catalog
Click Below To Visit My Online Store

Earn Free Exclusive Products
During Sale-a-bration
Click Below To Visit My Online Store


Around The World On Wednesday January Blog Hop Favorite Inspiration

It's time to start the New Year off with the Around The World On Wednesday Blog Hop and this month our theme is our Favorite Inspiration. You will be visiting with talented Stampin' Up! Demonstrators from around the world as they share their projects and ideas that reflect their sources of creative inspiration. 
I am often inspired by the things I see around me every day. It can be a scene I see outside or colors of clothing in a store. Sometimes it is the pattern in a fabric, such as the mask I got for Christmas recently. It was this particular source of inspiration that I chose to use today to create my card design. As soon as I saw the pattern on my mask, I immediately connected it with one of the designs in the Flower & Field Designer Series Paper (item #155223), which is one of the Level 1 Rewards that you can earn for Free with a qualifying order during Sale-a-bration. As you can see in the photo above, they coordinate beautifully. 
The colors in the designer series paper are remarkably similar to the colors in the design of my mask, and I used these colors to create my card design. I chose to use Basic Black, Granny Apple Green and White with a touch of Daffodil Delight and Gold as accents. I love the way the Granny Apple Green brings out the colors in the designer series paper and how it pops against the Basic Black background. I used the Medium Daisy Punch to create the embellishment to tie in with the background and I colored the center of the daisy with Pool Party Classic Ink so that it looked similar to the background daisies. The center of the daisy was created using a flower die cut with the Hippo & Friends Dies from Daffodil Delight cardstock. I applied the color to the daisy using a Sponge Dauber to give it a soft hint of blue. For a touch of shimmer, I added Clear Wink of Stella to the petals and the center of the daisy. 
Products Used:
Approaching Perfection stamp set (item #155282) Level 1 
Sale-a-bration Reward
Flower & Field Designer Series Paper (item #155223) Level 1 
Sale-a-bration Reward
Hippo & Friends Dies (item #153585)
Medium Daisy Punch (item #149517)
Basic Black Cardstock (item #121045)
Granny Apple Green Cardstock (item #146990)
Daffodil Delight Cardstock (item #119683)
Pool Party Classic Ink Pad (item #147107)
Versamark Pad (item #102283)
Gold Embossing Powder (item #109129)
Clear Wink Of Stella Glitter Brush (item #141897)
Sponge Daubers (item #141714)
Stampin' Dimensionals (item #104430)
Measurements:
Basic Black Cardstock Card Base - 8 1/2" x 5 1/2" (Scored at 4 1/4")
Granny Apple Green Cardstock
- Layer 5 1/4" x 4"
-For Label die cut with Hippo & Friends Dies
White Cardstock
- To create Medium Daisy punch out two with the Medium Daisy Punch
- Die cut Sentiment Label using Hippo & Friends Dies
Flower & Field Designer Series Paper Layer - 5" x 3 3/4"
This beautiful clean and simple card is perfect for a variety of occasions. I chose to create a birthday card using the Approaching Perfection stamp set (item #155282) which is also a Level 1 Sale-a-bration Reward that you can earn Free with a qualifying order. I love the fun sentiments in this stamp set and I chose to heat emboss the sentiment with Gold Embossing Powder for a touch of elegance. I decided not to add any bling or ribbon but instead let the designer series paper be the star of this design. I love that the inspiration I got from my mask, led me to create this simply beautiful card that I can send to brighten someone's day. 
Thank you for taking the time to visit my blog. I hope that my card design and inspiration source will help inspire you to look at the world around you in a way that will spark your creativity. You will be amazed at all the possibilities. 
Now it's time to visit Elaine's blog and see what she has to share with us. Just click the Next button below to visit her blog or use the Roll Call List below to find your way. We would love it if you would leave us a comment and let us know what you liked about our projects. I hope you enjoy the rest of our blog hop. 

If you live in the U.S. and do not have a Stampin' Up! Demonstrator, please contact me and I would be happy to help you with your creative projects. You may also visit my Online Store to place your order. 

Until Next Time

Happy Stamping,

Tricia Butts
Independent Stampin' Up! Demonstrator

Like What You See? Visit My Online Store Here

Visit My Facebook Business Page for Updates & Ideas

Click here to Contact Me


Celebrate The New Year
With The January-June 2021 Mini Catalog
Click Below To Visit My Online Store

Earn Free Exclusive Products
During Sale-a-bration
Click Below To Visit My Online Store