Showing posts with label Timeworn Type 3D Embossing Folder. Show all posts

Wednesday, April 10, 2024

Around The World On Wednesday April Blog Hop This Or That

Welcome to the Around The World On Wednesday April Blog Hop and this month we are having some fun with a This or That challenge. We have been challenged to create two projects that share some similarities but are different, to see which you prefer - This or That. Our talented Design Team is excited to share their projects to see which one you prefer.
For my two cards, I chose the same layout using the Notes of Nature stamp set, Perennial Postage Dies and Stylish Shapes Dies. Both are clean and simple card designs but one is black and white while the other is a pink monochromatic design. This challenge was so much fun and I loved playing with the different designer series paper and making little changes that helped make one card different from the other. I hope you like them.
Products Used:
This Card
Zoo Crew Designer Series Paper (item #161304) - Retiring
Notes of Nature stamp set (item #162630) - Retiring 
Perennial Postage Dies (item #163607)
Stylish Shapes Dies (item #159183)
Timeworn Type 3D Embossing Folder (item #156505)
Thick Basic White Cardstock (item #159229)
Basic White Cardstock (item #159276)
Basic Black Cardstock (item #121045)
Memento Tuxedo Black Pad (item #132708)
Festive Pearls (item #159963) - Retiring
Stampin' Dimensionals

That Card
Bright & Beautiful 6" x 6" Designer Series Paper (item #151449)
- Retiring
Notes of Nature stamp set (item #162630) - Retiring
Perennial Postage Dies (item #163607)
Stylish Shapes Dies (item #159183)
Berry Burst Cardstock (item #144243)
Versamark Pad (item #102283)
Metallics Embossing Powders (item #155555) - Retiring
Sheer Ribbon Combo Pack (item #161635) - Retiring
Pastel Adhesive Backed Sequins (item #160387) - Retiring
Stampin' Dimensionals
Measurements: 
This Card
Thick Basic White Cardstock
Card Base - 8 1/2" x 5 1/2" (Scored at 4 1/4")
Basic Black Cardstock
Card Front - 5 1/4" x 4" Embossed with the Timeworn Type 3D Embossing Folder 
Basic White Cardstock 
Sentiment Label die cut with the Stylish Shapes Dies
Zoo Crew Designer Series Paper
3 Medium Rectangles die cut with the Perennial Postage Dies
That Card
Berry Burst Cardstock
Card Base - 5 1/2" x 8 1/2" (Scored at 4 1/4")
Sentiment Label die cut with the Stylish Shapes Dies
Bright & Beautiful Designer Series Paper
Card Front - 5 1/4" x 4"
3 Medium Rectangles die cut with the Perennial Postage Dies
Both of these cards are basically the same layout using different designer series papers to create unique designs. For the "This" card, I chose to emboss the Basic Black cardstock card front with the Timeworn Type 3D Embossing Folder to add some wonderful texture. I chose black and white patterns from the Zoo Crew Designer Series Paper pack to create the focal rectangles and stamped the sentiment from the Notes of Nature stamp set using Memento Tuxedo Black ink. For embellishments, I used the Silver Pearls from the Festive Pearls, to add a touch of bling. 
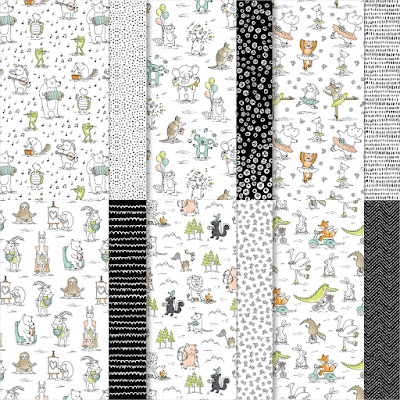
For the "That" Card, I chose patterns from the Bright & Beautiful 6"x6" Designer Series Paper pack to create an ombre look to the design. I chose one of the Bubble Bath ombre designs for the card front and then three different shades ranging from Bubble Bath to Berry Burst for the three rectangles. For this card, I chose to heat emboss the sentiment with Gold embossing powder onto the Berry Burst sentiment label to make it pop and I added Gold Sequins for a touch of bling. I also added a piece of Bubble Bath Sheer Ribbon underneath the sentiment label to help step up the design. 
So, I am curious. Which do you prefer? The Black & White This card or the Pink Monochromatic That Card? Let me know in the comments. 
Thank you for taking the time to visit my blog. I hope that my card designs will help inspire you to create your own projects that share common elements or products to help you come up with your own unique ideas. There are so many wonderful options to explore. Don't forget to check out the Last Chance Product Sale and save up to 60% off select retiring products from the 2023-2024 Annual Catalog and January-April 2024 Mini Catalog. All retiring products are available while supplies last or until April 30th. Make sure to place your order soon to avoid missing out on your favorite retiring products. 
Now it's time to visit Theresa's blog and see what she has created to share with us. Just click on the Next button to visit her blog or use the Roll Call List to find your way. We would appreciate it if you would leave us a comment and let us know what you liked about our projects. Which do you prefer? This or That?

Roll Call List

Jan Clothier - NZ

Leonie Stuart - AU

Rochelle Laird-Smith - AU

Cheryll Miller - AU

Danielle Kassing - NL

Aurélie Fabre - FR

Angie McKenzie - US

Kelly Taranto - US

Chris Smith - US

Tricia Butts - US

Theresa McEntee - US

Bree Renwick - US

Lori Willcox - CA

Teri West - US

Cheryl Hamilton - US


If you live in the U.S. and do not have a Stampin' Up! Demonstrator, please contact me and I would be happy to help you with your creative projects. You may also visit my Online Store to place your order and have it shipped to you. 

Until Next Time

Happy Stamping,

Tricia Butts
Independent Stampin' Up! Demonstrator

Like What You See? Visit My Online Store Here

Visit My Facebook Business Page for Updates & Ideas

Click here to Contact Me


Save Up To 60%
During the Last Chance Products Sale
Click Below To Shop Now

Explore Your Creativity
With The New Online Exclusives Products
Click Below To Visit My Online Store


Saturday, April 6, 2024

Stamping With Friends April Blog Hop Bloggers Choice

Welcome to the Stamping With Friends April Blog Hop and today our theme is Bloggers Choice. Our Design Team will be sharing their projects and ideas to help inspire you to get creative. I love that we have the freedom to share whatever we choose for this blog hop, so today I thought I would share some of my favorite retiring products and a fun technique.
If you have been following me for a while, you know that I love creating clean and simple cards using designer series paper. For today's card design, I have chosen a fun scrappy strip technique that I learned from a fellow Stampin' Up! Demonstrator, Karen Titus, that is a great way to use up your scraps of designer series paper to create beautiful cards. You can see her video here. I chose to use the beautiful Masterfully Made Designer Series Paper to create the focal design for my card and combined it with the Tailor Made Tags Dies and the Timeworn Type 3D Embossing Folder. Both of these products are retiring and are available while supplies last until April 30th. The colors I chose are from the designer series paper and I love how Pretty Peacock, Lost Lagoon and Berry Burst look together. 
Products Used:
Go To Greetings stamp set (item #158763) Retiring
Tailor Made Tags Dies (item #155563) Retiring
Timeworn Type 3D Embossing Folder (item #156505) Retiring
Masterfully Made Designer Series Paper (item #161192) Retiring
Pretty Peacock Cardstock (item #150880)
Lost Lagoon Cardstock (item #133679)
Berry Burst Cardstock (item #144243)
Versamark Pad (item #102283)
Metallics Embossing Powders (item #155555) Retiring 
Silver & Gold 1/8" Trim Combo Pack (item #161633)
Iridescent Pastel Gems (item #160429) Retiring
Stampin' Dimensionals (item #104430)
Measurements:
Pretty Peacock Cardstock
Card Base - 5 1/2" x 8 1/2" (Scored at 4 1/4")
Layer - 3" x 4 1/4"
Lost Lagoon Cardstock
Card Front - 5 1/4" x 4" Embossed with the Timeworn Type 3D Embossing Folder 
Masterfully Made Designer Series Paper
Sqaure - 3 1/2" x 3 1/2" Cut into strips - 1/2", 3/4", 1", 1 1/4"
Berry Burst Cardstock
Sentiment Tag - die cut with the Tailor Made Tags Dies 
This fun card design is so much fun to create and this layout would work for so many of your favorite designer series paper scraps. The beauty of this layout is that you can choose how wide you want your strips to be and arrange them how you like to create your finished design. Once I had cut up the strips from my 3 1/2" square of designer series paper, I adhered them to the piece of Pretty Peacock cardstock, leaving a gap between each strip. To add some interest to the background, I embossed the Lost Lagoon cardstock layer with the Timeworn Type 3D Embossing Folder. I love the subtle texture this embossing folder adds to the card design. I layered the background onto the Pretty Peacock card base and added the focal layer to the center of the Lost Lagoon card front using Stampin' Dimensionals. For the sentiment, I heat embossed the image using Silver embossing powder onto Berry Burst cardstock and die cut the tag using the Tailor Made Tags Dies. I tied a piece of the Silver Trim through the hole on the tag and adhered the tag to the right side of the focal layer. To complete the card design, I added several Iridescent Pastel Gems to the card front to add a touch of bling. This card design is perfect for so many occasions and gives you the option to personalize it for the person receiving it. 
Thank you for taking the time to visit my blog. I hope my card design helps inspire you to use all those scraps of designer series paper to create your own beautiful cards. There are so many wonderful possibilities to explore. Remember that all the retiring products are available while supplies last until April 30th, so don't delay in placing your order for your favorite products before they disappear. 
Please take the time to visit with my fellow Design Team members to see their amazing projects. Just click on the links in the Roll Call List below to find your way. We would appreciate it if you would leave us a comment and let us know what you like about our projects. 

If you live in the U.S. and do not have a Stampin' Up! Demonstrator, please contact me and I would be happy to help you with your creative projects. You may also visit my Online Store to place your order and have it shipped to you. 

Until Next Time

Happy Stamping,

Tricia Butts
Independent Stampin' Up! Demonstrator

Like What You See? Visit My Online Store Here

Visit My Facebook Business Page for Updates & Ideas

Click here to Contact Me


Stock Up On Your Favorite Retiring Products
From The Last Chance Products Sale
April 9 - 30th
Retiring Products Available While Supplies Last

Explore Your Creativity
With New Online Exclusives Products 
Click Below To Shop Now


Wednesday, May 10, 2023

ICS May Blog Hop 2023-2025 In Colors

Welcome to the ICS May Blog Hop as we showcase the new 2023-2025 In Colors. Our wonderful Design Team members will be sharing their projects and ideas featuring these beautiful colors, using products from the new 2023-2024 Annual Catalog. 
The new 2023-2025 Colors are simply amazing and I am having so much fun playing with these colors and experimenting with different color combinations. For today's card design, I chose to use two of the new In Colors - Moody Mauve and Pebbled Path and paired it with Bubble Bath to add a pop of contrast to the design. For this card design, I was inspired by a sample in the new 2023-2024 Annual Catalog on page 41, using the Wonderful Thoughts Bundle. This bundle is a hidden gem in the new catalog and it is full of wonderful sentiments and coordinating dies that provide so many great options for creating projects. 
Products Used:
Wonderful Thoughts Bundle (item #161494)
Timeworn Type 3D Embossing Folder (item #156505)
Moody Mauve Cardstock (item #161723)
Pebbled Path Cardstock (item #161722)
Bubble Bath Cardstock (item #161718)
Moody Mauve Classic Ink Pad (item #161649)
Versamark Pad (item #102283)
Basics Embossing Powders (item #155554)
Clear Wink of Stella Glitter Brush (item #141897)
2023-2025 In Color Dots (item #161620)
Blending Brushes (item #153611)
Stampin' Dimensionals (item #104430)
Measurements:
Pebbled Path Cardstock
Card Base - 5 1/2" x 8 1/2" (Scored at 4 1/4")
5 Labels die cut with the Wonderful Thoughts Dies
Moody Mauve Cardstock
Card Front - 5 1/4" x 4" Embossed with the Timeworn Type 3D Embossing Folder
Detailed Floral die cut with the Wonderful Thoughts Dies
Bubble Bath Cardstock
Detailed Floral die cut with the Wonderful Thoughts Dies
For my card design, I chose to use Pebbled Path for my card base and I love the way the Moody Mauve card front pops against this wonderful neutral color. I decided to add some texture to the card front using the Timeworn Type 3D Embossing Folder and I gently sponged some Moody Mauve Classic ink over the raised embossing using a Blending Brush, to help highlight the texture. I arranged the 5 Pebbled Path labels die cut with the Wonderful Thoughts Dies, spacing them evenly on the card front. I heat embossed the sentiment with White embossing powder on the right side of the bottom label and then attached each of the labels to the card front using Stampin' Dimensionals. To create the floral design on the left side of the card front, I attached the Moody Mauve floral die cut first towards the top and then added the Bubble Bath floral die cut so that it slightly overlapped the bottom of the top floral. I colored both of the die cuts with Clear Wink of Stella to add some shimmer and sparkle and completed the card design with several Moody Mauve In Color Dots. I really love this beautiful color combination and the simplicity of this card design. 
Thank you for taking the time to visit my blog. I hope that my card design will help inspire you to experiment with these beautiful new In Colors to create your own wonderful projects.
Now it's time to visit Debbi's blog and see what she has created with the new 2023-2025 In Colors. Just click on the Next button below to visit her blog. We would appreciate it if you would leave us a comment and let us know what you liked about our projects and what your favorite new In Color is. I hope you enjoy the rest of our blog hop. 

If you live in the U.S. and do not have a Stampin' Up! Demonstrator, please contact me and I would be happy to help you with your creative projects. You may also visit my Online Store to place your order and have it shipped to you. 

Until Next Time

Happy Stamping,

Tricia Butts
Independent Stampin' Up! Demonstrator

Like What You See? Visit My Online Store Here

Visit My Facebook Business Page for Updates & Ideas

Click here to Contact Me


Introducing The Amazing
New 2023-2025 In Colors
Click Below To Visit My Online Store

Explore Your Creativity
With The 2023-2024 Annual Catalog
Click Below To Shop From My Online Store


Wednesday, October 12, 2022

Around The World On Wednesday October Blog Hop Sketch 102 Challenge

Welcome to the Around The World On Wednesday October Blog Hop and this month we have a Sketch Challenge to share with you. Our amazing Design Team members will be sharing their projects and ideas to help inspire you. 
For my interpretation of the sketch, I flipped the card design from portrait to landscape and then mirrored the layout, to create my card design. I chose to use the Cottage Rose Bundle and the coordinating Abigail Rose Designer Series Paper for my design and added a little texture with the Timeworn Type 3D Embossing Folder. The color combination I chose features warm, Fall-like colors that work well for a birthday card for this time of year. 
Products Used:
Cottage Rose Bundle (item #159048)
Abigail Rose Designer Series Paper (item #159037)
Layering Circles Dies (item #151770)
Floral Gallery Dies (item #154316)
Timeworn Type 3D Embossing Folder (item #156505)
Early Espresso Cardstock (item #119686)
Pale Papaya Cardstock (item #155668)
Soft Sea Foam Cardstock (item #146988)
Very Vanilla Cardstock (item #101650)
Pale Papaya Classic Ink Pad (item #155668)
Soft Sea Foam Classic Ink Pad (item #147102)
Memento Tuxedo Black Pad (item #132708)
Versamark Pad (item #102283)
Metallics Embossing Powders (item #155555)
Pale Papaya Stampin' Blends Combo Pack (item #155519)
Soft Sea Foam Stampin' Blends Combo Pack (item #154902)
Daffodil Delight Stampin' Blends Combo Pack (item #154883)
Clear Wink of Stella Glitter Brush (item #141897)
Baker's Twine Essentials Pack (item #155475)
Sponge Daubers (item #133773)
Stampin' Dimensionals (item #104430)
Mini Glue Dots (item #103683)
Measurements:
Early Espresso Cardstock 
Card Base - 8 1/2" x 5 1/2" (Scored at 4 1/4")
2 detailed die cuts created using Cottage Flowers Dies
Large Circle die cut with Layering Circles Dies
Abigail Rose Designer Series Paper
Card Front - 5 1/4" x 4"
Pale Papaya Cardstock
Small Circle die cut with the Layering Circles Dies
Soft Sea Foam Cardstock
Medium Circle die cut with the Layering Circles Dies
Very Vanilla Cardstock
Floral image stamped and die cut with Cottage Rose Bundle
Sentiment Label die cut with the Floral Gallery Dies
This beautiful birthday card is all about the wonderful floral design in the bottom left corner and the sketch layout was a great way to help me piece it all together. I stamped and die cut the floral image and colored it with Stampin' Blends Markers to bring the image to life. The three circles were all embossed with the Timeworn Type 3D Embossing Folder and I sponged ink onto the edges and raised areas of the Pale Papaya and Soft Sea Foam circles to bring out the detail. The detailed floral elements were die cut from Early Espresso cardstock and attached to the two smaller circles and I heat embossed the sentiment with Gold embossing powder onto the Very Vanilla sentiment label to help step up the design. The small bow on the top corner of the sentiment label has been tied with Very Vanilla Baker's Twine and I added some Clear Wink of Stella to the floral design to add a touch of sparkle. The beautiful designer series paper background layer really helps make the floral image pop and the Early Espresso card base frames the card design perfectly. I love how this card design turned out and how much fun it was to try this sketch layout. 
Thank you for taking the time to visit my blog. I hope that my card design will help inspire you to create your own projects using this sketch layout. Sketches can be a wonderful way to spark your creativity. 
Now it's time to visit Teri's blog and see what she has create with this sketch challenge. Just click on the Next button to visit her blog or use the Roll Call List below to find your way. We would appreciate it if you would leave us a comment and let us know what you liked about our projects. I hope you enjoy the rest of our blog hop. 


If you live in the U.S. and do not have a Stampin' Up! Demonstrator, please contact me and I would be happy to help you with your creative projects. You may also visit my Online Store to place your order and have it shipped to you. 

Until Next Time

Happy Stamping,

Tricia Butts
Independent Stampin' Up! Demonstrator

Like What You See? Visit My Online Store Here

Visit My Facebook Business Page for Updates & Ideas

Click here to Contact Me


Get Creative For The Holidays
With The July-December 2022 Mini Catalog
Click Below To Visit My Online Store


Saturday, September 17, 2022

Stamping With Friends September Blog Hop Blogger's Choice - Annual Catalog

Welcome to the Stamping With Friends September Blog Hop as we explore the wonderful products in the 2022-2023 Annual Catalog with a Blogger's Choice theme. We will be sharing our projects and ideas to help inspire you to create your own beautiful projects with these amazing products.
Summer is almost over and we begin the transition to a new season. For my card design today, I wanted to create a card that showcased the beautiful Nature's Harvest stamp set and coordinating Harvest Dies, to create a design that shows that transition into Fall. The colors I chose to use are Old Olive, Cajun Craze and Whisper White and I added texture using the Timeworn Type 3D embossing folder to add a rustic feel to the design. The background paper is a design from the Design A Daydream Designer Series Paper, which is a Host Reward you can earn for Free with a qualifying order or party. This design works well for a variety of occasions and by changing the color combination, you can personalize the look and feel of the card.
Products Used:
Nature's Harvest stamp set (item #156495)
Harvest Dies (item #156504)
Tailor Made Tags Dies (item #155563)
Timeworn Type 3D Embossing Folder (item #156505)
Old Olive Cardstock (item #100702)
Cajun Craze (item #119684)
Basic White Cardstock (item #159276)
Old Olive Classic Ink Pad (item #147090)
Pear Pizzazz Classic Ink Pad (item #14)7
Memento Tuxedo Black Pad (item #132708)
Versamark Pad (item #102283)
Metallics Embossing Powders (item #155555)
Old Olive Stampin' Blends Combo Pack (item #154892)
Pale Papaya Stampin' Blends Combo Pack (item #155519)
Calypso Coral Stampin' Blends Combo Pack (item #154881)
Cajun Craze Stampin' Blends Combo Pack (item #154879)
Brushed Metallic Adhesive Backed Dots (item #156506)
Gold 3/8" Satine Edged Ribbon (item #159555)
Parakeet Party 1/8" Metallic Woven Ribbon (item #159196)
Sponge Daubers (item #133773)
Stampin' Dimensionals (item #104430)
Measurements:
Old Olive Cardstock
Card Base - 8 1/2" x 5 1/2" (Scored at 4 1/4")
Strip - 1" x 5 1/4" Embossed with the Timeworn Type 3D Embossing Folder
Sentiment Label die cut with the Harvest Dies
Cajun Craze Cardstock
Large Tag die cut with the Tailor Made Tags Dies
Basic White Tag
Large Tag die cut with the Tailor Made Tags Dies
Floral image stamped and die cut using the Nature's Harvest stamp set and Harvest Dies
Design A Daydream Designer Series Paper
Card Front - 5 1/4" x 4"
This pretty card design is a wonderful combination of color and texture and I love how it all came together. For the background, I used a piece of the Design A Daydream Designer Series Paper to add some contrast and texture to the design.  The Timeworn Type 3D Embossing Folder was used to add texture to the tags and the side panel on the card front and I added Pear Pizzazz Classic ink to the embossed Basic White tag to give it some soft color using a Sponge Dauber. For the Old Olive side panel, I sponged the embossed areas with Old Olive Classic ink to bring out the texture and add dimension to the design. The tags were tied together using a piece of the Gold Satin Edged Ribbon and the Party Parakeet Metallic Woven Ribbon to step up the card design. The floral image was colored with Stampin' Blends Markers and die cut with the Harvest Dies. For a touch of bling, I added Gold Brushed Metallic Adhesive Backed Dots to finish off the design. 
Thank you for taking the time to visit my blog. I hope that my card design will help inspire you to get creative with the wonderful products in the 2022-2023 Annual Catalog. There are so many possibilities to explore.
Please take the time to visit with my fellow Design Team members by using the Roll Call List below. We would appreciate it if you would leave us a comment and let us know what you enjoyed about our projects.

If you live in the U.S. and do not have a Stampin' Up! Demonstrator, please contact me and I would be happy to help you with your creative projects. You may also visit my Online Store to place your order and have it shipped to you. 

Until Next Time

Happy Stamping,

Tricia Butts
Independent Stampin' Up! Demonstrator

Like What You See? Visit My Online Store Here

Visit My Facebook Business Page for Updates & Ideas

Click here to Contact Me


Weekly Deals Are Here For The Month Of September
Available For A Limited Time
Click Below To View This Week's Deals

Perfect Partners Exclusive Dies
Available Only While Supplies Last
Click Below To Shop In My Online Store

Create Beautiful Christmas Cards
With The Exclusive Ho Ho Ho Paper Pumpkin Kit
Click Below To Subscribe By October 10th