Showing posts with label Playful Alphabet Dies. Show all posts

Saturday, November 6, 2021

Stamping With Friends 3D Christmas Gift Blog Hop

Welcome to the Stamping With Friends 3D Christmas Gift Blog Hop as we share fun and creative ideas to help you with your Christmas gift list. A handmade gift is a gift from the heart and you will be visiting with talented Stampin' Up! Demonstrators as they share their projects and ideas to help inspire you to create your own wonderful gifts for the holidays.
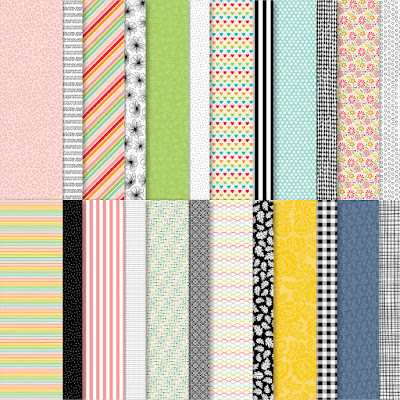
I often struggle with creating 3D projects, so I spent some time on Pinterest to come up with my gift idea for today's hop. The gift idea I found is so much and simple to create with just a few basic supplies. This Framed Dry Erase Shopping List is so much and would look great in someone's kitchen. In our house, it is not uncommon for someone to use the last of something and this Shopping List provides them with a way to let me know that I need to buy more when I head to the grocery store. The frame and Dry Erase Marker are from the Dollar Store and I decorated them with a piece of the Pattern Party Designer Series Paper and the Playful Alphabet Dies. The wonderful thing about this gift is that you can personalize it to suit the person who is receiving it to make it extra special.
Products Used:
Playful Alphabet Dies (item #152706)
Pattern Party Designer Series Paper (item #155426) Host Reward
Basic Black Cardstock (item #121045)
8"x10" Frame from the Dollar Store
Black Dry Erase Marker from the Dollar Store
Measurements: (adjust to suit your frame and marker size as needed)
Pattern Party Designer Series Paper
9 7/8" x 7 7/8" for to cover the front of the back of the frame
3 1/4" x 1 5/8" to wrap around the Dry Erase Marker
Basic Black Cardstock
Die cut letters using the Playful Alphabet Dies
To create the background for this project, I added adhesive to the back of the designer series paper and attached it to the front of the backing for the frame. The Playful Alphabet Dies are the perfect size for creating the lettering for this project. I die cut the individual letters and attached them to designer series paper background towards the top. I used an alcohol wipe to clean the glass before assembling the frame. For the Dry Erase Marker, I cut a piece of the designer series paper and wrapped it around the bottom half of the marker and attached it with adhesive. It's a simple gift idea that is easy to create and you can change the message to personalize it. Some other ideas would be a To Do List, Birthday List, Upcoming Events, just to name a few. 
Thank you for taking the time to visit my blog. I hope that my gift idea will help inspire you to look at fun ways to use your designer series paper to create wonderful personalized gifts. There are so many wonderful options to explore.
Now it's time to visit Karen's blog and see what wonderful gift ideas she has to share with us. Just click on the Next button below to visit her blog. Please leave us a comment and let us know what you like about our projects. I hope you enjoy the rest of our blog hop. 


If you live in the U.S. and you do not have a Stampin' Up! Demonstrator, please contact me and I would be happy to help you with your creative projects. You may also visit my Online Store to place your order and have it shipped to you. 

Until Next Time

Happy Stamping,

Tricia Butts
Independent Stampin' Up! Demonstrator

Like What You See? Visit My Online Store Here

Visit My Facebook Business Page for Updates & Ideas

Click here to Contact Me


Explore The Beautiful New Eden's Garden Collection
Click Below For More Details

Make Your Holiday Treats Special
With The Gifts Galore November Paper Pumpkin Kit
Click Below To Subscribe By November 10th


Saturday, April 24, 2021

Stamping With Friends April Blog Hop Mother's Day

Welcome to the Stamping With Friends April Blog Hop as we share projects inspired by upcoming holidays in the month of May. These holidays may be something well know or an occasion you have not heard of before. It's a fun way to create and send cards to the people we love to let them know that we are thinking of them. 
When I think of May, I automatically think of Mother's Day. As children, we would make handmade cards and gifts at school for our mothers and the tradition continues as we get older, although we tend to substitute the handmade gifts and cards for something special from a store. My Mum lives in Australia and one of the challenges I find with living in the U.S. is that it is very difficult to find a card with "Mum" on it instead of "Mom", which is more common here. So I love the opportunity to create my Mum a beautiful, handmade, one of a kind card that is special for her. Today I chose to use products from the Love You Always Suite in the January-June 2021 Mini Catalog. I chose to use one of the designs from the True Love Designer Series Paper (item #154281) with the Forever And Always Bundle (item #156200). This pretty paper is so easy to color with Stampin' Blends Markers and you can customize with your choice of colors. 
Products Used:
Forever & Always Bundle (item #156200)
True Love Designer Series Paper (item #154281)
Stitched Be Mine Dies (item #151814) - Retiring
Playful Alphabet Dies (item #152706)
Mint Macaron Cardstock (item #138337)
Basic White Cardstock (item #159276)
Gold Foil Sheets (item #132622)
Versamark Pad (item #102283)
Mint Macaron Stampin' Blends Combo Pack (item #154889)
Flirty Flamingo Stampin' Blends Combo Pack (item #154884)
Balmy Blue Stampin' Blends Combo Pack (item #154830)
Clear Wink of Stella Glitter Brush (item #141897)
Gold Glitter Enamel Dots (item #152155) - Retiring
Measurements:
Mint Macaron Cardstock
Card Base - 8 1/2" x 5 1/2" (Scored at 4 1/4")
Basic White Cardstock
Layer 1 - 5 1/4" x 4"
Heart die cut with Stitched Be Mine Dies
Background Love die cut with Always Dies
True Love Designer Series Paper
Background Layer - 5" x 3 3/4" - Colored With Stampin' Blends Markers
Gold Foil
Detailed Love die cut with Always Dies
MUM letters die cut with Playful Alphabet Dies
This clean and simple card is easy to assemble and is nice and flat to make it suitable for mailing. I love coloring with Stampin' Blends Markers and this beautiful paper is perfect for this technique. I added Clear Wink of Stella to the colored images for a touch of shimmer to step up the background. The Gold Foil lettering adds a lovely elegant touch to the design and Gold Glitter Enamel Dots are the perfect embellishment to finish off the design. This card design would work well for a variety of occasions and you can change the look and feel of the card simply by changing the colors. 
Thank you for taking the time to visit my blog today. I hope that my Mother's Day card will help inspire you to create your own beautiful cards to help celebrate this special occasion for the wonderful women in your life. Coloring is a wonderful way to relax and unwind and provides you with the ability to customize your card designs to suit any occasion.
Now it's time to visit Donna's beautiful blog and see what she has created for us this month. Just click the Next button below to visit her blog. We would appreciate it if you would leave us a comment and let us know what you enjoyed about our projects. I hope you enjoy the rest of our blog hop. 

Roll Call List
If you live in the U.S. and do not have a Stampin' Up! Demonstrator, please contact me and I would be happy to help you with your creative projects. You may also visit my Online Store to place your order and have it shipped to you. 

Until Next Time

Happy Stamping,

Tricia Butts
Independent Stampin' Up! Demonstrator

Like What You See? Visit My Online Store Here

Visit My Facebook Business Page for Updates & Ideas

Click here to Contact Me


Time Is Running Out!
The Last Chance Products Sale Ends May 3rd, 2021
Click Below To Shop For Your Favorite Products 
Before They Disappear

Create Fun Cards For The All Stars In Your Life
With The May Paper Pumpkin Kit
Click Below To Subscribe By May 10th

Get Creative This Spring
With The January-June 2021 Mini Catalog
Click Below To Visit My Online Store


Saturday, December 26, 2020

3D Paper Trimmer December Blog Hop Welcome 2021


Welcome to the 3D Paper Trimmer December Blog Hop as we showcase projects to welcome 2021. It's hard to believe we are getting ready to start a new year, but after everything we have been through in 2020, I think we are all looking forward to a better, brighter New Year. I hope our projects will help inspire spark your creativity. 
My card design features a Sneak Peek of products coming up in the 2021 Sale-a-bration Catalog. I wanted to create a fun New Year's card because let's face it, 2020 has been a tough year for us all and we are all hoping that 2021 will be a better year. I chose to use the cute Darling Donkeys stamp set (item #155264) combined with the beautiful Flower & Field Designer Series Paper (item #155223) to create this simple easel card. Both of these products are Level 1 Sale-a-bration products that can be earned Free with a qualifying order beginning January 5th, during Sale-a-bration. 
Products Used:
Darling Donkeys stamp set (item #155264) Level 1 Sale-a-bration
Flower & Field Designer Series Paper (item #155223) 
Level 1 Sale-a-bration
Layering Ovals Dies (item #151771)
Playful Alphabet Dies (item #152706)
Just Jade Cardstock (item #153079)
Whisper White Cardstock (item #100730)
Memento Tuxedo Black Ink Pad (item #132708)
Basic Rhinestone Jewels (item #144220)
Smoky Slate Stampin' Blends Combo Pack (item #154904)
Basic Black Stampin' Blends Combo Pack (item #154843)
Petal Pink Stampin' Blends Combo Pack (item #154893)
Measurements:
Just Jade Cardstock Card Base - 8 1/2" x 5 1/2" (Scored at 4 1/4", Cut at 1 1/4" from each side to the score line)
Pieces for Scalloped Ovals for Focal image and Sentiment die cut with Layering Ovals Dies
Piece for numbers die cut with Playful Alphabet Dies
Flower & Field Designer Series Paper 
2 Pieces - 2" x 2 7/8"
2 Strips - 1" x 4"
1 Strip - 1/2" x 2 7/8"
Whisper White Cardstock Inside Layer - 5 1/4" x 4"
Two Strips - 1 1/8" x 4 1/8"
Pieces for Focal Image and Sentiment Label die cut with Layering Ovals Dies
Piece for stamped image
This fun card design is easy to assemble and is a great way to showcase these wonderful new products. The image of the donkey was colored with Stampin' Blends Markers and fussy cut with Paper Snips. The sentiment was added to the card base with Stampin' Dimensionals to prop the easel part of the card front. The Basic Rhinestones add a touch of bling to this fun card design. 
Thank you for taking the time to visit my blog today. I hope that my card design will help inspire you to create your own projects for the New Year. The new January-June 2021 Annual Catalog and 2021 Sale-a-bration Catalog are full of amazing new products to help you get started creating fun projects for the upcoming year. 

Now it's time to visit Gez's wonderful blog and see what she has to share to welcome 2021. Just click on the Next button below to visit her blog. We would love it if you would leave us a comment and let us know what you enjoyed about our projects. I hope you enjoy the rest of our blog hop. 


If you live in the U.S. and do not have a Stampin' Up! Demonstrator, please contact me and I would be happy to help you with your creative projects. You may also visit my Online Store to place your order and have it shipped to you. 

Until Next Time

Happy Stamping,

Tricia Butts
Independent Stampin' Up! Demonstrator

Like What You See? Visit My Online Store Here

Visit My Facebook Business Page for Updates & Ideas

Click here to Contact Me


Time Is Running Out
To Take Advantage Of The Giant Year-End Closeout Sale
Click Below To Visit My Online Store

Share The Love With The People In Your Life
With The January Paper Pumpkin Kit
Click Below To Subscribe By January 10th


Check Out The Clearance Rack
Save Up To 60% On Retired & Discontinued Products
Click Below To Visit My Online Store

Tuesday, June 30, 2020

PPP June Blog Hop Box of Sunshine

Welcome to the Paper Pumpkin Possibilities June Blog Hop as we showcase alternative project ideas using the Box of Sunshine Kit. You will be visiting with Stampin' Up! Demonstrators as they share their ideas to help inspire you to create your own gifts of sunshine. 
 Let me just say that I love this kit so much and the bright colors and cheerful elements were such a joy to create with. I decided that my alternative card design would feature mainly items included in this month's kit combined with the new Playful Alphabet Dies from the new 2020-2021 Annual Catalog. 
 For my card design, I chose the beautiful yellow card base from the June Paper Pumpkin kit and I added the Black and White Polka Dot Panel to the card front, placing it toward the right side of the card. I added the Gold embossed Sun die cut from the kit to the top of this panel using the Mini Stampin' Dimensionals also in this kit.
 To create the sentiment on the left side of the card, I die cut the letters to spell Hello from one of the Black and White Polka Dot sentiment panels using the Playful Alphabet Dies (item #152706) using my die cutting machine. I love that the letters fit inside the narrow panel and were able to cut through all the layers so that the backing stayed on the back of each letter. I laid out the die cut letters on the left side of the card front and when I was happy with the placement, I removed the backing from each letter and attached it to the card. I love the way the Black and White Polka Dot letters pop against the vibrant yellow background. 
Using one of the White sentiment labels from the kit, I stamped the Sunshine image from the exclusive stamp set onto the label and attached the label to the bottom of the Black and White Polka Dot panel with Mini Stampin' Dimensionals. I added two of the small sequins from the kit to the sentiment label for a little sparkle and bling to finish it off. I love the bold design of this card and I think it would work well as a masculine or feminine card design to spread sunshine in the world. 
Thank you for taking the time to visit my blog. I hope that my alternative card design will inspire you to explore creating your own projects with this wonderful kit.  Don't be afraid to combine products from the kit with products in the new 2020-2021 Annual Catalog to help you explore new possibilities. 

Now it's time to visit June's blog and see what she has created with this month's kit. Just click the Next button below to visit her blog. We would love it if you would leave us a comment and let us know what you enjoyed about our projects. I hope that you enjoy the rest of our blog hop. 
 June


Until Next Time
Happy Stamping,
Tricia Butts
Independent Stampin' Up! Demonstrator
Like What You See? Visit My Online Store Here
Visit My Facebook Business Page for Updates & Ideas
Click here to Contact Me

Celebrate The Summer With The July Paper Pumpkin Kit
Click Below To Subscribe By July 10th
 Click Here To Subscribe


Take Advantage Of The Summer Nights Add-On  Kit 
Available July 1st While Supplies Last
Contact Me To Place Your Order


Friday, June 19, 2020

SBTD June Blog Hop New Annual Catalog

It's time to hop along with the SBTD June Blog Hop as we showcase products from the New 2020-2021 Annual Catalog. You will be visiting with Stampin' Up! Demonstrators from around the world as they share their ideas and projects to help inspire you to explore this wonderful new catalog. 
 For my card design today, I chose to showcase the Playing With Patterns Suite from the new 2020-2021 Annual Catalog. I love that the Pattern Play Bundle (item #154087) includes the Playful Alphabet Dies which also include numbers and punctuation symbols that provide so many wonderful options. The coordinating Pattern Play stamp set has wonderful background pattern images that are so much fun to play with.
 To create this card design, I chose Coastal Cabana cardstock for the card base and added a 5 1/4" x4" layer of Night of Navy cardstock to provide a matte for may focal background design. I stamped a 5" x 3 3/4" layer of Whisper White cardstock using the stripes stamp image, alternating between Coastal Cabana and Night of Navy Classic inks to decorate the full panel. 
The circle sentiment was created by using one of the stitched circle dies from the Stitched Shapes Dies to die cut a Night of Navy circle die cut. I die cut the letters H & B using the Playful Alphabet Dies from Coastal Cabana cardstock and attached them to the Night of Navy circle with adhesive. I heat embossed the sentiment for the second label onto Coastal Cabana cardstock using Silver embossing powder and punched it out using the Everyday Label Punch (item #144668).
 To decorate the card, I used the Coastal Cabana Ribbon and layered the Night of Navy Ribbon from the Playing With Patterns Ribbon Combo Pack (item #152468) on top, then added them to the card front. I added the Night of Navy circle to the top of the card front with Stampin' Dimensionals and then layered the Coastal Cabana sentiment label over the top of the ribbon with Stampin' Dimensionals. I tied a knot with the two ribbons and added it to the card front on top of the ribbon next to the Coastal Cabana sentiment label using a Mini Glue Dot. To add a little sparkle, I added 3 of the Pretty Peacock sequins from the Woven Threads Sequin Assortment (item #149498) to the top right corner using Mini Glue Dots. 
Thank you for taking the time to visit my blog today. I hope that my card design helps inspire you to explore the amazing new products in the new 2020-2021 Annual Catalog to create your own beautiful projects. The suites in this catalog make it so simple to create wonderful projects without the stress. 

Now it's time to visit Judi's blog and see what wonderful new products she has to share with us this month. Just click on the Next button below to visit her blog. We would love it if you would leave us a comment and let us know what you enjoyed about our projects. I hope you enjoy the rest of our blog hop.

 Judi


If you live in the U.S. and do not already have a Stampin' Up! Demonstrator, please contact me and I would be happy to help you with your creative projects. Please visit my Online Store to place your order 24/7 and have it shipped directly to you.
 Click Here To Shop From This Suite


Until Next Time
Happy Stamping,
Tricia Butts
Independent Stampin' Up! Demonstrator
Like What You See? Visit My Online Store Here
Visit My Facebook Business Page for Updates & Ideas
Click here to Contact Me

Celebrate Summer With The July Paper Pumpkin Kit
Click Below To Subscribe By July 10th
 Click Here To Subscribe