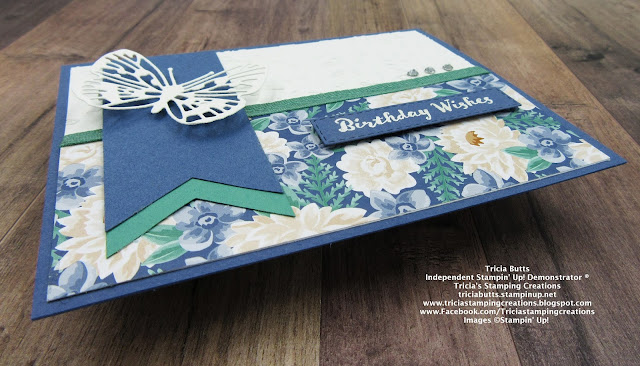
Sketches are a wonderful starting point when you need inspiration for a card design. It is like a road map that helps you to plan your layout and you choose what colors and images you want to use to create your own unique version.
For my card design, I chose to use one of the pretty papers from the Flowers For Every Season 6"x6" Designer Series Paper (item #152486) for the lower half of the background and I chose colors from this paper to create my card design. For the decorative element, I chose to use one of the detailed butterflies from the Brilliant Wings Dies (item #155523) and the sentiment is from the Itty Bitty Birthdays stamp set, which is one of my go-to sentiment stamp sets for birthdays.
Itty Bitty Birthdays stamp set (item #148618) - Retiring
Flowers For Every Season 6"x6" Designer Series Paper
(item #152486) - Retiring
Banner Triple Punch (item #138292) - Retiring
Brilliant Wings Dies (item #155523)
Meadow Moments Embossing Folders (item #153126)
Stitched Rectangles Dies (item #151820)
Misty Moonlight Cardstock (item #153081)
Just Jade Cardstock (item #153079)
Basic White Cardstock (item #159276)
Versamark Pad (item #102283)
White Embossing Powder (item #109132) - Retiring
Just Jade 1/4" Ribbon (item #153621) - Retiring
Basic Rhinestone Jewels (item #144220)
Misty Moonlight Cardstock
Card Base - 8 1/2" x 5 1/2" (Scored at 4 1/4")
Banner - 1 1/2" x 4" (One end punched with the Banner Triple Punch)
Sentiment Label die cut with one of the Stitched Rectangles Dies
Just Jade Cardstock
Banner - 1 /2" x 4" (One end punched with the Banner Triple Punch)
Basic White Cardstock
Background Layer - 5 1/4" x 4" Embossed with one of the Meadow Moments Embossing Folders
Detailed Butterfly die cut with the Brilliant Wings Dies
Flowers For Every Season Designer Series Paper
Layer - 2" x 5 1/4"
By following the layout of the sketch, it is easy to assemble this card to create a pretty clean and simple design. I embossed the Basic White cardstock layer to add texture and added the designer series paper layer to the bottom of this background layer. I added a piece of Just Jade 1/4" Ribbon to cover the seam of the designer series paper and provide the element in the sketch. For the banners, I used the Banner Triple Punch to create a banner on one end of the Misty Moonlight and Just Jade strips and then trimmed the length so that the Misty Moonlight piece was approx. 3 1/2" long and the Just Jade piece was approx. 3 3/4" long. I layered them and attached them to the left side of the card front, adding the detailed Basic White butterfly as the element in the sketch. For the sentiment, I heat embossed the image with White Embossing Powder onto a piece of Misty Moonlight cardstock and die cut it with one of the Stitched Rectangles Dies and added it to the card front with Stampin' Dimensionals. To finish off the design, I added three Basic Rhinestone Jewels for a touch of bling. This card design would work well for a variety of occasions and you could adapt it to work other designer series paper patterns to create a completely different look. There are so many wonderful possibilities to explore when using a sketch.
Thank you for taking the time to visit my blog. I hope that my card design will help inspire you to try creating your own beautiful projects using this fun sketch challenge. A sketch layout can be a wonderful way to help get you started when you are experiencing a creative block and they help to provide a road map for your own beautiful creations.
Now it's time to visit Mo's wonderful blog and see what beautiful projects she has to share with us using this sketch. Just click the Next button below to visit her blog or use the Roll Call List below to find your way. We would love it if you would leave us a comment and let us know what you enjoyed about our projects. I hope you enjoy the rest of our blog hop. Roll Call
If you live in the U.S. and do not have a Stampin' Up! Demonstrator, please contact me and I would be happy to help you with your creative projects. You may also visit my Online Store to place your order and have it shipped to you.
Until Next
Time
Happy
Stamping,
Tricia Butts
Independent Stampin' Up!
Demonstrator
Like What You
See? Visit My Online Store Here
Visit My Facebook Business Page for Updates & Ideas
Click here to Contact Me
Available While Supplies Last!
Shop For Your Favorite Retiring Products
From The Last Chance Products Sale
Click Below To Visit My Online Store
Shop For Your Favorite Retiring Products
From The Last Chance Products Sale
Click Below To Visit My Online Store
Step Up To The Plate
With The May Paper Pumpkin Kit
Click Below To Subscribe By May 10th
Celebrate Spring
With The January-June 2021 Mini Catalog
Click Below To Shop In My Online Store


What a great card Tricia! I love the products used for this sketch!
ReplyDeleteBeautiful card.
ReplyDeleteLovely card Tricia :-)
ReplyDeleteVery pretty card x
ReplyDeleteVery pretty card Miss Tricia!
ReplyDeletelove the color combination, such a pretty card
ReplyDeleteLove this card, and the great combination of colours!
ReplyDeleteSo beautiful!
ReplyDeleteVery pretty card.
ReplyDeleteLovely card Tricia, will miss this pretty dsp x
ReplyDeleteGorgeous card xx
ReplyDeleteLovely card! I love this DSP
ReplyDeleteLove the colour combo - so pretty.
ReplyDeleteI love this colour combo, gorgeous card, thank you for sharing x
ReplyDeleteLovely card Tricia, thanks for sharing.
ReplyDeleteStunning card!xx
ReplyDeleteGreat Post. Thank you.
ReplyDeleteLifestylesimplify.com