Tuesday, November 9, 2021

Technique Tuesdays November Blog Hop Designer Series Paper

Welcome to the Technique Tuesdays November Blog Hop and this month we have been challenged to create a project using a technique with Designer Series Paper. So often we hoard our beautiful paper, too afraid to cut it up and use it. Join us on our blog hop and get inspired to create wonderful projects with your pretty paper.
One of my favorite ways to use my designer series paper is to create One Sheet Wonders. Basically, it is a way to create multiple cards from one sheet of paper. For my card design today, I created a Quadrangle One Sheet Wonder using a piece of 6"x6" Magenta Madness Designer Series Paper from the 2020-2022 In Color Designer Series Paper. From this one sheet and a few simple measurements, I have four pieces that are exactly the same to create cards without any waste. The unusual shape is a wonderful accent for a card front and you can dress it up anyway you like. For my card design, I chose to use the Way To Goat stamp set with the Merry Melody 3D Embossing Folder to create this fun birthday card.
Products Used:
Way To Goat stamp set (item #152657)
Layering Circles Dies (item #151770)
Merry Melody 3D Embossing Folder (item #156392)
Label Me Fancy Punch (item #151297)
Magenta Madness Cardstock (item #153080)
Bumblebee Cardstock (item #153077)
Basic White Cardstock (item #159276)
Gold Foil Sheets (item #132622)
Memento Tuxedo Black Pad (item #132708)
Versamark Pad (item #102283)
Metallics Embossing Powders (item #155555)
Gray Granite Stampin' Blends Combo Pack (item #154886)
2020-2022 In Color Square Gems (item #155572)
Stampin' Dimensionals (item #104430)
Measurements:
Magenta Madness Cardstock 
Card Base 8 1/2" x 5 1/2" (Scored at 4 1/4")
Bumblebee Cardstock
Card Front - 5 1/4" x 4" Embossed with the Merry Melody 3D Embossing Folder
Basic White Cardstock
Circle die cut with Layering Circles Dies
Sentiment Label punched out with the Label Me Fancy Punch
Gold Foil Sheet
Large circle die cut with Layering Circles Dies
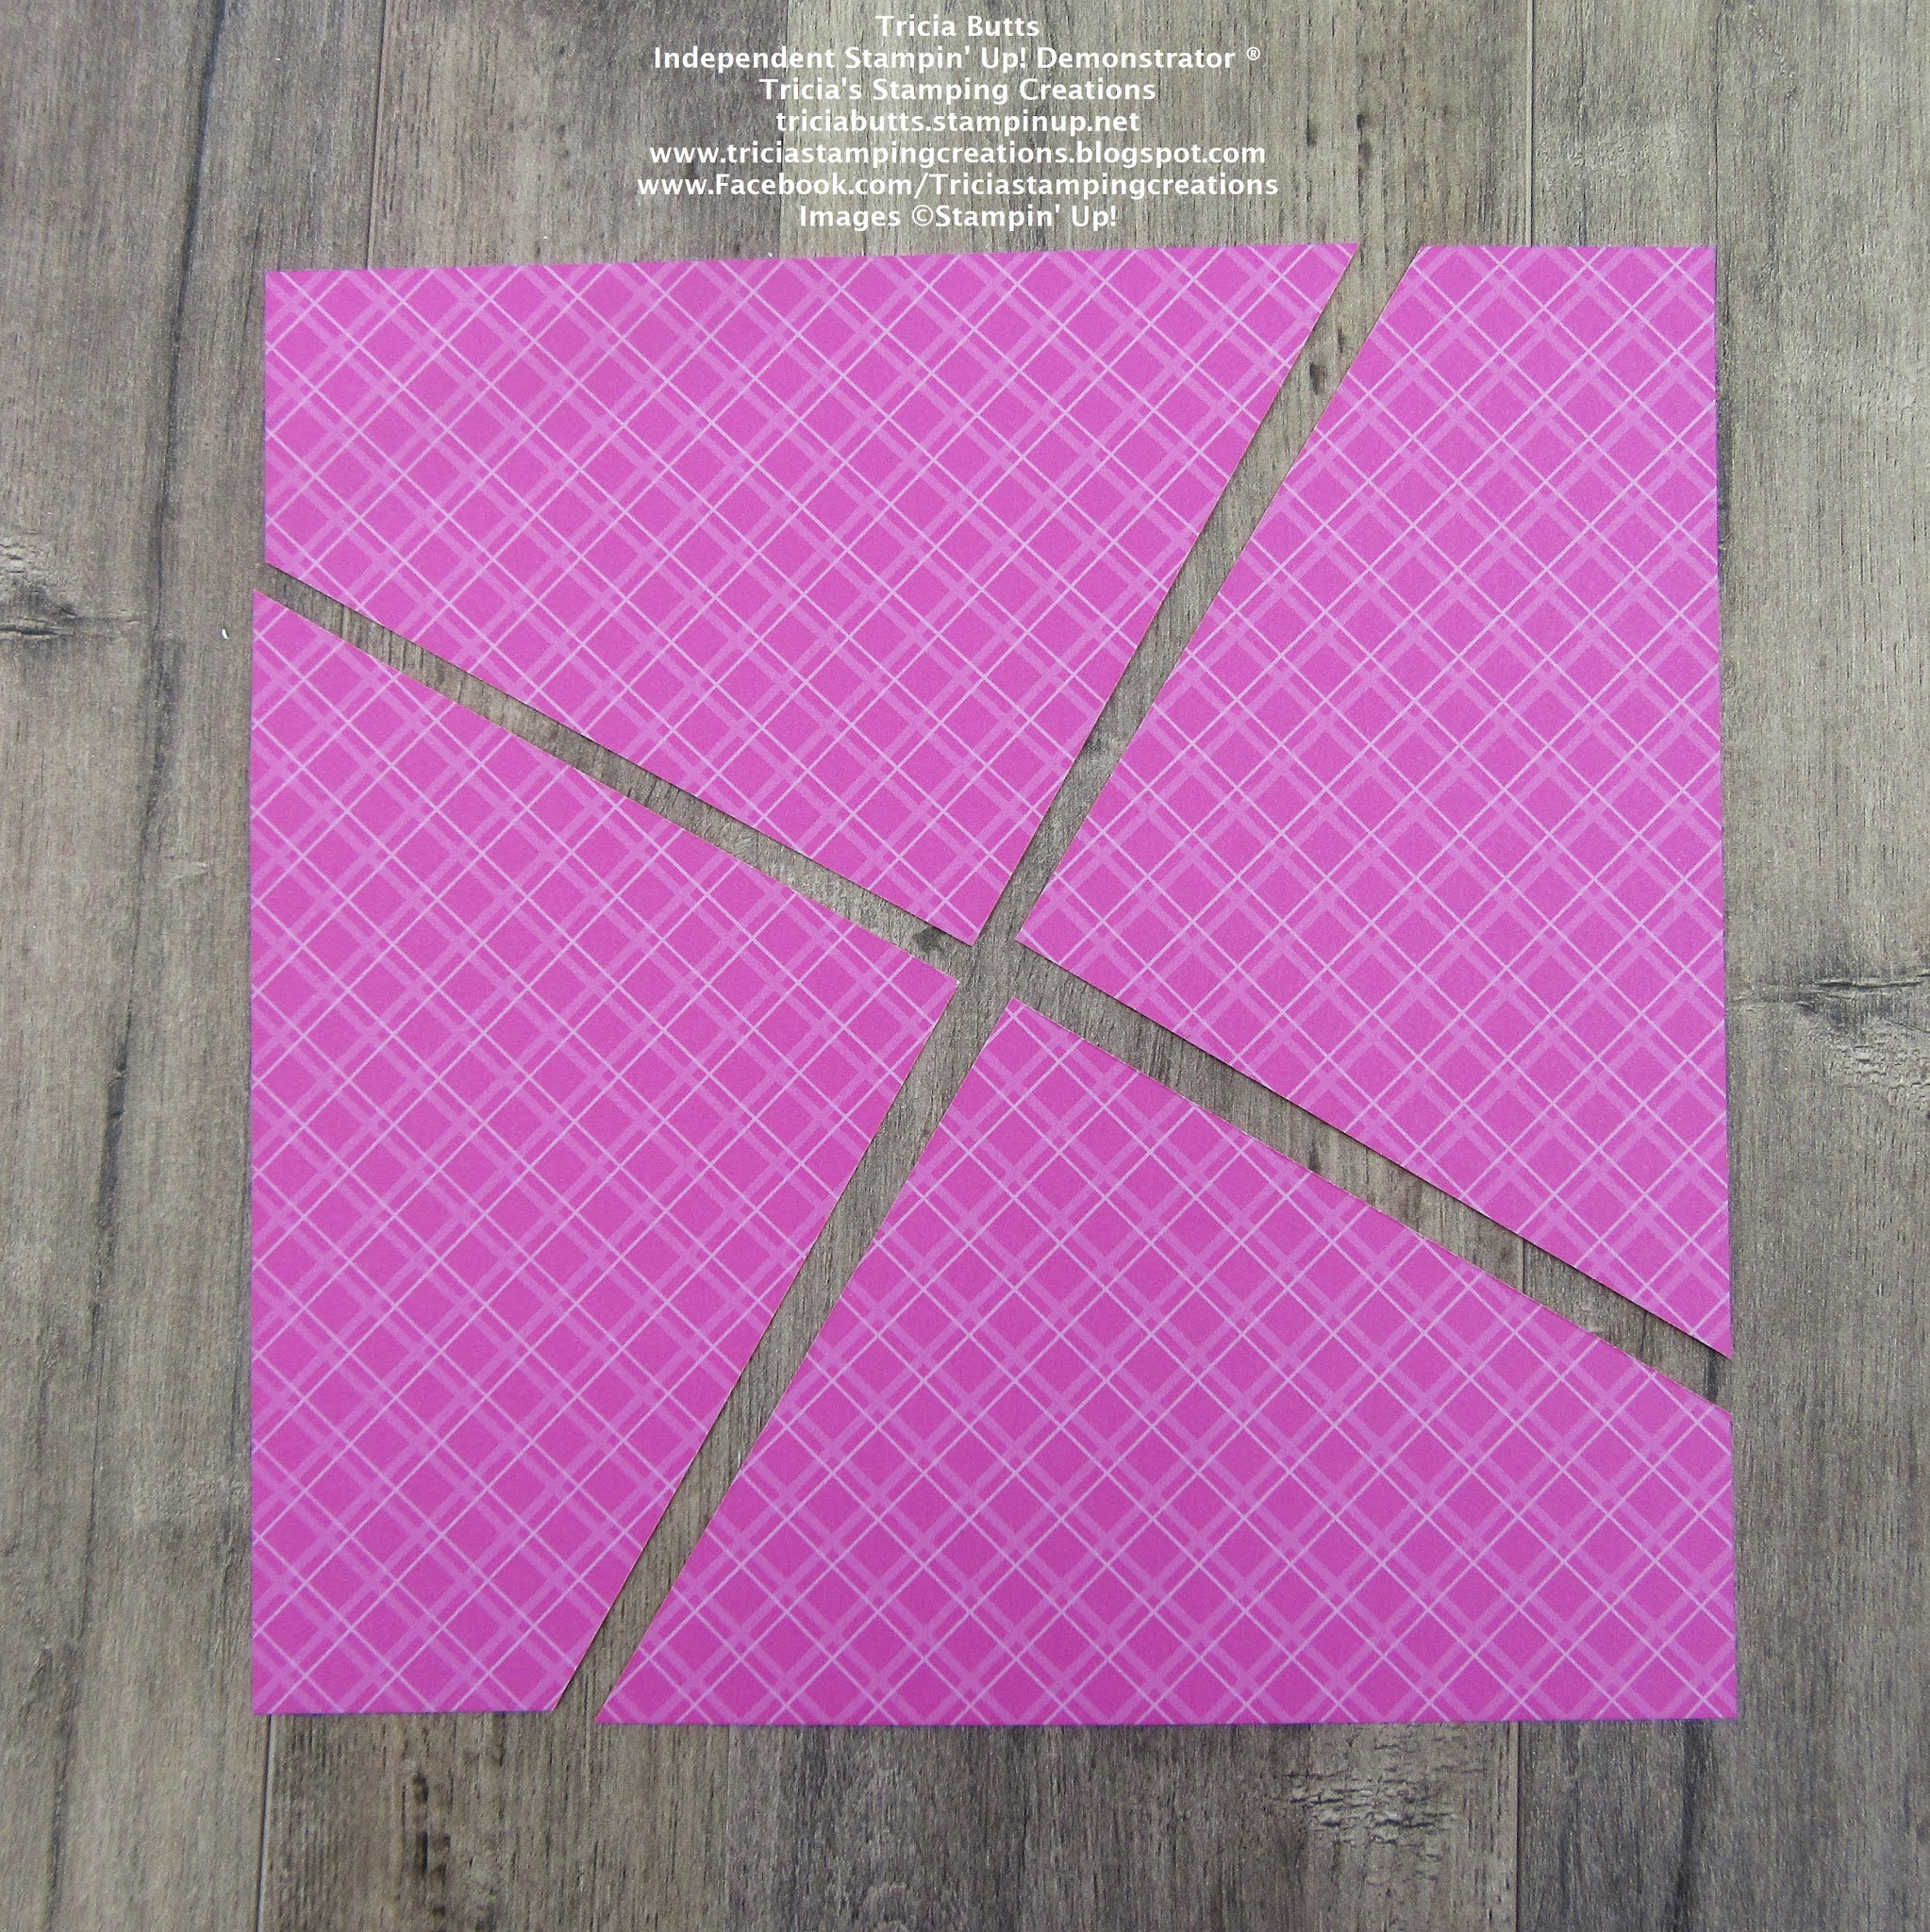
Magenta Madness 6"x6" Designer Series Paper
Measure 1 1/4" from the top corner and make a mark. Rotate and repeat on each side so that you have four marks. Draw a line diagonally across from the top left side to the bottom right side. Rotate paper and repeat. Using your Paper Trimmer, cut diagonally along the lines to create 4 pieces as shown in the photo above.
The wonderful thing about this technique is that it works with any 6"x6" Designer Series Paper and you can then create four cards with the pieces. You can choose to make the cards all the same or all different. Another option is to flip some of the pieces over so that the reverse pattern is facing up to create a completely different look.
For my card design, I embossed the Bumblebee cardstock card front with the Merry Melody 3D Embossing Folder to add some texture to the design. The image that I chose from the Way To Goat stamp set made me think that it was dancing, so I thought the musical theme was a good match. I stamped the goat image with Memento Tuxedo Black ink onto the Basic White circle and colored it with the Gray Granite Stampin' Blends Combo Pack. I attached this circle to the Gold Foil circle to add a frame to it. The sentiment has been heat embossed with Gold embossing powder to coordinate with the Gold Foil circle and I added two of the small Magenta Madness square gems to embellish it. To assemble the card, I attached the Bumblebee layer to the card base and then attached the Magenta Madness Designer Series Paper piece along the right side so that there is a border around the top and right side. This gives the illusion of an additional full layer to the card design. I attached the focal image to the card front, overlapping it over the designer series paper, with Stampin' Dimensionals. To complete the card design, I added the sentiment label with Stampin' Dimensionals, lining it up below the focal image. I love how bright and cheerful this card design is and the wonderful contrast between the designer series paper and the embossed Bumblebee cardstock layer. There are so many wonderful ways you can use the pieces of designer series paper to create your card designs. 

Thank you for taking the time to visit my blog. I hope that my card design will help inspire you to create your own beautiful projects with designer series paper. There are so many wonderful options to choose from to showcase the many designs available.

Now it's time visit with my fellow Stampin' Up! Demonstrators and see what wonderful projects they have to share with us. Just click on the links in the Roll Call List below to visit with them. We would love it if you would leave us a comment and let us know what you enjoyed about our projects.

If you live in the U.S. and do not have a Stampin' Up! Demonstrator, please contact me and I would be happy to help you with your creative projects. You may also visit my Online Store to place your order and have it shipped to you. 

Until Next Time

Happy Stamping,

Tricia Butts
Independent Stampin' Up! Demonstrator

Like What You See? Visit My Online Store Here

Visit My Facebook Business Page for Updates & Ideas

Click here to Contact Me

Explore The Beautiful Eden's Garden Collection
Click Below For More Details

Time Is Running Out
To Get Your Gifts Galore November Paper Pumpkin Kit
Click Below To Subscribe By November 10th


Monday, November 8, 2021

Kylie Bertucci's Monthly International Blog Highlights November 2021


Welcome to Kylie's Monthly International Blog Highlights as we showcase projects with the theme "Thank You". November is thought of as the month of gratitude and being thankful for blessings in our lives. What better way to show that than to create beautiful Thank You cards to send to the people in our lives to let them know we appreciate them. 
I love finding new ways to use my stamp sets and dies to create beautiful cards. The Pretty Pumpkins stamp set is traditionally a Fall/Thanksgiving themed set and I really love the fonts for the sentiments in this stamp set. I decided to pair one of the sentiments from this set with the Merriest Frames Hybrid Embossing Folder, which includes dies that coordinate with the embossing folder and the coordinating Merriest Moments stamp set. I love the detail in the embossed die cut and thought it would look pretty as a frame for a thank you card. For my color combination, I chose Fresh Freesia and Basic White with a touch of Silver for a soft and pretty design. 
Products:
Pretty Pumpkins stamp set (item #156472)
Merriest Moments Bundle (item #156783)
Wonderful Snowflakes (item #156340)
Fresh Freesia Cardstock (item #155613)
Basic White Cardstock (item #159276)
Versamark Pad (item #102283)
Metallics Embossing Powders (item #155555)
White 3/8" Glittered Organdy Ribbon (item #156408)
Basic Rhinestone Jewels (item #144220)
Mini Stampin' Dimensionals (item #144108)
Mini Glue Dots (item #103683)
Measurements:
Fresh Freesia Cardstock
Card Base - 8 1/2" x 5 1/2" (Scored at 4 1/4")
Sentiment Label die cut with the Merriest Frames Hybrid Embossing Folder (Dies)
Three small flowers die cut with the Merriest Frames Hybrid Embossing Folder (Dies)
Basic White Cardstock
Detailed embossed frame die cut with the Merriest Frames Hybrid Embossing Folder
This card design showcases the detail and versatility of the Merriest Frames Hybrid Embossing Folder. The combination of the embossing folder and the coordinating detailed frame die creates a beautiful frame for the sentiment label. I heat embossed the sentiment with Silver embossing powder to add an elegant touch. To create the flowers, I die cut three of the medium sized detailed flower die cuts from one of the Snowflake Wonder sheets in the spaces in between the snowflakes. This gives the white flowers a pretty shimmer to them. I then cut three of the small die cut flowers from the Fresh Freesia cardstock and attached them to the center of white flowers with Mini Glue Dots. For a touch of bling, I added a large Basic Rhinestone Jewel to the center of each flower and added them to embossed frame with Mini Stampin' Dimensionals. I attached the frame to the card base with Mini Stampin' Dimensionals to pop it up. To finish off the card design, I added a piece of the White Glittered Organdy Ribbon under the top right corner and a pretty bow to the bottom of the frame.  
Thank you for taking the time to visit my blog. I hope that my card design will help inspire you to create your own beautiful Thank You cards to send out to the people in your life. There are so many wonderful possibilities to explore.
I would love it if you would take the time to vote for my card this month as part of Kylie's Blog Highlights. Just click the button below and click on the heart for my card (#38) to vote for it. You can vote for 5 different projects each day, so please take the time to visit my fellow Stampin' Up! Demonstrators and see their wonderful projects. We appreciate your support. 

If you live in the U.S. and do not have a Stampin' Up!, please contact me and I will be happy to help you with your creative projects. You may also visit my Online Store to place your order and have it shipped to you. 

Until Next Time

Happy Stamping,

Tricia Butts
Independent Stampin' Up! Demonstrator

Like What You See? Visit My Online Store Here

Visit My Facebook Business Page for Updates & Ideas

Click here to Contact Me


Time Is Running Out
To Get Your November Gifts Galore Paper Pumpkin Kit
Click Below To Subscribe by November 10th

Explore The Beautiful Eden's Garden Collection
Click Below For More Details


Saturday, November 6, 2021

Stamping With Friends 3D Christmas Gift Blog Hop

Welcome to the Stamping With Friends 3D Christmas Gift Blog Hop as we share fun and creative ideas to help you with your Christmas gift list. A handmade gift is a gift from the heart and you will be visiting with talented Stampin' Up! Demonstrators as they share their projects and ideas to help inspire you to create your own wonderful gifts for the holidays.
I often struggle with creating 3D projects, so I spent some time on Pinterest to come up with my gift idea for today's hop. The gift idea I found is so much and simple to create with just a few basic supplies. This Framed Dry Erase Shopping List is so much and would look great in someone's kitchen. In our house, it is not uncommon for someone to use the last of something and this Shopping List provides them with a way to let me know that I need to buy more when I head to the grocery store. The frame and Dry Erase Marker are from the Dollar Store and I decorated them with a piece of the Pattern Party Designer Series Paper and the Playful Alphabet Dies. The wonderful thing about this gift is that you can personalize it to suit the person who is receiving it to make it extra special.
Products Used:
Playful Alphabet Dies (item #152706)
Pattern Party Designer Series Paper (item #155426) Host Reward
Basic Black Cardstock (item #121045)
8"x10" Frame from the Dollar Store
Black Dry Erase Marker from the Dollar Store
Measurements: (adjust to suit your frame and marker size as needed)
Pattern Party Designer Series Paper
9 7/8" x 7 7/8" for to cover the front of the back of the frame
3 1/4" x 1 5/8" to wrap around the Dry Erase Marker
Basic Black Cardstock
Die cut letters using the Playful Alphabet Dies
To create the background for this project, I added adhesive to the back of the designer series paper and attached it to the front of the backing for the frame. The Playful Alphabet Dies are the perfect size for creating the lettering for this project. I die cut the individual letters and attached them to designer series paper background towards the top. I used an alcohol wipe to clean the glass before assembling the frame. For the Dry Erase Marker, I cut a piece of the designer series paper and wrapped it around the bottom half of the marker and attached it with adhesive. It's a simple gift idea that is easy to create and you can change the message to personalize it. Some other ideas would be a To Do List, Birthday List, Upcoming Events, just to name a few. 
Thank you for taking the time to visit my blog. I hope that my gift idea will help inspire you to look at fun ways to use your designer series paper to create wonderful personalized gifts. There are so many wonderful options to explore.
Now it's time to visit Karen's blog and see what wonderful gift ideas she has to share with us. Just click on the Next button below to visit her blog. Please leave us a comment and let us know what you like about our projects. I hope you enjoy the rest of our blog hop. 


If you live in the U.S. and you do not have a Stampin' Up! Demonstrator, please contact me and I would be happy to help you with your creative projects. You may also visit my Online Store to place your order and have it shipped to you. 

Until Next Time

Happy Stamping,

Tricia Butts
Independent Stampin' Up! Demonstrator

Like What You See? Visit My Online Store Here

Visit My Facebook Business Page for Updates & Ideas

Click here to Contact Me


Explore The Beautiful New Eden's Garden Collection
Click Below For More Details

Make Your Holiday Treats Special
With The Gifts Galore November Paper Pumpkin Kit
Click Below To Subscribe By November 10th


Friday, November 5, 2021

Global Stamping Friends November Blog Hop Snowflakes


Welcome to the Global Stamping Friends November Blog Hop as we showcase projects featuring Snowflakes. You will be visiting with talented Stampin' Up! Demonstrators from around the world as they share their projects and ideas to help inspire you. 
When I think of Winter themed cards, I think of snowflakes. For today's card, I combined the Snowflake Wishes stamp set with the Wintry 3D Embossing Folders, both in the 2021-2022 Annual Catalog. I used one of the beautiful Wonderful Snowflakes die cuts from the July-December 2021 Mini Catalog as the focal image for my design and I love the way this pretty iridescent foil snowflake pops against the embossed Misty Moonlight background. There is something so clean and beautiful about the combination of Misty Moonlight and Basic White and I love how this clean and simple Christmas card turned out.
Products Used:
Snowflake Wishes stamp set (item #158267)
Wintry 3D Embossing Folders (item #155433)
Wonderful Snowflakes (item #156340)
Misty Moonlight Cardstock (item #153081)
Basic White Cardstock (item #159276)
Misty Moonlight Classic Ink Pad (item #153118)
Opal Rounds (item #154289)
Stampin' Dimensionals
Measurements:
Misty Moonlight Cardstock
Card Base - 8 1/2" x 5 1/2" (Scored at 4 1/4")
Card Front - 5" x 3 3/4" Embossed with the snowflake embossing folder from the Wintry 3D Embossing Folders
Basic White Cardstock
Layer 1- 5 1/4" x 4"
Sentiment Strip - 1" x 3 3/4"
This pretty card design has wonderful texture and detail while keeping the supplies simple. The Basic White layers pop against the Misty Moonlight layers and the embossing adds a wonderful subtle texture to the card front. The Wonderful Snowflake die cut has a lovely shimmer to it that helps step up the card design. I stamped the sentiment from the Snowflake Wishes stamp set in Misty Moonlight Classic ink to coordinate with the card design but you could also heat emboss it with Silver embossing powder if you wanted to step it up to the next level. The Opal Rounds add an elegant touch to the design and coordinate beautifully with the die cut snowflake. I attached the snowflake to the card front with a Stampin' Dimensional in the center to pop it up. The card front was adhered to the Basic White layer with Stampin' Seal Adhesive and then I attached it to the card base with Stampin' Dimensionals. I love how this adds dimension to the card design. This clean and simple card design could be created in a variety of colors and it is a great design to create multiples to send out to the people on your Christmas card list. 
Thank you for taking the time to visit my blog. I hope that my card design will help inspire you to create your own beautiful projects using snowflakes to send to family and friends. Snowflakes are perfect for Winter themed all occasion cards as well as Christmas cards. There are so many wonderful options to explore.
Now it's time to visit Kimberley's blog and see what she has to share with us. Just click on the Next button below to visit her blog. We would love it if you would leave us a comment and let us know what you liked about our projects. I hope you enjoy the rest of our blog hop.


If you live in the U.S. and do not have a Stampin' Up! Demonstrator, please contact me and I would be happy to help you with your creative projects. You may also visit my Online Store to place your order and have it shipped to you.

Until Next Time

Happy Stamping,

Tricia Butts
Independent Stampin' Up! Demonstrator

Like What You See? Visit My Online Store Here

Visit My Facebook Business Page for Updates & Ideas

Click here to Contact Me


Explore The Beautiful Eden's Garden Collection

Click Below For More Details


Make Your Holiday Treats Special
With The Gifts Galore November Paper Pumpkin Kit
Click Below To Subscribe By November 10th


Monday, November 1, 2021

We Create November Blog Hop Gratitude & Thanks

Welcome to the We Create November Blog Hop as we showcase projects with the theme " Gratitude & Thanks". You will be visiting with our talented Design Team Members as they share their ideas and projects to help inspire you to create your own beautiful projects.
Fall is in full swing and Thanksgiving is just around the corner here in Colorado. The wonderful colors of this season are perfect for creating cards of gratitude and thanks and for my card design today, I wanted to create an organic feel to my design. For this card, I chose to use the Gorgeous Leaves Bundle and added the Pretty Pumpkins stamp set for the beautiful sentiment. I love that the Gorgeous Leaves stamp set has so many wonderful images to add texture to the background and I combined them with the detailed leaves and branch dies from the coordinating Intricate Leaves Dies to create this wonderful design. The Gold and Copper accents help to step up this card design without having to add any bling. The Linen Thread adds the perfect finishing touch for this card.
Products Used:
Gorgeous Leaves Bundle (item #158609)
Pretty Pumpkins stamp set (item #156472)
Crumb Cake Cardstock (item #120953)
Early Espresso Cardstock (item #119686)
Very Vanilla Cardstock (item #101650)
Gold Foil Sheets (item #132622)
Copper Foil Sheets (item #142020)
Soft Suede Classic Ink Pad (item #147115)
Crumb Cake Classic Ink Pad (item #147116)
Cajun Craze Classic Ink Pad (item #147085)
Versamark Pad (item #102283)
Metallics Embossing Powders (item #155555)
Linen Thread (item #104199)
Stampin' Dimensionals (item #104430)
Measurements:
Crumb Cake Cardstock
Card Base - 8 1/2" x 5 1/2" (Scored at 4 1/4")
Early Espresso Cardstock
Layer 1 - 5 1/4" x 4"
Branch die cut with the Intricate Leaves Dies
Very Vanilla Cardstock
Card Front - 5" x 3 3/4"
Copper Foil
Two detailed leaves die cut with the Intricate Leaves Dies
Gold Foil
One long leaf die cut with the Intricate Leaves Dies
The textured background for this card design was created by stamping the Woodgrain image with Soft Suede ink several times using Generational stamping. I then stamped the large spotted background image with Crumb Cake ink repeating the process. I heat embossed the sentiment in the bottom right corner with Copper embossing powder and added the small leaves images in both Gold and Copper embossing to coordinate. I attached the die cut branch to the left side of the card front and then added the foil die cut leaves to give the impression they were falling from the tree. To add a touch of color, I stamped the smaller spotted background image with Cajun Craze ink, making sure to stamp off each time to tone down the intensity of the color. II adhered the card front to the Early Espresso cardstock layer to create a frame for the focal image. For the final touch, I added Linen Thread around the bottom of the card front, wrapping it twice and then tying a knot at the front. I attached the card front to the Crumb Cake card base with Stampin' Dimensionals to pop it up. The beautiful card design works well as a Thanksgiving card or as general Thank You card. The embossing adds an elegant touch to the design without being to over the top. 
Thank you for taking the time to visit my blog. I hope that my card design will help inspire you to create your own beautiful projects to share with the people in your life. Sending thank you cards is a wonderful way to show the people in your life how much you appreciate them.
Now it's time to visit Cheryl's wonderful blog and see what she has to share with us. Just click the Next button below to visit her blog. We would love it if you would leave us a comment and let us know what you enjoyed about our projects. I hope you enjoy the rest of our blog hop.

If you live in the U.S. and do not have a Stampin' Up! Demonstrator, please contact me and I would be happy to help you with your creative projects. You may also visit my Online Store to place your order and have it shipped to you. 

Until Next Time

Happy Stamping,

Tricia Butts
Independent Stampin' Up! Demonstrator

Like What You See? Visit My Online Store Here

Visit My Facebook Business Page for Updates & Ideas

Click here to Contact Me


Make Your Holiday Treats Special 

With The November Gifts Galore Paper Pumpkin Kit

Click Below To Subscribe By November 10th


Celebrate The Holidays
With The July-December 2021 Mini Catalog
Click Below To Visit My Online Store

Explore Your Creativity
With The Kits Collection
Click Below For More Details