Showing posts with label Winter. Show all posts

Saturday, July 29, 2023

Stamping With Friends Online Exclusives Blog Hop

Welcome to the Stamping With Friends Blog Hop as we showcase products from the Online Exclusives. Our wonderful Design Team is excited to share their projects and ideas to help show you the amazing possibilities open to you with these products. As the name suggests, these products can only be found online and it's important to remember that they are available while supplies last. I hope our projects will encourage you to explore this exclusive collection of products. 
Lately I have been having so much fun creating projects with the beautiful One Horse Open Sleigh Suite Collection. I just love how these products coordinate to make it simple and stress free to create with. I love the beautiful One Horse Open Sleigh 6"x6" Designer Series Paper and how the pretty Winter scenes make perfect backgrounds for simply beautiful cards. For today's card design, I chose to use one of the beautiful designs to create a stepped up clean and simple card design, that showcases how these amazing products work together to create a wonderful Christmas card. 
Products Used:
One Horse Open Sleigh Suite Collection (item #162130)
- Horse & Sleigh Bundle (item #162126)
- One Horse Open Sleigh 6"x6" Designer Series Paper (item #162118)
-Adhesive Backed Snowflake Assortment (item #162129)
Misty Moonlight Cardstock (item # 153081)
Basic White Cardstock (item #159276)
Vellum Cardstock (item #101856)
Versamark Pad (item #102283)
Metallics Embossing Powders (item #155555)
Clear Wink of Stella Glitter Brush (item #141897)
Iridescent Rhinestones Basic Jewels (item #158130)
Measurements:
Misty Moonlight Cardstock
Card Base - 8 1/2" x 5 1/2" (Scored at 4 1/4")
Detailed Tree die cut with the Horse & Sleigh Dies
One Horse Open Sleigh Designer Series Paper
Card Front - 5 1/4" x 4"
Basic White Cardstock
4 Snowbanks die cut with the Horse & Sleigh Dies
Vellum Cardstock
Tag die cut with the Tailored Tags Dies
The hardest part about creating with this wonderful suite of products, is choosing which design from the One Horse Open Sleigh Designer Series Paper to use. For this card design, I chose the design that gives the feeling of a Winter sunrise/sunset with the warm glow in the sky in the background. I love using Vellum cardstock with this paper pack to minimize covering up the beautiful scenes and this time I chose to use an old favorite, Tailor Made Tags Dies, to create a simple tag for my sentiment. To step up the tag, I die cut 2 each of the snowbanks with the Horse & Sleigh Dies to create some dimension in the foreground of the card design. I heat embossed the sentiment from the Horse & Sleigh stamp set using Gold embossing powder, positioning the sentiment towards the top of the tag, to allow room of the snowbanks along the bottom. I attached two of the snowbanks to the reverse side of the vellum tag and the other two on the front of the tag, offsetting them so that it allowed the back layers to show through and create multiple layers. I attached the Misty Moonlight tree die cut to the right side of the card front, near the grass peeking through the snow. I attached the vellum tag to the card front so that it partially overlapped the tree and hid the adhesive behind the snowbanks so that it wouldn't show. To embellish the card, I added several white Snowflakes and added Iridescent Rhinestones to the centers of the snowflakes for a touch of sparkle. To help hold down the vellum tag, I also added a Mini Glue Dot behind each of the snowflakes to anchor it. I love how soft and pretty this card design turned out and even though I have used a Christmas sentiment for my card, you could also use this design for a variety of other occasions. 
Thank you for taking the time to visit my blog. I hope that my card design will inspire you to explore the wonderful products available in the Online Exclusives. It's a wonderful way to create beautiful projects and mix and match with old favorites from the 2023-2024 Annual Catalog.
Please take the time to visit my fellow Design Team members to see their wonderful projects but clicking on the links in the Roll Call List below. We would appreciate it if you would leave us a comment and let us know what you enjoyed about our projects and what products you would like to try. 

If you live in the U.S. and do not have a Stampin' Up! Demonstrator, please contact me and I would be happy to help you with your creative projects. You may also visit my Online Store to place your order and have it shipped to you. 

Until Next Time

Happy Stamping,

Tricia Butts
Independent Stampin' Up! Demonstrator

Like What You See? Visit My Online Store Here

Visit My Facebook Business Page for Updates & Ideas

Click here to Contact Me 

Bonus Days Are Coming To An End
Earn A $5 Coupon For Every $50 You Spend
Click Below To Shop In My Online Store

New Online Exclusives
Now Available While Supplies Last
Click Below To Visit My Online Store

August's Meaningful Flowers Kit
Includes A Bonus Free Stamp Set
Click Below To Subscribe By August 10th


Friday, July 7, 2023

Global Stamping Friends July Blog Hop New Online Exclusives

Welcome to the Global Stamping Friends July Blog Hop as we explore the wonderful new products from the Online Exclusives, available now. Our wonderful Design Team members will be sharing their beautiful projects and ideas to help inspire you to explore these amazing new products. 
I fell in love with the products in the new One Horse Open Sleigh Suite Collection and couldn't wait to start creating Christmas cards with them. I often create "Christmas in July" projects and it's a great way to get a head start on my holiday projects. The One Horse Open Sleigh 6"x6" Designer Series Paper has simply stunning scenic background designs that make beautiful cards not only for Christmas but for other Winter themed occasions. For my card design today, I felt like it could be used like a Thinking of You card or as a Christmas card because the sentiment leaves it open to be used for a variety of occasions. I love the Horse & Sleigh Bundle and it coordinates beautifully with the pretty designer series paper. 
Products Used:
One Horse Open Sleigh Suite Collection (item #162130)
- Horse & Sleigh Bundle (item #162126)
- One Horse Open Sleigh 6"x6" Designer Series Paper (item #162118)
- Adhesive Backed Snowflake Assortment (item #162129)
Stylish Shapes Dies (item #159183)
Night Of Navy Cardstock (item #100867)
Basic White Cardstock (item #159276)
Memento Tuxedo Black Pad (item #132708)
Versamark Pad (item #102283)
Metallics Embossing Powders (item #155555)
Boho Blue Stampin' Blends Combo Pack (item #161659)
Moody Mauve Stampin' Blends Combo Pack (item #161660)
Pebbled Path Stampin' Blends Combo Pack (item #161658)
Smoky Slate Stampin' Blends Combo Pack (item #154904) 
Flirty Flamingo Stampin' Blends Combo Pack (item #154884)
Balmy Blue Stampin' Blends Combo Pack (item #154830)
Petal Pink Stampin' Blends Combo Pack (item #154893)
Loose Silver Sequins (item #161626)
Mini Stampin' Dimensionals (item #144108
Measurements:
Night Of Navy Cardstock
Card Base - 8 1/2" x 5 1/2" (Scored at 4 1/4")
Sentiment Label die cut with the Stylish Shapes Dies
One Horse Open Sleigh Designer Series Paper
Card Front - 5 1/4" x 4"
Basic White Cardstock
Horse & Sleigh image stamped and die cut with the Horse & Sleigh Bundle
This beautiful card is relatively simple to create and I wanted the horse and sleigh to feel like a part of the background scene for this design. I used one of the designer series paper designs to create the card front and adhered it to the Night of Navy card base to help it stand out. For the horse and sleigh image, I stamped the image with Memento Tuxedo Black ink onto Basic White cardstock and colored it in with Stampin' Blends Markers. I chose to use Boho Blue for the sleigh, Moody Mauve for the coats and hats, Smoky Slate for the horse, Pebbled Path for the reins and gloves and Petal Pink for the faces. I added a touch of Flirty Flamingo for one of the pillows as a contrast to the Moody Mauve. I used the coordinating dies to die cut the image and then I used Light Balmy Blue to lightly color around the white edge of the image so that it would blend in with the designer series paper background. For the sentiment, I heat embossed the image with Silver embossing powder onto the Night of Navy sentiment label die cut with the Stylish Shapes Dies and trimmed off the right side to create a straight edge. I added the sentiment to the card front on the bottom right side so that it was in line with the edge of the designer series paper. For the horse and sleigh, I used Mini Stampin' Dimensionals to add the die cut to the card front so that it slightly overlapped the sentiment label. to complete the design, I added several of the White Snowflakes to the card front and added small Silver Sequins to the centers for an additional touch of bling. I just love the Winter feel of this card design, a perfect contrast on a hot Summer's day. 
Thank you for taking the time to visit my blog. I hope that my card design will inspire you to create your own beautiful projects using the wonderful new Online Exclusives products.
Now it's time to visit Marieke's blog and see what she has created to share with us. Just click on the Next button below to visit her blog. We would appreciate it if you would leave us a comment and let us know what you liked about our projects. I hope you enjoy the rest of our blog. 


If you live in the U.S. and do not have a Stampin' Up! Demonstrator, please contact me and I would be happy to help you with your creative projects. You may also visit my Online Store to place your order and have it shipped to you. 

Until Next Time

Happy Stamping,

Tricia Butts
Independent Stampin' Up! Demonstrator

Like What You See? Visit My Online Store Here

Visit My Facebook Business Page for Updates & Ideas

Click here to Contact Me


New Online Exclusive Products
Available While Supplies Last
Click Below To Visit My Online Store

Bonus Coupons Are Back
Earn A $5 Coupon For Every $50 You Spend
Redeem Your Coupons In August
Click Below To Start Shopping

Last Chance To Sign Up
For the July Paper Pumpkin Kit
Click Below To Subscribe By July 10th


Saturday, August 20, 2022

Stamping With Friends August Blog Hop July-December 2022 Mini Catalog
Welcome to the Stamping With Friends August Blog Hop as we showcase our favorite Suites and stamp sets in the July-December 2022 Mini Catalog. Our wonderful Design Team members will be sharing their projects and ideas to help inspire you to get ready for the holidays and the change in the seasons. There is so much to look forward to in the next few months and a perfect time to get creative.
Picking my favorite products from the new July-December 2022 Mini Catalog was not an easy task, as there are so many great suites, bundles and stamp sets in this catalog. However, I must admit, that the Storybook Gnomes Suite was an instant hit with me the moment I saw it. So for today's card design, I decided to use products from this suite to create my Winter themed card. I love that this suite can be used for so much more than Christmas, with possibilities for projects for any season. 
Products Used:
Storybook Gnomes Suite (item #159630)
 - Kindest Gnomes Bundle (item #159626)
 - Storybook Designer Series Paper (item #159615)
Layering Diorama Dies (item #155565)
Tailor Made Tags Dies (item #155563)
Wintry 3D Embossing Folders (item #155433)
Balmy Blue Cardstock (item #146982)
Night of Navy Cardstock (item #100867)
Pacific Point Classic Ink Pad (item #147098)
Clear Wink of Stella Glitter Brush (item #141897)
Basic Rhinestone Jewels (item #144220)
Baker's Twine Essentials Pack (item #155475)
Stampin' Dimensionals (item #104430)
Measurements: 
Balmy Blue Cardstock
Card Base - 8 1/2" x 5 1/2" (Scored at 4 1/4")
Sentiment Tag die cut with the Tailor Made Tags Dies
Night of Navy Cardstock
Card Front 5 1/4" x 4" embossed with the Wintry 3D Embossing Folders. Center opening die cut with the Layering Diorama Dies
Storybook Gnomes Designer Series Paper
Background Layer - 5" x 3 3/4"
Blue Gnome die cut with the Gnomes Dies
This sweet gnome card is so much fun and so easy to create. I love that the pretty designer series paper does the bulk of the work in creating this design. I used one of the snowflake background designs for the background of the opening for the card design and I die cut one of the cute gnomes from another sheet using the coordinating Gnomes Dies, to create the focal image. The embossed snowflakes add wonderful texture to the card front and I love how the Clear Wink of Stella adds a subtle sparkle to the card. The sentiment tag was die cut using the Tailor Made Tag Dies and I added some White Baker's Twine to finish it off. The Basic Rhinestone Jewels add just the right amount of bling to the background to finish off this fun card design. You could use this card for a variety of occasions and this layout would work well for other seasons just by changing the colors and background for the opening. As you can see, this suite is great for so much more than Christmas. 
Thank you for taking the time to visit my blog. I hope that my card design will help inspire you to get creative for the upcoming months with products from the July-December 2022 Mini Catalog. There are so many wonderful possibilities to explore. 
Now it's time to hop along with my fellow Design Team members and check out their amazing projects. Just click on the Roll Call List below to follow along. Please leave us a comment and let us know how our projects inspired you. I hope you enjoy the rest of our blog hop.

If you live in the U.S. and do not have a Stampin' Up! Demonstrator, please contact me and I would be happy to help you with your creative projects. You may also visit my Online Store to place your order and have it shipped to you. 

Until Next Time

Happy Stamping,

Tricia Butts
Independent Stampin' Up! Demonstrator

Like What You See? Visit My Online Store Here

Visit My Facebook Business Page for Updates & Ideas

Click here to Contact Me


Get Ready For The Holidays
With The July-December 2022 Mini Catalog
Click Below To Visit My Online Store

Time Is Running Out
To Take Advantage Of Sale-a-bration
Click Below For More Details


Tuesday, July 12, 2022

ICS July Blog Hop Sale-a-brations

Welcome to the ICS July Blog Hop as we celebrate the new Sale-a-brations catalog and all the amazing new products that you can earn for free with a qualifying order. Our wonderful Design Team will be sharing their projects and ideas to help inspire you to get creative for the Summer. 
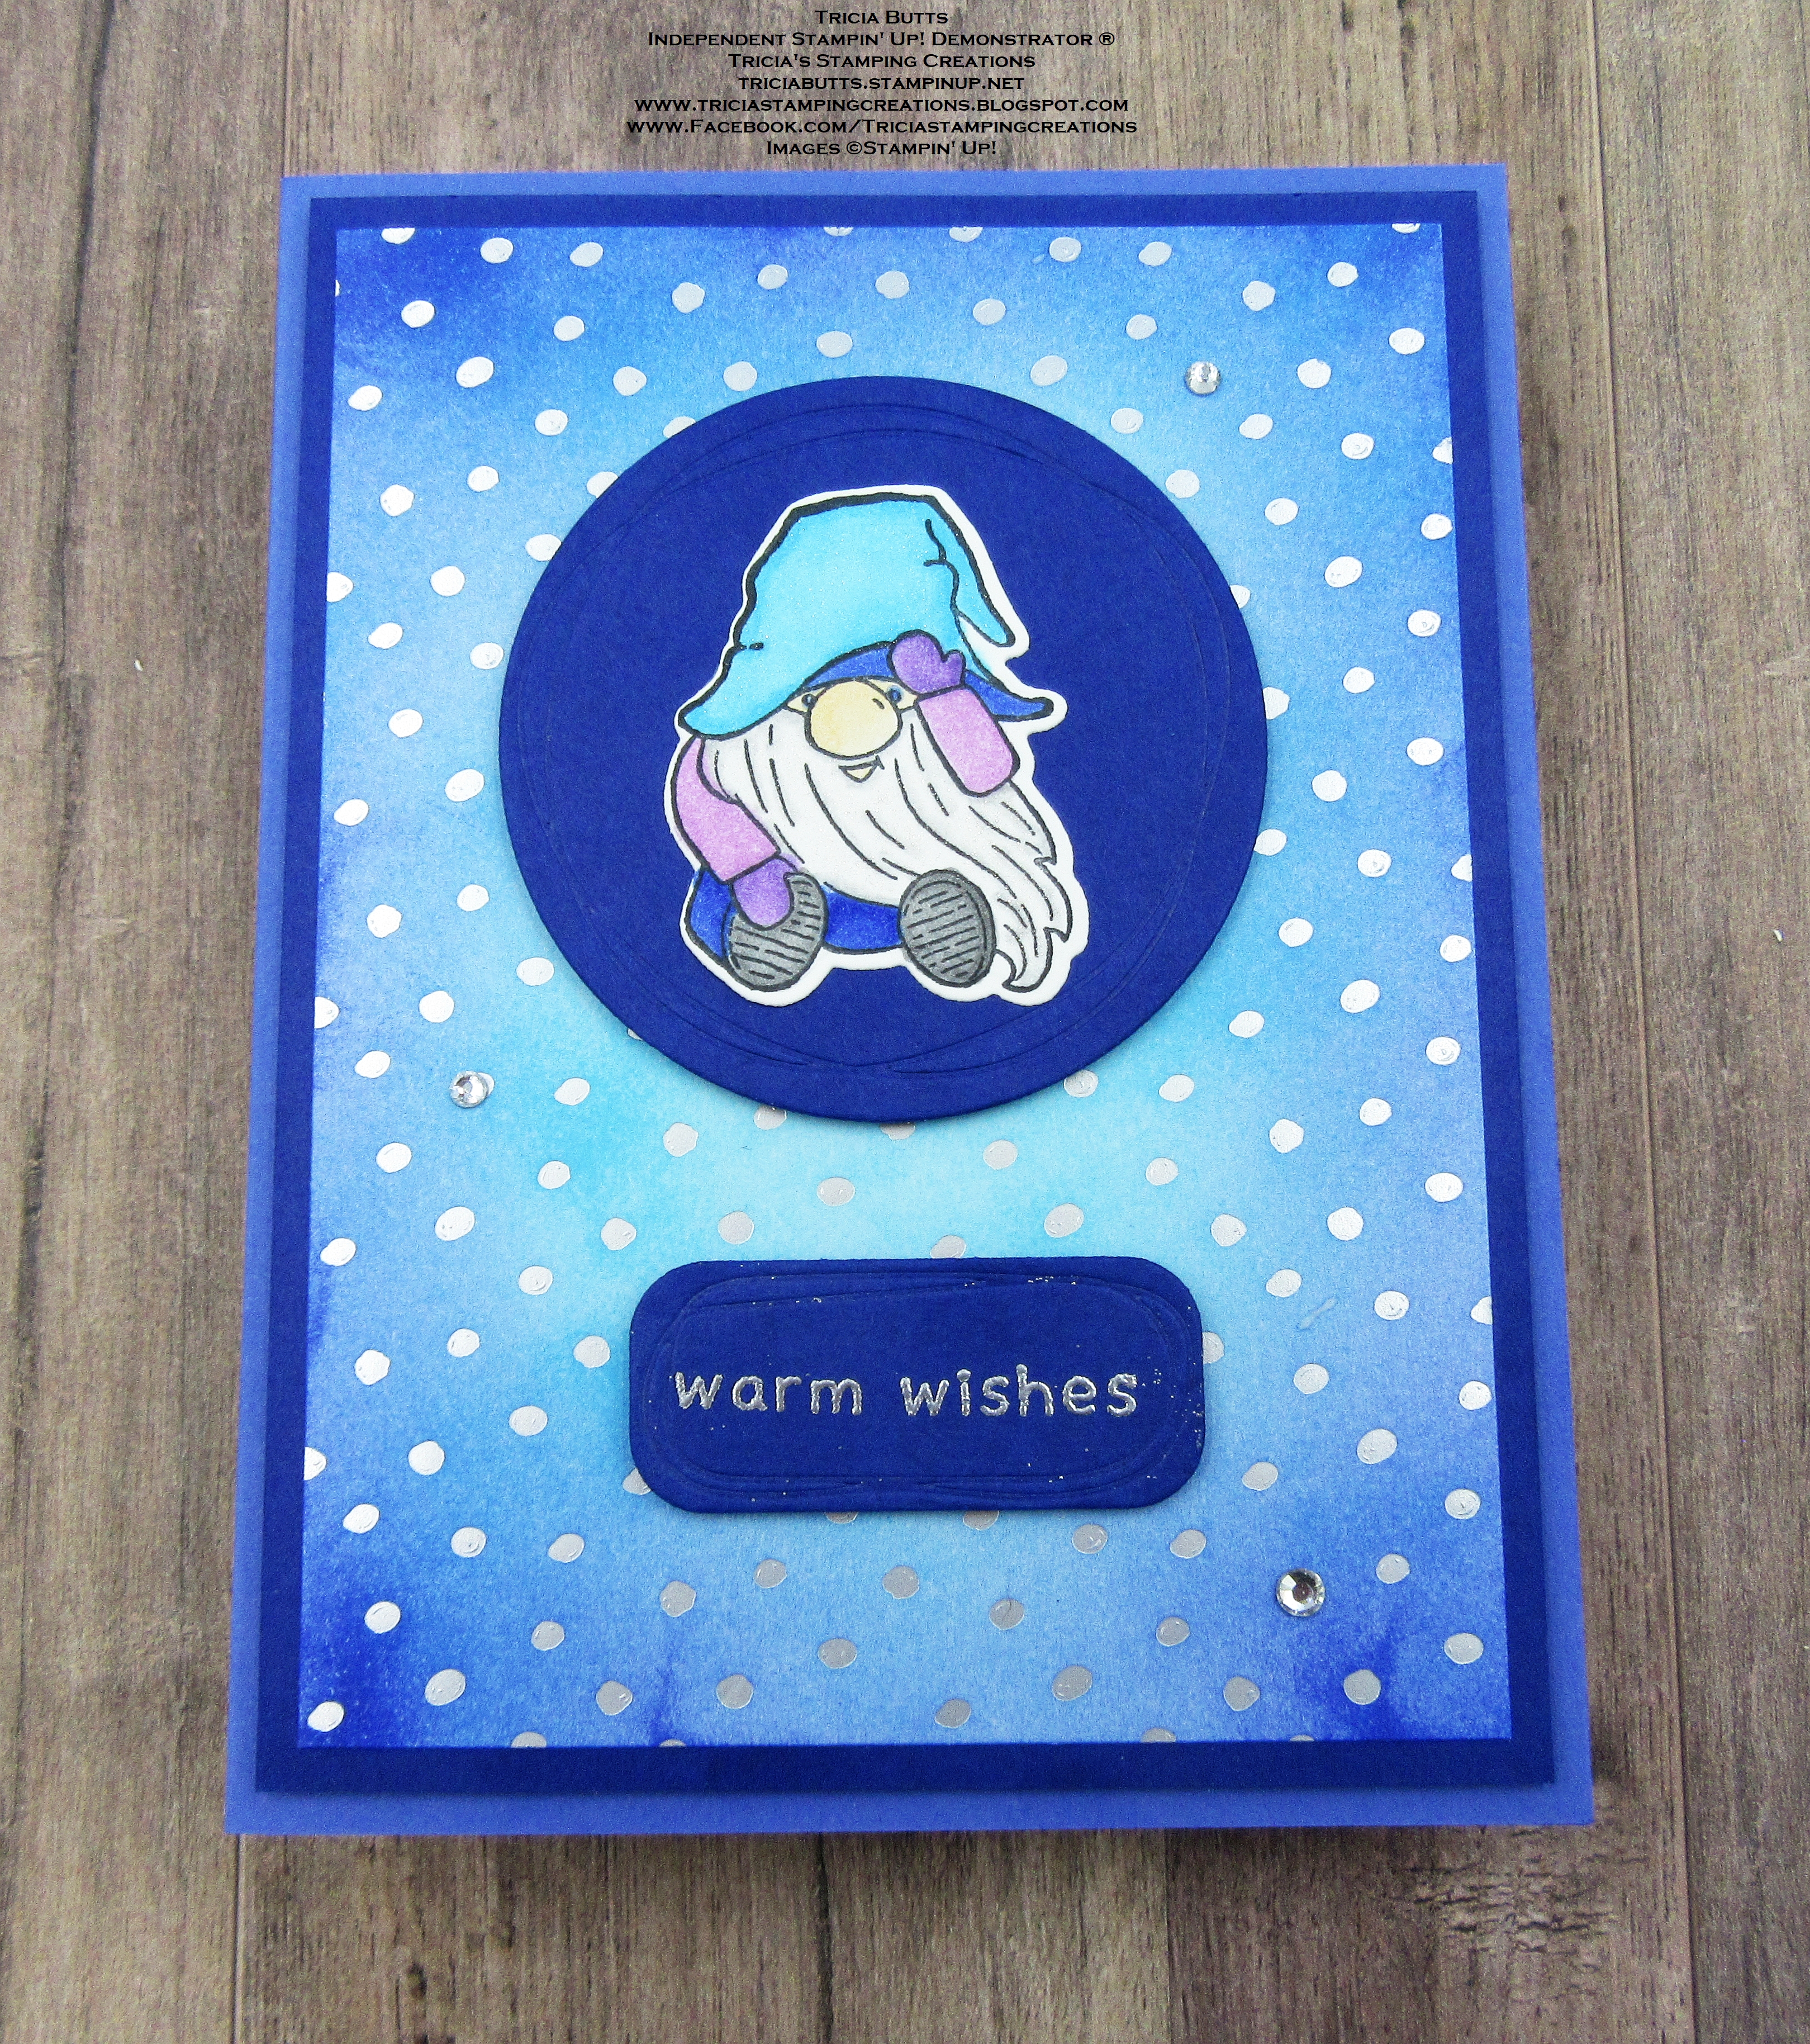
It was so hard to choose which Sale-a-bration product I wanted to showcase. I finally decided to use one of the designs from the Gold & Silver 6"x6" Designer Series Paper to create the background for my card design. You can choose this beautiful paper pack for free during Sale-a-bration with a qualifying $50 order. One of the great things about this pretty paper is that you can color it in a variety of ways. For my card design, I decided to use Orchid Oasis and Tahitian Tide Classic inks with Blending Brushes to create this wonderful background. 
Products Used:
Kindest Gnomes Bundle (item #159626)
Beautiful Shapes Dies (item #158046)
Starry Sky Cardstock (item #159263)
Orchid Oasis Cardstock (item #159267)
Silver & Gold 6"x6" Designer Series Paper (item #159941) 
Sale-a-bration Reward
Orchid Oasis Classic Ink Pad (item #159214)
Tahitian Tide Classic Ink Pad (item #159210)
Memento Tuxedo Black Pad (item #132708)
Versamark Pad (item #102283)
Metallics Embossing Powders (item #155555)
Tahitian Tide Stampin' Blends Combo Pack (item #159221)
Orchid Oasis Stampin' Blends Combo Pack (item #159223)
Smoky Slate Stampin' Blends Combo Pack (item #154904)
Fresh Freesia Stampin' Blends Combo Pack (item #155518)
Highland Heather Stampin' Blends Combo Pack (item #154887)
Medium Light (SU 800) Natural Tones Stampin' Blends Combo Pack (item #159463)
Clear Wink of Stella Glitter Brush (item #141897)
Basic Rhinestone Jewels (item #144220)
Stampin' Dimensionals (item #104430)
Blending Brushes (item #153611)
Measurements:
Orchid Oasis Cardstock
Card Base - 8 1/2" x 5 1/2" (Scored at 4 1/4")
Starry Sky Cardstock
Layer 1 - 5 1/4" x 4"
Circle die cut with Beautiful Shapes Dies
Sentiment Label die cut with Beautiful Shapes Dies
Silver & Gold Designer Series Paper (Silver Polka Dot)
Card Front - 5" x 3 3/4" 
For this card design, I used Blending Brushes to create the beautiful background. I started with Tahitian Tide Classic ink, starting in the center of the Silver Polka Dot piece of designer series paper, and worked my way out towards the edges. Then I blended Orchid Oasis Classic ink from the outside edges, especially at the corners, towards the middle. For my focal image, I stamped the cute little gnome onto Basic White cardstock and die cut it with the coordinating die. Using Stampin' Blends Markers, I colored in the image to coordinate with the background. I attached the gnome to the Starry Sky circle and attached it to the card front with Stampin' Dimensionals. for the sentiment, I heat embossed the image with Silver embossing powder onto Starry Sky cardstock and attached it to the card front with Stampin' Dimensionals. For a touch of bling, I added several small Basic Rhinestone Jewels to make it sparkle. I just love how the silver polka dots on the design series paper pop against the blended background and give the impression of falling snow. This card design would work well for a variety of occasions for the Winter months. 
Thank you for taking the time to visit my blog. I hope that my card design will help you to get excited about the amazing new products in the Sale-a-bration Catalog. Whether you love stamp sets, designer series paper or even dies, there is something for everyone. 
Now it's time to visit Sharon's blog and see what Sale-a-bration products she has to share with us. Just click on the Next button to visit her blog. We would appreciate it if you would leave us a comment and let us know what you enjoyed about our projects. 


If you live in the U.S. and do not have a Stampin' Up! Demonstrator, please contact me and I would be happy to help you with your creative projects. You may also visit my Online Store to place your order and have it shipped to you. 

Until Next Time

Happy Stamping,

Tricia Butts
Independent Stampin' Up! Demonstrator

Like What You See? Visit My Online Store Here

Visit My Facebook Business Page for Updates & Ideas

Click here to Contact Me


Get Creative For The Holidays
With The July-December 2022 Mini Catalog
Click Below To Visit My Online Store

Earn Exclusive Free Products
During Sale-A-Bration
Click Below For Details


Friday, November 5, 2021

Global Stamping Friends November Blog Hop Snowflakes


Welcome to the Global Stamping Friends November Blog Hop as we showcase projects featuring Snowflakes. You will be visiting with talented Stampin' Up! Demonstrators from around the world as they share their projects and ideas to help inspire you. 
When I think of Winter themed cards, I think of snowflakes. For today's card, I combined the Snowflake Wishes stamp set with the Wintry 3D Embossing Folders, both in the 2021-2022 Annual Catalog. I used one of the beautiful Wonderful Snowflakes die cuts from the July-December 2021 Mini Catalog as the focal image for my design and I love the way this pretty iridescent foil snowflake pops against the embossed Misty Moonlight background. There is something so clean and beautiful about the combination of Misty Moonlight and Basic White and I love how this clean and simple Christmas card turned out.
Products Used:
Snowflake Wishes stamp set (item #158267)
Wintry 3D Embossing Folders (item #155433)
Wonderful Snowflakes (item #156340)
Misty Moonlight Cardstock (item #153081)
Basic White Cardstock (item #159276)
Misty Moonlight Classic Ink Pad (item #153118)
Opal Rounds (item #154289)
Stampin' Dimensionals
Measurements:
Misty Moonlight Cardstock
Card Base - 8 1/2" x 5 1/2" (Scored at 4 1/4")
Card Front - 5" x 3 3/4" Embossed with the snowflake embossing folder from the Wintry 3D Embossing Folders
Basic White Cardstock
Layer 1- 5 1/4" x 4"
Sentiment Strip - 1" x 3 3/4"
This pretty card design has wonderful texture and detail while keeping the supplies simple. The Basic White layers pop against the Misty Moonlight layers and the embossing adds a wonderful subtle texture to the card front. The Wonderful Snowflake die cut has a lovely shimmer to it that helps step up the card design. I stamped the sentiment from the Snowflake Wishes stamp set in Misty Moonlight Classic ink to coordinate with the card design but you could also heat emboss it with Silver embossing powder if you wanted to step it up to the next level. The Opal Rounds add an elegant touch to the design and coordinate beautifully with the die cut snowflake. I attached the snowflake to the card front with a Stampin' Dimensional in the center to pop it up. The card front was adhered to the Basic White layer with Stampin' Seal Adhesive and then I attached it to the card base with Stampin' Dimensionals. I love how this adds dimension to the card design. This clean and simple card design could be created in a variety of colors and it is a great design to create multiples to send out to the people on your Christmas card list. 
Thank you for taking the time to visit my blog. I hope that my card design will help inspire you to create your own beautiful projects using snowflakes to send to family and friends. Snowflakes are perfect for Winter themed all occasion cards as well as Christmas cards. There are so many wonderful options to explore.
Now it's time to visit Kimberley's blog and see what she has to share with us. Just click on the Next button below to visit her blog. We would love it if you would leave us a comment and let us know what you liked about our projects. I hope you enjoy the rest of our blog hop.


If you live in the U.S. and do not have a Stampin' Up! Demonstrator, please contact me and I would be happy to help you with your creative projects. You may also visit my Online Store to place your order and have it shipped to you.

Until Next Time

Happy Stamping,

Tricia Butts
Independent Stampin' Up! Demonstrator

Like What You See? Visit My Online Store Here

Visit My Facebook Business Page for Updates & Ideas

Click here to Contact Me


Explore The Beautiful Eden's Garden Collection

Click Below For More Details


Make Your Holiday Treats Special
With The Gifts Galore November Paper Pumpkin Kit
Click Below To Subscribe By November 10th