Showing posts with label birthday card. Show all posts

Wednesday, January 1, 2025

We Create January Blog Hop Something Old Something New

Happy New Year everyone. Let's celebrate the start of 2025 with the We Create January Blog Hop with our theme of Something Old, Something New to help spark your creativity. Our wonderful Design Team is excited to share their projects and ideas to help inspire you to create your own beautiful projects.
One of my favorite things to do to start off a New Year, is to create birthday cards to add to my stash to send out to friends and family throughout the year. It's also exciting because there is a new mini catalog coming soon and it gives me an opportunity to play with new products that I can mix and match with my existing supplies to create new ideas and designs. For this beautiful clean and simple birthday card, I chose to use the new With You In Mind stamp set from the January-April 2025 Mini Catalog, with its large sentiments, to help step up my card design using one of our existing designer series paper packs from the 2024-2025 Annual Catalog. I love the bold, beautiful patterns in the Wildly Flowering Designer Series Paper and how they can create the perfect backgrounds for clean and simple designs. This is a great way to create a stack of pretty cards for a variety of occasions to send out throughout the year.
Projects Used:
With You In Mind stamp set (item #164747)
Nested Essentials Dies (item #161597)
Wildly Flowering Designer Series Paper (item #163323)
Misty Moonlight Cardstock (item #153081)
Wild Wheat Cardstock (item #161725)
Versamark Pad (item #102283)
Basics Wow Embossing Powders (item #165679)
Brushed Brass Butterflies (item #158136)
Stampin' Dimensionals (item #104430) 
Measurements:
Misty Moonlight Cardstock
Card Base - 5 1/2" x 8 1/2" (Scored at 4 1/4")
Sentiment Label die cut with the Nested Essentials Dies
Wild Wheat Cardstock
Matte Label die cut with the Nested Essentials Dies
Wildly Flowering Designer Series Paper
Card Front - 5 1/4" x 4"
I love creating clean and simple card designs using designer series paper and the Wildly Flowering Designer Series Paper has so many beautiful designs that work well not only for floral, feminine designs but also more masculine neutral layouts. The color combinations are soft and muted, which works well for this time of year as we make our way through the Winter months. I used the Nested Essentials Dies, one of my staples in my crafting tool kit, to create the sentiment label to help the beautiful bold sentiment stand out as the focal point for this card. The With You In Mind stamp set has a wonderful combination of all occasion sentiments and coordinating images to help create cards for the people you love. I used White embossing powder to help step up the sentiment and make it pop against the Misty Moonlight cardstock label. I layered it onto a slightly larger Wild Wheat cardstock label and popped it up with Stampin' Dimensionals to make the sentiment pop. To complete the card design, I added several Brushed Brass Butterflies to add a touch of bling. This card design is a great example of how you can create beautiful cards quickly and easily using existing supplies and adding something as simple as a new stamp set to help take them to the next level. 
Thank you for taking the time to visit my blog. I hope that my card design will help inspire you to get creative in 2025 and have fun creating your own beautiful projects to send to family and friends. With the new January-April 2025 Mini Catalog and 2025 Sale-a-bration launching January 7th, 2025, there are so many exciting new products to explore. 
Now it's time to visit Linda's blog and see what she has to share with us. Just click on the Next button below to visit her blog or use the Roll Call List to find your way. We would appreciate it if you would leave us a comment and let us know what you liked about our projects. 

Roll Call List

If you live in the U.S. and do not have a Stampin' Up! Demonstrator, please contact me and I would be happy to help you with your creative projects. You may also visit my Online Store to place your order and have it shipped to you. 

Until Next Time

Happy Stamping,

Tricia Butts
Independent Stampin' Up! Demonstrator

Like What You See? Visit My Online Store Here

Visit My Facebook Business Page for Updates & Ideas

Click here to Contact Me


Friday, October 4, 2024

Crafty Collaborations Monochromatic Color Challenge Week 40 - Blueberry Bushel

It's time for Week 40 of the Crafty Collaborations Monochromatic Color Challenge and this week we are showcasing Blueberry Bushel from the Regals Collection. I love this beautiful blue and I couldn't wait to create this fun birthday card to share with you.
For my card design, I chose to use the Friendly Fins Bundle from the 2024-2025 Annual Catalog and paired it with the So Swirly Embossing Folder to add some texture to the background. This birthday card design is so much fun and works well for people of all ages. 
Products Used:
Friendly Fins Bundle (item #163589)
Nested Essentials Dies (item #161597)
So Swirly Embossing Folder (item #163791)
Blueberry Bushel Cardstock (item #146968)
Basic White Cardstock (item #159276)
Blueberry Bushel Classic Ink Pad (item #147138)
Tinsel Gems Four Pack (item #161623)
Stampin' Dimensionals (item #104430)
Measurements:
Blueberry Bushel Cardstock
Card Base - 5 1/2" x 8 1/2" (Scored at 4 1/4")
Card Front 5" x 3 3/4" Embossed with the So Swirly Embossing Folder
Basic White Cardstock
Layer 1 - 5 1/4" x 4"
Shark image stamped and die cut with the Friendly Fins Bundle
Sentiment Label die cut with the Nested Essentials Dies
This clean and simple birthday card was so much fun to create and I love how it showcases Blueberry Bushel. I wanted to add some texture to the background using the So Swirly Embossing Folder to give the illusion of water for the shark. I stamped the hammerhead shark outline image using Blueberry Bushel Classic ink onto Basic White cardstock and then stamped the body image also using Blueberry Bushel Classic ink, stamping it off once to give it a lighter shade. I die cut the shark image out using the coordinating die and attached it to the card front with Stampin' Dimensionals. For the sentiment, I stamped the Happy Birthday image using Blueberry Bushel Classic ink onto the sentiment label that I die cut using the Nested Essentials Dies. I attached it to the card front using Stampin' Dimensionals, centering it below the shark image. To complete the card design, I added two of the Blueberry Bushel Tinsel Gems for a touch of bling. 
Thank you for taking the time to visit my blog. I hope that my card design will help inspire you to give Blueberry Bushel a try when creating your own beautiful projects. There are so many wonderful options to explore to help spark your creativity. 
Please take the time to visit this week's Monochromatic Insta Hop to see all the amazing projects showcasing Blueberry Bushel. Just click here to get started. We would love it if you would leave us a comment and let us know what you liked about our projects. I hope you will come back next week to see what color we will be showcasing. 

If you live in the U.S. and do not have a Stampin' Up! Demonstrator, please contact me and I would be happy to help you with your creative projects. You may also visit my Online Store to place your order and have it shipped to you. 

Until Next Time

Happy Stamping,

Tricia Butts
Independent Stampin' Up! Demonstrator

Like What You See? Visit My Online Store Here

Visit My Facebook Business Page for Updates & Ideas

Click here to Contact Me


Wednesday, August 28, 2024

Paper Pumpkin Possibilities August Blog Hop Time For Cake

Welcome to the Paper Pumpkin Possibilities August Blog Hop as we showcase alternative project ideas featuring the Time For Cake Paper Pumpkin Kit. Our wonderful Design Team will be sharing their projects and ideas to help inspire you to think outside the box and create your own fun alternative designs. 
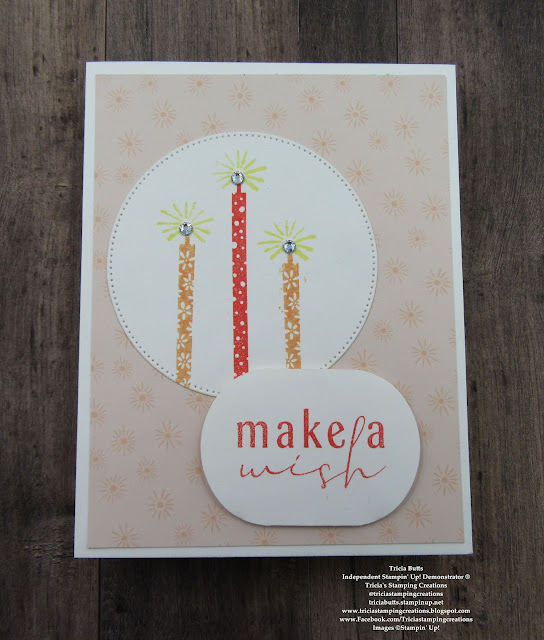
For my card design, I wanted to showcase the wonderful images in the exclusive stamp set included in this month's kit. To create this soft and pretty birthday card, I used one of the Petal Pink card bases included in the kit for my card front and created a focal image using the candles images from the stamp set. This clean and simple design is fresh and fun and a great example of how you can mix and match the images to create your own unique designs.
Products Used:
Paper Pumpkin August 2024 Kit Time For Cake
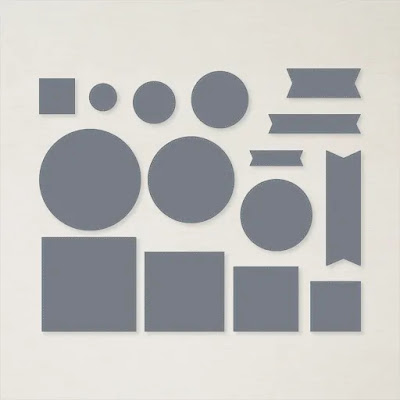
Stylish Shapes Dies (item #159183)
Modern Oval Punch (item #162234)
Thick Basic White Cardstock (item #159229)
Basic White Cardstock (item #159276)
Flirty Flamingo Classic Ink Pad (item #147052)
Petal Pink Classic Ink Pad (item #147108)
Lemon Lolly Classic Ink Pad (item #161666)
Basic Rhinestone Jewels (item #1144220)
Measurements:
Thick Basic White Cardstock
Card Base - 5 1/2" x 8 1/2" (Scored at 4 1/4")
Basic White Cardstock
Large Circle die cut with the Stylish Shapes Dies
Sentiment Label punched out with the Modern Oval Punch
Time For Cake Kit
Card Front - 5 1/4" x 4" (From Petal Pink Card Base)
To create this fun birthday card, I cut a card front from one of the Petal Pink card bases and attached it to the Thick Basic White card base. To create the focal image, I die cut a large circle from Basic White cardstock using the Stylish Shapes Dies. I stamped the tallest candle image using Flirty Flamingo Classic ink and the two shorter candles with Petal Pink Classic ink, on either side of the taller candle. I stamped the sparkle image on top of each of the candles with Lemon Lolly Classic ink. For the sentiment label, I stamped the image with Flirty Flamingo Classic ink onto Basic White cardstock and then punched it out using the Modern Oval Punch. To assemble the remainder of the card, I attached the circle image to the center of the card front towards the left side and then attached the sentiment label with Mini Stampin' Dimensionals from the kit, slightly overlapping the bottom right curve of the focal circle. For a touch of bling, I added a Basic Rhinestone Jewel to the top of each candle to complete the card design. 
Thank you for taking the time to visit my blog. I hope that my card design will help inspire you to explore using the supplies in this kit for your own alternative designs. There are so many wonderful possibilities available when you think outside the box.
Please take the time to visit with the Design Team and see their amazing alternative projects created with this months' Paper Pumpkin kit. Just click on the links in the Roll Call List below to find your way. We would love it if you would leave us a comment and let us know what you liked about our projects.

If you live in the U.S. and do not have a Stampin' Up! Demonstrator, please contact me and I would be happy to help you with your creative projects. You may also visit my Online Store to place your order and have it shipped to you. Not a Paper Pumpkin subscriber? Click the link below to sign up by September 10th to receive the September Paper Pumpkin Kit, Autumn Abundance. As a subscriber, you can also order the coordinating Every Day Celebrations Dies, as an exclusive perk available to subscribers only. These dies are available only while supplies last.

Until Next Time

Happy Stamping,

Tricia Butts
Independent Stampin' Up! Demonstrator

Like What You See? Visit My Online Store Here

Visit My Facebook Business Page for Updates & Ideas

Click here to Contact Me


Let's Get Ready For Fall
With The Autumn Abundance Paper Pumpkin Kit
Click Below To Subscribe By September 10th

Paper Pumpkin Subscriber Exclusive!
Order The Every Day Celebrations Dies 
Click Below To Shop Now


Saturday, June 15, 2024

Stamping With Friends June Blog Hop 2024-2025 Annual Catalog Bundles

Welcome to the Stamping With Friends June Blog Hop as we explore the wonderful new bundles in the 2024-2025 Annual Catalog. What exactly is a bundle? It is Stampin' Up! pairs together a stamp set with a coordinating punch or coordinating dies so that you can save 10% on the price. This makes it a great, budget friendly way to add your favorites to your crafting tool kit. Our amazing Design Team will be sharing their projects and ideas using the new bundles to help inspire you to create your own projects.
For my card design, I wanted to use the Hearts & Hugs Bundle to create a sweet birthday card. This bundle stole my heart when I first saw the new catalog and it was one of the first bundles I had to have. I love the combination of adorable images and cute sentiments and having coordinating dies just makes creating with this bundle so simple and fun. For today's design, I chose to use the sweet walruses for my focal image and colored it with Stampin' Blends Markers. The background was created with one of the Meandering Meadows 6"x6" Designer Series Paper designs. Did you know that the reverse sides have wonderful monochromatic patterns that make amazing backgrounds? This is just one example of how you can use this pretty paper in a less traditional way. I added a pop of color with the banner and the hearts using Real Red cardstock to bring the design together. This clean and simple design is so much fun and I love that I was able to use just the stamp set and coordinating dies from this bundle to create my design. 
Products Used: 
Hearts & Hugs Bundle (item #163667)
Meandering Meadows 6"x6" Designer Series Paper (item #162735)
Blueberry Bushel Cardstock (item #146968)
Real Red Cardstock (item #102482)
Basic White Cardstock (item #159276)
Blueberry Bushel Classic Ink Pad (item #147138)
Memento Tuxedo Black Pad (item #132708)
Smoky Slate Stampin' Blends Combo Pack (item #154904)
Ivory/Bronze Stampin' Blends Combo Pack (item #154922)
Pebbled Path Stampin' Blends Combo Pack (item #161658)
Stampin' Dimensionals (item #104430)
Measurements:
Blueberry Bushel Cardstock
Card Base - 5 1/2" x 8 1/2" (Scored at 4 1/4")
Real Red Cardstock
Background piece - 3" x 1 1/2" approx.
Sentiment Label die cut with the Hearts & Hugs Dies
Basic White Cardstock
Layer 1 - 5 1/4" x 4"
Sentiment Label stamped & die cut with the Hearts & Hugs Bundle
Walruses image stamped & die cut with the Heart & Hugs Bundle
Meandering Meadows Designer Series Paper
Card Front - 5" x 3 3/4" with hearts die cut from the background
(2 of the hearts used for sentiment label)
There is so much to love about this card design, it's hard to know where to start. I love the texture of the background design and how it makes everything else pop. Blueberry Bushel is one of my favorite blues, but it is often overlooked. I used a layer of Basic White cardstock to create a frame around the focal layer and help it stand out from the Blueberry Bushel card base. After adhering the designer series paper layer to the Basic White cardstock, I die cut out the detailed hearts arch towards the top and center of the card front. I added a piece of Real Red cardstock on the back, behind the negative die cut hearts, to give them a beautiful bright red color. For the walruses, I stamped the image with Memento Tuxedo Black ink onto Basic White cardstock and colored them with Smoky Slate, Ivory and Light Pebbled Path Stampin' Blends Markers. I die cut the image out using the coordinating die from the bundle and attached it to the card front using Stampin' Dimensionals, positioning it in the center just below the hearts. For the sentiment, I stamped the image with Blueberry Bushel Classic ink and die cut the label using one of the dies from the bundle. I also die cut a Real Red label using the same die and cut it in half using Paper Snips. I attached each piece of the Real Red label to the back of the Basic White sentiment label, leaving a small banner on each end to frame the sentiment. I then attached the sentiment label to the card front using Stampin' Dimensionals, centering it below the walruses. To complete the design, I added two of the hearts created from the background, to the sentiment label. I attached the card front to the card base using Stampin' Dimensionals to pop it up and add extra dimension to the design. Isn't this just the cutest birthday card? I just love how it turned out.
Thank you for taking the time to visit my blog. I hope that my card design will help inspire you to explore the wonderful bundles in the 2024-2025 Annual Catalog to help spark your creativity. Make sure to take advantage of the extra 10% discount on select bundles during the month of June as well as save 10% on Stampin' Cut & Emboss Machines.
Please take the time to visit the Design Team to see their amazing projects by clicking on the links in the Roll Call List. We would appreciate it if you would leave us a comment and let us know what you liked about our projects.

If you live in the U.S. and do not have a Stampin' Up! Demonstrator, please contact me and I would be happy to help you with your creative projects. You may also visit my Online Store to place your order and have it shipped to you. 

Until Next Time

Happy Stamping,

Tricia Butts
Independent Stampin' Up! Demonstrator

Like What You See? Visit My Online Store Here

Visit My Facebook Business Page for Updates & Ideas

Click here to Contact Me


Save An Extra 10% On Select Bundles
Plus 10% Off Stampin' Cut & Emboss Machines
Click Below To Shop Now


Friday, May 3, 2024

Global Stamping Friends May Blog Hop Fresh & New

 
Welcome to the Global Stamping Friends May Blog Hop and this month we are celebrating the new 2024-2025 Annual Catalog with the theme of "Fresh & New". One of my favorite things about a new catalog is getting to explore all the wonderful new products hidden inside. Our wonderful Design Team will be sharing their projects and ideas to help spark your creativity and get you excited about this amazing new catalog. 
It's no secret that I love to create clean and simple card designs for all occasions. One of my favorite ways to do this is with designer series paper and the new Thoughtful Journey 6"x6" Designer Series Paper is perfect for this style of card. This paper pack is full of beautiful designs that have the look of watercolor landscape scenes that make the most beautiful cards. For today's card, I paired one of these designs with the new Simply Said stamp set which has wonderful sentiments to suit a variety of occasions. With this combination, it is easy to create a variety of card designs to help you stock up your card stash for upcoming events.
Products Used:
Simply Said stamp set (item #163786)
Thoughtful Journey 6"x6" Designer Series Paper (item #163303)
Thick Basic White Cardstock (item #159229)
Basic White Cardstock (item #159276)
Misty Moonlight Classic Ink Pad (item #153118)
Tinsel Gems Three Pack (item #161624)
Measurements:
Thick Basic White Cardstock
Card Base - 5 1/2" x 8 1/2" (Scored at 4 1/4")
Basic White Cardstock
Sentiment Strip - 1/2" x 3 1/4"
Thoughtful Journey Designer Series Paper 
Card Front - 5 1/4" x 4"
For this card design, I chose to use Thick Basic White cardstock for the card base to help make the designer series paper card front pop. I love this beautiful color combination of blues and pinks that reminds me of a misty morning in the mountains. For the sentiment, I used a 1/2" strip of Basic White cardstock to stamp the image with Misty Moonlight Classic ink and then trimmed it down to approx. 3 1/4". I attached the sentiment to the bottom right corner of the card front to complete the clean and simple design. To step up the design, I added two of the Fresh Freesia Tinsel Gems for a touch of bling. I love how peaceful this card design looks and it would work well for so many occasions. 
Thank you for taking the time to visit my blog. I hope that my card design will help inspire you to take a look at the wonderful new products inside the new 2024-2025 Annual Catalog to create your own beautiful projects. There are so many options to choose from and it's so much fun to mix new products with your old favorites to help you step outside your comfort zone. 
Now it's time to visit Jan's blog and see what she has created to share with us. Just click on the Next button below to visit her blog. We would love it if you would leave us a comment and let us know what you liked about our projects. 

Roll Call List

If you live in the U.S. and do not have a Stampin' Up! Demonstrator, please contact me and I would be happy to help you with your creative projects. You may also visit my Online Store to place your order and have it shipped to you. 

Until Next Time

Happy Stamping,

Tricia Butts
Independent Stampin' Up! Demonstrator

Like What You See? Visit My Online Store Here

Visit My Facebook Business Page for Updates & Ideas

Click here to Contact Me


Explore The Amazing New Products
Now Available From The 2024-2025 Annual Catalog
Click Below To Shop Now 

Get New 2024-2026 In Color Products Free
In Your Starter Kit During The Month of May
Click Below For More Details