Showing posts with label Thank you. Show all posts

Friday, November 8, 2024

Crafty Collaborations Monochromatic Color Challenge Week 45 - Calypso Coral

Welcome to Week 45 of the Monochromatic Color Challenge as we showcase Calypso Coral from the Subtles Collection. This beautiful color is so versatile and I thought it would be fun to use it create a lovely Fall themed Thank You card. 
For today's card design, I chose to use the Simply Zinnia Bundle and I chose to use Stampin' Blends Markers to help bring the floral image to life. They are one of my favorite coloring mediums and I just love how pretty and vibrant the colors are. All occasion card designs are great to have on hand and Thank You cards are something I use throughout the year, so it helps to have a stash on hand for when I need them. 
Products Used:
Simply Zinnia Bundle (item #163480)
Deckled Rectangles Dies (item #159173)
Calypso Coral Cardstock (item #122925)
Basic White Cardstock (item #159276)
Calypso Coral Classic Ink Pad (item #147101)
Memento Tuxedo Black Pad (item #132708)
Calypso Coral Stampin' Blends Combo Pack (item #154881)
Daffodil Delight Stampin' Blends Combo Pack (item #154883)
Granny Apple Green Stampin' Blends Combo Pack (item #154885)
Iridescent Foil Gems (item #162842)
Stampin' Dimensionals (item #104430)
Measurements:
Calypso Coral Cardstock
Card Base - 5 1/2" x 8 1/2" (Scored at 4 1/4")
Card Front - 5 1/4" x 4"
Basic White Cardstock
Floral image stamped and die cut with the Simply Zinnia Bundle
Sentiment Label die cut with the Deckled Rectangles Dies
This pretty Thank You card is simple to create and the great thing is that you only need one stamp set to have everything you need. I chose to use the large single blossom image to create a tone on tone background on the card front to add subtle texture to the design. For the focal image, I stamped the image using Memento Tuxedo Black ink onto Basic White cardstock and colored the image with Stampin' Blends Markers. I used the coordinating die to die cut the image and attached it to the card front. For the sentiment, I stamped the image with Tuxedo Black ink onto the Basic White sentiment label that I die cut using the Deckled Rectangles Dies. I love the uneven edges that these dies create and it adds a vintage feel to the label. To complete the card design, I added several Iridescent Foil Gems for a touch of bling. This clean and simple card design would work well for a variety of occasions to add to your card stash. 163480
Thank you for taking the time to visit my blog. I hope that my card design helps inspire you to explore using Calypso Coral in your future projects. This beautiful color is so versatile and works well for so many occasions.
Please take a moment to check out this week's Monochromatic Insta Hop to see all the amazing projects showcasing Calypso Coral. You will love all the wonderful ideas that are sure to spark your creativity. Just click here to get started. We would appreciate it if you would leave us a comment and let us know what you liked about our projects. 

If you live in the U.S. and do not have a Stampin' Up! Demonstrator, please contact me and I would be happy to help you with your creative projects. You may also visit my Online Store to place your order and have it shipped to you. 

Until Next Time

Happy Stamping,

Tricia Butts
Independent Stampin' Up! Demonstrator

Like What You See? Visit My Online Store Here

Visit My Facebook Business Page for Updates & Ideas

Click here to Contact Me


Friday, June 7, 2024

Global Stamping Friends June Blog Hop Coloring Inside The Lines

 
Welcome to the Global Stamping Friends June Blog Hop and this month our theme is "Coloring Inside the Lines". Our Design Team will be sharing their projects and ideas to help inspire you to explore all the wonderful coloring options Stampin' Up! has to offer. 
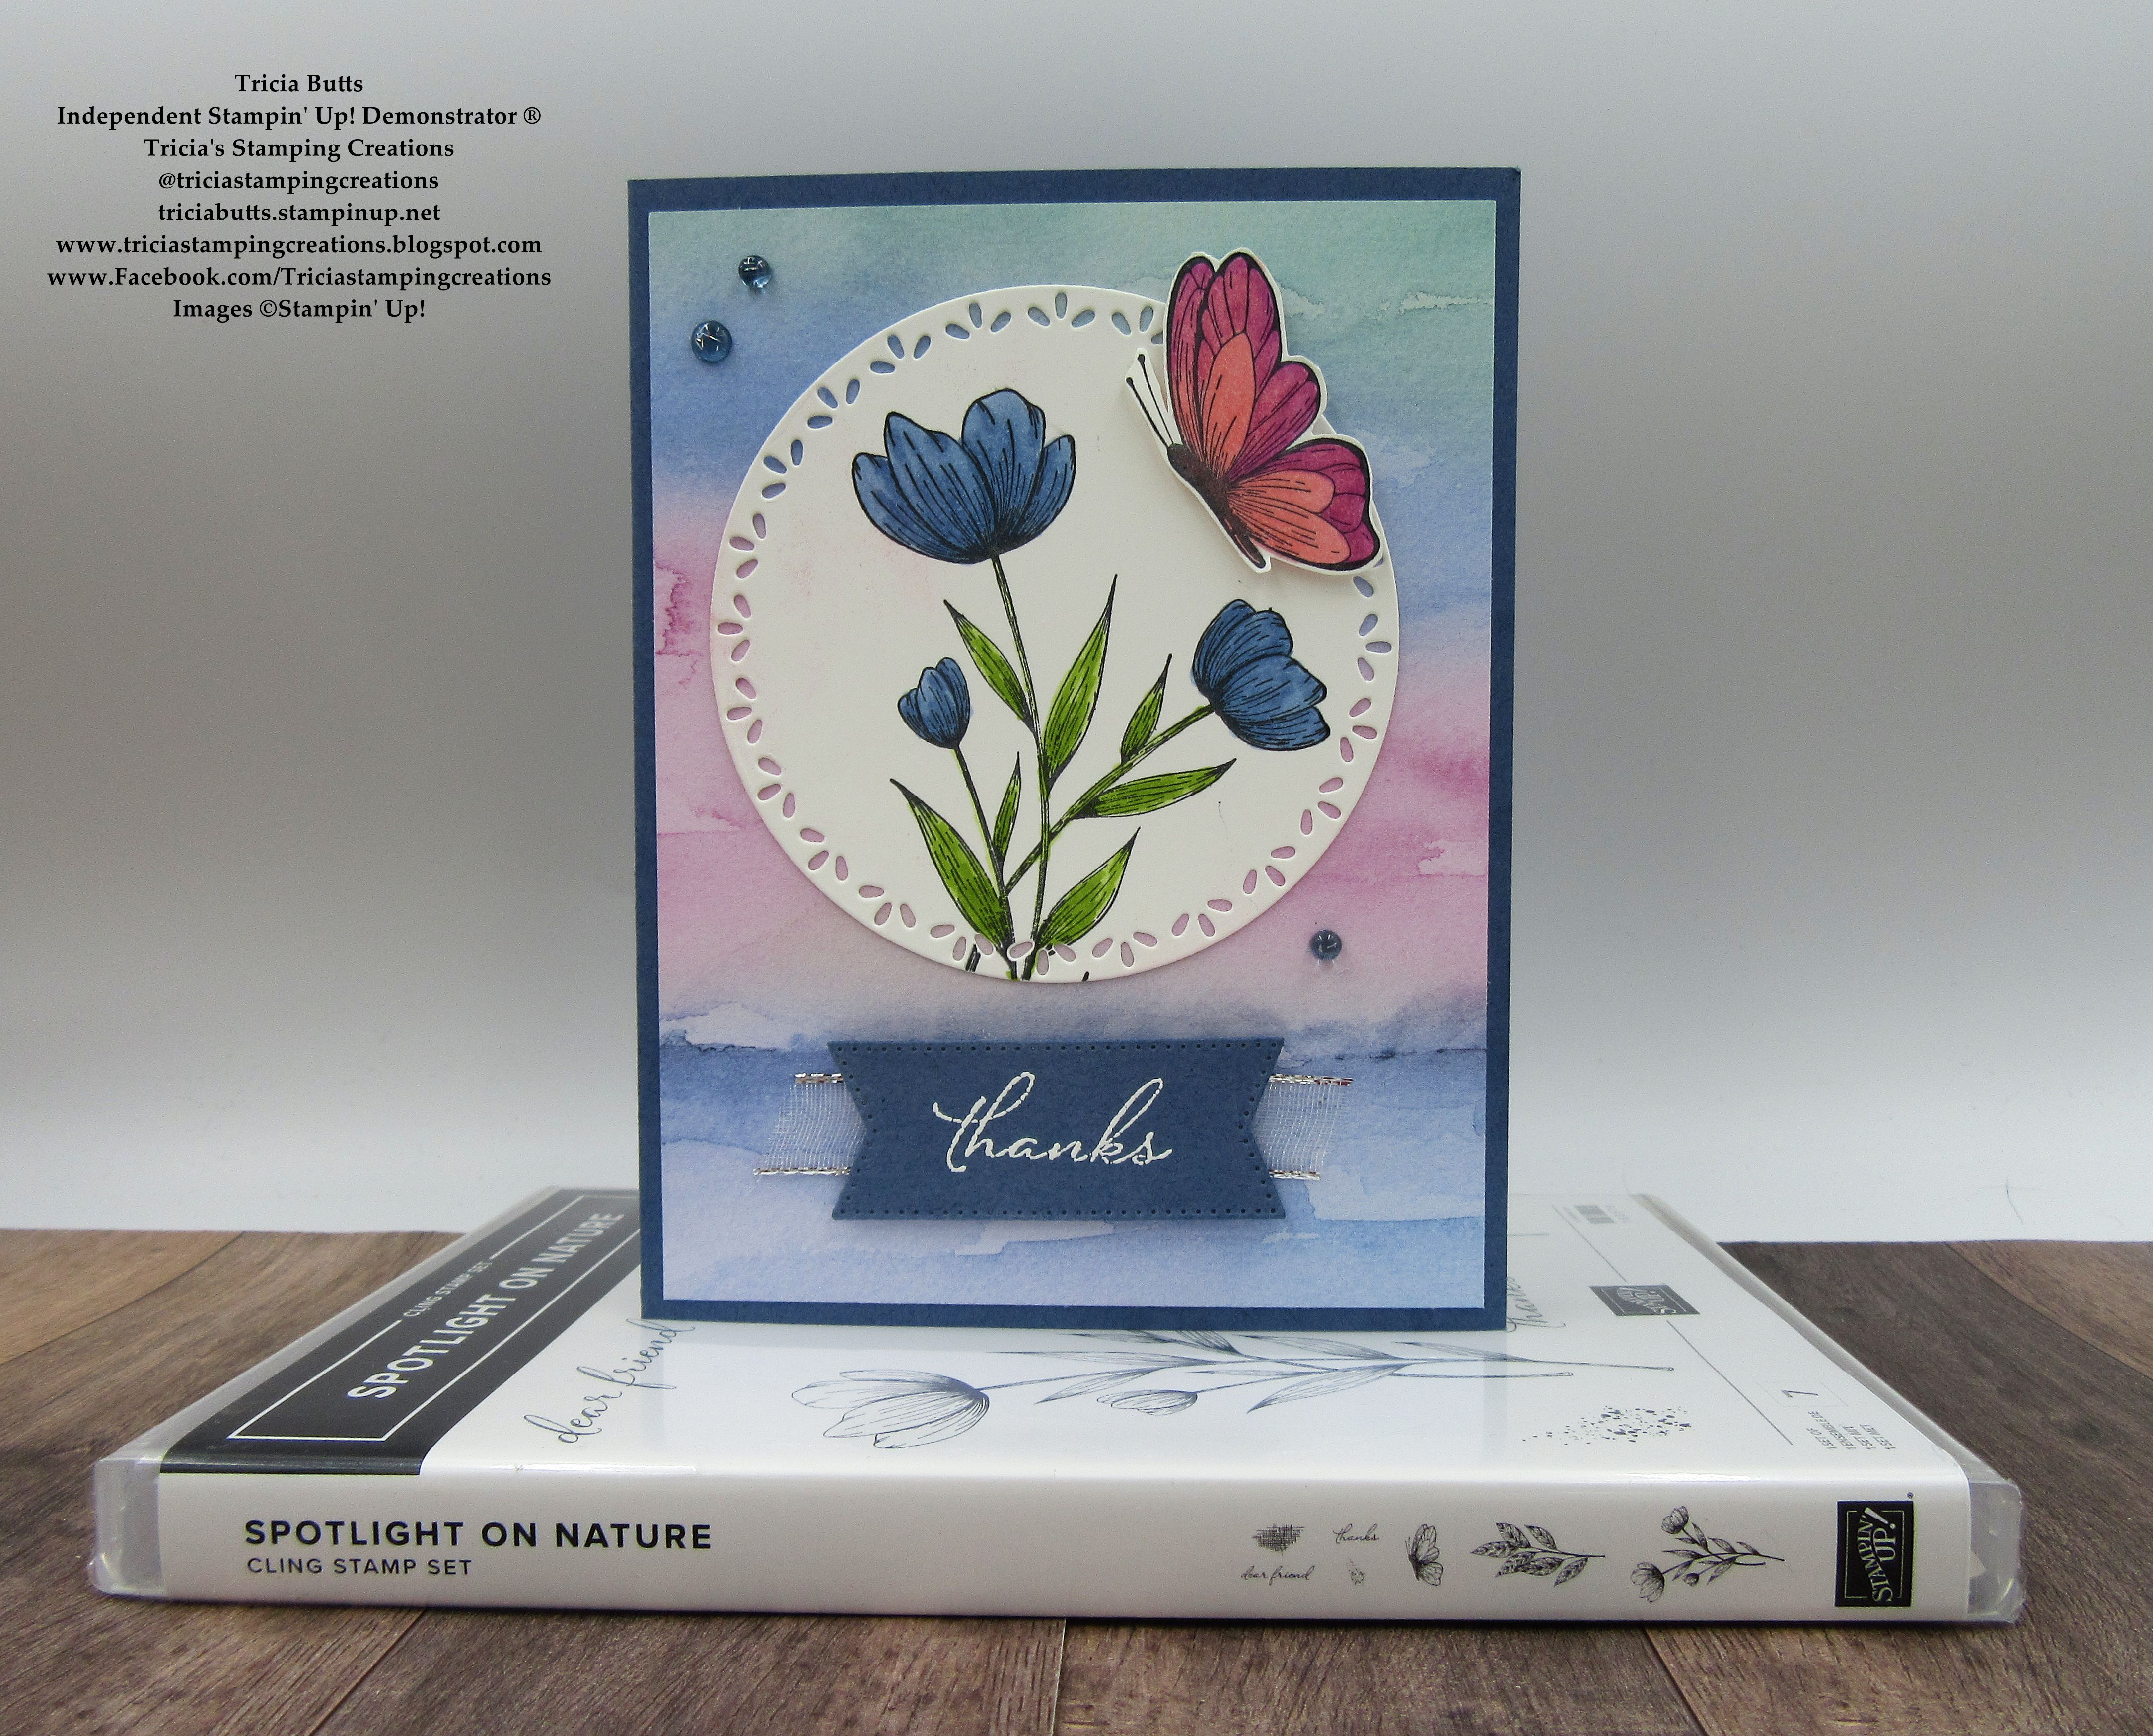
One of my favorite coloring techniques would have to be coloring with Stampin' Blends Markers. I love the way these alcohol markers blend and the beautiful vibrant colors. For this card design, I chose to use the new Spotlight on Nature Bundle, which is one of the bundles on sale this month with an additional 10% discount. I paired it with one of the designs from the Thoughtful Journey 6"x6" Designer Series Paper. I just love the soft, water color background it creates for the card design that combines beautifully with the focal images. 
Products Used:
Spotlight On Nature Bundle (item #163581)
Stylish Shapes Dies (item #159183)
Thoughtful Journey 6"x6" Designer Series Paper (item #163303)
Misty Moonlight Cardstock (item #153081)
Basic White Cardstock (item #159276)
Memento Tuxedo Black Pad (item #132708)
Versamark Pad (item #102283)
Basics Wow Embossing Powders (item #165679)
Boho Blue Stampin' Blends Combo Pack (item #161659)
Granny Apple Green Stampin' Blends Combo Pack (item #154885)
Petunia Pop Stampin' Blends Combo Pack (item #163828)
Pretty In Pink Stampin' Blends Combo Pack (item #163824)
Tinsel Gems Three Pack (item #161624)
Silver & White 1/2" Sheer Ribbon (item #162149)
Stampin' Dimensionals (item #104430)
Measurements:
Misty Moonlight Cardstock
Card Base - 5 1/2" x 8 1/2" (Scored at 4 1/4")
Sentiment Label die cut with the Stylish Labels Dies
Basic White Cardstock
Large Circle die cut with the Spotlight On Nature Dies 
Butterfly stamped and fussy cut
Thoughtful Journey Designer Series Paper
Card Front - 5 1/4" x 4"
This pretty card design is all about beautiful colors and I chose to use Boho Blue and Granny Apple Green Stampin' Blends Markers for the floral image and Pretty In Pink and Petunia Pop Stampin' Blends Markers for the butterfly image. To create the focal image, I used the Spotlight on Nature Dies to die cut the large detailed circle. I fussy cut the butterfly out after coloring it and added it to the circle with Stampin' Dimensionals to pop it up. For the sentiment label, I heat embossed the image with Basic White embossing powder and die cut the sentiment with the Stylish Shapes Dies. To add a touch of bling, I added several of the Misty Moonlight Gems and I piece of the Silver & White Sheer Ribbon behind the sentiment label. I love how the colors work together to create a beautiful thank you card. 
Thank you for taking the time to visit my blog. I hope that my card design will help inspire to create your own wonderful projects using coloring techniques. There are so many amazing options to explore. Don't forget to take advantage of the sale on select stamp & dies bundles this month and save an extra 10%. 
Now it's time to visit Kimberley's blog and see what she has created this month to share with us. Just click on the Next button below to visit her blog or use the Roll Call List to find your way. We would appreciate it if you would leave us a comment and let us know what you liked about our projects. 

Roll Call List

If you live in the U.S. and do not have a Stampin' Up! Demonstrator, please contact me and I would be happy to help you with your creative projects. You may also visit my Online Store to place your order and have it shipped to you. 

Until Next Time

Happy Stamping,

Tricia Butts
Independent Stampin' Up! Demonstrator

Like What You See? Visit My Online Store Here

Visit My Facebook Business Page for Updates & Ideas

Click here to Contact Me


Save An Extra 10% On Select Bundles
Plus 10% Off Stampin' Cut & Emboss Machines
Click Below To Shop Now


Friday, May 3, 2024

Crafty Collaborations Monochromatic Color Challenge Week 18 - Coastal Cabana

Welcome to Week 18 of the Crafty Collaborations Monochromatic Color Challenge as we showcase Coastal Cabana from the Brights Collection. This beautiful color makes me think of tropical oceans but for my card design today, I thought I would go in a different direction.
 For my card, I chose to use the Simply Zinnia stamp set paired with the coordinating Zinnia 3D Embossing Folder to create a design with wonderful background texture. I also chose to use one of the Paper Butterfly Accents for the focal image and added Gold embossing for a distressed, almost vintage look. This was outside my comfort zone as I am not a big flowers person but I think the end result turned out pretty well. What do you think?
Products Used:
Simply Zinnia stamp set (item #163472)
Zinnia 3D Embossing Folder (item #163337)
Deckled Circles Dies (item #162286)
Stylish Shapes Dies (item #159183)
Coastal Cabana Cardstock (item #131297)
Basic White Cardstock (item #159276)
Paper Butterfly Accents (item #162612)
Coastal Cabana Classic Ink Pad (item #147097)
Clear Wink of Stella Glitter Brush (item #141897)
Versamark Pad (item #102283)
Metallics Wow Embossing Powders (item #165678)
Neutrals Adhesive Backed Sequins (item #161627)
Stampin' Dimensionals (item #104430)
Products:
Coastal Cabana Cardstock
Card Base - 5 1/2" x 8 1/2" (Scored at 4 1/4")
Card Front - 5 1/4" x 4" Embossed with the Zinnia 3D Embossing Folder with Coastal Cabana Classic Ink Pad
Banner die cut with the Stylish Shapes Dies
Basic White Cardstock
Medium Circle die cut with the Deckled Circles Dies
Sentiment Label die cut with the Stylish Shapes Dies
Creating this card design was a bit of a challenge because I don't have any current Coastal Cabana designer series paper to work with, so I had to figure out a different way to add texture and detail. So for my background design, I chose to ink up the inside of the Zinnia 3D Embossing Folder with Coastal Cabana Classic ink and then placed a piece of Coastal Cabana cardstock inside and embossed it to get this wonderful tone on tone textured design. To add some contrast, I die cut a Basic White circle with the Deckled Circles dies and then stamped one of the Zinnia images with Coastal Cabana Classic ink, stamping it off once, to create a soft floral design. To help make the butterfly die cut stand out, I added some Versamark ink to the outside edges of the die cut and then added Gold embossing powder and heat embossed it to give it a wonderful distressed look. I then added some Coastal Cabana Classic ink to the rest of the butterfly with a Blending Brush and gently colored it with Clear Wink of Stella to give it a pretty shimmer. The sentiment was heat embossed with Gold embossing powder onto the Basic White banner and then layered onto the Coastal Cabana banner, slightly offsetting it. To finish off the card, I added several Gold Sequins for a touch of bling. I love the way all the layers come together to create this beautiful design with Coastal Cabana.
Thank you for taking the time to visit my blog. I hope that my card design will help you to step outside your comfort zone and try something new. It is so much fun to experiment with mixing and matching different products and colors to come up with your own unique designs. 
Please take the time to visit this week's Monochromatic Insta Hop and see all the amazing projects created using Coastal Cabana. Click here to get started. We would appreciate it if you would leave us a comment and let us know how we inspired you.

If you live in the U.S. and do not have a Stampin' Up! Demonstrator, please contact me and I would be happy to help you with your creative projects. You may also visit my Online Store to place your order and have it shipped to you. 

Until Next Time

Happy Stamping,

Tricia Butts
Independent Stampin' Up! Demonstrator

Like What You See? Visit My Online Store Here

Visit My Facebook Business Page for Updates & Ideas

Click here to Contact Me 


Monday, February 12, 2024

Demonstrator Training February Blog Hop Thank You

Welcome to the Demonstrator Training February Blog Hop as we showcase Thank You and Congratulations cards to help inspire you. Our wonderful Design Team will be sharing their projects and ideas using current Stampin' Up! products to help spark your creativity.
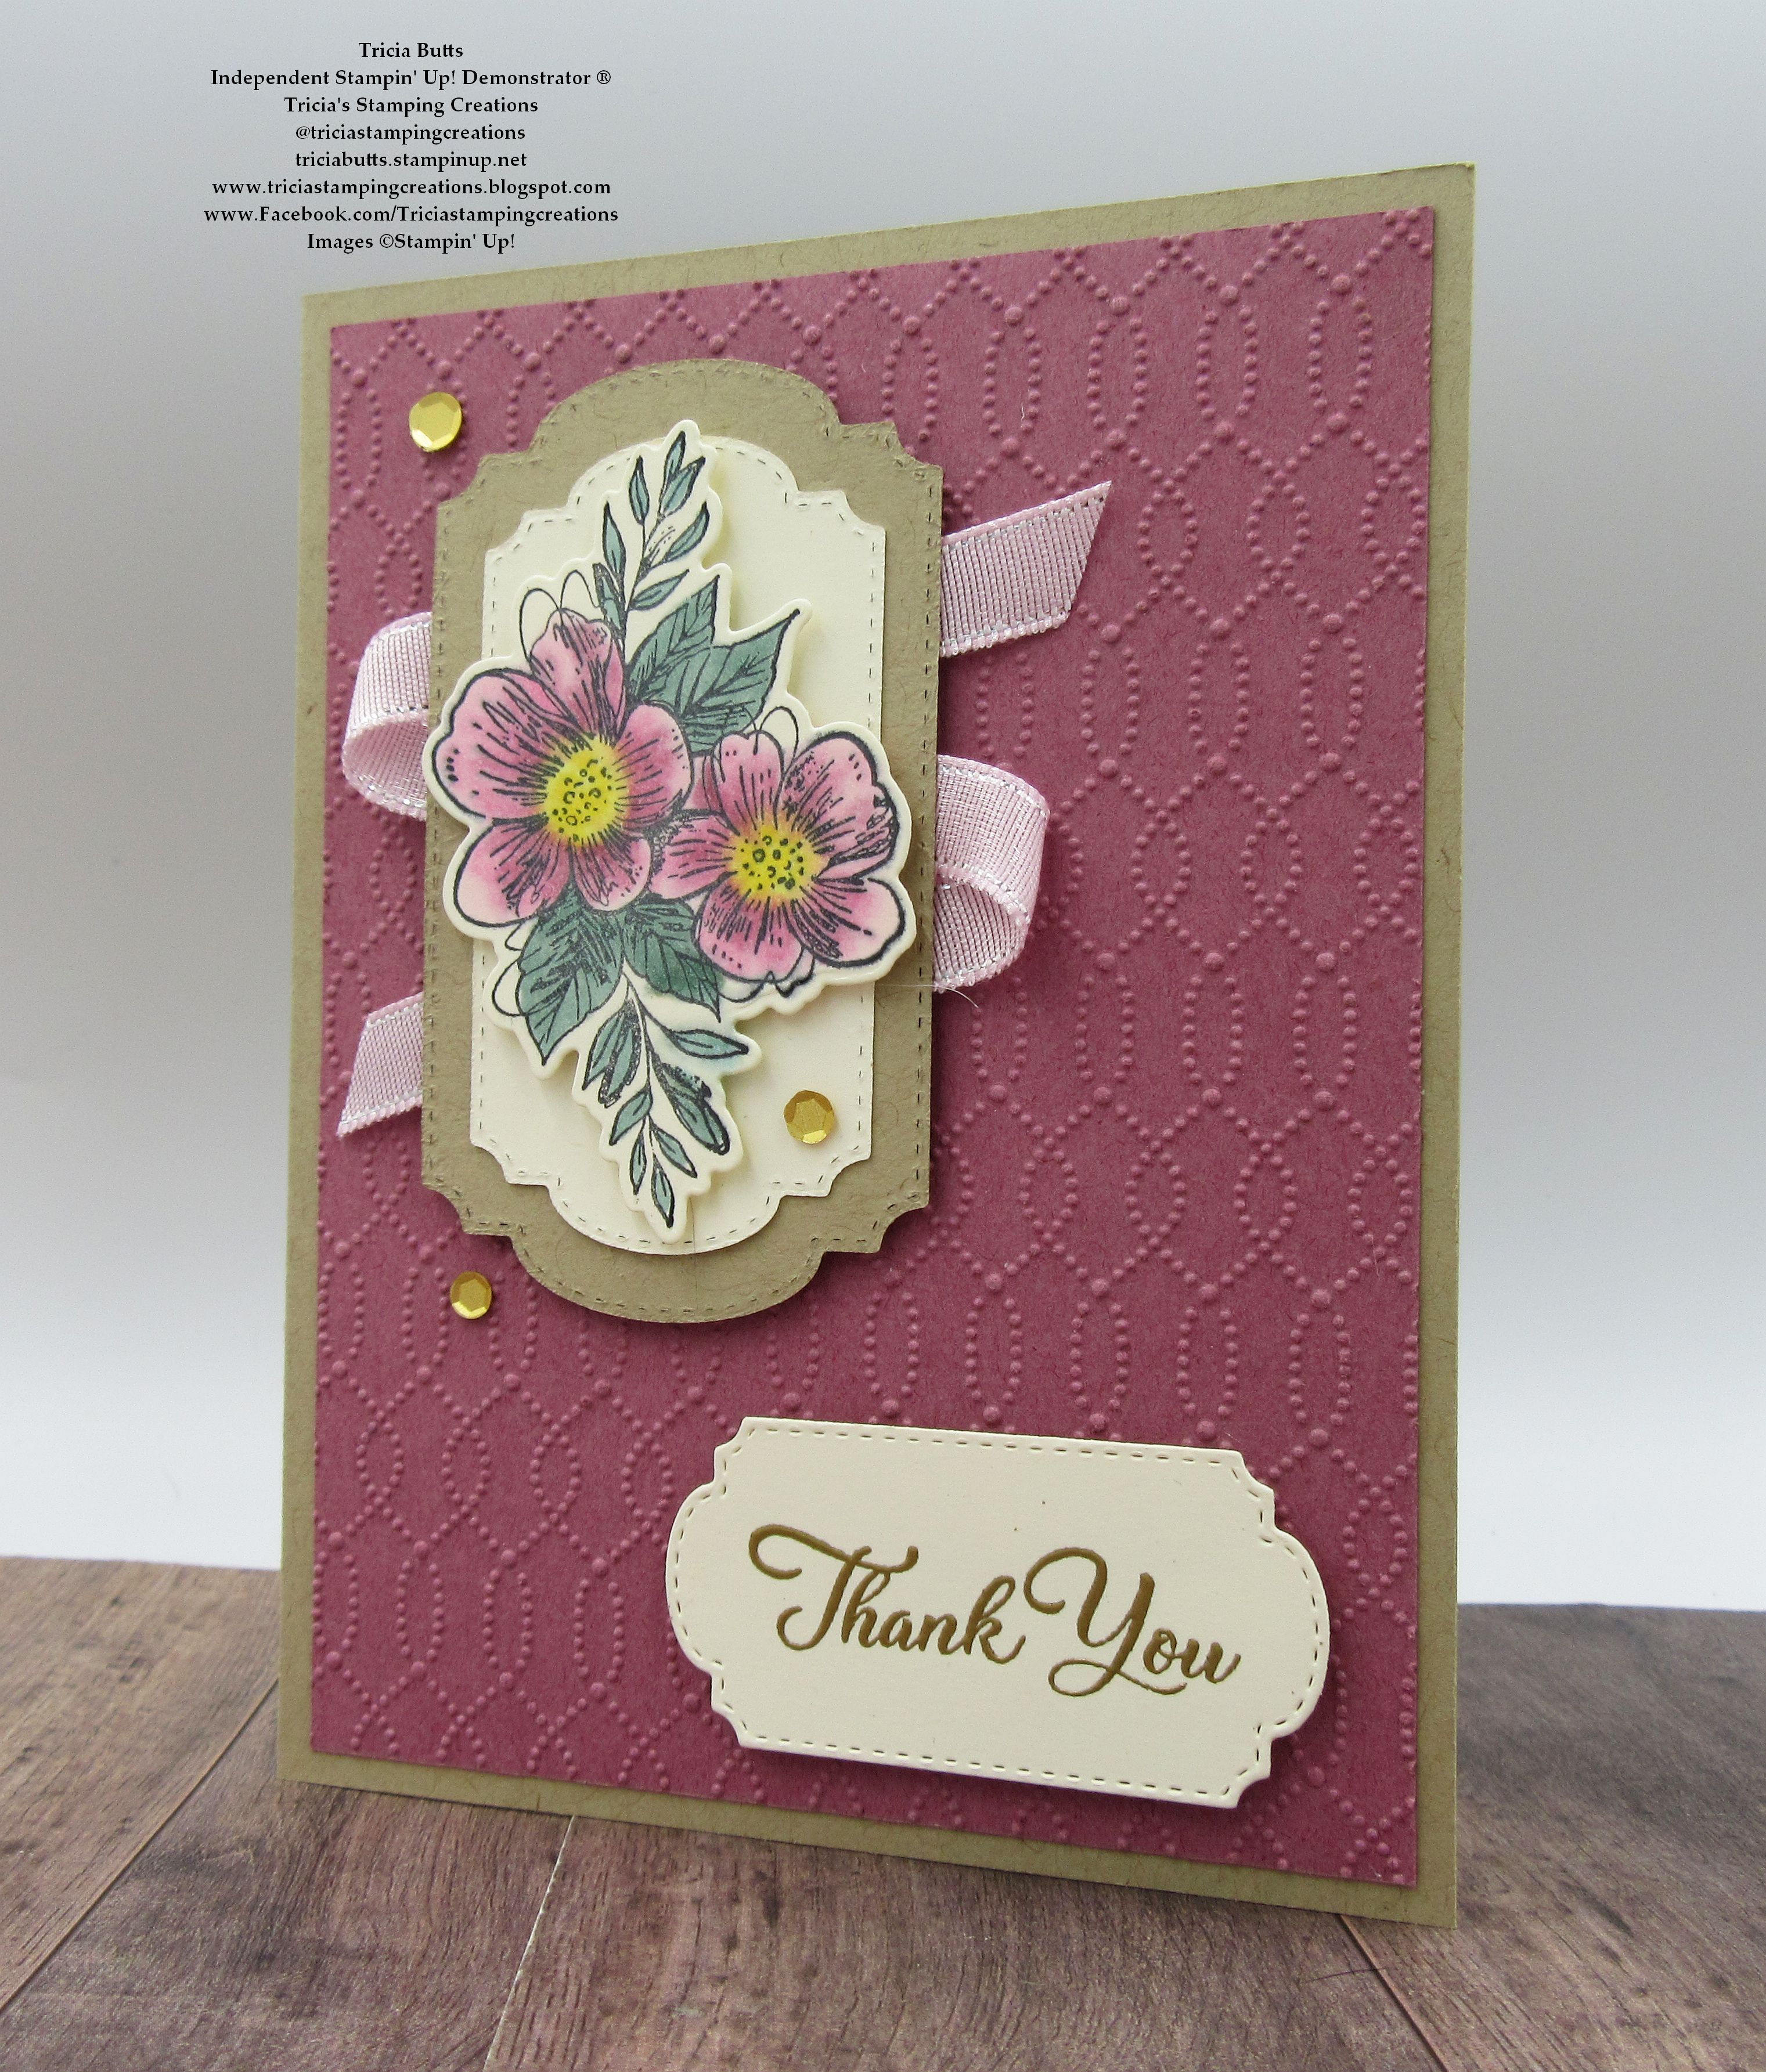
For my card design today, I thought I would use the new Thoughtful Expressions Bundle to create a pretty Thank You card. I chose to use the embossing folder from the Softly Sophisticated Bundle, which is a Level 2 Sale-a-bration Reward you can earn free with a qualifying $100 order. I love the delicate detail and texture this embossing folder adds to the background. The beautiful floral image is just one of the wonderful designs in the Thoughtful Expressions stamp set and I love the variety of layering shapes in the Thoughtful Expressions Dies. The sentiment is from the Go To Greetings stamp set, one of my favorite sentiment stamp sets because it has a wonderful range of sentiments in different sizes and fonts that works well for a variety of occasions.
Products Used:
Thoughtful Expressions Bundle (item #162822)
Softly Sophisticated Bundle (item #162947) Sale-a-bration Level 2 Reward
Go To Greetings stamp set (item #158763)
Crumb Cake Cardstock (item #120953)
Moody Mauve Cardstock (item #161723)
Very Vanilla Cardstock (item #101650)
Memento Tuxedo Black Pad (item #132708)
Versamark Pad (item #102283)
Metallics Embossing Powders (item #155555)
Moody Mauve Stampin' Blends Combo Pack (item #161660)
Bubble Bath Stampin' Blends Combo Pack (item #161675)
Lost Lagoon Stampin' Blends Combo Pack (item #161680)
Daffodil Delight Stampin' Blends Combo Pack (item #154883)
Sheer Ribbon Combo Pack (item #161635)
Pastel Adhesive Backed Sequins (item #160387)
Stampin' Dimensionals (item #104430)
Measurements:
Crumb Cake Cardstock
Card Base - 5 1/2" x 8 1/2" (Scored at 4 1/4")
Label die cut with the Thoughtful Expressions Dies
Very Vanilla Cardstock 
Floral image stamped and die cut with the Thoughtful Expressions Dies
Focal Layer die cut with the Thoughtful Expressions Dies
Sentiment Label die cut with the Thoughtful Expressions Dies
Moody Mauve Cardstock
Card Front - 5 1/4" x 4"
This pretty card design is all about the layers to add depth and dimension to the design. I stamped the floral design onto a piece of Very Vanilla cardstock with Memento Tuxedo Black ink and colored in the image using Stampin' Blends Markers before die cutting it out with the coordinating die. I layered it onto a Very Vanilla cardstock label die cut with the Thoughtful Expressions Dies, using Stampin' Dimensionals to pop it up. I then added it to the slightly larger Crumb Cake label die cut with same dies. The card front has been embossed with the Softly Sophisticated Embossing Folder and attached to the Crumb Cake card base. I added a piece of the Bubble Bath Sheer Ribbon behind the Crumb Cake label in a zig zag and then attached the label to the card front with Stampin' Dimensionals, towards the left side. For the sentiment, I heat embossed the image from the Go To Greetings stamp set with Gold embossing powder onto a Very Vanilla cardstock label and attached it to the card front with Stampin' Dimensionals. To finish off the design, I added several Gold Sequins for a touch of bling. I love the soft and pretty look of this card design and how well these colors work together.
Thank you for taking the time to visit my blog. I hope that my card design will help inspire you to create your own beautiful Thank You cards to send to family and friends. There are so many wonderful options to explore. The Softly Sophisticated Bundle is just one of the amazing Sale-a-bration products you can earn free with a qualifying order. Remember that Sale-a-bration ends February 29th, so make to place your order soon to avoid missing out. 
Please take a moment to visit with my fellow Stampin' Up! Demonstrators from around the world as they share their projects to help inspire you. Just click on the links in the Roll Call List to visit their blogs. We would appreciate it if you would leave us a comment and let us know what you liked about our projects.

If you live in the U.S. and do not have a Stampin' Up! Demonstrator, please contact me and I would be happy to help you with your creative projects. You may also visit my Online Store to place your order and have it shipped to you. 

Until Next Time

Happy Stamping,

Tricia Butts
Independent Stampin' Up! Demonstrator

Like What You See? Visit My Online Store Here

Visit My Facebook Business Page for Updates & Ideas

Click here to Contact Me


More Sale-a-bration Products Are Now Available
To Earn Free With A Qualifying Order
Click Below For More Details 

Explore Your Creativity In 2024
With The January-April 2024 Mini Catalog
Click Below To Shop Now


Monday, January 15, 2024

Demonstrator Training January Blog Hop

It's a cold, snowy day here in Colorado, which is a perfect reason to stay inside and create beautiful cards to share as part of the Demonstrator Training January Blog Hop. You will have the opportunity to visit with talented Stampin' Up! Demonstrators from around the world as they share their projects and ideas to help spark your creativity. Our theme is Thank You and Congratulations cards to share with the people in our lives. 
When the weather is cold and dreary, I love to make bright and cheerful cards to help brighten people's days. There is nothing like getting happy mail to bring a smile to someone's face. For my Thank You card today, I chose to use this pretty pattern from the Sunny Days Designer Series Paper, which is a Level 1 Sale-a-bration Reward you can earn free with a qualifying order. I love this sweet cherry design and I wanted it to be the star of the show, so I chose to use the Perennial Postage Bundle to create a simple sentiment label. I don't use Poppy Parade very often, but I love how bold and bright it looks with this design. 


Products Used:
Perennial Postage Bundle (item #162608)
Sunny Days Designer Series Paper (item #162974) Level 1 
Sale-a-bration Reward 
Poppy Parade Cardstock (item #119793)
Basic White Cardstock (item #159276)
Shaded Spruce Classic Ink Pad (item #147088)
Sweet Sorbet 1/4" Bordered Ribbon (item #162558)
Tinsel Gems Four Pack (item #161623)
Stampin' Dimensionals (item #104430)
Measurements:
Poppy Parade Cardstock
Card Base - 8 1/2" x 5 1/2" (Scored at 4 1/4")
Mat Layer die cut with the Perennial Postage Dies
Basic White Cardstock
Sentiment Label die cut with the Perennial Postage Dies
Sunny Days Designer Series Paper
Card Front - 5 1/4" x 4"
This is such a fun card design and simple to create. For the sentiment, I chose to stamp the image from the Perennial Postage stamp set onto Basic White cardstock with Shaded Spruce Classic ink to coordinate with the colors in the designer series paper. I die cut the sentiment with one of the Perennial Postage Dies and then layered it onto a Poppy Parade die cut with the die one size larger. I added two pieces of the Sweet Sorbet Bordered Ribbon across the middle of the card front and added the sentiment label on top with Stampin' Dimensionals to pop it up. For a touch of bling, I used some Pretty Peacock Gems from the Tinsel Gems Four Pack to complete the design. You may have noticed that the Sweet Sorbet Ribbon and Pretty Peacock Gems are a close match to Poppy Parade and Shaded Spruce and it's a good reminder that you can mix and match products to help you design your cards and projects. 
Thank you for taking the time to visit my blog. I hope that my card will help give you some creative ideas to help you create your own beautiful card designs. There are so many wonderful possibilities to explore in the January-April 2024 Mini Catalog and 2024 Sale-a-bration Catalog. 
Please visit with the other Demonstrators taking part in today's blog hop by clicking on the links in the Roll Call List below. You will find so many wonderful projects to inspire you. We would appreciate it if you would leave us a comment and let us know what you liked about our projects. I hope you enjoy our blog hop.

If you live in the U.S. and do not have a Stampin' Up! Demonstrator, please contact me and I would be happy to help you with your creative projects. You may also visit my Online Store to place your order and have it shipped to you. 

Until Next Time

Happy Stamping,

Tricia Butts
Independent Stampin' Up! Demonstrator

Like What You See? Visit My Online Store Here

Visit My Facebook Business Page for Updates & Ideas

Click here to Contact Me


Explore Your Creativity In 2024
With The January-April 2024 Mini Catalog
Click Below To Shop Now

Sale-a-Bration Is Here!
Earn Exclusive Free Products With A Qualifying Order
Click Below For More Details