Friday, June 21, 2024

Crafty Collaborations Monochromatic Color Challenge Week 25 - Real Red

Welcome to Week 25 of the Crafty Collaborations Monochromatic Color Challenge. Can you believe we are halfway through the year? Time has flown by so quickly and it has been so much fun. This week we are showcasing Real Red from the Regals Collection and I can't wait to share my card design with you. It is something a little different for me but I had so much fun creating it.
For this card design, I chose to use three of the patterns of Real Red Designer Series Paper from the Regals 6"x6" Designer Series Paper. I used one of the banner dies from the Nested Essentials Dies. I paired it with the Happy Little Things stamp set to create this fun clean and simple card design that is perfect for celebrating the special occasions in your life. I love the texture that the patterns from the designer series paper add to the background and the bold contrast of a red and white color combination. 
Products Used:
Happy Little Things stamp set (item #163705)
Nested Essentials Dies (item #161597)
Regals 6"x6" Designer Series Paper (item #163774)
Real Red Cardstock (item #102482)
Basic White Cardstock (item #159276)
Real Red Classic Ink Pad (item #147084)
Real Red Stampin' Blends Combo Pack (item #154899)
Iridescent Pearls Basic Jewels (item #158987)
Stampin' Dimensionals (item #104430)
Measurements:
Real Red Cardstock
Card Base - 5 1/2" x 8 1/2'" (Scored at 4 1/4")
Basic White Cardstock
Card Front - 5 1/4" x 4"
Sentiment Strip - 1" x 5"
Real Red Designer Series Paper
3 Banners die cut with the Nested Essentials Dies (1 of each pattern)
I love creating clean and simple cards with designer series paper. For this card design, I chose to use three different patterns of Real Red Designer Series Paper to create the banners for my design. I used one of the banner dies from the Nested Essentials Dies and cut them at 1" from the top to create two pieces to give the look of an elongated banner. I love the texture that each of the patterns adds to the design as well as the variations of the color to add contrast. For the sentiment strip, I stamped the outline image with Real Red Classic ink in the center of the strip and then added the solid image, stamping off once on scrap paper, to give the lighter shade of Real Red. I added all the banner pieces and the sentiment strip with Stampin' Dimensionals to the Basic White card front to add dimension to the design and then attached the card front to the Real Red card base. To complete the card, I added two Iridescent Pearls that I colored with the Dark Real Red Stampin' Blends Marker to the sentiment strip to coordinate with the rest of the design. I love how this card turned out and I think it is the perfect way to showcase this beautiful bright red. What do you think?
Thanks for taking the time to visit my blog. I hope that you enjoy my fun card design and that it gives you ideas to help you create your own beautiful cards using stamps, paper and ink. There are so many wonderful options to explore.
Please take the time to visit this week's Monochromatic Insta Hop over on Instagram. You can get started here and click on the links in the description to visit each of the amazing projects. We would love it if you would leave us a comment and let us know how you liked out projects. 

If you live in the U.S. and do not have a Stampin' Up! Demonstrator, please contact me and I would be happy to help you with your creative projects. You may also visit my Online Store to place your order and have it shipped to you. 

Until Next Time

Happy Stamping,

Tricia Butts
Independent Stampin' Up! Demonstrator

Like What You See? Visit My Online Store Here

Visit My Facebook Business Page for Updates & Ideas

Click here to Contact Me


Save An Extra 10% On Select Bundles
Plus 10% Off Stampin' Cut & Emboss Machines
Click Below To Shop Now


Wednesday, June 19, 2024

New At SU June Blog Hop Catalog Sketch Challenge Latte Love

It's time to hop along with the New At SU June Blog Hop and this month we are doing a Sketch Challenge with a bit of twist. If you have seen the new 2024-2025 Annual Catalog, you may have noticed the sketch layouts on the bottom of page 22 that Stampin' Up! has provided for inspiration to help you get creative. For this month's sketch challenge, our wonderful Design Team members have each chosen to use one of these sketch layouts to create their card design using products from the new catalog and Online Exclusives. Sketch layouts provide a great starting point for creating your own unique card designs using the products you have in your crafty stash. 
For my card design today, I chose to use the third sketch shown using the Latte Love Bundle and coordinating A Little Latte Designer Series Paper available in the Online Exclusives. I love how the coffee theme fits with this layout and it was fun using the designer series paper and images from the bundle to recreate the layout. 
Products Used:
Latte Love Bundle (item #163461)
Something Fancy Dies (item #160424)
A Little Latte Designer Series Paper (item #163453)
Early Espresso Cardstock (item #119686)
Pecan Pie Cardstock (item #161717)
Very Vanilla Cardstock (item #101650)
Early Espresso Classic Ink Pad (item #147114)
Pecan Pie Classic Ink Pad (item #161665)
Summer Splash Stampin' Blends Combo Pack (item #163826)
Adhesive Backed Swirl Dots (item #163464)
Linen Thread (item #104199)
Stampin' Dimensionals (item #104430)
Measurements:
Pecan Pie Cardstock 
Card Base - 5 1/2" x 8 1/2" (Scored at 4 1/4")
Early Espresso Cardstock
Card Front - 5 1/4" x 4"
Strip - 1/2" x 4"
Very Vanilla Cardstock
Cup image stamped and die cut with the Latte Love Bundle
Latte image stamped and die cut with the Latte Love Bundle
Sentiment Label die cut with the Something Fancy Dies
A Little Latte Designer Series Paper
3 Strips - 1" x 4 1/4"
This card was so much fun to design and I love how the designer series paper worked to create the three panels for the background design. You may notice that the strips are aligned so that you can see the swirls in the pattern and I love how it pops against the Early Espresso cardstock card front. For the focal circle from the layout, I chose to use one of coffee cup images to replace to circle and I added a strip of Early Espresso cardstock across the card front for it to sit on top of to recreate that part of the sketch. I used a piece of Linen Thread to wrap around the card front twice on top of the Early Espresso strip and then tied a bow on the left side. For the coffee cup image, I colored the cup with Summer Splash Stampin' Blends Markers and I stamped the latte image with Pecan Pie Classic ink to add to the center of the cup. I attached the coffee cup over the top of the strip and Linen Thread with Stampin' Dimensionals to make it pop up. For the sentiment, I stamped the image with Pecan Pie Classic ink onto the label and attached it on the left side of the card, slightly lower than the Early Espresso strip using Stampin' Dimensionals. I attached the completed card front to the Pecan Pie card base with Stampin' Dimensionals for extra dimension. To complete the card design, I added several of the Adhesive Backed Swirl Dots for the perfect finishing touch. I love that the sketch layout provided me with the blueprint to follow for my card design, and with a few simple changes, I was able to make my own unique design. 
Thank you for taking the time to visit my blog. I hope that my card design will help inspire you to explore using the wonderful sketches in the new 2024-2025 Annual Catalog to help spark your creativity. There are so many possibilities to explore. Don't forget to check out the current promotion where you can save an additional 10% on select bundles. The Latte Love Bundle that I chose for my card design, is just one of many currently on sale. 
Please take the time to visit with my fellow Design Team members by clicking on the links in the Roll Call List below. We would love it if you would leave us a comment and let us know what you liked about our projects. 

If you live in the U.S. and do not have a Stampin' Up! Demonstrator, please contact me and I would be happy to help you with your creative projects. You may also visit my Online Store to place your order and have it shipped to you. 

Until Next Time

Happy Stamping,

Tricia Butts
Independent Stampin' Up! Demonstrator

Like What You See? Visit My Online Store Here

Visit My Facebook Business Page for Updates & Ideas

Click here to Contact Me


Save An Extra 10% On Select Bundles
Plus 10% Off Stampin' Cut & Emboss Machines
Click Below To Shop Now


Saturday, June 15, 2024

Stamping With Friends June Blog Hop 2024-2025 Annual Catalog Bundles

Welcome to the Stamping With Friends June Blog Hop as we explore the wonderful new bundles in the 2024-2025 Annual Catalog. What exactly is a bundle? It is Stampin' Up! pairs together a stamp set with a coordinating punch or coordinating dies so that you can save 10% on the price. This makes it a great, budget friendly way to add your favorites to your crafting tool kit. Our amazing Design Team will be sharing their projects and ideas using the new bundles to help inspire you to create your own projects.
For my card design, I wanted to use the Hearts & Hugs Bundle to create a sweet birthday card. This bundle stole my heart when I first saw the new catalog and it was one of the first bundles I had to have. I love the combination of adorable images and cute sentiments and having coordinating dies just makes creating with this bundle so simple and fun. For today's design, I chose to use the sweet walruses for my focal image and colored it with Stampin' Blends Markers. The background was created with one of the Meandering Meadows 6"x6" Designer Series Paper designs. Did you know that the reverse sides have wonderful monochromatic patterns that make amazing backgrounds? This is just one example of how you can use this pretty paper in a less traditional way. I added a pop of color with the banner and the hearts using Real Red cardstock to bring the design together. This clean and simple design is so much fun and I love that I was able to use just the stamp set and coordinating dies from this bundle to create my design. 
Products Used: 
Hearts & Hugs Bundle (item #163667)
Meandering Meadows 6"x6" Designer Series Paper (item #162735)
Blueberry Bushel Cardstock (item #146968)
Real Red Cardstock (item #102482)
Basic White Cardstock (item #159276)
Blueberry Bushel Classic Ink Pad (item #147138)
Memento Tuxedo Black Pad (item #132708)
Smoky Slate Stampin' Blends Combo Pack (item #154904)
Ivory/Bronze Stampin' Blends Combo Pack (item #154922)
Pebbled Path Stampin' Blends Combo Pack (item #161658)
Stampin' Dimensionals (item #104430)
Measurements:
Blueberry Bushel Cardstock
Card Base - 5 1/2" x 8 1/2" (Scored at 4 1/4")
Real Red Cardstock
Background piece - 3" x 1 1/2" approx.
Sentiment Label die cut with the Hearts & Hugs Dies
Basic White Cardstock
Layer 1 - 5 1/4" x 4"
Sentiment Label stamped & die cut with the Hearts & Hugs Bundle
Walruses image stamped & die cut with the Heart & Hugs Bundle
Meandering Meadows Designer Series Paper
Card Front - 5" x 3 3/4" with hearts die cut from the background
(2 of the hearts used for sentiment label)
There is so much to love about this card design, it's hard to know where to start. I love the texture of the background design and how it makes everything else pop. Blueberry Bushel is one of my favorite blues, but it is often overlooked. I used a layer of Basic White cardstock to create a frame around the focal layer and help it stand out from the Blueberry Bushel card base. After adhering the designer series paper layer to the Basic White cardstock, I die cut out the detailed hearts arch towards the top and center of the card front. I added a piece of Real Red cardstock on the back, behind the negative die cut hearts, to give them a beautiful bright red color. For the walruses, I stamped the image with Memento Tuxedo Black ink onto Basic White cardstock and colored them with Smoky Slate, Ivory and Light Pebbled Path Stampin' Blends Markers. I die cut the image out using the coordinating die from the bundle and attached it to the card front using Stampin' Dimensionals, positioning it in the center just below the hearts. For the sentiment, I stamped the image with Blueberry Bushel Classic ink and die cut the label using one of the dies from the bundle. I also die cut a Real Red label using the same die and cut it in half using Paper Snips. I attached each piece of the Real Red label to the back of the Basic White sentiment label, leaving a small banner on each end to frame the sentiment. I then attached the sentiment label to the card front using Stampin' Dimensionals, centering it below the walruses. To complete the design, I added two of the hearts created from the background, to the sentiment label. I attached the card front to the card base using Stampin' Dimensionals to pop it up and add extra dimension to the design. Isn't this just the cutest birthday card? I just love how it turned out.
Thank you for taking the time to visit my blog. I hope that my card design will help inspire you to explore the wonderful bundles in the 2024-2025 Annual Catalog to help spark your creativity. Make sure to take advantage of the extra 10% discount on select bundles during the month of June as well as save 10% on Stampin' Cut & Emboss Machines.
Please take the time to visit the Design Team to see their amazing projects by clicking on the links in the Roll Call List. We would appreciate it if you would leave us a comment and let us know what you liked about our projects.

If you live in the U.S. and do not have a Stampin' Up! Demonstrator, please contact me and I would be happy to help you with your creative projects. You may also visit my Online Store to place your order and have it shipped to you. 

Until Next Time

Happy Stamping,

Tricia Butts
Independent Stampin' Up! Demonstrator

Like What You See? Visit My Online Store Here

Visit My Facebook Business Page for Updates & Ideas

Click here to Contact Me


Save An Extra 10% On Select Bundles
Plus 10% Off Stampin' Cut & Emboss Machines
Click Below To Shop Now


Friday, June 14, 2024

Crafty Collaborations Monochromatic Color Challenge Week 24 - Early Espresso

It's Week 24 of the Crafty Collaborations Monochromatic Color Challenge and this week we are showcasing Early Espresso from the Neutrals Collection. I love this wonderfully rich dark brown and I am so excited to share with you the card design I came up with for this week's challenge.
My card this week is a fun masculine design featuring the Adventurous Sky Bundle. I wanted to create a worn, vintage look to this design and I used the Watercolor World background stamp to create my background and added some texture with the Painted Texture 3D Embossing Folder. I used Early Espresso Classic ink to create the different layers of color that help to showcase the versatility of this wonderful color. This card design would be great for a Father's Day card, masculine birthday or graduation card. 
Products Used:
Adventurous Sky Bundle (item #163447)
Watercolor World stamp set (item #160708)
Deckled Circles Dies (item #162286)
Something Fancy Dies (item #160424)
Painted Texture 3D Embossing Folder (item #154317)
Early Espresso Cardstock (item #119686)
Very Vanilla Cardstock (item #101650)
Early Espresso Classic Ink Pad (item #147114)
Neutrals Adhesive Backed Sequins (item #161627)
Blender Pens (item #102845)
Sponge Daubers (item #133773)
Stampin' Dimensionals (item #104430)
Measurements:
Early Espresso Cardstock
Card Base - 5 1/2" x 8 1/2" (Scored at 4 1/4")
Medium Circle die cut with the Deckled Circles Dies 
Very Vanilla Cardstock
Card Front - 5 1/4" x 4" Embossed with the Painted Texture 3D Embossing Folder
Plane image stamped and die cut with the Adventurous Sky Bundle 
Sentiment Label die cut with the Something Fancy Dies
To create this beautiful card, I chose to use the Watercolor World stamp set for my background and I stamped the image with Early Espresso Classic ink onto the Very Vanilla cardstock card front. I then embossed the layer with the Painted Texture 3D Embossing Folder to give the layer the look of wrinkled parchment paper and then added some Early Espresso ink around the edges and over the raised lines using a Sponge Dauber to give the background a distressed look. For the plane image, I stamped it with Early Espresso Classic ink onto Very Vanilla cardstock and then used a Blender Pen to color the image using the ink from the stamped image to add soft color. I also stamped the sentiment onto the Very Vanilla sentiment label using Early Espresso Classic ink. To assemble to card, I added the Early Espresso Deckled Circle to the card front and the layered the plane and sentiment onto using Stampin' Dimensionals. To complete the card, I added several of the Neutrals Adhesive Backed Sequins for a touch of bling without being overwhelming. I love how Early Espresso works with Very Vanilla, especially when you are looking to create a project with a vintage feel to it. 
Thank you for taking the time to visit my blog. I hope that my card design will help inspire you to explore using Early Espresso in your creative projects in the future. There are so many wonderful options available to help spark your creativity.
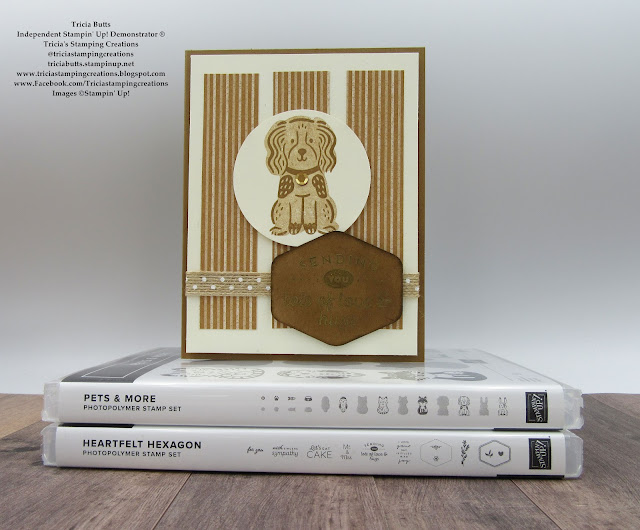
Please take the time to check out this week's Monochromatic Insta Hop to see the amazing projects showcasing Early Espresso. You can start here on my Instagram account. We would love it if you would leave us a comment and let us know what you liked about our projects. 

If you live in the U.S. and do not have a Stampin' Up! Demonstrator, please contact me and I would be happy to help you with your creative projects. You may also visit my Online Store to place your order and have it shipped to you. 

Until Next Time

Happy Stamping,

Tricia Butts
Independent Stampin' Up! Demonstrator

Like What You See? Visit My Online Store Here

Visit My Facebook Business Page for Updates & Ideas

Click here to Contact Me


Save An Extra 10% On Select Bundles
Plus 10% Off Stampin' Cut & Emboss Machines 
Click Below To Shop Now


Wednesday, June 12, 2024

ICS June Blog Hop It's A Guy Thing

Welcome to the ICS June Blog Hop and this month our theme is "It's a Guy Thing". Masculine cards can be challenging at the best of times, so our wonderful Design Team will be sharing their projects and ideas to help spark your creativity and help you create something special for the guys in your life. 
For my masculine card, I decided to go with a silhouette scenic design using minimal supplies and no stamping. Yes, you read that correctly, I said no stamping. When I combined the beautiful designer series background with the detailed silhouette card front, I felt like it was perfect without a sentiment. Sometimes, less is more and I think that is true for this card design. 
Products Used:
Groves Dies (item #157844)
Thoughtful Journey 6"x6" Designer Series Paper (item #163303)
Basic Black Cardstock (item #121045)
Stampin' Dimensionals (item #104430)
Measurements:
Basic Black Cardstock
Card Base - 5 1/2" x 8 1/2" (Scored at 4 1/4")
Detailed Card Front - 3 3/4" x 5" die cut with the Groves Dies
2 Deer die cut with the Groves Dies
Thoughtful Journey Designer Series Paper
Background Layer - 5 1/4" x 4"
This beautiful design is a great example of how you can create wonderful cards without a lot of supplies and without a lot of fuss. The delicate die cut card front was created using the Groves Dies to create a silhouette from Basic Black cardstock and when it is placed on top of the layer of designer series paper, it creates the look of a sunset in the woods with the colors of the background making the silhouette come alive.  I used Stampin' Dimensionals to pop up the detailed card front and then added the two deer to the background so that the bottom of their legs are hidden behind the grass at the bottom. It's a great way to add some subtle dimension to the design and the outer edge of the designer series paper creates a beautiful frame around the scene. The Basic Black card base helps to tie everything together to create a wonderful clean and simple card design that is suitable for a variety of occasions. 
Thank you for taking the time to visit my blog. I hope that my card design will help inspire you to create your own beautiful cards for the men in your lives. Masculine cards don't have to be fancy or intimidating. Just keep it clean and simple using Stampin' Up!'s wonderful coordinating products to help take the stress out of creating. 
Now it's time to visit  Joni blog and see what she has created for this month's challenge. Just click on the Next button below to visit her blog. We would love it if you would leave us a comment and let us know what you like about our projects. I hope you enjoy the rest of our blog hop. 

If you live in the U.S. and do not have a Stampin' Up! Demonstrator, please contact me and I would be happy to help you with your creative projects. You may also visit my Online Store to place your order and have it shipped to you. 

Until Next Time

Happy Stamping,

Tricia Butts
Independent Stampin' Up! Demonstrator

Like What You See? Visit My Online Store Here

Visit My Facebook Business Page for Updates & Ideas

Click here to Contact Me


Save An Extra 10% On Select Bundles
Plus 10% Off Stampin' Cut & Emboss Machines
Click Below To Visit My Online Store