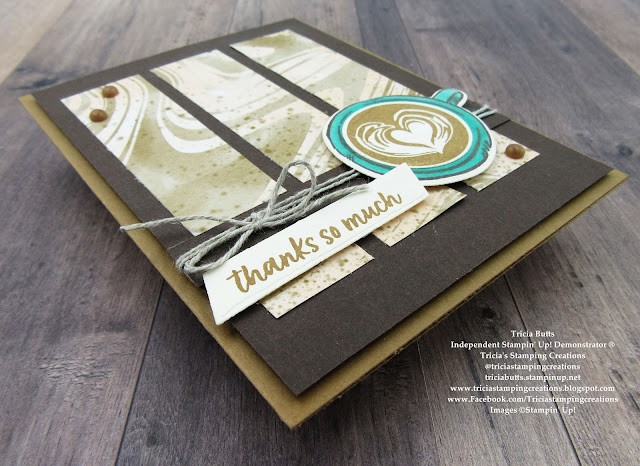
It's time to hop along with the New At SU June Blog Hop and this month we are doing a Sketch Challenge with a bit of twist. If you have seen the new 2024-2025 Annual Catalog, you may have noticed the sketch layouts on the bottom of page 22 that Stampin' Up! has provided for inspiration to help you get creative. For this month's sketch challenge, our wonderful Design Team members have each chosen to use one of these sketch layouts to create their card design using products from the new catalog and Online Exclusives. Sketch layouts provide a great starting point for creating your own unique card designs using the products you have in your crafty stash.
For my card design today, I chose to use the third sketch shown using the Latte Love Bundle and coordinating A Little Latte Designer Series Paper available in the Online Exclusives. I love how the coffee theme fits with this layout and it was fun using the designer series paper and images from the bundle to recreate the layout. Products Used:
Latte Love Bundle (item #163461)
Something Fancy Dies (item #160424)
A Little Latte Designer Series Paper (item #163453)
Early Espresso Cardstock (item #119686)
Pecan Pie Cardstock (item #161717)
Very Vanilla Cardstock (item #101650)
Early Espresso Classic Ink Pad (item #147114)
Pecan Pie Classic Ink Pad (item #161665)
Summer Splash Stampin' Blends Combo Pack (item #163826)
Adhesive Backed Swirl Dots (item #163464)
Linen Thread (item #104199)
Stampin' Dimensionals (item #104430)
Measurements:
Pecan Pie Cardstock
Card Base - 5 1/2" x 8 1/2" (Scored at 4 1/4")
Early Espresso Cardstock
Card Front - 5 1/4" x 4"
Strip - 1/2" x 4"
Very Vanilla Cardstock
Cup image stamped and die cut with the Latte Love Bundle
Latte image stamped and die cut with the Latte Love Bundle
Sentiment Label die cut with the Something Fancy Dies
A Little Latte Designer Series Paper
3 Strips - 1" x 4 1/4"

This card was so much fun to design and I love how the designer series paper worked to create the three panels for the background design. You may notice that the strips are aligned so that you can see the swirls in the pattern and I love how it pops against the Early Espresso cardstock card front. For the focal circle from the layout, I chose to use one of coffee cup images to replace to circle and I added a strip of Early Espresso cardstock across the card front for it to sit on top of to recreate that part of the sketch. I used a piece of Linen Thread to wrap around the card front twice on top of the Early Espresso strip and then tied a bow on the left side. For the coffee cup image, I colored the cup with Summer Splash Stampin' Blends Markers and I stamped the latte image with Pecan Pie Classic ink to add to the center of the cup. I attached the coffee cup over the top of the strip and Linen Thread with Stampin' Dimensionals to make it pop up. For the sentiment, I stamped the image with Pecan Pie Classic ink onto the label and attached it on the left side of the card, slightly lower than the Early Espresso strip using Stampin' Dimensionals. I attached the completed card front to the Pecan Pie card base with Stampin' Dimensionals for extra dimension. To complete the card design, I added several of the Adhesive Backed Swirl Dots for the perfect finishing touch. I love that the sketch layout provided me with the blueprint to follow for my card design, and with a few simple changes, I was able to make my own unique design.

Thank you for taking the time to visit my blog. I hope that my card design will help inspire you to explore using the wonderful sketches in the new 2024-2025 Annual Catalog to help spark your creativity. There are so many possibilities to explore. Don't forget to check out the current promotion where you can save an additional 10% on select bundles. The Latte Love Bundle that I chose for my card design, is just one of many currently on sale.
Please take the time to visit with my fellow Design Team members by clicking on the links in the Roll Call List below. We would love it if you would leave us a comment and let us know what you liked about our projects.
If you live in
the U.S. and do not have a Stampin' Up! Demonstrator, please contact me and I
would be happy to help you with your creative projects. You may also visit my
Online Store to place your order and have it shipped to you.
Until Next
Time
Happy
Stamping,
Tricia Butts
Independent Stampin' Up!
Demonstrator
Like What You See?
Visit My Online Store Here
Visit My Facebook Business Page for Updates & Ideas
Click here to Contact Me
Save An Extra 10% On Select Bundles
Plus 10% Off Stampin' Cut & Emboss Machines
Click Below To Shop Now


