Showing posts with label Stampin' Blends Markers. Show all posts

Wednesday, November 20, 2024

New At SU November Blog Hop One Color Palette, Many Ways Color Challenge Dear Santa

It's time to hop along with the New At SU November Blog Hop and this month we have a fun Color Challenge to explore. Our wonderful Design Team will be sharing their ideas and projects featuring the following colors: Moody Mauve, Bubble Bath, Old Olive, Mossy Meadow and Basic Beige. We can choose to use all or some of these colors to create our projects to help spark your creativity.
For my card design, I chose to create a fun, non-traditional Christmas card design using all of the above colors. This isn't a color combination that I would have thought to create with on my own, so it was a wonderful way for me to step outside my comfort zone and explore this beautiful colors. I used a combination of card stock, designer series paper and inks in the various colors to showcase how well these colors work together. I did add one extra color, Lemon Lolly, for the hair for my image. The patterns in the designer series paper strips add texture and contrast to the design and work well with the whimsy of the focal image and sentiment from the Dear Santa stamp set. I love how all the different elements combined to create this sweet Christmas card that will hopefully brighten someone's day.
Products Used:
Dear Santa stamp set (item #164303)
Stylish Shapes Dies (item #159183)
Iconic Celebrations 6"x6" Designer Series Paper (item #164193)
Moody Mauve Cardstock (item #161723)
Old Olive Cardstock (item #100702)
Bubble Bath Cardstock (item #161718)
Basic Beige Cardstock (item #164511)
Basic White Cardstock (item #159276)
Moody Mauve Classic Ink Pad (item #161649)
Basic Beige Classic Ink Pad (item #163806)
Memento Tuxedo Black Pad (item #132708)
Moody Mauve Stampin' Blends Combo Pack (item #161660)
Bubble Bath Stampin' Blends Combo Pack (item #161675)
Old Olive Stampin' Blends Combo Pack (item #154892)
Lemon Lolly Stampin' Blends Combo Pack (item #161673)
Color Lifter (item #144608)
Blender Pens (item #102845)
Rainbow Adhesive Backed Dots (item #162758)
Stampin' Dimensionals (item #104430)
Measurements:
Moody Mauve Cardstock
Card Base - 5 1/2" x 8 1/2" (Scored at 4 1/4")
Old Olive Cardstock
Layer 1 - 5 1/4" x 4"
Basic Beige Cardstock
Card Front - 5" x 3 3/4"
Basic White Cardstock
Medium Circle die cut with the Stylish Shapes Dies
Bubble Bath Cardstock
Sentiment Label die cut with the Stylish Shapes Dies
Iconic Celebrations Designer Series Paper
4 Strips Mossy Meadow Design - 1/2" x 3 1/2"
4 Strips Moody Mauve Design - 1/2" x 3 1/2"
I love the fun images in the Dear Santa stamp set and I thought the sweet little girl eating the cookies was perfect for this color combination. The combination of the Moody Mauve and Mossy Meadow Designer Series Paper strips really pop against the Basic Beige card front and add some fun to this card design. I used Stampin' Blends Markers to color the focal image as well as Basic Beige Classic ink with a Blender Pen to color the cookies. The Old Olive cardstock layer makes a wonderful border around the card front and pops against the Moody Mauve card base. To complete the layout, I stamped the sentiment with Moody Mauve Classic ink onto the Bubble Bath cardstock label and added it to the card front with Stampin' Dimensionals. I added several Bubble Bath Dots to a subtle touch of bling to finish off the card design. I love how this card design turned out and how pretty it looks with this color combination. 
Thank you for taking the time to visit my blog. I hope that my card design will help inspire you to explore this color combination to create your own beautiful projects. Color Challenges can be a great way to help spark your creativity and try something new, especially if they are colors that you may not have tried before. 
Please take a moment to hop along our blog hop this month and visit with our wonderful Design Team to see what amazing projects and ideas they have to share. Just click on the links in the Roll Call List below to visit their blogs. We would love it if you would leave us a comment and let us know what you liked about our projects.

If you live in the U.S. and do not have a Stampin' Up! Demonstrator, please contact me and I would be happy to help you with your creative projects. You may also visit my Online Store to place your order and have it shipped to you. 


Until Next Time

Happy Stamping,

Tricia Butts
Independent Stampin' Up! Demonstrator

Like What You See? Visit My Online Store Here

Visit My Facebook Business Page for Updates & Ideas

Click here to Contact Me


Wednesday, October 16, 2024

New At SU October Blog Hop Sketches Surfing Santa

Welcome to the New At SU October Blog Hop and this month we are showcasing sketches on page 16 of the September-December 2024 Mini Catalog using new products which can also be found in this catalog. Our wonderful Design Team will be sharing their projects and ideas to help inspire you to explore this amazing tool which can open up so many possibilities to help spark your creativity.
For my card design, I chose the above sketch to create the layout for my card design. I love the simple structure that it provides for my card and I chose to use the new Surfing Santa stamp set to create the focal design. As you will see from my finished card, this layout helps showcase this stepped up Christmas card perfectly to create a non-traditional holiday design.
Growing up in Australia, our Christmases were in the Summer, which mean hot days instead of the traditional White Christmas scenes that are often portrayed for the holidays. So when I saw the Surfing Santa stamp set in the September-December 2024 Mini Catalog, I just knew I had to get it to create Christmas cards that felt more like what I grew up with, to send to my family back home. I love how this sketch helped bring my card design to life and the bright, beautiful colors that reflect a Summer Christmas. 
Products Used:
Surfing Santa stamp set (item #164298)
Stylish Shapes Dies (item #159183)
Deckled Rectangles Dies (item #159173)
Nested Essentials Dies (item #161597)
So Swirly Embossing Folder (item #163791)
Azure Afternoon Cardstock (item #161719)
Balmy Blue Cardstock (item #146982)
Daffodil Delight Cardstock (item #119683)
Basic White Cardstock (item #159276)
Azure Afternoon Classic Ink Pad (item #161663)
Balmy Blue Classic Ink Pad (item #147105)
Daffodil Delight Classic Ink Pad (item #147094)
Memento Tuxedo Black Pad (item #132708)
Azure Afternoon Stampin' Blends Combo Pack (item #161672)
Balmy Blue Stampin' Blends Combo Pack (item #154830)
Daffodil Delight Stampin' Blends Combo Pack (item #154883)
Granny Apple Green Stampin' Blends Combo Pack (item #154885)
Petal Pink Stampin' Blends Combo Pack (item #154893)
Poppy Parade Stampin' Blends Combo Pack (item #154958)
Smoky Slate Stampin' Blends Combo Pack (item #154904)
Color Lifter (item #144608)
Iridescent Foil Gems (item #162842)
Stampin' Dimensionals (item #104430)
Measurements:
Azure Afternoon Cardstock 
Card Base - 5 1/2" x 8 1/2" (Scored at 4 1/4")
Balmy Blue Cardstock 
Card Front - 5 1/4" x 4" Embossed with the So Swirly Embossing Folder
Daffodil Delight Cardstock
Large Banner die cut with the Nested Essentials Dies
Basic White Cardstock
Large Circle die cut with the Stylish Shapes Dies
Sentiment Label die cut with the Deckled Rectangles Dies
Surfing Santa image stamped and fussy cut 
To create this card, I chose to use bright colors that create the feeling of being at the beach during the holidays. I feel like Santa is kicking up his heels and relaxing after all his deliveries are over and he can enjoy the surf and the sand. The colors I chose include Azure Afternoon, Balmy Blue, Daffodil Delight and Basic White with pops of Poppy Parade and Granny Apple Green for a touch of the traditional Christmas colors. I stamped the focal image onto a piece of Basic White cardstock with Memento Tuxedo Black ink and colored the image with Stampin' Blends Markers. I then fussy cut the image out with Paper Snips. To create the waves, I stamped the wave image several times with Balmy Blue ink, without reinking, to create the different variations of color of the water. The Balmy Blue card front has been embossed using the So Swirly Embossing Folder to give it texture that makes me think of motion of the waves. 
For the banner, I used the Nested Essentials Dies and cut a piece of Daffodil Delight cardstock approx 2 1/4" x 4 1/4" and lined up the die so that it created an extended banner, the length of the strip, making sure not to cut through to the end from each side. I then stamped the cardstock with the sand image using Daffodil Delight Classic ink to add subtle texture to the banner. I attached the Balmy Blue card front to the Azure Afternoon card base and then added the Daffodil Delight cardstock banner to the card front, placing it slightly above halfway on the card front. For the sentiment, I stamped the image with Azure Afternoon Classic ink onto the Basic White sentiment label and then stamped the background with the sand image using Daffodil Delight Classic ink, using generational stamping to give it the look of a sandy beach. I attached the focal circle to the center of the Daffodil Delight Banner using Stampin' Dimensionals and added the surfing Santa to the center of the circle, also using Stampin' Dimensionals. I positioned the sentiment label below the circle using Stampin' Dimensionals. To complete the design, I added several Iridescent Foil Gems for a touch of bling. 
Thank you for taking the time to visit my blog. I hope that my card design will inspire you to explore using the wonderful sketches in the new September-December 2024 Mini Catalog (page 16) to help you create your own beautiful projects. There are so many wonderful options to try. 
Please take the time to visit my fellow Design Team members by clicking on the links in the Roll Call List below. We would love it if you would leave us a comment and let us know how our projects have inspired you.

If you live in the U.S. and do not have a Stampin' Up! Demonstrator, please contact me and I would be happy to help you with your creative projects. You may also visit my Online Store to place your order and have it shipped to you. 

Until Next Time

Happy Stamping,

Tricia Butts
Independent Stampin' Up! Demonstrator

Like What You See? Visit My Online Store Here

Visit My Facebook Business Page for Updates & Ideas

Click here to Contact Me


Saturday, June 15, 2024

Stamping With Friends June Blog Hop 2024-2025 Annual Catalog Bundles

Welcome to the Stamping With Friends June Blog Hop as we explore the wonderful new bundles in the 2024-2025 Annual Catalog. What exactly is a bundle? It is Stampin' Up! pairs together a stamp set with a coordinating punch or coordinating dies so that you can save 10% on the price. This makes it a great, budget friendly way to add your favorites to your crafting tool kit. Our amazing Design Team will be sharing their projects and ideas using the new bundles to help inspire you to create your own projects.
For my card design, I wanted to use the Hearts & Hugs Bundle to create a sweet birthday card. This bundle stole my heart when I first saw the new catalog and it was one of the first bundles I had to have. I love the combination of adorable images and cute sentiments and having coordinating dies just makes creating with this bundle so simple and fun. For today's design, I chose to use the sweet walruses for my focal image and colored it with Stampin' Blends Markers. The background was created with one of the Meandering Meadows 6"x6" Designer Series Paper designs. Did you know that the reverse sides have wonderful monochromatic patterns that make amazing backgrounds? This is just one example of how you can use this pretty paper in a less traditional way. I added a pop of color with the banner and the hearts using Real Red cardstock to bring the design together. This clean and simple design is so much fun and I love that I was able to use just the stamp set and coordinating dies from this bundle to create my design. 
Products Used: 
Hearts & Hugs Bundle (item #163667)
Meandering Meadows 6"x6" Designer Series Paper (item #162735)
Blueberry Bushel Cardstock (item #146968)
Real Red Cardstock (item #102482)
Basic White Cardstock (item #159276)
Blueberry Bushel Classic Ink Pad (item #147138)
Memento Tuxedo Black Pad (item #132708)
Smoky Slate Stampin' Blends Combo Pack (item #154904)
Ivory/Bronze Stampin' Blends Combo Pack (item #154922)
Pebbled Path Stampin' Blends Combo Pack (item #161658)
Stampin' Dimensionals (item #104430)
Measurements:
Blueberry Bushel Cardstock
Card Base - 5 1/2" x 8 1/2" (Scored at 4 1/4")
Real Red Cardstock
Background piece - 3" x 1 1/2" approx.
Sentiment Label die cut with the Hearts & Hugs Dies
Basic White Cardstock
Layer 1 - 5 1/4" x 4"
Sentiment Label stamped & die cut with the Hearts & Hugs Bundle
Walruses image stamped & die cut with the Heart & Hugs Bundle
Meandering Meadows Designer Series Paper
Card Front - 5" x 3 3/4" with hearts die cut from the background
(2 of the hearts used for sentiment label)
There is so much to love about this card design, it's hard to know where to start. I love the texture of the background design and how it makes everything else pop. Blueberry Bushel is one of my favorite blues, but it is often overlooked. I used a layer of Basic White cardstock to create a frame around the focal layer and help it stand out from the Blueberry Bushel card base. After adhering the designer series paper layer to the Basic White cardstock, I die cut out the detailed hearts arch towards the top and center of the card front. I added a piece of Real Red cardstock on the back, behind the negative die cut hearts, to give them a beautiful bright red color. For the walruses, I stamped the image with Memento Tuxedo Black ink onto Basic White cardstock and colored them with Smoky Slate, Ivory and Light Pebbled Path Stampin' Blends Markers. I die cut the image out using the coordinating die from the bundle and attached it to the card front using Stampin' Dimensionals, positioning it in the center just below the hearts. For the sentiment, I stamped the image with Blueberry Bushel Classic ink and die cut the label using one of the dies from the bundle. I also die cut a Real Red label using the same die and cut it in half using Paper Snips. I attached each piece of the Real Red label to the back of the Basic White sentiment label, leaving a small banner on each end to frame the sentiment. I then attached the sentiment label to the card front using Stampin' Dimensionals, centering it below the walruses. To complete the design, I added two of the hearts created from the background, to the sentiment label. I attached the card front to the card base using Stampin' Dimensionals to pop it up and add extra dimension to the design. Isn't this just the cutest birthday card? I just love how it turned out.
Thank you for taking the time to visit my blog. I hope that my card design will help inspire you to explore the wonderful bundles in the 2024-2025 Annual Catalog to help spark your creativity. Make sure to take advantage of the extra 10% discount on select bundles during the month of June as well as save 10% on Stampin' Cut & Emboss Machines.
Please take the time to visit the Design Team to see their amazing projects by clicking on the links in the Roll Call List. We would appreciate it if you would leave us a comment and let us know what you liked about our projects.

If you live in the U.S. and do not have a Stampin' Up! Demonstrator, please contact me and I would be happy to help you with your creative projects. You may also visit my Online Store to place your order and have it shipped to you. 

Until Next Time

Happy Stamping,

Tricia Butts
Independent Stampin' Up! Demonstrator

Like What You See? Visit My Online Store Here

Visit My Facebook Business Page for Updates & Ideas

Click here to Contact Me


Save An Extra 10% On Select Bundles
Plus 10% Off Stampin' Cut & Emboss Machines
Click Below To Shop Now


Friday, June 7, 2024

Global Stamping Friends June Blog Hop Coloring Inside The Lines

 
Welcome to the Global Stamping Friends June Blog Hop and this month our theme is "Coloring Inside the Lines". Our Design Team will be sharing their projects and ideas to help inspire you to explore all the wonderful coloring options Stampin' Up! has to offer. 
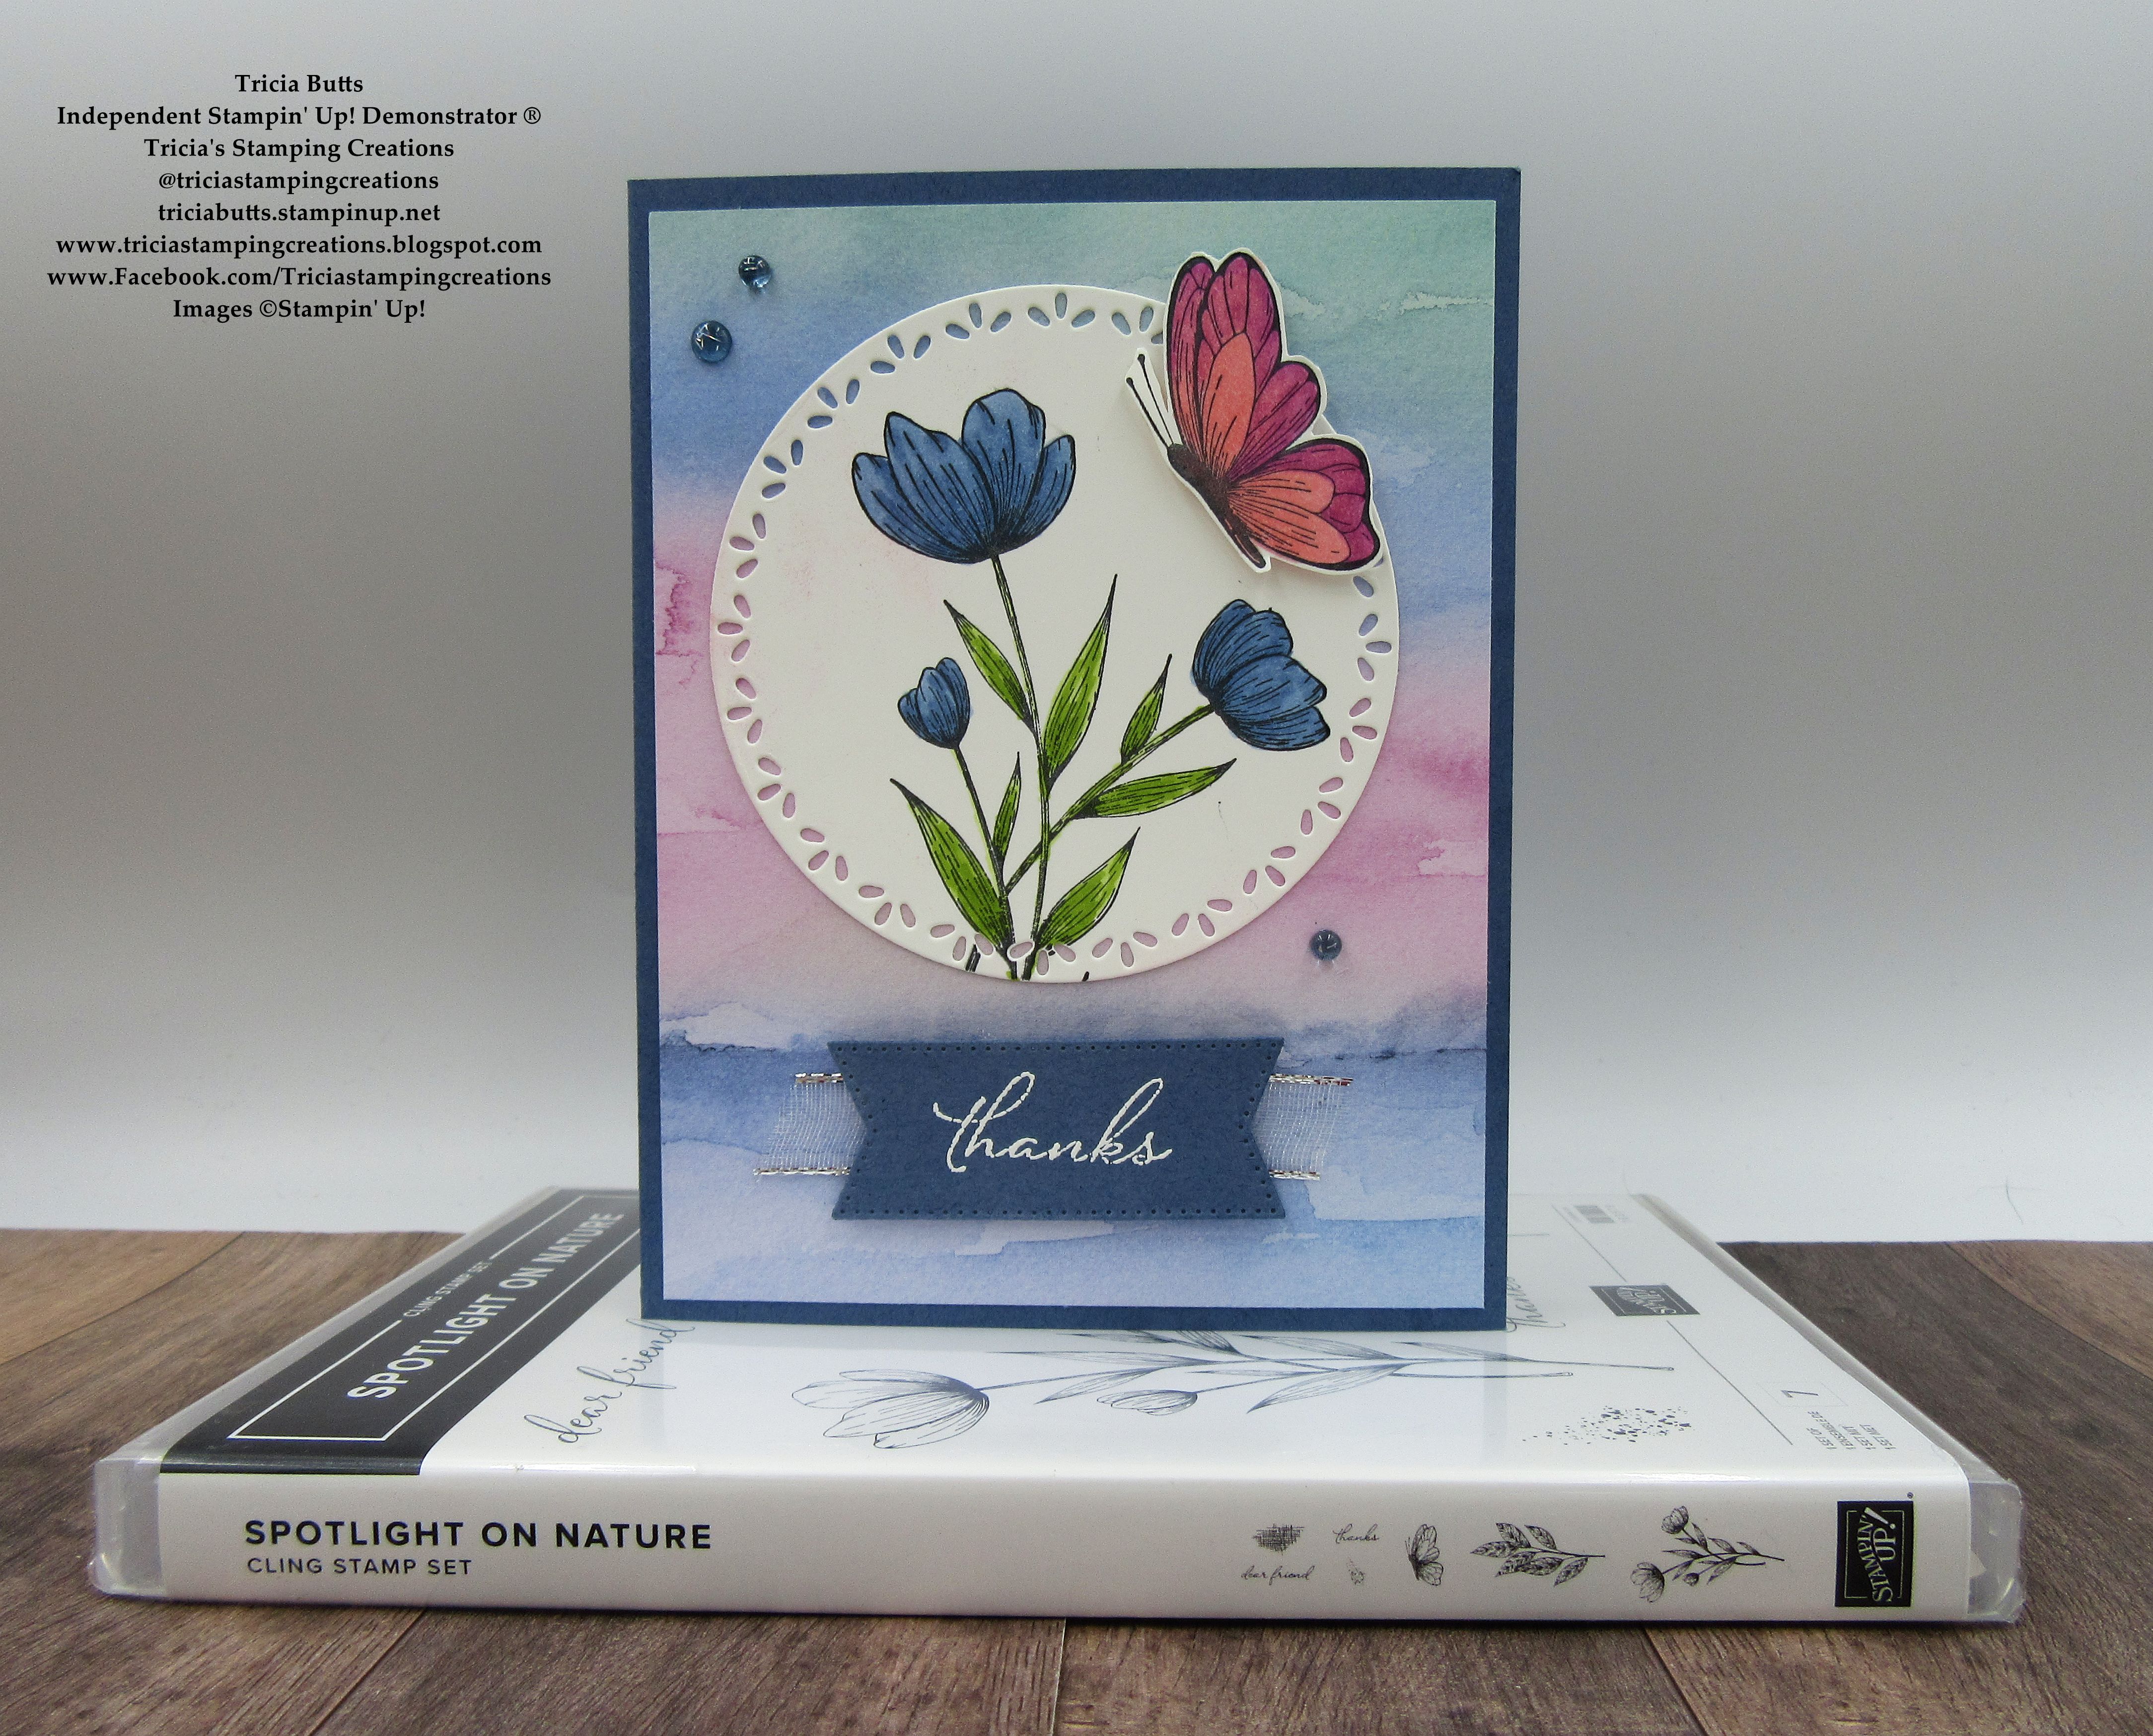
One of my favorite coloring techniques would have to be coloring with Stampin' Blends Markers. I love the way these alcohol markers blend and the beautiful vibrant colors. For this card design, I chose to use the new Spotlight on Nature Bundle, which is one of the bundles on sale this month with an additional 10% discount. I paired it with one of the designs from the Thoughtful Journey 6"x6" Designer Series Paper. I just love the soft, water color background it creates for the card design that combines beautifully with the focal images. 
Products Used:
Spotlight On Nature Bundle (item #163581)
Stylish Shapes Dies (item #159183)
Thoughtful Journey 6"x6" Designer Series Paper (item #163303)
Misty Moonlight Cardstock (item #153081)
Basic White Cardstock (item #159276)
Memento Tuxedo Black Pad (item #132708)
Versamark Pad (item #102283)
Basics Wow Embossing Powders (item #165679)
Boho Blue Stampin' Blends Combo Pack (item #161659)
Granny Apple Green Stampin' Blends Combo Pack (item #154885)
Petunia Pop Stampin' Blends Combo Pack (item #163828)
Pretty In Pink Stampin' Blends Combo Pack (item #163824)
Tinsel Gems Three Pack (item #161624)
Silver & White 1/2" Sheer Ribbon (item #162149)
Stampin' Dimensionals (item #104430)
Measurements:
Misty Moonlight Cardstock
Card Base - 5 1/2" x 8 1/2" (Scored at 4 1/4")
Sentiment Label die cut with the Stylish Labels Dies
Basic White Cardstock
Large Circle die cut with the Spotlight On Nature Dies 
Butterfly stamped and fussy cut
Thoughtful Journey Designer Series Paper
Card Front - 5 1/4" x 4"
This pretty card design is all about beautiful colors and I chose to use Boho Blue and Granny Apple Green Stampin' Blends Markers for the floral image and Pretty In Pink and Petunia Pop Stampin' Blends Markers for the butterfly image. To create the focal image, I used the Spotlight on Nature Dies to die cut the large detailed circle. I fussy cut the butterfly out after coloring it and added it to the circle with Stampin' Dimensionals to pop it up. For the sentiment label, I heat embossed the image with Basic White embossing powder and die cut the sentiment with the Stylish Shapes Dies. To add a touch of bling, I added several of the Misty Moonlight Gems and I piece of the Silver & White Sheer Ribbon behind the sentiment label. I love how the colors work together to create a beautiful thank you card. 
Thank you for taking the time to visit my blog. I hope that my card design will help inspire to create your own wonderful projects using coloring techniques. There are so many amazing options to explore. Don't forget to take advantage of the sale on select stamp & dies bundles this month and save an extra 10%. 
Now it's time to visit Kimberley's blog and see what she has created this month to share with us. Just click on the Next button below to visit her blog or use the Roll Call List to find your way. We would appreciate it if you would leave us a comment and let us know what you liked about our projects. 

Roll Call List

If you live in the U.S. and do not have a Stampin' Up! Demonstrator, please contact me and I would be happy to help you with your creative projects. You may also visit my Online Store to place your order and have it shipped to you. 

Until Next Time

Happy Stamping,

Tricia Butts
Independent Stampin' Up! Demonstrator

Like What You See? Visit My Online Store Here

Visit My Facebook Business Page for Updates & Ideas

Click here to Contact Me


Save An Extra 10% On Select Bundles
Plus 10% Off Stampin' Cut & Emboss Machines
Click Below To Shop Now


Saturday, December 9, 2023

Stamping Inkspirations December Blog Hop Sounds of the Season

Welcome to the Stamping Inkspirations December Blog Hop and this month our theme is Sounds of the Season. Our wonderful Design Team members will be sharing their projects and ideas to help inspire you to explore this wonderful theme. There are so many possibilities to explore. 
When I think about the sounds of Christmas, I think of singing Christmas carols and listening to holiday music to get us into the spirit of the season. So for my card design, I chose to use one of the designs from the Merry Bold & Bright Designer Series Paper with the Merry Melody 3D Embossing Folder to create a festive background. The focal image and sentiment are from one of my favorite Christmas stamp sets, Festive & Fun, and I colored the images with Stampin' Blends Markers, one of my favorite ways to color. The result is a bright and festive Christmas card that makes me think of spending time together with family and friends, celebrating the joy of the holidays. 
Products Used:
Festive & Fun stamp set (item #162078) - Retiring
Countryside Corners Dies (item #161471)
Merry Melody 3D Embossing Folder (item #156392)
Merry Bold & Bright Designer Series Paper (item #161945) - Retiring
Shaded Spruce Cardstock (item #146981)
Parakeet Party Cardstock (item #159259)
Basic White Cardstock (item #159276)
Sweet Sorbet Classic Ink Pad (item #159216)
Memento Tuxedo Black Pad (item #132708)
Sweet Sorbet Stampin' Blends Combo Pack (item #159224)
Parakeet Party Stampin' Blends Combo Pack (item #159220)
Balmy Blue Stampin' Blends Combo Pack (item #154830)
Shaded Spruce Stampin' Blends Combo Pack (item #154903)
Crumb Cake Stampin' Blends Combo Pack (item #154882)
Smoky Slate Stampin' Blends Combo Pack (item #154904)
Daffodil Delight Stampin' Blends Combo Pack (item #154883)
Color Lifter (item #144608)
White 1/2" Iridescent Ribbon (item #161955)
Parakeet Party 1/8" Metallic Woven Ribbon (item #159196)
2022-2024 In Color Pearls (item #161621)
Stampin' Dimensionals (item #104430)
Measurements:
Shaded Spruce Cardstock
Card Base - 8 1/2" x 5 1/2" (Scored at 4 1/4")
Large Layer die cut with the Countryside Corners Dies
Parakeet Party Cardstock
Card Front - 5 1/4" x 4" embossed with the Merry Melody 3D Embossing Folder
Merry Bold & Bright Designer Series Paper
Card Front Square - 4" x 4"
Basic White Cardstock
Focal Layer die cut with the Countryside Corners Dies
Sentiment Label die cut with the Countryside Corners Dies
For my card design, I chose to go traditional with a red and green combination using Sweet Sorbet, Shaded Spruce and Parakeet Party. I love how the designer series paper adds a wonderful pop of color against the greens and I embossed the Parakeet Party cardstock to add some texture to the design. I stamped the focal image with Memento Tuxedo Black ink and colored the images with a variety of bright and cheerful colors to bring the design to life. For the sentiment, I used part of one of the images from the Festive & Fun stamp set and die cut it out with one of the Countryside Corners Dies. For the embellishments, I layered the White Iridescent Ribbon with the Parakeet Party Metallic Woven Ribbon to cover the seam of the designer series paper layer and used several Parakeet Party Pearls from the 2022-2024 In Color Pearls. I love how this card turned out and how bright and festive it looks. 
Thank you for taking the time to visit my blog. I hope that my card design will help inspire you to explore this fun theme to help you create your own beautiful projects. Remember to check out the retiring products from the September-December 2023 Mini Catalog to stock up on your favorites before they disappear. 
Now it's time to visit Danielle's blog and see what she has to share with us. Just click on the Next button to visit her blog or use the Roll Call List to find your way. We would love it if you would leave us a comment and let us know what you liked about our projects. I hope you enjoy the rest of our blog hop. 

Roll Call List

If you live in the U.S. and do not have a Stampin' Up! Demonstrator, please contact me and I would be happy to help you with your creative projects. You may also visit my Online Store to place your order and have it shipped to you. 

Until Next Time

Happy Stamping,

Tricia Butts
Independent Stampin' Up! Demonstrator

Like What You See? Visit My Online Store Here

Visit My Facebook Business Page for Updates & Ideas

Click here to Contact Me


Stock Up On Your Favorite Retiring Products
From The September-December 2023 Mini Catalog
Click Below To Start Shopping

Send A Note Of Hope
With The All The Best Paper Pumpkin Kit
Click Below To Subscribe By December 10th

Check Out The Latest Additions
To The Online Exclusives
Click Below To Visit My Online Store