Showing posts with label Regals Designer Series Paper. Show all posts

Thursday, October 24, 2024

Crafty Collaborations Monochromatic Color Challenge Week 42 - Gorgeous Grape

In case you were wondering what happened to Week 42 of the Crafty Collaborations Monochromatic Color Challenge, never fear, it is here at last. My husband had to have shoulder replacement surgery last Thursday and getting into a new routine with after surgery care has meant that my creative schedule was thrown into chaos. While my project did go live as part of the Insta Hop last Friday as scheduled, I wasn't able to get it posted to my blog until now. I hope that you will love what I came up with and that it was worth the wait.
Gorgeous Grape is such a beautiful purple and I wanted to create something out of the box that would showcase its versatility. So I decided to create a fun Halloween themed card design to get into the spirit of the season. For this spooky design, I chose to use the Playful Ghosts stamp set from the Online Exclusives and paired it with the sentiment and background image from the Potions & Spells stamp set. I just love the background pattern created using one of the Gorgeous Grape designs from the Regals 6"x 6" Designer Series Paper. To color in my cute little Vampire ghosty, I used Watercolor Pencils and a Blender Pen. Isn't he just adorable?
Products Used:
Playful Ghosts stamp set (item #164366)
Potions & Spells stamp set (item #164355)
Nested Essentials Dies (item #161597)
Regals 6"x6" Designer Series Paper (item #163774)
Gorgeous Grape Cardstock (item #146987)
Basic White Cardstock (item #159276)
Memento Tuxedo Black Pad (item #132708)
Versamark Pad (item #102283)
Basics Wow Embossing Powders (item #165679)
Watercolor Pencils Assortment 1 (item #161700)
Watercolor Pencils Assortment 2 (item #149014)
Blender Pens (item #102845)
Glossy Dots Assortment (item #158827)
Stampin' Dimensionals (item #104430)
Measurements:
Gorgeous Grape Cardstock'
Card Base - 5 1/2" x 8 1/2" (Scored at 4 1/4")
Sentiment Label die cut with the Nested Essentials Dies
Basic White Cardstock
Ghost image stamped and fussy cut with Paper Snips
Gorgeous Grape Designer Series Paper
Card Front - 5 1/4" x 4"
Halloween cards are so much fun to create and I love the variety of images available in the Playful Ghosts stamp set. The cute little Vampire ghost caught my eye and I thought he would be perfect for my card design. I chose to use Watercolor Pencils for something a little different and I love using this coloring medium as an alternative to Stampin' Blends Markers, which are my usual go-to favorite coloring tool. Using a Blender Pen helps smooth out the pencil lines created and gives me the ability to add light and dark shades of the Gorgeous Grape sections. For the background, I chose to use one of the Gorgeous Grape designs and I love the texture it adds to this card design. It makes me think of old fashioned wallpaper that you might find in a spooky old house. For the sentiment label, I used one of the dies from the Nested Essentials Dies and heat embossed the sentiment and background image with Basic White embossing powder to help make them pop. To finish off the card design, I added several Gorgeous Grape Glossy Dots for a touch of bling. I just love how this Halloween card turned out and I can't wait to try some of the other images to create different variations of this design. 
Thank you for taking the time to visit my blog. I hope that my card design will help inspire you to explore using Gorgeous Grape in your future creative projects. This beautiful purple is so versatile and so much fun to create with.
Please take the time to visit Week 42's Monochromatic Insta Hop to see all the amazing projects featuring Gorgeous Grape. There are so many inspiring ideas to choose from. Just click here to get started. We would love it if you would leave us a comment and let us know what you liked about our projects.

If you live in the U.S. and do not have a Stampin' Up! Demonstrator, please contact me and I would be happy to help you with your creative projects. You may also visit my Online Store to place your order and have it shipped to you. 

Until Next Time

Happy Stamping,

Tricia Butts
Independent Stampin' Up! Demonstrator

Like What You See? Visit My Online Store Here

Visit My Facebook Business Page for Updates & Ideas

Click here to Contact Me


Friday, August 2, 2024

Crafty Collaborations Monochromatic Color Challenge Week 31 - Pretty Peacock

Happy Friday everyone. It's time for Week 31 of the Crafty Collaborations Monochromatic Color Challenge and this week we are showcasing Pretty Peacock from the Regals Collection. I love this gorgeous blue-green color and how versatile it is. I hope you enjoy the card design I created this week.
For today's card design, I wanted to play with the new Sketched Butterflies Bundle from the 2024-2025 Annual Catalog. I love butterflies and I was so excited when I saw the detailed images and beautiful sentiments in this bundle. I chose to create a clean and simple birthday card using one of the patterns from the Regals 6"x6" Designer Series Paper for my background. I love the texture and detail it adds to the card design and how it gives the impression that the butterfly is flying through a forest. The Countryside Corners Dies help add a frame around the focal image that really makes the butterfly pop. I love how this card design turned out and with the wide range of sentiments and images in this bundle, you could create a variety of card designs for all occasions.
Products Used:
Sketched Butterflies Bundle (item #163492)
Countryside Corners Dies (item #161471)
Regals 6"x6" Designer Series Paper (item #163774)
Pretty Peacock Cardstock (item #150880)
Basic White Cardstock (item #159276)
Pretty Peacock Classic Ink Pad (item #150083)
Tinsel Gems Four Pack (item #161623)
Stampin' Dimensionals (item #104430)
Measurements:
Pretty Peacock Cardstock
Card Base - 5 1/2" x 8 1/2" (Scored at 4 1/4")
Large Label die cut with the Countryside Corners Dies
Basic White Cardstock
Focal Layer die cut with the Countryside Corners Dies
Medium Butterfly stamped and die cut with the Sketched Butterflies Bundle
Pretty Peacock Designer Series Paper
Card Front - 5 1/4" x 4"
This beautiful clean and simple card design is easy to create with just a few supplies. I love how the Countryside Corner Dies help create a frame around the focal image and sentiment and help them pop against the designer series paper card front. I stamped the butterfly with Pretty Peacock Classic ink onto a piece of Basic White cardstock and then die cut it out with the coordinating die. I also stamped the sentiment with Pretty Peacock Classic ink onto the focal layer towards the bottom. I attached the butterfly die cut with a Stampin' Dimensional towards the top of the focal layer and added several Pretty Peacock gems to decorate the body of the butterfly. I attached the focal layer to the larger Pretty Peacock die cut layer. To complete the card design, I attached the designer series paper card front to the Pretty Peacock card base and then centered the focal image onto the card front. As you can see, it comes together very quickly and easily to create a simply beautiful design. 
Thank you for taking the time to visit my blog. I hope that this card design will encourage you to explore using Pretty Peacock to create your own beautiful projects. This pretty color is so versatile and would work well for so many occasions.
Please take time to visit our Monochromatic Insta Hop this week to see all the amazing projects featuring Pretty Peacock. Just click here to get started. We would love it if you would leave us a comment and let us know what you liked about our projects. 

If you live in the U.S. and do not have a Stampin' Up! Demonstrator, please contact me and I would be happy to help you with your creative projects. You may also visit my Online Store to place your order and have it shipped to you. 

Until Next Time

Happy Stamping,

Tricia Butts
Independent Stampin' Up! Demonstrator

Like What You See? Visit My Online Store Here

Visit My Facebook Business Page for Updates & Ideas

Click here to Contact Me


Coming August 6th!
15% Off Select Designer Series Paper
From the 2024-2025 Annual Catalog


Friday, June 21, 2024

Crafty Collaborations Monochromatic Color Challenge Week 25 - Real Red

Welcome to Week 25 of the Crafty Collaborations Monochromatic Color Challenge. Can you believe we are halfway through the year? Time has flown by so quickly and it has been so much fun. This week we are showcasing Real Red from the Regals Collection and I can't wait to share my card design with you. It is something a little different for me but I had so much fun creating it.
For this card design, I chose to use three of the patterns of Real Red Designer Series Paper from the Regals 6"x6" Designer Series Paper. I used one of the banner dies from the Nested Essentials Dies. I paired it with the Happy Little Things stamp set to create this fun clean and simple card design that is perfect for celebrating the special occasions in your life. I love the texture that the patterns from the designer series paper add to the background and the bold contrast of a red and white color combination. 
Products Used:
Happy Little Things stamp set (item #163705)
Nested Essentials Dies (item #161597)
Regals 6"x6" Designer Series Paper (item #163774)
Real Red Cardstock (item #102482)
Basic White Cardstock (item #159276)
Real Red Classic Ink Pad (item #147084)
Real Red Stampin' Blends Combo Pack (item #154899)
Iridescent Pearls Basic Jewels (item #158987)
Stampin' Dimensionals (item #104430)
Measurements:
Real Red Cardstock
Card Base - 5 1/2" x 8 1/2'" (Scored at 4 1/4")
Basic White Cardstock
Card Front - 5 1/4" x 4"
Sentiment Strip - 1" x 5"
Real Red Designer Series Paper
3 Banners die cut with the Nested Essentials Dies (1 of each pattern)
I love creating clean and simple cards with designer series paper. For this card design, I chose to use three different patterns of Real Red Designer Series Paper to create the banners for my design. I used one of the banner dies from the Nested Essentials Dies and cut them at 1" from the top to create two pieces to give the look of an elongated banner. I love the texture that each of the patterns adds to the design as well as the variations of the color to add contrast. For the sentiment strip, I stamped the outline image with Real Red Classic ink in the center of the strip and then added the solid image, stamping off once on scrap paper, to give the lighter shade of Real Red. I added all the banner pieces and the sentiment strip with Stampin' Dimensionals to the Basic White card front to add dimension to the design and then attached the card front to the Real Red card base. To complete the card, I added two Iridescent Pearls that I colored with the Dark Real Red Stampin' Blends Marker to the sentiment strip to coordinate with the rest of the design. I love how this card turned out and I think it is the perfect way to showcase this beautiful bright red. What do you think?
Thanks for taking the time to visit my blog. I hope that you enjoy my fun card design and that it gives you ideas to help you create your own beautiful cards using stamps, paper and ink. There are so many wonderful options to explore.
Please take the time to visit this week's Monochromatic Insta Hop over on Instagram. You can get started here and click on the links in the description to visit each of the amazing projects. We would love it if you would leave us a comment and let us know how you liked out projects. 

If you live in the U.S. and do not have a Stampin' Up! Demonstrator, please contact me and I would be happy to help you with your creative projects. You may also visit my Online Store to place your order and have it shipped to you. 

Until Next Time

Happy Stamping,

Tricia Butts
Independent Stampin' Up! Demonstrator

Like What You See? Visit My Online Store Here

Visit My Facebook Business Page for Updates & Ideas

Click here to Contact Me


Save An Extra 10% On Select Bundles
Plus 10% Off Stampin' Cut & Emboss Machines
Click Below To Shop Now


Friday, March 1, 2024

Global Stamping Friends March Blog Hop Time Marches On


It's time to hop along with the Global Stamping Friends March Blog Hop and this month our theme is "Time Marches On". As Spring approaches there are so many wonderful events to celebrate which means so many new projects to create. Our small but mighty Design Team will be sharing their wonderful projects to help get you in the spirit to create your own wonderful projects to celebrate the new season.
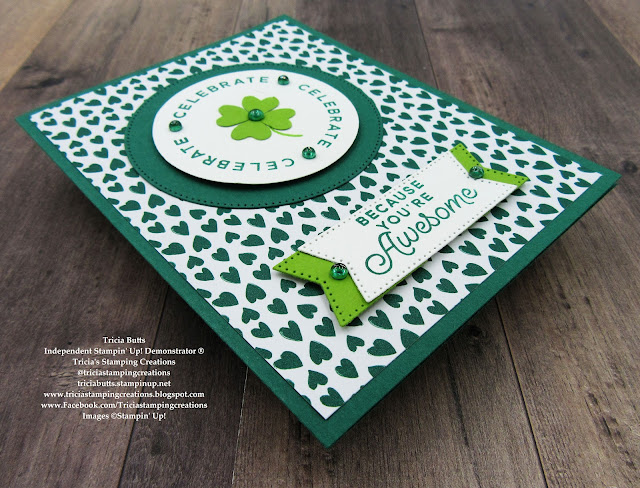
For my card, I decided to create a fun St Patrick's Day themed design. I love being able to play with the different greens that Stampin' Up! has to offer and for this design I chose to use Shaded Spruce and Granny Apple Green. St Patrick's Day is very popular here in Colorado and we have a parade and celebrations to celebrate the day when everyone is Irish. I decided to incorporate the celebration with the traditional shamrock design to create a fun, clean and simple design. 
Products Used:
Circle Sayings Bundle (item #161355)
Stylish Shapes Dies (item #159183)
Bee Builder Punch (item #162553)
Shaded Spruce Cardstock (item #146981)
Regals 6"x6" Designer Series Paper (item #161642)
Granny Apple Green Cardstock (item #146990)
Basic White Cardstock (item #159276)
Shaded Spruce Classic Ink Pad (item #147088)
Brights Stampin' Write Marker Assortments (item #161696)
Tinsel Gems Four-Pack (item #161623)
Stampin' Dimensionals (item #104430)
Measurements:
Shaded Spruce Cardstock
Card Base - 8 1/2" x 5 1/2" (Scored at 4 1/4")
Large Circle die cut with the Stylish Shapes Dies
Basic White Cardstock
Medium Circle punched out with the 2 3/8" Circle
Sentiment Label die cut with the Stylish Labels Dies
Granny Apple Green Cardstock
4 Small Hearts punched out with the Bee Builder Punch
Label die cut with the Stylish Shapes Dies cut in half
Shaded Spruce Designer Series Paper
Card Front - 5 1/4" x 4"
I chose to use the Circle Sayings Bundle for the sentiments for the focal design and sentiment label. I used the coordinating 2 3/8" Circle Punch from the bundle to punch out the stamped Celebrate circle and layered it onto a Shaded Spruce circle I die cut using the Stylish Shapes Dies, using Stampin' Dimensionals to pop it up. To create the shamrock in the center, I punched out 4 of the small hearts from Granny Apple Green cardstock using the Bee Builder Punch and arranged them in the center of the circle. I used the Granny Apple Green Stampin' Write Marker to draw in the stem. For the sentiment, I stamped the image onto Basic White cardstock using Shaded Spruce Classic ink and die cut it out with the Stylish Shapes Dies. I framed it with the Granny Apple Green Label cut in half and attached to the ends on the back of the sentiment label. I attached the designer series paper card front to the card base and then added the focal image and sentiment to the card front to create the design. To complete the card, I added several of the Tinsel Gems Four Pack to add a touch of bling. The Pretty Peacock gems are a close match to the Shaded Spruce and help finish off the design. I love how fun and fresh this card design looks and I think it's a great way to help brighten someone's day.
Thank you for taking the time to visit my blog. I hope that my card design will help get you in the mood to create your own wonderful Spring projects to help celebrate all the wonderful events coming up this month. There are so many options to explore to help spark your creativity.
Now it's time to visit Jan's blog and see what she has created to share this month. Just click on the Next button to visit her blog or use the Roll Call List to find your way. We would appreciate it if you would leave us a comment and let us know what you enjoyed about our projects.
Roll Call List

If you live in the U.S. and do not have a Stampin' Up! Demonstrator, please contact me and I would be happy to help you with your creative projects. You may also visit my Online Store to place your order and have it shipped to you. 

Until Next Time

Happy Stamping,

Tricia Butts
Independent Stampin' Up! Demonstrator

Like What You See? Visit My Online Store Here

Visit My Facebook Business Page for Updates & Ideas

Click here to Contact Me


Coming Soon!
New Online Exclusives Arriving March 5th
To Spark Your Creativity

Get Creative For Spring
With The January-April 2024 Mini Catalog
Click Below To Shop Now


Saturday, April 9, 2022

Colour Combo April Blog Hop

Welcome to the Colour Combo April Blog Hop as we get ready for a new color challenge. This month we have been challenged to use Shaded Spruce, Garden Green and Sahara Sand to create our projects to share with you. I hope our projects and ideas will help inspire you to explore this wonderful color combination to create your own beautiful projects.
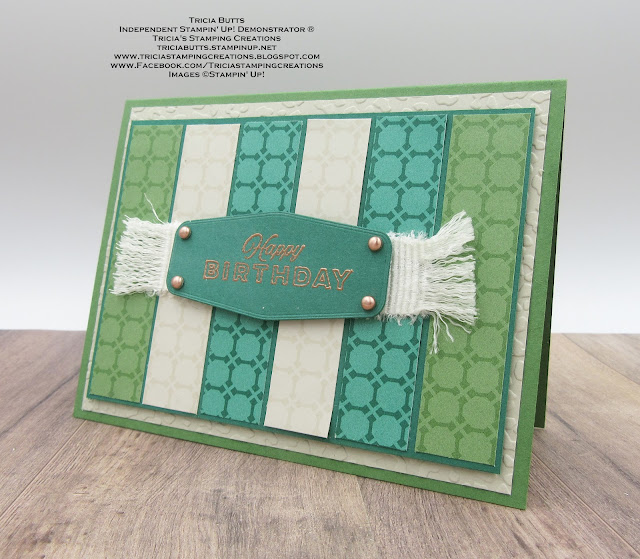
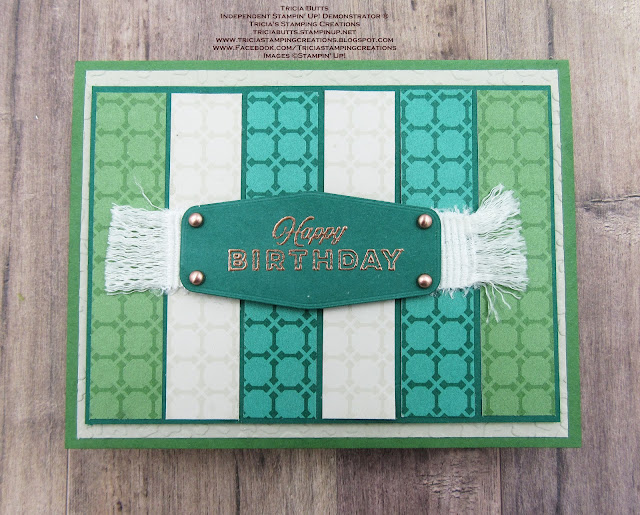
For my card design, I decided to CASE a card I created last year using strips of designer series paper here. I chose to use the same pattern for each of the colors from both the Neutrals & Regals 6"x6" Designer Series Paper. At first, I wasn't sure how these colors would work together, but I must say that I love how this card design turned out. This color combination works well as a masculine card design and would work for a variety of occasions.
Products Used:
Celebrating You stamp set (item #158028)
Tasteful Labels Dies (item #152886) Retiring
Animal Print Embossing Folder (item #155429) Retiring
Neutrals 6"x6" Designer Series Paper (item #155226) Retiring
Regals 6"x6" Designer Series Paper (item #155227)
Garden Green Cardstock (item #102584) 
Shaded Spruce Cardstock (item #146981)
Sahara Sand Cardstock (item #121043)
Versamark Pad (item #102283)
Metallics Embossing Powders (item #155555)
White 3/4" Frayed Ribbon (item #158138)
Brushed Metallic Adhesive Dots (item #156506)
Stampin' Dimensionals (item #104430)
Mini Glue Dots (item #103683)
Measurements:
Garden Green Cardstock
Card Base - 8 1/2" x 5 1/2" (Scored at 4 1/4")
Sahara Sand Cardstock
Card Front - 5 1/4" x 4" Embossed with the Animal Prints Embossing Folder
Shaded Spruce Cardstock
Layer 3 - 5" x 3 3/4" (Trimmed to 5" x 3 5/8" after strips are attached)
Sentiment Label die cut with the Tasteful Labels Dies
Regals Designer Series Paper
2 strips Garden Green - 3/4" x 3 1/2"
2 strips Shaded Spruce - 3/4" x 3 1/2"
Neutrals Designer Series Paper 
2 strips Sahara Sand - 3/4" x 3 1/2"
White Frayed Ribbon 
Approx. 4 1/2" long, frayed at both ends
This card design is all about layering the colors to create bold, geometric design. I layered the strips of designer series paper onto the Shaded Spruce cardstock layer, using the same pattern for each strip. I trimmed the background cardstock to 5" x 3 5/8" to create an even border around the strips. For the card front layer, I embossed the Sahara Sand cardstock with the Animal Prints Embossing Folder to add some extra texture to the card design. I attached it to the Garden Green card back with adhesive and then attached the focal layer to the card front with Stampin' Dimensionals. For the sentiment, I heat embossed the image from the Celebrating You stamp set with Copper embossing powder and added four of the small Copper Brushed Metallic Ahesive Dots to the corners to coordinate with the embossing. To provide a little contrast, I added a piece of the White Frayed Ribbon to the center of the focal layer, fraying both ends to add texture to the design. I attached the sentiment label over the center of the ribbon with Stampin' Dimensionals to complete the card design. 
Thank you for taking the time to visit my blog. I hope that my card design will help inspire you to give this color combination a try to create your own wonderful projects. Stampin' Up! has so many amazing coordinating products to help take the stress out of designing and creating. 
Now it's time to visit Sonja's blog and see what beautiful projects she has to share with us. Just click on the Next button to visit her blog. We would love it if you would leave us a comment and let us know what you liked about our projects. I hope you enjoy the rest of our blog hop. 


If you live in the U.S. and do not have a Stampin' Up! Demonstrator, please contact me and I would be happy to help you with your creative projects. You may also visit my Online Store to place your order and have it shipped to you. 

Until Next Time

Happy Stamping,

Tricia Butts
Independent Stampin' Up! Demonstrator

Like What You See? Visit My Online Store Here

Visit My Facebook Business Page for Updates & Ideas

Click here to Contact Me


Stock Up On Your Favorite Retiring Products
Before They Disappear
Click Below To Visit My Online Store

Today Is The Last Day To Sign Up
For The April Paper Pumpkin Kit
Click Below To Subscribe Before 11:50pm Mountain Time