Showing posts with label 2024-2026 In Colors. Show all posts

Wednesday, January 15, 2025

New At SU January Blog Hop Sale-a-bration Coordination Corner In Bloom

Welcome to the New At SU January Blog Hop with our theme this month featuring Sale-a-bration Coordination. Our amazing Design Team will be sharing their projects and ideas to showcase the wonderful Sale-a-bration products you can earn free with a qualifying order. I can't wait to share with you all the project I have created using the new Corner In Bloom stamp set.
For today's card design, I wanted to showcase one of my favorite techniques: heat embossing. There is just something so magical about this technique and it is what got me hooked on card making many years agon. To help chase away the Winter Blues, I chose to use Petunia Pop for my card, one of the 2024-2026 In Colors. I just love how bright and pretty it is and how it makes the White embossed images pop. The images in the Corner In Bloom stamp set are perfect for creating beautiful clean and simple designs and I added the sentiment from the With You In Mind stamp set. I love the way these two stamp sets work together to provide so many wonderful options for all occasion cards. 
Products Used:
Corner In Bloom stamp set (item #164959) Sale-a-bration Level 2
With You In Mind stamp set (item #164747)
Petunia Pop Cardstock (item #163801)
Versamark Pad (item #102283)
Basics Wow Embossing Powders (item #165679)
2024-2026 In Color Shimmer Gems (item #163781)
Stampin' Dimensionals (item #104430)
Measurements:
Petunia Pop Cardstock
Card Base - 5 1/2" x 8 1/2" (Scored at 4 1/4")
Card Front - 5 1/4" x 4"
Heat embossing is a great technique for stepping up clean and simple card designs. The delicate line images in the Corner In Bloom stamp set look beautiful with this technique and with the addition of a sentiment, you can create a variety of designs to add to your card stash. The White embossing makes me think of chalk art that I used to do with my kids. It is so fun and cheerful, a way to bring a smile to someone who receives it. For a touch of bling, I added several Pretty In Pink Shimmer Gems to complete the card design.
Thank you for taking the time to visit my blog. I hope that my card design will help inspire you to explore the amazing new Sale-a-bration products that you can earn free with a qualifying order during Sale-a-bration. 
Please take a moment to visit with the rest of our Design Team to see their amazing projects and ideas. Just click on the links in the Roll Call List below to visit their blogs. 

If you live in the U.S. and do not have a Stampin' Up! Demonstrator, please contact me and I would be happy to help you with your creative projects. You may also visit my Online Store to place your order and have it shipped to you. 

Until Next Time

Happy Stamping,

Tricia Butts
Independent Stampin' Up! Demonstrator

Like What You See? Visit My Online Store Here

Visit My Facebook Business Page for Updates & Ideas

Click here to Contact Me


Wednesday, August 21, 2024

New At SU August Blog Hop Elevated Embossing Dashing Designs

Welcome to the New At SU August Blog Hop as we showcase embossing folders and elevate them to the next level with fun techniques and designs. Our wonderful Design Team is excited to share their projects and ideas to help you make the most of your embossing folders.
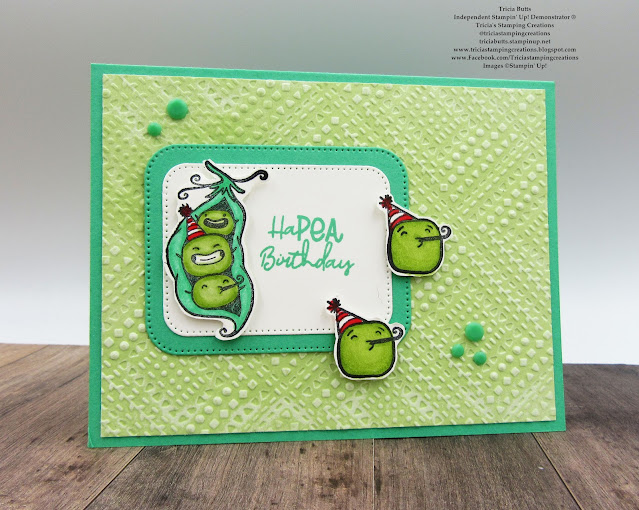
For my card design today, I wanted to create a fun birthday card using the new Sweet Peas stamp set from the 2024-2025 Annual Catalog. To help step up the design, I chose to use the Dashing Designs 3D Embossing Folder to add texture and detail to the background. I chose to use Versamark ink on the inside of the embossing folder and run the Soft Sea Foam cardstock through the Stampin' Cut & Emboss Machine so that the Versamark ink transferred to the raised parts of the embossed design. I then applied Clear embossing powder and heat embossed it to create a slightly glossy shimmer to the background. I love the distressed look it gives to the background which adds to the fun of this card design.
Products Used:
Sweet Peas stamp set (item #163621)
Nested Essentials Dies (item #161597)
Dashing Designs 3D Embossing Folder (item #163483)
Shy Shamrock Cardstock (item #163795)
Soft Sea Foam Cardstock (item #146988)
Shy Shamrock Classic Ink Pad (item #163808)
Basic White Cardstock (item #159276)
Memento Tuxedo Black Pad (item #132708)
Versamark Pad (item #102283)
Basics Wow Embossing Powders (item #165679)
Shy Shamrock Stampin' Blends Combo Pack (item #163825)
Granny Apple Green Stampin' Blends Combo Pack (item #154885)
Poppy Parade Stampin' Blends Combo Pack (item #154958)
2024-2026 In Color Resin Dots (item #163389)
Mini Stampin' Dimensionals (item #144108)
Measurements:
Shy Shamrock Cardstock
Card Base - 5 1/2" x 8 1/2" (Scored at 4 1/4")
Medium Rectangle die cut with the Nested Essentials Dies
Soft Sea Foam Cardstock
Card Front - 5 1/4" x 4" Embossed with the Dashing Designs 3D Embossing Folder 
Basic White Cardstock
Sentiment Label die cut with the Nested Essentials Dies
Peas images stamped with the Sweet Peas stamp set and fussy cut with Paper Snips
I love heat embossing, so I thought it would be fun to use this technique with the embossing folder to help step up the background. After applying the Versamark ink to the front of the inside of the embossing folder, I carefully placed the Soft Sea Foam cardstock inside the folder and gently closed it before embossing it with the Stampin' Cut & Emboss Machine. I noticed that the Versamark ink was heavier in some areas on the card front than others, which meant that when I applied the Clear embossing powder and then heat set it, the background had an uneven look with the glossy shimmer from the embossing powder. I really liked how this gave the embossed layer a distressed look and gave the design a tone on tone look. For the focal layer, I stamped the sentiment with Shy Shamrock Classic ink on the right side of the Basic White sentiment label and adhered it to the Shy Shamrock rectangle layer to frame it before adhering it to the embossed card front. To create the sweet peas images, I stamped them with Memento Tuxedo Black ink onto Basic White cardstock and colored them with Stampin' Blends Markers. Next I fussy cut the images out and added them to the card front using Mini Stampin' Dimensionals. To complete the card design, I added several Shy Shamrock Resin Dots. This cute birthday card is so much fun and is sure to brighten someone's special day.
Thank you for taking the time to visit my blog. I hope that my card design will help inspire you to explore using embossing folders to add texture and detail to your projects. There are so many wonderful techniques you can try to help step up your projects and have some fun. 
Please take the time to visit the Design Team and see their amazing projects by clicking on the links in the Roll Call List below. We would appreciate it if you would leave us a comment and let us know what you liked about our projects.

If you live in the U.S. and do not have a Stampin' Up! Demonstrator, please contact me and I would be happy to help you with your creative projects. You may also visit my Online Store to place your order and have it shipped to you. 

Until Next Time

Happy Stamping,

Tricia Butts
Independent Stampin' Up! Demonstrator

Like What You See? Visit My Online Store Here

Visit My Facebook Business Page for Updates & Ideas

Click here to Contact Me

Wednesday, August 14, 2024

ICS August Blog Hop Happy Anniversary


Welcome to our very special ICS August Blog Hop as we celebrate our 10 year anniversary. I was honored to be invited to join this amazing Design Team over 5 years ago and I have loved every minute of this creative journey with such talented Stampin' Up! Demonstrators. To help celebrate this occasion, we will be sharing our projects and ideas with the theme of anniversary to help inspire you. 
Anniversary cards celebrate a special event, so I thought I would create an elegant clean and simple card design using the new Changing Leaves Hybrid Embossing Folder from the Online Exclusives. I love how the embossing folder and coordinating dies work together to add wonderful detail. For my color palette, I chose to use the new 2024-2026 In Color, Summer Splash, paired with Pool Party and Gold accents. For the sentiment, I heat embossed the image from the Sweetly Scripted stamp set, also from the Online Exclusives, to finish off this beautiful card design. 
Products Used:
Sweetly Scripted stamp set (item #163600)
Changing Leaves Hybrid Embossing Folder (item #164138)
Summer Splash Cardstock (item #163797)
Pool Party Cardstock (item #122924)
Gold Foil Sheets (item #132622)
Versamark Pad (item #102283)
Metallics Wow Embossing Powders (item #165678)
Blooming Pearls (item #162238)
Mini Stampin' Dimensionals (item #144108)
Measurements:
Summer Splash Cardstock
Card Base - 5 1/2" x 8 1/2" (Scored at 4 1/4")
Sentiment Strip - 3/4" x 5 1/4"
Pool Party Cardstock
Card Front - 5 3/8" x 4 1/8" Embossed with the Changing Leaves Hybrid Embossing Folder
Gold Foil Sheets
Detailed Gold Leaves die cut with the Changing Leaves Hybrid Embossing Folder Dies
This simply beautiful card focuses on the wonderful texture created by the Changing Leaves Hybrid Embossing Folder combined with the exquisitely detailed Gold foil leaves created with the coordinating dies. I love the way the Pool Party card front pops against the Summer Splash card base. I chose Gold embossing for the sentiment on the Summer Splash sentiment strip to coordinate with the Gold leaves and added several Gold pearls to complete the design.
Thank you for taking the time to visit my blog. I hope that my card design will help inspire you to create your own beautiful projects to celebrate the special milestone events in your life. 
Now it's time to visit Charmane's blog and see what she has created to celebrate our 10 year anniversary. Just click on the Next button to visit her blog. We would love it if you would leave us a comment and let us know what you like about our projects. I hope you enjoy the rest of our blog hop.


If you live in the U.S. and do not have a Stampin' Up! Demonstrator, please contact me and I would be happy to help you with your creative projects. You may also visit my Online Store to place your order and have it shipped to you. 

Until Next Time

Happy Stamping,

Tricia Butts
Independent Stampin' Up! Demonstrator

Like What You See? Visit My Online Store Here

Visit My Facebook Business Page for Updates & Ideas

Click here to Contact Me


Wednesday, June 26, 2024

Paper Pumpkin Possibilities June Blog Hop Life Is Sweet

Welcome to the Paper Pumpkin Possibilities June Blog Hop as we showcase this month's kit, Life is Sweet. Our wonderful Design Team will be sharing their projects and ideas to help inspire you to create your own alternative designs with the supplies in this kit. There are so many wonderful possibilities to explore using the new 2024-2026 In Colors featured in this kit.
For my card design, I chose to use the supplies from this kit to create a sweet card for a friend. I experimented with different color combinations, using one of the card bases from the kit for my card front and chose to use the lemons as my focal design. For my main sentiment, I used the glitter "miss you" die cuts and add a touch of color to tint them to help them stand out. I also trimmed one of the leaves die cuts to place behind the die cut sentiment to add some texture to the design. This card design has a wonderfully fresh, cheerful feel to it and I hope it will help brighten my friend's day when she receives it.
Products Used:
Paper Pumpkin June 2024 Life Is Sweet Kit
Thick Basic White Cardstock (item #159229)
Daffodil Delight Classic Ink Pad (item #147094)
Water Painters (item #151298)
Measurements:
Thick Basic White Cardstock
Card Base - 5 1/2" x 8 1/2" (Scored at 4 1/4")
Life Is Sweet Kit
Card Front from Summer Splash/Pool Party Base - 5 1/4" x 4"
Shy Shamrock Leaves Die Cut
Miss You Die Cut 
Two Lemons Die Cuts 
Sentiment Label
One of the fun ways to create alternative card designs, is to mix and match the different elements to come up with your own fun ideas. My starting point was actually the small sentiment "sending a big squeeze" and I built my design from there. I chose to cut one of the Summer Splash/Pool Party card bases to create a card front to go on a Thick Basic White card base. I love how fresh and clean this combination looks. To provide some texture to the background, I added one of the leaves die cuts to the top left corner, trimming off some of the pieces. For the large sentiment, I used a Water Painter to add Daffodil Delight Classic ink to the glitter die cut words to tint them yellow to tie in with the lemon die cut pieces. I love how it ties everything together and gives it a summer feel to the design. I stamped the smaller sentiment with the Shy Shamrock Stampin' Spot from the kit onto one of the sentiment labels. I added the lemons to the bottom of the card, popping the smaller lemon up with Mini Stampin' Dimensionals and I then layered the sentiment label over the top. I added the large glitter words to the top left corner on top of the leaves and then added several of the pearls to complete the design. I love how this card came together using items from the kit.
Thank you for taking the time to visit my blog. I hope that my card design will help inspire you to explore creating your own wonderful alternative projects with this kit. There are so many possibilities to explore.
Please take the time to visit the Design Team by using the links in the Roll Call List below to see their amazing alternative project ideas. We would appreciate it if you would leave us a comment and let us know what you liked about our projects. 

If you live in the U.S. and do not have a Stampin' Up! Demonstrator, please contact me and I would be happy to help you with your creative projects. You may also visit my Online Store to place your order and have it shipped to you. 

Until Next Time

Happy Stamping,

Tricia Butts
Independent Stampin' Up! Demonstrator

Like What You See? Visit My Online Store Here

Visit My Facebook Business Page for Updates & Ideas

Click here to Contact Me


 Create Beautiful Floral Cards For The Summer
With The July Paper Pumpkin Kit
Click Below To Subscribe By July 10th


Saturday, May 18, 2024

Stamping With Friends Blog Hop 2024-2026 In Colors

Welcome to the Stamping With Friends Blog Hop as we showcase the new 2024-2026 In Colors. Our Design Team will be sharing their projects and ideas to help inspire you to explore using these beautiful new colors in your projects. There are so many options to choose from and I can't wait to share my card design with you.
Today's card is a fun birthday design using the Playing in the Rain stamp set and coordinating Playing In The Rain Dies using Shy Shamrock, Summer Splash, Peach Pie and a touch of Pretty In Pink. I love experimenting with different color combinations and I think these colors work really well together. This cute card design would work well for people of all ages and is a great way to celebrate someone's special day.
Products Used:
Saying Hey stamp set (item #163697)
Playing In The Rain stamp set (item #160542)
Playing In The Rain Dies (item #160550)
Deckled Circles Dies (item #162286)
Everyday Details Dies (item #162864)
2024-2026 In Color 6"x6" Designer Series Paper (item #163777)
Peach Pie Cardstock (item #163799)
Basic White Cardstock (item #159276)
Shy Shamrock Classic Ink Pad (item #163808)
Memento Tuxedo Black Pad (item #132708)
Peach Pie Stampin' Blends Combo Pack (item #163827)
Pretty In Pink Stampin' Blends Combo Pack (item #163824)
Shy Shamrock Stampin' Blends Combo Pack (item #163825)
Summer Splash Stampin' Blends Combo Pack (item #163826)
Color Lifter (item #144608)
Rainbow Adhesive Backed Dots (item #162758)
Stampin' Dimensionals (item #104430)
Measurements:
Peach Pie Cardstock
Card Base - 5 1/2" x 8 1/2" (Scored at 4 1/4")
Large Circle die cut with the Deckled Circles Dies
Basic White Cardstock
Medium Circle die cut with the Deckled Circles Dies
Turtle stamped and die cut with the Playing In the Rain Dies
Sentiment Label die cut with the Everday Details Dies
This card design is so cute and I thought that the combination of Shy Shamrock and Summer Splash would be perfect to color my cute little turtle. I used Stampin' Blends Markers to color the turtle using Shy Shamrock, Summer Splash, Peach Pie and a couch of Pretty In Pink for the flower. I die cut the image out and attached it to the Basic White circle with Stampin' Dimensionals and then layered it onto the Peach Pie Circle. For the sentiment, I stamped the image from the Saying Hey stamp set using Shy Shamrock Classic ink onto the Basic White sentiment label. I wanted to keep the design very simple, so I chose to use two of the small Petal Pink Dots from the Rainbow Adhesive Backed Dots to embellish the sentiment label. I love how this card design turned out and how beautifully these colors worked together. 
Thank you for taking the time to visit my blog. I hope that my card design will help inspire you to explore these beautiful new In Colors and come up with your own color combinations to create your own amazing projects. There are so many wonderful products to choose from to help spark your creativity.
Please take a trip along our blog hop and see what our Design Team has to share with you. Just click on the links in the Roll Call List below to visit their blogs and see their amazing projects and ideas. We would appreciate it if you would leave us a comment and let us know what you liked about our projects and which of the new In Colors is your favorite. 

If you live in the U.S. and do not have a Stampin' Up! Demonstrator, please contact me and I would be happy to help you with your creative projects. You may also visit my Online Store to place your order and have it shipped to you. 

Until Next Time

Happy Stamping,

Tricia Butts
Independent Stampin' Up! Demonstrator

Like What You See? Visit My Online Store Here

Visit My Facebook Business Page for Updates & Ideas

Click here to Contact Me


Explore The Amazing New Products
In The 2024-2025 Annual Catalog
Click Below To Visit My Online Store

Get New 2024-2026 In Color Products Free
In Your Starter Kit During The Month of May
Click Below For Details


Wednesday, May 15, 2024

New At SU May Blog Hop 2024-2026 In Colors Simply Said

It's time to hop along with the New At SU May Blog Hop and this month we are showcasing the beautiful new 2024-2026 In Colors released this month. Our amazing Design Team will be sharing their projects and ideas to help spark your creativity with these incredible new colors.
For my card design, I wanted to share a clean and simple card design using the new Simply Said stamp set from the 2024-2025 Annual Catalog. I love that this stamp set has sentiments for a variety of occasions is great whether you are just starting out or a seasoned stamper. I chose to use all five of the new In Colors - Petunia Pop, Pretty In Pink, Peach Pie, Shy Shamrock and Summer Splash to create this bright and cheerful card.
Products Used:
Simply Said stamp set (item #163756)
Stylish Shapes Dies (item #159183)
2024-2026 In Color Glimmer Specialty Paper (item #163771)
Petunia Pop Cardstock (item #163801)
Pretty In Pink Cardstock (item #163793)
Basic Black Cardstock (item #121045)
Versamark Pad (item #102283)
Metallics Wow Embossing Powders (item #165678)
2024-2026 In Color Shimmer Gems (item #163781)
Stampin' Dimensionals (item #104430)
Measurements:
Petunia Pop Cardstock
Card Base - 5 1/2" x 8 1/2" (Scored at 4 1/4")
Pretty In Pink Cardstock
Layer 1 - 5 1/4" x 4"
Basic Black Cardstock
Card Front - 5" x 3 3/4"
Sentiment Strip - 1/2" x 3 1/8" 
2024-2026 In Color Glimmer Specialty Paper
5 Medium Circles die cut with the Stylish Shapes Dies
- 1 each of Petunia Pop, Pretty In Pink, Peach Pie, Shy Shamrock & Summer Splash
I love making clean and simple card designs, especially when I can add a Wow factor to make it extra special. For this card design, I chose the new In Color Glimmer Specialty Paper in each of the five colors to add some sparkle to the design. I used the Stylish Shapes Dies to die cut the circles and adhered them to the Basic Black card front, trimming the edges flush with the card front. I used the excess pieces to fill in around the edges to complete the design. For the sentiment, I heat embossed the image from the Simply Said stamp set with Gold embossing powder onto the Basic Black cardstock strip and trimmed it to approx. 3 1/8". I added two of the Peach Pie Shimmer Gems to decorate the sentiment label. I added the sentiment to the center of the card front with Stampin' Dimensionals to pop it up. I added the Basic Black card front to the Pretty In Pink cardstock layer and then used Stampin' Dimensionals to add it to the Petunia Pop card base. I love how beautifully these colors work together and how they pop against the Basic Black card front. This card would work well to help celebrate a variety of occasions.

Thank you for taking the time to visit my blog. I hope that my card design will inspire you to explore using the new 2024-2026 In Colors for your own beautiful projects. These pretty colors are perfect for Spring and Summer projects for a variety of occasions and the coordinating products take the stress out of creating. 
Please take the time to visit my fellow Design Team members and see their amazing projects. Just click on the links in the Roll Call List to find your way along this month's blog hop. We would love it if you would leave us a comment and let us know what you liked about our projects and maybe even what your favorite new In Color is. I hope you enjoy the rest of our blog hop.


If you live in the U.S. and do not have a Stampin' Up! Demonstrator, please contact me and I would be happy to help you with your creative projects. You may also visit my Online Store to place your order and have it shipped to you. 

Until Next Time

Happy Stamping,

Tricia Butts
Independent Stampin' Up! Demonstrator

Like What You See? Visit My Online Store Here

Visit My Facebook Business Page for Updates & Ideas

Click here to Contact Me


Explore The Amazing New Products
In The 2024-2025 Annual Catalog
Click Below To Shop Now

Get New 2024-2026 In Color Products Free
In Your Starter Kit During The Month of May
Click Below For Details