Wednesday, April 10, 2024

Around The World On Wednesday April Blog Hop This Or That

Welcome to the Around The World On Wednesday April Blog Hop and this month we are having some fun with a This or That challenge. We have been challenged to create two projects that share some similarities but are different, to see which you prefer - This or That. Our talented Design Team is excited to share their projects to see which one you prefer.
For my two cards, I chose the same layout using the Notes of Nature stamp set, Perennial Postage Dies and Stylish Shapes Dies. Both are clean and simple card designs but one is black and white while the other is a pink monochromatic design. This challenge was so much fun and I loved playing with the different designer series paper and making little changes that helped make one card different from the other. I hope you like them.
Products Used:
This Card
Zoo Crew Designer Series Paper (item #161304) - Retiring
Notes of Nature stamp set (item #162630) - Retiring 
Perennial Postage Dies (item #163607)
Stylish Shapes Dies (item #159183)
Timeworn Type 3D Embossing Folder (item #156505)
Thick Basic White Cardstock (item #159229)
Basic White Cardstock (item #159276)
Basic Black Cardstock (item #121045)
Memento Tuxedo Black Pad (item #132708)
Festive Pearls (item #159963) - Retiring
Stampin' Dimensionals

That Card
Bright & Beautiful 6" x 6" Designer Series Paper (item #151449)
- Retiring
Notes of Nature stamp set (item #162630) - Retiring
Perennial Postage Dies (item #163607)
Stylish Shapes Dies (item #159183)
Berry Burst Cardstock (item #144243)
Versamark Pad (item #102283)
Metallics Embossing Powders (item #155555) - Retiring
Sheer Ribbon Combo Pack (item #161635) - Retiring
Pastel Adhesive Backed Sequins (item #160387) - Retiring
Stampin' Dimensionals
Measurements: 
This Card
Thick Basic White Cardstock
Card Base - 8 1/2" x 5 1/2" (Scored at 4 1/4")
Basic Black Cardstock
Card Front - 5 1/4" x 4" Embossed with the Timeworn Type 3D Embossing Folder 
Basic White Cardstock 
Sentiment Label die cut with the Stylish Shapes Dies
Zoo Crew Designer Series Paper
3 Medium Rectangles die cut with the Perennial Postage Dies
That Card
Berry Burst Cardstock
Card Base - 5 1/2" x 8 1/2" (Scored at 4 1/4")
Sentiment Label die cut with the Stylish Shapes Dies
Bright & Beautiful Designer Series Paper
Card Front - 5 1/4" x 4"
3 Medium Rectangles die cut with the Perennial Postage Dies
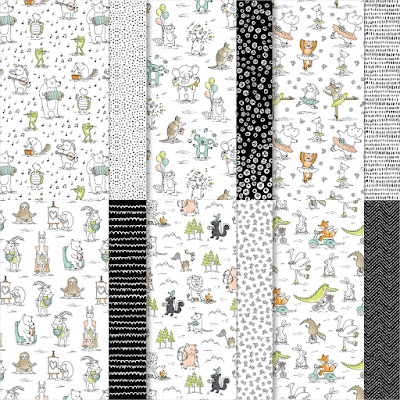
Both of these cards are basically the same layout using different designer series papers to create unique designs. For the "This" card, I chose to emboss the Basic Black cardstock card front with the Timeworn Type 3D Embossing Folder to add some wonderful texture. I chose black and white patterns from the Zoo Crew Designer Series Paper pack to create the focal rectangles and stamped the sentiment from the Notes of Nature stamp set using Memento Tuxedo Black ink. For embellishments, I used the Silver Pearls from the Festive Pearls, to add a touch of bling. 
For the "That" Card, I chose patterns from the Bright & Beautiful 6"x6" Designer Series Paper pack to create an ombre look to the design. I chose one of the Bubble Bath ombre designs for the card front and then three different shades ranging from Bubble Bath to Berry Burst for the three rectangles. For this card, I chose to heat emboss the sentiment with Gold embossing powder onto the Berry Burst sentiment label to make it pop and I added Gold Sequins for a touch of bling. I also added a piece of Bubble Bath Sheer Ribbon underneath the sentiment label to help step up the design. 
So, I am curious. Which do you prefer? The Black & White This card or the Pink Monochromatic That Card? Let me know in the comments. 
Thank you for taking the time to visit my blog. I hope that my card designs will help inspire you to create your own projects that share common elements or products to help you come up with your own unique ideas. There are so many wonderful options to explore. Don't forget to check out the Last Chance Product Sale and save up to 60% off select retiring products from the 2023-2024 Annual Catalog and January-April 2024 Mini Catalog. All retiring products are available while supplies last or until April 30th. Make sure to place your order soon to avoid missing out on your favorite retiring products. 
Now it's time to visit Theresa's blog and see what she has created to share with us. Just click on the Next button to visit her blog or use the Roll Call List to find your way. We would appreciate it if you would leave us a comment and let us know what you liked about our projects. Which do you prefer? This or That?

Roll Call List

Jan Clothier - NZ

Leonie Stuart - AU

Rochelle Laird-Smith - AU

Cheryll Miller - AU

Danielle Kassing - NL

Aurélie Fabre - FR

Angie McKenzie - US

Kelly Taranto - US

Chris Smith - US

Tricia Butts - US

Theresa McEntee - US

Bree Renwick - US

Lori Willcox - CA

Teri West - US

Cheryl Hamilton - US


If you live in the U.S. and do not have a Stampin' Up! Demonstrator, please contact me and I would be happy to help you with your creative projects. You may also visit my Online Store to place your order and have it shipped to you. 

Until Next Time

Happy Stamping,

Tricia Butts
Independent Stampin' Up! Demonstrator

Like What You See? Visit My Online Store Here

Visit My Facebook Business Page for Updates & Ideas

Click here to Contact Me


Save Up To 60%
During the Last Chance Products Sale
Click Below To Shop Now

Explore Your Creativity
With The New Online Exclusives Products
Click Below To Visit My Online Store


Saturday, April 6, 2024

Stamping With Friends April Blog Hop Bloggers Choice

Welcome to the Stamping With Friends April Blog Hop and today our theme is Bloggers Choice. Our Design Team will be sharing their projects and ideas to help inspire you to get creative. I love that we have the freedom to share whatever we choose for this blog hop, so today I thought I would share some of my favorite retiring products and a fun technique.
If you have been following me for a while, you know that I love creating clean and simple cards using designer series paper. For today's card design, I have chosen a fun scrappy strip technique that I learned from a fellow Stampin' Up! Demonstrator, Karen Titus, that is a great way to use up your scraps of designer series paper to create beautiful cards. You can see her video here. I chose to use the beautiful Masterfully Made Designer Series Paper to create the focal design for my card and combined it with the Tailor Made Tags Dies and the Timeworn Type 3D Embossing Folder. Both of these products are retiring and are available while supplies last until April 30th. The colors I chose are from the designer series paper and I love how Pretty Peacock, Lost Lagoon and Berry Burst look together. 
Products Used:
Go To Greetings stamp set (item #158763) Retiring
Tailor Made Tags Dies (item #155563) Retiring
Timeworn Type 3D Embossing Folder (item #156505) Retiring
Masterfully Made Designer Series Paper (item #161192) Retiring
Pretty Peacock Cardstock (item #150880)
Lost Lagoon Cardstock (item #133679)
Berry Burst Cardstock (item #144243)
Versamark Pad (item #102283)
Metallics Embossing Powders (item #155555) Retiring 
Silver & Gold 1/8" Trim Combo Pack (item #161633)
Iridescent Pastel Gems (item #160429) Retiring
Stampin' Dimensionals (item #104430)
Measurements:
Pretty Peacock Cardstock
Card Base - 5 1/2" x 8 1/2" (Scored at 4 1/4")
Layer - 3" x 4 1/4"
Lost Lagoon Cardstock
Card Front - 5 1/4" x 4" Embossed with the Timeworn Type 3D Embossing Folder 
Masterfully Made Designer Series Paper
Sqaure - 3 1/2" x 3 1/2" Cut into strips - 1/2", 3/4", 1", 1 1/4"
Berry Burst Cardstock
Sentiment Tag - die cut with the Tailor Made Tags Dies 
This fun card design is so much fun to create and this layout would work for so many of your favorite designer series paper scraps. The beauty of this layout is that you can choose how wide you want your strips to be and arrange them how you like to create your finished design. Once I had cut up the strips from my 3 1/2" square of designer series paper, I adhered them to the piece of Pretty Peacock cardstock, leaving a gap between each strip. To add some interest to the background, I embossed the Lost Lagoon cardstock layer with the Timeworn Type 3D Embossing Folder. I love the subtle texture this embossing folder adds to the card design. I layered the background onto the Pretty Peacock card base and added the focal layer to the center of the Lost Lagoon card front using Stampin' Dimensionals. For the sentiment, I heat embossed the image using Silver embossing powder onto Berry Burst cardstock and die cut the tag using the Tailor Made Tags Dies. I tied a piece of the Silver Trim through the hole on the tag and adhered the tag to the right side of the focal layer. To complete the card design, I added several Iridescent Pastel Gems to the card front to add a touch of bling. This card design is perfect for so many occasions and gives you the option to personalize it for the person receiving it. 
Thank you for taking the time to visit my blog. I hope my card design helps inspire you to use all those scraps of designer series paper to create your own beautiful cards. There are so many wonderful possibilities to explore. Remember that all the retiring products are available while supplies last until April 30th, so don't delay in placing your order for your favorite products before they disappear. 
Please take the time to visit with my fellow Design Team members to see their amazing projects. Just click on the links in the Roll Call List below to find your way. We would appreciate it if you would leave us a comment and let us know what you like about our projects. 

If you live in the U.S. and do not have a Stampin' Up! Demonstrator, please contact me and I would be happy to help you with your creative projects. You may also visit my Online Store to place your order and have it shipped to you. 

Until Next Time

Happy Stamping,

Tricia Butts
Independent Stampin' Up! Demonstrator

Like What You See? Visit My Online Store Here

Visit My Facebook Business Page for Updates & Ideas

Click here to Contact Me


Stock Up On Your Favorite Retiring Products
From The Last Chance Products Sale
April 9 - 30th
Retiring Products Available While Supplies Last

Explore Your Creativity
With New Online Exclusives Products 
Click Below To Shop Now


Friday, April 5, 2024

Global Stamping Friends April Blog Hop A Fond Farewell

It's April, which means it's time to say a Fond Farewell to our favorite retiring products with the Global Stamping Friends April Blog Hop. Our small but mighty Design Team will help you prepare to say goodbye to the 2023-2024 Annual Catalog and January-April 2024 Mini Catalog and inspire you to get creative with products you may have missed. 
Today I decided to showcase some of my favorite retiring products from the 2023-2024 Annual Catalog that you may have forgotten about. I chose to use one of the designs from the beautiful Masterfully Made Designer Series Paper to create the background for my card design and paired it with the retiring Sending Dies and coordinating Sending Smiles stamp set for the sentiments. I love the way that Berry Burst and Blackberry Bliss look together to create this pretty birthday card. I added a touch of bling with the retiring Iridescent Rhinestones, which I am sad to see go, as they are one of my favorite embellishments. 
Products Used: 
Sending Smiles stamp set (item #158701) Retiring
Sending Dies (item #161597) Retiring
Nested Essentials Dies (item #161597)
Masterfully Made Designer Series Paper (item #161192) Retiring
Blackberry Bliss Cardstock (item #133675)
Berry Burst Cardstock (item #144243)
Versamark Pad (item #102283)
Metallics Embossing Powders (item #155555) Retiring
Iridescent Rhinestones Basic Jewels (item #158130) Retiring
Mini Stampin' Dimensionals (item #144108)
Measurements:
Black Berry Bliss Cardstock 
Card Base - 5 1/2" x 8 1/2" (Scored at 4 1/4")
Large Sentiment Label die cut with the Nested Essentials Dies
Small Sentiment Label die cut with the Sending Dies
Berry Burst Cardstock
Detailed Sending Sentiment die cut with the Sending Dies
Masterfully Made Designer Series Paper
Card Front - 5 1/4" x 4"
This beautiful clean and simple card is all about the designer series paper background. I love the look of the torn paper strips that add wonderful texture and detail. I wanted the sentiment labels to really pop against the background, so I chose to use Blackberry Bliss for the large and small labels to coordinate with the card base. I die cut the detailed Sending sentiment using the Sending Dies from Berry Burst cardstock and I heat embossed the sentiment on the smaller sentiment label with Silver embossing powder to make it pop. (Note that while the Metallics embossing powders are listed as retiring, they will return in a new configuration in the new catalog and with a new item number due to a change in manufacturer.) To finish off the card design, I added Iridescent Rhinestones for a touch of bling. This pretty birthday card is a great example of how you can mix and match retiring products to create beautiful projects. 
Thank you for taking the time to visit my blog. I hope that my card design will help inspire you to give the retiring catalogs a second look and check all the amazing products we are saying goodbye to. You never know what you might find that you just can't live without. Remember that all retiring products are available only while supplies last until April 30th. 
Now it's time to visit Kimberley's blog and see what she has created this month. Just click on the link below to visit her blog. We would love it if you would leave us a comment and let us know what you liked about our projects. I hope you enjoy our little blog hop.

Roll Call List

If you live in the U.S. and do not have a Stampin' Up! Demonstrator, please contact me and I would be happy to help you with your creative projects. You may also visit my Online Store to place your order and have it shipped to you. 

Until Next Time

Happy Stamping,

Tricia Butts
Independent Stampin' Up! Demonstrator

Like What You See? Visit My Online Store Here

Visit My Facebook Business Page for Updates & Ideas

Click here to Contact Me


Stock Up On Your Favorite Retiring Products
During The Last Chance Products Sale
April 9-30th, 2024
Retiring Products Available While Supplies Last

Explore Your Creativity
With The New Online Exclusives Products
Click Below To Shop Now


Crafty Collaborations Monochromatic Color Challenge Week 14 - Pumpkin Pie

Welcome to Week 14 of the Crafty Collaborations Monochromatic Color Challenge and this week we are showcasing Pumpkin Pie from the Brights Collection. This vibrant Orange was a fun challenge and had me thinking outside the box to help me show how beautiful this color is. 
My card design today is a stepped up version of simple stamping, which also includes the spotlight technique. This fun technique is a great way to add a touch of color to a black and white image to help bring it to life. I chose to use the new Simply Zinnia stamp set from the Online Exclusives. I love the detailed line image of the floral design and the sentiment is a lovely combination of fonts that helps to finish it off. I added some bling and colored some ribbon to help step up the design to create a soft and pretty card. 
Products Used:
Simply Zinnia stamp set (item #163472)
Deckled Circles Dies (item #162286)
Thick Basic White Cardstock (item #159229)
Basic White Cardstock (item #159276)
Pumpkin Pie Cardstock (item #105117)
Pumpkin Pie Classic Ink Pad (item #147086)
Memento Tuxedo Black Pad (item #132708)
Pumpkin Pie Stampin' Blends Combo Pack (item #154897)
Blending Brushes (item #153611)
Silver & White 1/2" Shimmer Ribbon (item #162149)
Iridescent Rhinestones Basic Jewels (item #158130)
Measurements:
Thick Basic White Cardstock
Card Base - 5 1/2" x 8 1/2" (Scored at 4 1/4")
Pumpkin Pie Cardstock
Layer 1 - 5 1/4" x 4"
Basic White Cardstock
Card Front - 5" x 3 3/4"
This clean and simple card design is easy to create and works well for a variety of occasions. I wanted to showcase how versatile Pumpkin Pie can be by showing the different shades using different coordinating products. I added the Pumpkin Pie cardstock layer to help make the focal layer pop. I added the circle of color by die cutting a circle out of a piece of printer paper using the Deckled Circles Dies and used it as a mask to apply Pumpkin Pie Classic ink to the card front using a Blending Brush until I got the intensity that I wanted. I then stamped the floral image using Memento Tuxedo Black ink so that the flowers were inside the circle and the stems were just below the circle. I also stamped the sentiment in the bottom right corner to complete the design. For the ribbon, I used the Dark Pumpkin Pie Stampin' Blends Marker to color a piece of the Silver & White Shimmer Ribbon to give it a hint of color and then tied it into a simple bow and then attached it to the card front with a Mini Glue Dot. For a touch of bling, I added several Iridescent Rhinestones to complete this lovely card design. I just love how beautiful this card design looks and how well it showcases this bold, bright color. 
Thank you for taking the time to visit my blog. I hope that my card design will help convince you to give Pumpkin Pie another look and try it when creating your next project. There are so many wonderful ways to use it and so many products that coordinate to help take the stress out of creating.
Don't forget to check out all the amazing card designs this week featuring Pumpkin Pie as part of our Monochromatic Insta Hop. Just click here to get started. We would love it if you would leave us a comment and let us know what you liked about our projects. 

If you live in the U.S. and do not have a Stampin' Up! Demonstrator, please contact me and I would be happy to help you with your creative projects. You may also visit my Online Store to place your order and have it shipped to you. 

Until Next Time

Happy Stamping,

Tricia Butts
Independent Stampin' Up! Demonstrator

Like What You See? Visit My Online Store Here

Visit My Facebook Business Page for Updates & Ideas

Click here to Contact Me


Last Chance Product Sale
April 9-30th, 2024
Retiring Products Available While Supplies Last

Explore Your Creativity
With The New Online Exclusives Products
Click Below To Shop Now


Monday, April 1, 2024

We Create April Blog Hop April Showers

Welcome to the We Create April Blog Hop and this month our theme is "April Showers". Here in Colorado, Spring is in full swing and we have been alternating between lovely warm, sunny days and cooler rainy and sometimes even snowy weather. Basically, typical Spring weather for Colorado. Our Design Team is excited to share their wonderful projects and ideas to help inspire you to create your own beautiful projects to help celebrate the special occasions you have coming up.
When I think of Spring, I think of the saying, "April showers bring May flowers" and so far we have been lucky enough to have both rain and snow. For my card design, I chose to use the lovely Spring scenery in the Rocky Mountains as my inspiration. Once the snow has melted, the beautiful wildflowers start to bloom and everything is so green and pretty. I chose one of the designs from the Meandering Meadows 6"x6" Designer Series Paper to create the background for my card design, to recreate that wonderful view. I wanted to keep my design clean and simple, so I chose to add a simple sentiment and minimal embellishments to create a lovely Thinking of You card.
Products Used:
Garden Meadow stamp set (item #162736)
Something Fancy Dies (item #160424)
Meandering Meadow 6"x6" Designer Series Paper (item #162735)
Highland Heather Cardstock (item #146986)
Basic White Cardstock (item #159276)
Highland Heather Classic Ink Pad (item #147103)
Ribbon Duo Combo Pack (item #161318)
Adhesive Backed Dragonflies & Birds (item #162743)
Stampin' Dimensionals (item #104430)
Measurements:
Highland Heather Cardstock
Card Base - 5 1/2" x 8 1/2" (Scored at 4 1/4")
Basic White Cardstock 
Sentiment Label die cut with the Something Fancy Dies
Meandering Meadows Designer Series Paper
Card Front - 5 1/4" x 4"
This beautiful card really does showcase the wonderful designs in the Meandering Meadows Designer Series Paper pack. The soft, watercolor look to the scenes are so peaceful and soothing and I thought it would be perfect for a Thinking of You card. I added the designer series card front to a Highland Heather card base to help make the scene stand out. I stamped the sentiment with Highland Heather Classic ink onto Basic White cardstock and die cut out the sentiment with one of the Something Fancy Dies. I cut two pieces of the Petal Pink ribbon and attached them to the card front and then added the sentiment label over the top with Stampin' Dimensionals. For a touch of bling, I added several gold Dragonflies to complete the design. This clean and simple design is a wonderful way to showcase your pretty designer series paper to help you create beautiful cards. 
Thank you for taking the time to visit my blog. I hope that my card design will help inspire you to create your own beautiful projects. Spring is such a lovely time of the year and there are so many wonderful possibilities to explore.
Now it's time to visit Cheryl's blog and see what she has created to share with us. Just click on the Next button below to visit her blog. We would appreciate it if you would leave us a comment and let us know what you liked about our projects. I hope that you enjoy the rest of our blog hop.

Roll Call List

If you live in the U.S. and do not have a Stampin' Up! Demonstrator, please contact me and I would be happy to help you with your creative projects. You may also visit my Online Store to place your order and have it shipped to you. 

Until Next Time

Happy Stamping,

Tricia Butts
Independent Stampin' Up! Demonstrator

Like What You See? Visit My Online Store Here

Visit My Facebook Business Page for Updates & Ideas

Click here to Contact Me


Explore The Amazing Products 
Available In The Online Exclusives 
Click Below To Shop Now

Create Beautiful Elegant Cards
With The Delicate Wings Paper Pumpkin Kit
Click Below To Subscribe By April 10th