Showing posts with label Pumpkin Pie. Show all posts

Friday, January 31, 2025

Crafty Collaborations Monochromatic Color Challenge 2025 Week 5 - Pumpkin PIe

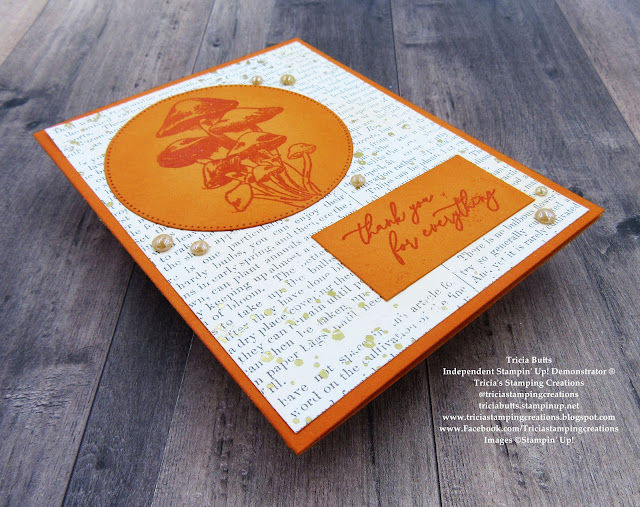
Welcome to Week 5 of the 2025 Monochromatic Color Challenge and this week we are showcasing Pumpkin Pie from the Brights Collection. I must admit that this is a color I don't use very often so this was a fun challenge to create a clean and simple design that shows how versatile this color can be.
I love heat embossing, so for today's card design, I wanted to create a tone on tone look to for the focal image and sentiment using Clear embossing powder. To help make the images pop a little more, I added some Pumpkin Pie Classic ink around the edges of the circle and sentiment label with a Blending Brush to create some depth and dimension. I also added some soft color to the designer series paper background to give it a distressed, vintage feel that also helps bring out the Gold embossed detail. This card design has a wonderful clean and simple elegance to it that works well for a variety of occasions.
Products Used:
Inspirationational Sketches stamp set (item #162684)
Stylish Shapes Dies (item #159183)
Nature's Sweetness Specialty Designer Series Paper (item #162616)
Pumpkin Pie Cardstock (item #105117)
Pumpkin Pie Classic Ink Pad (item #147086)
Versamark Pad (item #102283)
Basics Wow Embossing Powders (item #165679)
Blending Brushes (item #153611)
Champagne Iridescent Dots (item #162824)
Measurements:
Pumpkin Pie Cardstock
Card Base - 8 1/2" x 5 1/2" (Scored at 4 1/4")
Large Circle die cut with the Stylish Shapes Dies
Sentiment Label - 2 1/4" x 1 1/8"
Nature's Sweetness Specialty Designer Series Paper
Card Front - 5 1/4" x 4"
If you have been following me for a while, you know how much I love creating clean and simple card designs using designer series paper. Recently I rediscovered Nature's Sweetness Specialty Designer Series Paper from my crafting stash and I just love the simple elegance of the beautiful gold embossing on the designs in this paper pack. For today's card, I chose the design that has a newsprint feel to it with subtle Gold embossed splatters and I applied Pumpkin Pie Classic ink softly over the card front to give it just a hint of color. This helps bring out the Gold splatters and gives the card design more of a vintage feel. The Clear embossing of the focal image and sentiment add a wonderful contrast to the card design and I love the subtle glossy look that the embossing powder adds. For a touch of bling, I added several of the Champagne Iridescent Dots that coordinate perfectly with the other elements of this card design. 
Thank you for taking the time to visit my blog. I hope that my card design will inspire you to explore using Pumpkin Pie to create your own beautiful card designs. As you can see, there is so much more to this color than Halloween and Fall and I just love the versatility of this beautiful orange. 
Please take a moment to check out this week's Monochromatic Insta Hop to see all the amazing projects featuring Pumpkin Pie. Just click here to get started. We would appreciate it if you would leave us a comment and let us know what you liked about our projects. I hope you will join me next Friday to see what color we will showcase for Week 6. 

If you live in the U.S. and do not have a Stampin' Up! Demonstrator, please contact me and I would be happy to help you with your creative projects. You may also visit my Online Store to place your order and have it shipped to you. 

Until Next Time

Happy Stamping,

Tricia Butts
Independent Stampin' Up! Demonstrator

Like What You See? Visit My Online Store Here

Visit My Facebook Business Page for Updates & Ideas

Click here to Contact Me


Friday, April 5, 2024

Crafty Collaborations Monochromatic Color Challenge Week 14 - Pumpkin Pie

Welcome to Week 14 of the Crafty Collaborations Monochromatic Color Challenge and this week we are showcasing Pumpkin Pie from the Brights Collection. This vibrant Orange was a fun challenge and had me thinking outside the box to help me show how beautiful this color is. 
My card design today is a stepped up version of simple stamping, which also includes the spotlight technique. This fun technique is a great way to add a touch of color to a black and white image to help bring it to life. I chose to use the new Simply Zinnia stamp set from the Online Exclusives. I love the detailed line image of the floral design and the sentiment is a lovely combination of fonts that helps to finish it off. I added some bling and colored some ribbon to help step up the design to create a soft and pretty card. 
Products Used:
Simply Zinnia stamp set (item #163472)
Deckled Circles Dies (item #162286)
Thick Basic White Cardstock (item #159229)
Basic White Cardstock (item #159276)
Pumpkin Pie Cardstock (item #105117)
Pumpkin Pie Classic Ink Pad (item #147086)
Memento Tuxedo Black Pad (item #132708)
Pumpkin Pie Stampin' Blends Combo Pack (item #154897)
Blending Brushes (item #153611)
Silver & White 1/2" Shimmer Ribbon (item #162149)
Iridescent Rhinestones Basic Jewels (item #158130)
Measurements:
Thick Basic White Cardstock
Card Base - 5 1/2" x 8 1/2" (Scored at 4 1/4")
Pumpkin Pie Cardstock
Layer 1 - 5 1/4" x 4"
Basic White Cardstock
Card Front - 5" x 3 3/4"
This clean and simple card design is easy to create and works well for a variety of occasions. I wanted to showcase how versatile Pumpkin Pie can be by showing the different shades using different coordinating products. I added the Pumpkin Pie cardstock layer to help make the focal layer pop. I added the circle of color by die cutting a circle out of a piece of printer paper using the Deckled Circles Dies and used it as a mask to apply Pumpkin Pie Classic ink to the card front using a Blending Brush until I got the intensity that I wanted. I then stamped the floral image using Memento Tuxedo Black ink so that the flowers were inside the circle and the stems were just below the circle. I also stamped the sentiment in the bottom right corner to complete the design. For the ribbon, I used the Dark Pumpkin Pie Stampin' Blends Marker to color a piece of the Silver & White Shimmer Ribbon to give it a hint of color and then tied it into a simple bow and then attached it to the card front with a Mini Glue Dot. For a touch of bling, I added several Iridescent Rhinestones to complete this lovely card design. I just love how beautiful this card design looks and how well it showcases this bold, bright color. 
Thank you for taking the time to visit my blog. I hope that my card design will help convince you to give Pumpkin Pie another look and try it when creating your next project. There are so many wonderful ways to use it and so many products that coordinate to help take the stress out of creating.
Don't forget to check out all the amazing card designs this week featuring Pumpkin Pie as part of our Monochromatic Insta Hop. Just click here to get started. We would love it if you would leave us a comment and let us know what you liked about our projects. 

If you live in the U.S. and do not have a Stampin' Up! Demonstrator, please contact me and I would be happy to help you with your creative projects. You may also visit my Online Store to place your order and have it shipped to you. 

Until Next Time

Happy Stamping,

Tricia Butts
Independent Stampin' Up! Demonstrator

Like What You See? Visit My Online Store Here

Visit My Facebook Business Page for Updates & Ideas

Click here to Contact Me


Last Chance Product Sale
April 9-30th, 2024
Retiring Products Available While Supplies Last

Explore Your Creativity
With The New Online Exclusives Products
Click Below To Shop Now