It's a cold, snowy day here in Colorado, which is a perfect reason to stay inside and create beautiful cards to share as part of the Demonstrator Training January Blog Hop. You will have the opportunity to visit with talented Stampin' Up! Demonstrators from around the world as they share their projects and ideas to help spark your creativity. Our theme is Thank You and Congratulations cards to share with the people in our lives.
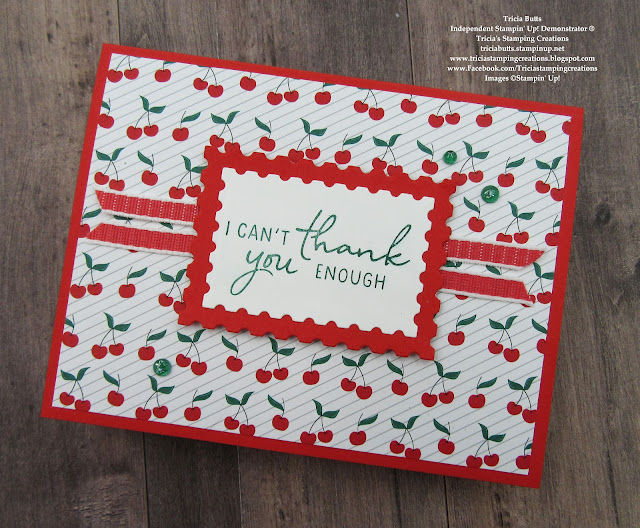
When the weather is cold and dreary, I love to make bright and cheerful cards to help brighten people's days. There is nothing like getting happy mail to bring a smile to someone's face. For my Thank You card today, I chose to use this pretty pattern from the Sunny Days Designer Series Paper, which is a Level 1 Sale-a-bration Reward you can earn free with a qualifying order. I love this sweet cherry design and I wanted it to be the star of the show, so I chose to use the Perennial Postage Bundle to create a simple sentiment label. I don't use Poppy Parade very often, but I love how bold and bright it looks with this design.
Products Used:
Perennial Postage Bundle (item #162608)
Sunny Days Designer Series Paper (item #162974) Level 1
Sale-a-bration Reward
Poppy Parade Cardstock (item #119793)
Basic White Cardstock (item #159276)
Shaded Spruce Classic Ink Pad (item #147088)
Sweet Sorbet 1/4" Bordered Ribbon (item #162558)
Tinsel Gems Four Pack (item #161623)
Stampin' Dimensionals (item #104430)
Measurements:
Poppy Parade Cardstock
Card Base - 8 1/2" x 5 1/2" (Scored at 4 1/4")
Mat Layer die cut with the Perennial Postage Dies
Basic White Cardstock
Sentiment Label die cut with the Perennial Postage Dies
Sunny Days Designer Series Paper
Card Front - 5 1/4" x 4"
This is such a fun card design and simple to create. For the sentiment, I chose to stamp the image from the Perennial Postage stamp set onto Basic White cardstock with Shaded Spruce Classic ink to coordinate with the colors in the designer series paper. I die cut the sentiment with one of the Perennial Postage Dies and then layered it onto a Poppy Parade die cut with the die one size larger. I added two pieces of the Sweet Sorbet Bordered Ribbon across the middle of the card front and added the sentiment label on top with Stampin' Dimensionals to pop it up. For a touch of bling, I used some Pretty Peacock Gems from the Tinsel Gems Four Pack to complete the design. You may have noticed that the Sweet Sorbet Ribbon and Pretty Peacock Gems are a close match to Poppy Parade and Shaded Spruce and it's a good reminder that you can mix and match products to help you design your cards and projects.
Thank you for taking the time to visit my blog. I hope that my card will help give you some creative ideas to help you create your own beautiful card designs. There are so many wonderful possibilities to explore in the January-April 2024 Mini Catalog and 2024 Sale-a-bration Catalog.
Please visit with the other Demonstrators taking part in today's blog hop by clicking on the links in the Roll Call List below. You will find so many wonderful projects to inspire you. We would appreciate it if you would leave us a comment and let us know what you liked about our projects. I hope you enjoy our blog hop.
If you live in the U.S. and do not have a Stampin' Up! Demonstrator, please contact me and I would be happy to help you with your creative projects. You may also visit my Online Store to place your order and have it shipped to you.
Until Next
Time
Happy
Stamping,
Tricia Butts
Independent Stampin' Up!
Demonstrator
Like What You
See? Visit My Online Store Here
Visit My Facebook Business Page for Updates & Ideas
Click here to Contact Me
Explore Your Creativity In 2024
With The January-April 2024 Mini Catalog
Click Below To Shop Now
Sale-a-Bration Is Here!
Earn Exclusive Free Products With A Qualifying Order
Click Below For More Details


Pretty card Tricia. I love the use of the Ribbon
ReplyDeleteCute card Tricia!!! Fabulous layout!
ReplyDeleteSo pretty, love the ribbon! Thank you Tricia for taking part in our Demonstrator Training Blog Hop this month!
ReplyDelete