Wednesday, October 16, 2019

What's New at SU October Blog Hop Fall & Halloween

It's time to hop along with the What's New at SU Blog Hop for October as we share projects for Fall and Halloween. You will be visiting with Stampin' Up! demonstrators as they share their ideas featuring products from Stampin' Up!'s Holiday and Annual Catalog to  help inspire you. I hope that you enjoy the creations we have to share.
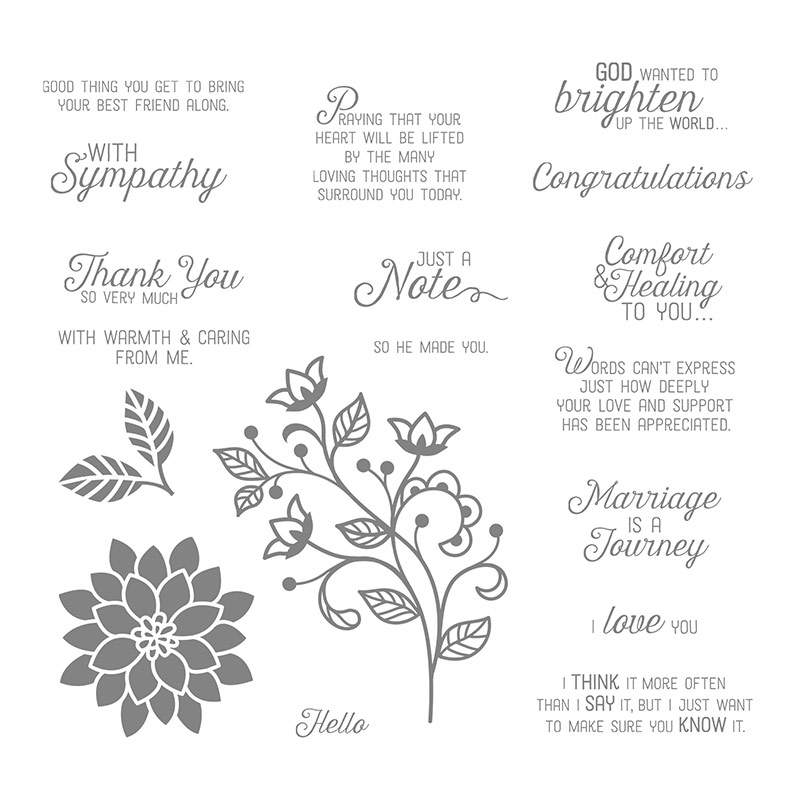
I am in love with the beautiful designs in the Come To Gather Designer Series Paper (item #150454) from the 2019 Holiday Catalog. They are perfect for Fall themed cards for all occasions and today I am creating a Thank You card using the Flourishing Phrases stamp set (item #151407) and the Frosted Bouquet Die set (item #147895) from the 2019-2020 Annual Catalog. 
 For this clean and simple card design, I chose to use Early Espresso cardstock for the card base and added the layer of designer series paper using Snail Adhesive to create the background. Using the dies from the Frosted Bouquet Dies, I die cut two of the detailed branches from Copper Foil to embellish the sentiment.
To create the sentiment, I heat embossed the image from the Flourishing Phrases stamp set onto a scrap of Very Vanilla cardstock using Copper embossing powder and die cut it using the smaller label die. I then die cut the larger label from Early Espresso cardstock to create the matte for the sentiment. Using some Snail Adhesive, I attached the Copper Foil branches to the back of the sentiment label and then attached the label to the card front with Stampin' Dimensionals to complete the card design. 
 This card design is very easy to assemble and you can create a variety of them with the beautiful designs in this designer series paper pack. In addition to creating thank you cards, this card design would be wonderful for masculine birthdays, Thinking of You and even Get Well cards. 

Thank you for taking the time to visit my blog today. I hope that my card design helps inspire you to create your own fun projects for the season. If you live in the U.S. and do not already have a demonstrator, please contact me and I would be happy to help you.

Now it's time to visit Judi's blog and see what amazing project she has to share this month. Just click on the Next button below to visit her blog or click the Previous button to visit Margriet's blog. I hope that you will enjoy our ideas. 

Roll Call List
Margriet Siekman - Creatiefmarsie
Anke Heim – Scraphexe Pia Gerhardt-Scraproomboom
Sharon Burkert – As the Ink Dries
Heather Cooper-Playing with Papercrafting
Loni Spendlove - Creative Juice by Loni
Diane Browning - 24-7 Inkspiration


Until Next Time
Happy Stamping,


Tricia Butts
Independent Stampin' Up! Demonstrator
Like What You See? Visit My Online Store Here
Visit My Facebook Business Page for Updates & Ideas


Click here to Contact Me

Monday, October 14, 2019

Kylie's Demonstrator Training Blog Hop October 2019

Welcome to Kylie's Demonstrator Training Program's Monthly Blog Hop. This is our first hop for the new training year and I am excited to participate with all these amazing, talented Stampin' Up! demonstrators as we share our creative projects to help inspire you. I hope that you will enjoy our blog hop today. 
 Today's card design has a wonderful "back to nature" feel to it using the beautiful Nature's Beauty stamp set (item #150528) from the 2019 Holiday Catalog. This amazing stamp set has a special meaning as it is part of Stampin' Up!'s Making a Difference program, with $3 from every stamp set sold going to designated Mental Health Organizations globally. Mental Health has always been something very important and personal for me and my family, so this stamp set has special meaning. 
 I wanted to create a card design that would be suitable as either a masculine or feminine card, so I paired the Nature's Beauty stamp set with the lovely Pressed Petals Specialty Designer Series Paper (item #149500) from the 2019-2020 Annual Catalog. The designs in this paper pack have a wonderful organic feel and I love the texture and variety of patterns available. I chose this leaf background design for my card as it gave me a feeling of peace which I thought worked well with the stamp set. 
The card base was created using Early Espresso cardstock and I added the layer of designer series paper to create the background for the card front. I stamped the deer image using Versamark ink onto Very Vanilla cardstock and heat embossed it with Copper Embossing powder. I die cut the image using the Stitched Nested Labels Dies (item #149638) and layered it onto a larger piece of Early Espresso cardstock die cut from the same set of dies. 
To add some texture to the card design, I added a piece of 5/8" Burlap Ribbon (item #140487) to the designer series paper, fraying the ends for a more rustic look. I attached the focal image over the top of the burlap ribbon with Stampin' Dimensionals to add dimension to the design. For the sentiment, I heat embossed the image from the Itty Bitty Greetings stamp set (item #151331) with Copper Embossing powder onto a scrap of Very Vanilla cardstock. I punched it out using the Classic Label Punch (item #141491) and added a matte to frame this label by punching out another label from Early Espresso cardstock and cutting it in half. I attached each half to the back of the Very Vanilla Label using Snail Adhesive so that the ends extended past the sentiment label. To add a touch of bling, I colored two Basic Pearls with the Light Old Olive Stampin' Blends Marker and attached them to the sentiment. Using Stampin' Dimensionals, I attached the sentiment to the card front below the focal image. 
This card design can be used for a variety of occasions and I love the peaceful feeling to this design. I hope that you have enjoyed my ideas today and perhaps inspired you to create your own projects.

Thank you for taking the time to visit my blog today. Please take time to hop along and visit the other demonstrators taking part in this blog hop by clicking on the links in the list below. 

If you live in the U.S. and do not already have a demonstrator, please contact me and I would be happy to help you. 

Until Next Time
Happy Stamping,


Tricia Butts
Independent Stampin' Up! Demonstrator
Like What You See? Visit My Online Store Here
Visit My Facebook Business Page for Updates & Ideas


Click here to Contact Me

Sunday, October 13, 2019

Kre8tors October Blog Hop Fall

Welcome to the Kre8tors October Blog Hop featuring Fall as our theme this month. You will be visiting with Stampin' Up! demonstrators from around the world as we showcase wonderful products that will help you create your own fun Fall projects. I hope that you will enjoy what we have to share this month.
 My inspiration for today's Fall themed card comes from the beautiful Come To Gather Designer Series Paper (item #150454) in the 2019 Holiday Catalog. I fell in love with this beautiful pumpkin design and loved the Pretty Peacock accents. I decided to use Crumb Cake cardstock for the card base and used a piece of Pretty Peacock cardstock to matte the piece of designer series paper. The combination of Pretty Peacock, Crumb Cake and Copper is not exactly traditional for Fall, but I really love how they go together.
 To add texture to the card base, I embossed it using the Scripty 3D Embossing Folder (item #149634) and then gently sponged the background with Crumb Cake Classic ink to bring out the script detail. 
The sentiment I chose is from the Flourishing Phrases stamp set (item #151407), an old favorite of mine, and I heat embossed it using Copper Embossing powder onto Pretty Peacock cardstock. I die cut the sentiment using one of the dies from the Ornate Frames Dies (item #150664) and layered it onto the detailed label die cut from Copper Foil with the coordinating die from the same die set.
To assemble the card, I added a piece of 1/4" Copper Trim (item #144179) across the center of the designer series paper panel, teasing out the trim a little to give a loose weave look. I attached the sentiment over the top of the copper trim with Mini Stampin' Dimensionals. For the finishing touch, I added Basic Pearls that I colored with the Light Pretty Peacock Stampin' Blends Marker, to the top and bottom of the card base, above and below the designer series paper panel. 
Thank you for taking the time to visit my blog today. I hope that my Fall card design will help you to explore creating projects with non-traditional Fall colors. If you live in the U.S. and do not already have a demonstrator, please contact me and I would be happy to help you.

Now it's time to visit Su Mohr's Blog and see what she has created this month. Please click the Next button below to visit her blog or use the Roll Call List below to find your way. I hope that you enjoy the rest of our blog hop.


Roll Call List

Until Next Time
Happy Stamping,


Tricia Butts
Independent Stampin' Up! Demonstrator
Like What You See? Visit My Online Store Here
Visit My Facebook Business Page for Updates & Ideas

Click here to Contact Me