Happy New Year Everyone,
Yes, I am back after a long hiatus. So much has happened since my last post back in September and I thank you all for being so patient while I have been away.
Now that 2013 is underway, I have started to focus again on the creative side of my life and hope to once again share with you ideas and projects that hopefully will inspire you in your own creative journey.
For those of you who have been following my Facebook page, you know that I haven't been completely silent and if you are not following my Facebook page, please click on the icon that can be found on my sidebar and like my page. I share information about the latest special offers from Stampin' Up! as well as projects and ideas (including the occasional video) here, so be sure to visit and check it out.
Since my last visit, we have said farewell to the 2012 Holiday Catalog and a big hello to the new 2013 Spring Catalog. Can I just say that I love so many things in this new catalog that it is hard to know where to start. To get a Free Digital copy of the 2013 Spring Catalog, just click the 2013 Spring Catalog icon on my sidebar of my blog and save it to your desktop, or visit my Stampin' Up! Website here and click on the icon to download.
Here's wishing you all a great 2013.
Until Next Time,
Happy Stampin',
Tricia Butts
http://www.triciabutts.stampinup.net
https://www.facebook.com/#!/TriciaStampingCreations
Saturday, January 5, 2013


Tuesday, September 18, 2012
Holiday Season Inspirations
Hi Everyone,
One of the things I love about attending Stampin' Up! events, are all the wonderful card designs and ideas that inspire me with my creations. At the Denver Regional, I had the opportunity to take photos of hundreds of different cards and projects on display that were generously shared by demonstrators.
Today I thought I would share a few photos of cards created that have that Wow! factor without being overly complicated. Some feature punches, perhaps some Designer Series Paper or maybe some ribbon to make the design pop.
These first two cards are examples of how different techniques can provide a different look to your card design. The top card focuses on stamping, with the ornaments arranged with the smaller ornament stamped separately and die cut before adding to the card. There is a classic elegance to this card design which is in contrast to the card below it.
 The bottom card was created using punch art and has a bold, fun feel to it. The background has been embossed with the Petals a Plenty Embossing Folder. The "pom poms" on the elf shoes were created with a circle punch from Silver Glimmer paper for a little sparkle.
Both cards have that eye-catching quality without being overly fussy or difficult to create. The next two cards show how you can take die cutting and give it a little twist for an unexpected look.
The Season's Greetings card features Designer Series paper as the focus of the card. The opening was cut with the large framelit from the Apothecary Accents set. By filling the negative space with strips of Designer Series paper from the Be of Good Cheer DSP pack, you take a simple white card base and make it a Wow card. The Cherry Cobbler 1/2" Scallop Dots Ribbon adds the perfect embellishment to the sentiment for a quilted look to a traditional Christmas card.

This next card was created using the Holiday Collections Framelits set, which can be purchase separately or as part of the Scentsational Season Bundle in the 2012 Holiday Catalog. Once again the negative space created by the framelits has been filled, this time with various ribbon scraps to add color and dimension to this card design. The little tags and Early Espresso Bakers Twine give the card a rustic, country feel.
 Christmas ornaments are a popular theme with Christmas cards and this pretty card features the stamp set Chock Full of Cheer. I love the combination of Gumball Green (one of the new 2012-2014 In Colors) with Cherry Cobbler. The Designer Series paper provides a wonderful background and the Gumball Green 3/8" Stitched Satin Ribbon makes a great accent to the ornament. This is just one of the five 2012-2014 In Color Ribbons that you can earn for free during the month of September with a $40 purchase of Stampin' Up! products. Just think how many Christmas cards you could make with a free spool of ribbon.
 The final card that I am sharing today, also features my favorite combination of Gumball Green and Cherry Cobbler. This time the focal point is a Santa created using various punches. Isn't it cute! I love the Cherry Cobbler 1/2" Seam Binding used to embellish this card. It really pops against the polka dots of the Gumball Green Designer Series paper.
 I hope you have enjoyed the card designs I have shared with you today and I hope it helps demonstrate how you can create amazing Christmas cards to fit the style that best works for you. Using a similar color palette, you can create something classic and elegant or something more fun and bold. It doesn't have to be overly complicated or fussy to have that Wow factor that will have you friends and family loving the cards you send them this holiday season.
Until Next Time.
Happy Stamping,
Tricia Butts
http://www.triciabutts.stampinup.net
One of the things I love about attending Stampin' Up! events, are all the wonderful card designs and ideas that inspire me with my creations. At the Denver Regional, I had the opportunity to take photos of hundreds of different cards and projects on display that were generously shared by demonstrators.
Today I thought I would share a few photos of cards created that have that Wow! factor without being overly complicated. Some feature punches, perhaps some Designer Series Paper or maybe some ribbon to make the design pop.
These first two cards are examples of how different techniques can provide a different look to your card design. The top card focuses on stamping, with the ornaments arranged with the smaller ornament stamped separately and die cut before adding to the card. There is a classic elegance to this card design which is in contrast to the card below it.

Both cards have that eye-catching quality without being overly fussy or difficult to create. The next two cards show how you can take die cutting and give it a little twist for an unexpected look.
The Season's Greetings card features Designer Series paper as the focus of the card. The opening was cut with the large framelit from the Apothecary Accents set. By filling the negative space with strips of Designer Series paper from the Be of Good Cheer DSP pack, you take a simple white card base and make it a Wow card. The Cherry Cobbler 1/2" Scallop Dots Ribbon adds the perfect embellishment to the sentiment for a quilted look to a traditional Christmas card.

This next card was created using the Holiday Collections Framelits set, which can be purchase separately or as part of the Scentsational Season Bundle in the 2012 Holiday Catalog. Once again the negative space created by the framelits has been filled, this time with various ribbon scraps to add color and dimension to this card design. The little tags and Early Espresso Bakers Twine give the card a rustic, country feel.


Until Next Time.
Happy Stamping,
Tricia Butts
http://www.triciabutts.stampinup.net
Sunday, September 16, 2012
Great Bootiful Occasions Swaps & Samples from Denver Regional
Hi Everyone,
Today I thought I would share some photos of samples on the display boards as well swaps I received at the Denver Regional last weekend. These card designs feature a new stamp set in the 2012-2013 Catalog that I hadn't really looked at closely, but I must say I have since fallen in love with. The stamp set I am talking about, is the Bootiful Occasions stamp set which can be found on page 50 of the catalog and contains 5 stamp images you will love, especially if you love boots and will work for occasions throughout the year.
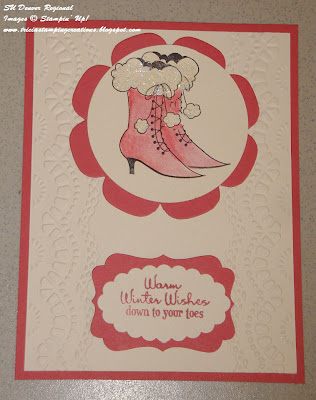
This first card was a swap card on display and I love this Christmas card design. The sparkle on the trim of the boots adds a little bling to this clean and simple design. Change the color of the boots and add a different sentiment and you could personalize this card to suit any occasion just right for that special person.
 This second card design was featured on one of the display boards and I love the bright colors and cheerful design, it just brightens your day to look at it. This cute pair of Wellington boots was created by stamping the image twice and cutting out one boot to overlap the other. This would be a great Get Well Card or Thinking of You card.
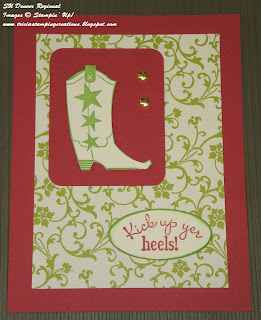
 The next card sample is a swap I received from Sharon Pettit, a demonstrator visiting from Albuquerque, New Mexico. I love the color combination she used for this card design and this would be a great idea for a masculine card. The boot has been cut out and popped up using Stampin' Dimensionals and the gold brads are the perfect embellishment to finish off the card.
 The last two cards I have to share with you today are fabulous Halloween Cards that add a little style to this spooky holiday. This first card design was featured on the Halloween Display board and I love the cute spider background created using the postage stamp punch. The web image is from the stamp set Wicked Cool (page 28) and the cute little spider is from the stamp set Spooky Bingo Bits (page 29). I love the combination of Pumpkin Pie and Basic Black and the 1/8" Basic Black Taffeta ribbon makes a cute embellishment to the boot.
 The second Halloween card is a card front I received as a swap from Sherry Huxtable, a demonstrator from Wichita, Kansas. I just love the bling on this card provided by the new Champagne Glimmer paper found in the new Holiday catalog on page 18. I love the way she used it as a background to make the boot image pop, but she also used the small circle punch from the Itty Bitty Shapes Punch Pack to create the accents to embellish the card.
 I hope you have enjoyed these wonderful cards and the versatility of this amazing stamp set, Bootiful Occasions. It never ceases to amaze me how creative Stampin' Up! demonstrators are and I just love the variety of ideas that I have for this new stamp set to inspire me with my projects. I hope that you will be inspired to create your own projects to share with your family and friends.
Until Next Time.
Happy Stamping,
Tricia Butts
http://www.triciabutts.stampinup.net

Today I thought I would share some photos of samples on the display boards as well swaps I received at the Denver Regional last weekend. These card designs feature a new stamp set in the 2012-2013 Catalog that I hadn't really looked at closely, but I must say I have since fallen in love with. The stamp set I am talking about, is the Bootiful Occasions stamp set which can be found on page 50 of the catalog and contains 5 stamp images you will love, especially if you love boots and will work for occasions throughout the year.
This first card was a swap card on display and I love this Christmas card design. The sparkle on the trim of the boots adds a little bling to this clean and simple design. Change the color of the boots and add a different sentiment and you could personalize this card to suit any occasion just right for that special person.


Until Next Time.
Happy Stamping,
Tricia Butts
http://www.triciabutts.stampinup.net


Creative Card Share - Denver Regional Swap
Hi Everyone,
Last Saturday, September 8th, I was fortunate enough to have the opportunity to attend the Stampin' Up! Regional held in Denver at the Convention Center. It was such an amazing experience and being a part of the incredible creative energy in that room was inspiring.
One of the traditions at a Stampin' Up! event, is of course the swapping of cards and other items. The past month has been a roller coaster ride for my family so my focus was not on my stamping. I did manage to create 20 card fronts to swap the night before the Regional, and I am so glad that I was able to get them finished and participate in the fun.
I decided to design a birthday card that would work well for anyone. How many times have you had an unexpected birthday surprise you and you needed a card that would work at a moments notice? With this card design, I felt that I had achieved that, as well as a sense of fun that would make the recipient smile.
 The 3 gift bags were created using Real Red, Daffodil Delight and Pacific Point cardstock and I embossed them with the Chevron Embossing Folder. The handles were created using the Whisper White Bakers Twine and the tissue paper was stamped with the circle image from the Confetti stamp set. I sponged the tissue paper and bags with the coordinating classic ink to add some dimension. I attached them to the card using Stampin' Dimensionals for added dimension.
Did you notice the scored lines on the Whisper White cardstock layer? They were created using the Simply Scored Scoring Tool and provide a little extra detail to the background. It also helps when it comes time to line up the bags on the card.
This is a card design that you could create in many different color schemes and have on hand as your emergency supply of birthday cards. Create the bags in shades of pinks and purples for a more feminine version or use scraps of Designer Series Paper to create a designer look.
Over the next few days I will be sharing with you some of the cards I received from other demonstrators during the swap as well as photos of card designs featured on the display boards. I hope you will find them as inspiring as I have, and I hope it will help you to create your own projects for your friends and family.
Until Next Time.
Happy Stamping,
Tricia Butts
http://www.triciabutts.stampinup.net
Recipe (All Supplies used are Stampin' Up! unless otherwise noted):
Stamp Sets: Confetti, Teeny Tiny Wishes (Happy Birthday Sentiment)
Cardstock: Whisper White, Pacific Point, Real Red, Daffodil Delight
Classic Inks: Pacific Point, Real Red, Daffodil Delight
Accessories: Tissue Paper (Dollar Store), 1 1/4" Square Punch, Modern Label Punch, Word Window Punch, Chevron Embossing Folder, Simply Scored Scoring Tool, Whisper White Bakers Twine, Sponge Daubers, Stampin' Dimensionals, Snail Adhesive.
Last Saturday, September 8th, I was fortunate enough to have the opportunity to attend the Stampin' Up! Regional held in Denver at the Convention Center. It was such an amazing experience and being a part of the incredible creative energy in that room was inspiring.
One of the traditions at a Stampin' Up! event, is of course the swapping of cards and other items. The past month has been a roller coaster ride for my family so my focus was not on my stamping. I did manage to create 20 card fronts to swap the night before the Regional, and I am so glad that I was able to get them finished and participate in the fun.
I decided to design a birthday card that would work well for anyone. How many times have you had an unexpected birthday surprise you and you needed a card that would work at a moments notice? With this card design, I felt that I had achieved that, as well as a sense of fun that would make the recipient smile.

Did you notice the scored lines on the Whisper White cardstock layer? They were created using the Simply Scored Scoring Tool and provide a little extra detail to the background. It also helps when it comes time to line up the bags on the card.
This is a card design that you could create in many different color schemes and have on hand as your emergency supply of birthday cards. Create the bags in shades of pinks and purples for a more feminine version or use scraps of Designer Series Paper to create a designer look.
Over the next few days I will be sharing with you some of the cards I received from other demonstrators during the swap as well as photos of card designs featured on the display boards. I hope you will find them as inspiring as I have, and I hope it will help you to create your own projects for your friends and family.
Until Next Time.
Happy Stamping,
Tricia Butts
http://www.triciabutts.stampinup.net
Recipe (All Supplies used are Stampin' Up! unless otherwise noted):
Stamp Sets: Confetti, Teeny Tiny Wishes (Happy Birthday Sentiment)
Cardstock: Whisper White, Pacific Point, Real Red, Daffodil Delight
Classic Inks: Pacific Point, Real Red, Daffodil Delight
Accessories: Tissue Paper (Dollar Store), 1 1/4" Square Punch, Modern Label Punch, Word Window Punch, Chevron Embossing Folder, Simply Scored Scoring Tool, Whisper White Bakers Twine, Sponge Daubers, Stampin' Dimensionals, Snail Adhesive.
Friday, August 17, 2012
VC Rocks Blog 4 - Big Shot, Punch Art & Simply Scored Projects
Hi Everyone,
Welcome to the VC Rocks Blog Hop #4, featuring projects created using the Big Shot, Punch Art with punches as well as Stampin' Up!'s Simply Scored Tool. To view the list of blogs participating in this Blog Hop, click here to visit the VC Rocks Blog.
If you are just starting the Blog Hop here, then welcome and I hope you will enjoy all the wonderful projects that everyone will be sharing this weekend. Or perhaps you may have just come from Mary Campbell's Blog, Mimi to Jett and her amazing creations. This is my first Blog Hop ever and I am so excited to share my projects with you all.
With my 4 children starting school next week, I thought I would share with you this gift idea that would be perfect for a child to give to his/her teacher. Isn't this petite purse simply adorable? I just love using my Big Shot to create my projects. It is probably my most favorite tool in my craft room. As for my punches, well they would be a close second.

I created my petite purse and matching Thank You card using Wisteria Wonder cardstock from the 2011-2013 In Colors. I am not normally a purple person but I really love using Wisteria Wonder and the way it pops against the Whisper White. The beauty of this project is that you can use whatever color combination you wish to suit the person receiving it.
The petite purse is created using the Sizzix Petite Purse Bigz L die with the Big Shot. With just a couple of strips of Sticky Strip, this cute little purse goes together so simply. Before I assembled the purse, I embossed the die cut cardstock with the new Lacy Brocade Textured Impressions Embossing Folder (from the 2012 Holiday Catalog) with just a quick pass through the Big Shot. I love the delicate texture it adds to the purse.

To create the embellishment on the front of the purse, I used the stamp set, Mixed Bunch with Wisteria Wonder Classic ink and punched out the stamped circle image using the 3/4" Circle punch. I love how the stamps in this set coordinate with Stampin' Up! punches to make quick and easy projects. I used the new 1 1/4" Scallop Circle punch (also from the 2012 Holiday Catalog) to create the base and embossed it with the Lacy Brocade Embossing Folder to match the purse. The basic Pearl jewel in the center of the flower image adds the finishing touch to the purse.
The matching card is also created using Wisteria Wonder and Whisper White cardstock. I embossed the Whisper White cardstock with the Lacy Brocade Textured Impressions Embossing Folder to coordinate with the purse. The flower is created using one of the stamps from the Mixed Bunch stamp set with Wisteria Wonder Classic ink and punched out with the coordinating Blossom punch. I also punched out another blossom shape from Wisteria Wonder cardstock and attached the layers with a Stampin' Dimensional, offsetting the petals. I stamped the circle image separately (the same one I used for the purse) and punched it out with the 3/4" Circle punch. Once again I used the Basic Pearl Jewel to embellish the center.

The sentiment is from one of my favorite stamp sets, Curly Cute. I just love the simple elegance it brings to my projects. I stamped Thank You with Wisteria Wonder Classic ink on Whisper White cardstock and punched it out using the Modern Label punch. I used the Extra Large Oval punch to punch out an oval from Wisteria Wonder cardstock to create a matte and also embossed it using the Lacy Brocade Embossing Folder.
You can fill your petite purse with candy or chocolate for a sweet treat. It would also be great gift bag for jewelry for someone special. Imagine the cute favors you could create for a Bridal or Baby Shower, not to mention for birthday parties. One of the best things about using the Big Shot and Stampin' Up!'s punches, is that it helps you create amazing cards and gifts, quickly and easily.
I hope you have enjoyed my Blog Hop share and I hope it helps to inspire you to create your own creative project. Now it's time to move on to Loni Holt's Blog, Loni's Life and see the wonderful creations she has for you.
Until Next Time.
Happy Stamping,
Tricia Butts
http://www.triciabutts.stampinup.net
Recipe (All Products are Stampin' Up!):
Stamp Sets: Mixed Bunch (p 94), Curly Cute (p 138)
Inks: Wisteria Wonder Classic (p 152)
Cardstock: Wisteria Wonder (p152), Whisper White (p 156)
Accessories: Big Shot (p 186), Petite Purse Bigz L Die (p194), Lacy Brocade Textured Impressions Embossing Folder (p 6*), 1 1/4" Scallop Circle Punch (p 7*), Blossom Punch (p185), Extra Large Oval Punch (p 184), Modern Label Punch (p 183), 3/4" Circle Punch (p184), Basic Pearl Jewels (p 175), Stampin' Dimensionals (p 177), Snail Adhesive (p 177), Sticky Strip (p 177)
Page numbers are from the 2012-2013 Catalog
Except those marked with a * which can be found in the 2012 Holiday Catalog
Welcome to the VC Rocks Blog Hop #4, featuring projects created using the Big Shot, Punch Art with punches as well as Stampin' Up!'s Simply Scored Tool. To view the list of blogs participating in this Blog Hop, click here to visit the VC Rocks Blog.
If you are just starting the Blog Hop here, then welcome and I hope you will enjoy all the wonderful projects that everyone will be sharing this weekend. Or perhaps you may have just come from Mary Campbell's Blog, Mimi to Jett and her amazing creations. This is my first Blog Hop ever and I am so excited to share my projects with you all.
With my 4 children starting school next week, I thought I would share with you this gift idea that would be perfect for a child to give to his/her teacher. Isn't this petite purse simply adorable? I just love using my Big Shot to create my projects. It is probably my most favorite tool in my craft room. As for my punches, well they would be a close second.

The petite purse is created using the Sizzix Petite Purse Bigz L die with the Big Shot. With just a couple of strips of Sticky Strip, this cute little purse goes together so simply. Before I assembled the purse, I embossed the die cut cardstock with the new Lacy Brocade Textured Impressions Embossing Folder (from the 2012 Holiday Catalog) with just a quick pass through the Big Shot. I love the delicate texture it adds to the purse.

To create the embellishment on the front of the purse, I used the stamp set, Mixed Bunch with Wisteria Wonder Classic ink and punched out the stamped circle image using the 3/4" Circle punch. I love how the stamps in this set coordinate with Stampin' Up! punches to make quick and easy projects. I used the new 1 1/4" Scallop Circle punch (also from the 2012 Holiday Catalog) to create the base and embossed it with the Lacy Brocade Embossing Folder to match the purse. The basic Pearl jewel in the center of the flower image adds the finishing touch to the purse.
The matching card is also created using Wisteria Wonder and Whisper White cardstock. I embossed the Whisper White cardstock with the Lacy Brocade Textured Impressions Embossing Folder to coordinate with the purse. The flower is created using one of the stamps from the Mixed Bunch stamp set with Wisteria Wonder Classic ink and punched out with the coordinating Blossom punch. I also punched out another blossom shape from Wisteria Wonder cardstock and attached the layers with a Stampin' Dimensional, offsetting the petals. I stamped the circle image separately (the same one I used for the purse) and punched it out with the 3/4" Circle punch. Once again I used the Basic Pearl Jewel to embellish the center.

You can fill your petite purse with candy or chocolate for a sweet treat. It would also be great gift bag for jewelry for someone special. Imagine the cute favors you could create for a Bridal or Baby Shower, not to mention for birthday parties. One of the best things about using the Big Shot and Stampin' Up!'s punches, is that it helps you create amazing cards and gifts, quickly and easily.
I hope you have enjoyed my Blog Hop share and I hope it helps to inspire you to create your own creative project. Now it's time to move on to Loni Holt's Blog, Loni's Life and see the wonderful creations she has for you.
Until Next Time.
Happy Stamping,
Tricia Butts
http://www.triciabutts.stampinup.net
Recipe (All Products are Stampin' Up!):
Stamp Sets: Mixed Bunch (p 94), Curly Cute (p 138)
Inks: Wisteria Wonder Classic (p 152)
Cardstock: Wisteria Wonder (p152), Whisper White (p 156)
Accessories: Big Shot (p 186), Petite Purse Bigz L Die (p194), Lacy Brocade Textured Impressions Embossing Folder (p 6*), 1 1/4" Scallop Circle Punch (p 7*), Blossom Punch (p185), Extra Large Oval Punch (p 184), Modern Label Punch (p 183), 3/4" Circle Punch (p184), Basic Pearl Jewels (p 175), Stampin' Dimensionals (p 177), Snail Adhesive (p 177), Sticky Strip (p 177)
Page numbers are from the 2012-2013 Catalog
Except those marked with a * which can be found in the 2012 Holiday Catalog
Thursday, August 16, 2012
Let it Snow?
Hi Everyone,
Well, it may not be cold enough to snow, but the temperature here in Northglenn is about 20 degrees cooler today than yesterday. This started me thinking about the fact that it is mid August and snow has a habit of showing up here in Colorado when you least expect it. Thankfully it is usually gone again as quickly as it arrived, but it got me thinking about snowmen and how much I love these cute little guys.
So I thought I would share with you a card that we created recently at my Christmas in July card class. I love the color combination of Island Indigo with Pool Party, two of the 2011-2013 In Colors, and it seemed like the perfect combination for a snowman card.
This frosty card features one of the snowmen from the stamp set, Snow Much Fun, and I think that is a pretty accurate description of this stamp set. You can't help but smile when you create with these stamps.

Our snow friend was "watercolored" with a blender pen and ink and I added some sparkle to him with Dazzling Diamonds. The Silver Glimmer paper border and Island Indigo 3/8" Ruffled ribbon accent dress up this fun Christmas card.
I hope you enjoy this sweet snowman Christmas card and I hope it inspires you to create your own Christmas cards ready for the holidays.
Until Next Time.
Happy Stamping,
Tricia Butts
http://www.triciabutts.stampinup.net
Recipe: (products are all Stampin' Up!)
Stamp Set: Snow Much Fun (p15)
Inks: Stazon Jet Black (p157), Classic Pool Party (p152), Island Indigo (p152), Basic Grey (p156) & Pumpkin Pie (p153)
Cardstock: Pool Party (p152), Island Indigo (p152), Naturals White (p160), Silver Glimmer Paper (p160)
Accessories: Sizzix Big Shot(p186), Argyle Embossing Folder (p189), Dotted Scallop Ribbon Border Punch (p183), Blender Pen (p178), Dazzling Diamonds (p158), Island Indigo 3/8" Ruffled Ribbon (p172), Snail Adhesive (p177), Stampin' Dimensionals (p177)
Well, it may not be cold enough to snow, but the temperature here in Northglenn is about 20 degrees cooler today than yesterday. This started me thinking about the fact that it is mid August and snow has a habit of showing up here in Colorado when you least expect it. Thankfully it is usually gone again as quickly as it arrived, but it got me thinking about snowmen and how much I love these cute little guys.
So I thought I would share with you a card that we created recently at my Christmas in July card class. I love the color combination of Island Indigo with Pool Party, two of the 2011-2013 In Colors, and it seemed like the perfect combination for a snowman card.
This frosty card features one of the snowmen from the stamp set, Snow Much Fun, and I think that is a pretty accurate description of this stamp set. You can't help but smile when you create with these stamps.

I hope you enjoy this sweet snowman Christmas card and I hope it inspires you to create your own Christmas cards ready for the holidays.
Until Next Time.
Happy Stamping,
Tricia Butts
http://www.triciabutts.stampinup.net
Recipe: (products are all Stampin' Up!)
Stamp Set: Snow Much Fun (p15)
Inks: Stazon Jet Black (p157), Classic Pool Party (p152), Island Indigo (p152), Basic Grey (p156) & Pumpkin Pie (p153)
Cardstock: Pool Party (p152), Island Indigo (p152), Naturals White (p160), Silver Glimmer Paper (p160)
Accessories: Sizzix Big Shot(p186), Argyle Embossing Folder (p189), Dotted Scallop Ribbon Border Punch (p183), Blender Pen (p178), Dazzling Diamonds (p158), Island Indigo 3/8" Ruffled Ribbon (p172), Snail Adhesive (p177), Stampin' Dimensionals (p177)
New Challenges - Exploring the world of ATC's
Hi Everyone,
Over the summer I have been expanding my creative horizons, trying new techniques and new formats of art with Stampin' Up! products.
It all started when I joined a yahoo group called VC Rocks for the summer and started participating in their challenges and swaps to help me get out of the slump I had fallen into. Let me tell you, it has been a wonderful experience and I have created more cards and projects in the last two months than I had in the past 6 months.
One of the swaps I participated in was an ATC swap. Now you maybe asking, what is an ATC?
ATC stands for Artist Trading Card and it is like the art version of a baseball or sports card. Artists create these cards featuring their artwork and trade it with other artists. There is a specific size requirement necessary to qualify as an ATC. The card size required is 2.5" x 3.5".
Now I had first heard about ATC's during my decorative painting days, several years ago, but I found it difficult to paint small enough to do justice to my small canvas. However, I have discovered that in my new medium of papercrafting using stamps and ink, the challenge was both enjoyable and satisfying.
After auditioning several different ideas, this is the design I came up with featuring the stamp set, Creative Elements, one of my new favorite stamp sets.

Now the swap required me to create 11 identical ATC's (I created 12 so that I would have one to keep) to send to the Swap Organizer and in return I received back 10 different ATC's cards from the other participants. Below is a photo of 4 of the ATC cards I created for the swap.
I love the new In Color, Primrose Petal, that I used for the flower image. The new foam ink pad provided wonderful coverage and was a dream to stamp with. Don't you just love the cute little blue butterfly created with the Beautiful Wings Embosslit and embellished with a sparkling rhinestone for a little bling.

All in all, this was a wonderful experience and it was great to stretch myself to creating on a smaller size. I am looking forward to exploring the world of ATC's further in the future. Call me crazy, but wouldn't this look fantastic as a business card. Just add your details on the back and it would definitely grab people's attention when you hand them out. They would also make a great focal point on a card front or as an element on a scrapbook page. The opportunities are endless.
I hope my journey into the world of ATC's will inspire you to create something new and challenging.
Until Next Time.
Happy Stamping,
Tricia Butts
http://www.triciabutts.stampinup.net
Recipe:
Stamp Sets:
Creative Elements (p126), Language of Friendship (p74)
Classic Inks: Primrose Petal (p152), Lucky Limeade (p152), Soft Suede (p156)
Cardstock: Whisper White (p156), Bashful Blue (p154)
Accessories: Sizzix Big Shot (p186), Beautiful Wings Embosslit (p188), Designer Frames Folders (p188), Extra Large Oval Punch (p184), Sponge Daubers (p179), Rhinestone Basic Jewels (p175), Snail Adhesive (p177), Stampin' Dimensionals (p177).
Over the summer I have been expanding my creative horizons, trying new techniques and new formats of art with Stampin' Up! products.
It all started when I joined a yahoo group called VC Rocks for the summer and started participating in their challenges and swaps to help me get out of the slump I had fallen into. Let me tell you, it has been a wonderful experience and I have created more cards and projects in the last two months than I had in the past 6 months.
One of the swaps I participated in was an ATC swap. Now you maybe asking, what is an ATC?
ATC stands for Artist Trading Card and it is like the art version of a baseball or sports card. Artists create these cards featuring their artwork and trade it with other artists. There is a specific size requirement necessary to qualify as an ATC. The card size required is 2.5" x 3.5".
Now I had first heard about ATC's during my decorative painting days, several years ago, but I found it difficult to paint small enough to do justice to my small canvas. However, I have discovered that in my new medium of papercrafting using stamps and ink, the challenge was both enjoyable and satisfying.
After auditioning several different ideas, this is the design I came up with featuring the stamp set, Creative Elements, one of my new favorite stamp sets.

I love the new In Color, Primrose Petal, that I used for the flower image. The new foam ink pad provided wonderful coverage and was a dream to stamp with. Don't you just love the cute little blue butterfly created with the Beautiful Wings Embosslit and embellished with a sparkling rhinestone for a little bling.

I hope my journey into the world of ATC's will inspire you to create something new and challenging.
Until Next Time.
Happy Stamping,
Tricia Butts
http://www.triciabutts.stampinup.net
Recipe:
Stamp Sets:
Creative Elements (p126), Language of Friendship (p74)
Classic Inks: Primrose Petal (p152), Lucky Limeade (p152), Soft Suede (p156)
Cardstock: Whisper White (p156), Bashful Blue (p154)
Accessories: Sizzix Big Shot (p186), Beautiful Wings Embosslit (p188), Designer Frames Folders (p188), Extra Large Oval Punch (p184), Sponge Daubers (p179), Rhinestone Basic Jewels (p175), Snail Adhesive (p177), Stampin' Dimensionals (p177).
Thursday, August 9, 2012
Exciting Fabric Sale!
Hi Everyone,
I just had to stop by and let you all know about a great sale that Stampin' Up! is offering on its discontinued fabric. Only while supplies last, you can purchase select discontinued fabric for just 99 cents. Yes, you read correctly, I said 99 cents. That is a huge savings and there is no limit to the quantity you can purchase.
Here is a list of the available fabric designs:
To see a sample of the fabric, click here to view a PDF file.
The best way to place your order to take advantage of this amazing sale, is to visit my Online Store here, to avoid missing out. Don't forget to check out the other incredible savings available in the Clearance Rack.
Please contact me if you have any questions.
Until Next Time,
Happy Stamping,
Tricia Butts
http://www.triciabutts.stampinup.net
I just had to stop by and let you all know about a great sale that Stampin' Up! is offering on its discontinued fabric. Only while supplies last, you can purchase select discontinued fabric for just 99 cents. Yes, you read correctly, I said 99 cents. That is a huge savings and there is no limit to the quantity you can purchase.
Here is a list of the available fabric designs:
| Item | Description | Price |
| 121716 | Deck the Halls Designer Fabric | $0.99 |
| 121715 | Candy Cane Christmas Designer Fabric | $0.99 |
| 121817 | Springtime Vintage Designer Fabric | $0.99 |
| 121818 | Sweet Stitches Designer Fabric | $0.99 |
The best way to place your order to take advantage of this amazing sale, is to visit my Online Store here, to avoid missing out. Don't forget to check out the other incredible savings available in the Clearance Rack.
Please contact me if you have any questions.
Until Next Time,
Happy Stamping,
Tricia Butts
http://www.triciabutts.stampinup.net
 |
Thursday, August 2, 2012
2012 SU Holiday Catalog is here!

Hi Everyone,
How many of you have started your Holiday projects? If you haven't, don't panic because Stampin' Up! has just launched its 2012 Holiday Catalog and it is full of incredible new products that will help you create fun and fabulous projects to help you avoid the holiday stress.
This Holiday catalog is bigger and better than before with new products that will coordinate to make planning your projects so much easier. Exclusive new Sizzix Framelits with coordinating stamp sets, Core'dinations Cardstock in select Stampin' Up! colors, beautiful Designer Series Paper packs with coordinating embellishments are just a few of the highlights. Plus, Stampin' Up! recognizes that our customers lead busy lives, so they are offering wonderful bundles and kits to save you time without skimping on quality, while providing value to suit your budget.
To view the 2012 Holiday Catalog just click the icon in my Sidebar or Click the link below to download your free digital copy:

Over the upcoming weeks, I will be sharing projects and ideas featuring products from the Holiday Catalog and the new 2012-2013 Catalog.
Please contact me if you have any questions or you would like to place an order. Don't forget, you can also visit my Online Store 24/7 to place your order.
Until Next Time.
Happy Stamping,
Tricia Butts
Visit My Facebook Page & "Like" it for Updates & Ideas:
Back to the Land of Blogging
Hi Everyone,
Well, it has been awhile since I updated my blog and so much has happened since then. The summer is coming to an end, sadly, which means my 4 children are going back to school in a few weeks and Fall will be just around the corner.
While I am busy with back to school activities, I am looking forward to getting back to blogging on a regular basis and filling you in on all the incredible new things going on at Stampin' Up! In addition, I will be sharing card and project ideas as well as upcoming classes and promotions to get you inspired and keep you informed.
With Halloween around the corner, Thanksgiving on the horizon and Christmas less than 5 months away, I am looking forward to providing useful and creative ideas to help you get ready for the upcoming Holiday Season so that you can avoid the last minute stress and enjoy the holidays with your family.
I hope you will join me.
Until Next Time.
Happy Stamping,
Tricia Butts
http://www.triciabutts.stampinup.net
Join me on Facebook & "Like" my Page for updates & ideas:
https://www.facebook.com/#!/TriciaStampingCreations
Well, it has been awhile since I updated my blog and so much has happened since then. The summer is coming to an end, sadly, which means my 4 children are going back to school in a few weeks and Fall will be just around the corner.
While I am busy with back to school activities, I am looking forward to getting back to blogging on a regular basis and filling you in on all the incredible new things going on at Stampin' Up! In addition, I will be sharing card and project ideas as well as upcoming classes and promotions to get you inspired and keep you informed.
With Halloween around the corner, Thanksgiving on the horizon and Christmas less than 5 months away, I am looking forward to providing useful and creative ideas to help you get ready for the upcoming Holiday Season so that you can avoid the last minute stress and enjoy the holidays with your family.
I hope you will join me.
Until Next Time.
Happy Stamping,
Tricia Butts
http://www.triciabutts.stampinup.net
Join me on Facebook & "Like" my Page for updates & ideas:
https://www.facebook.com/#!/TriciaStampingCreations
Monday, February 20, 2012
Creative Card Share: Outlined Love Easel Card
Hi Everyone,
Today, as promised, I am sharing with you an Easel Card I created for Valentine's Day using the Sale-a-bration stamp set, Outlined Occasions as well as the stamp set Greeting Card Kids. The sweet little girl is just perfect for water coloring using a blender pen Stampin' Up!'s Classic ink pads (I also colored the Love from Outlined Occasions using this technique).
The frame for the little girl was created using the new Sizzix Paper Doily Large Sizzlits Die available in the Occasions Mini Catalog. Isn't this a beautiful die cut? I just love the detail and it turns an ordinary piece of cardstock into a delicate work of art. For this card, I used Cherry Cobbler cardstock to showcase the stamped image and the Pretty in Pink cardstock matted behind the image.

Today, as promised, I am sharing with you an Easel Card I created for Valentine's Day using the Sale-a-bration stamp set, Outlined Occasions as well as the stamp set Greeting Card Kids. The sweet little girl is just perfect for water coloring using a blender pen Stampin' Up!'s Classic ink pads (I also colored the Love from Outlined Occasions using this technique).
The frame for the little girl was created using the new Sizzix Paper Doily Large Sizzlits Die available in the Occasions Mini Catalog. Isn't this a beautiful die cut? I just love the detail and it turns an ordinary piece of cardstock into a delicate work of art. For this card, I used Cherry Cobbler cardstock to showcase the stamped image and the Pretty in Pink cardstock matted behind the image.

The background of the card was created using the Vintage Wallpaper Textured Impressions Embossing Folder on a piece of Pretty in Pink cardstock. To add a vintage feel to the card, I lightly sponged Frost White Shimmer paint onto the embossed areas of the cardstock using a sponge dauber. It added a subtle shimmer to the cardstock that helped to enhance the Cherry Cobbler Doily frame. I used Stampin' Dimensionals to attach the Doily diecut to the Pretty in Pink cardstock.
To create the base of the card, I once again used a piece of Pretty in Pink cardstock. I stamped the Love image on Very Vanilla cardstock using Stazon Black ink and water colored the image. I then punched out the image using the Extra Large Oval punch and matted it with a piece of Cherry Cobbler cardstock punched using the Decorative Label punch. I attached it to the card base using Stampin' Dimensionals to allow it to act as a rest for the card front so that it stands up. The hearts located on either side were created using the Fashionable Hearts Embosslits Die (found on p35 of the Occasions Mini Catalog) and embellished with the medium rhinestones from the Basic Rhinestones pack.
The wonderful thing about this card is that it lays flat and is easy to mail in a regular envelope.
This card went together so simply using my Sizzix Bigshot to do the hard work for me, diecutting the Doily and embossing the cardstock. I just love the way this card came together and I think it has a Wow factor to it, don't you?
I hope today's Creative Card Share has helped to inspire you to create your own Easel card for someone special. With Easter just around the corner, not to mention Mother's Day, wouldn't this be the perfect type of card to send to a friend or family member?
I hope you all have a wonderful day.
Until Next Time.
Happy Stampin',
Tricia Butts
P.S. To see another example of an Easel Card I created, this time for Mother's Day, visit here .
Easel Cards: Adding the Simply Wow Factor to your Cards
Hi Everyone,
Once again life has added some twists and turns but I am back again. Hard to believe we are approaching the end of February already. Boy is the year speeding by fast.
Today I want to share with you a video from Stampin' Up! that shows you how easy it is to create an Easel Card. I love the Wow Factor that comes with an Easel card and they are so much fun to create. They are a great way to display a favorite photo on a card front and the possibilities are only limited by your imagination.
Watch this video for great tips on how to create your Easel Card:
OK, so now that you have seen how amazing the Easel card looks and how easy it is to create, there is no reason not to give it a try yourself. Pick an upcoming birthday, anniversary or other occasion and get creative!
In my next post, I will share my Easel Card that I created for Valentine's Day to help inspire you to create your own masterpiece.
Until Next Time,
Happy Stampin',
Tricia Butts
http://www.triciabutts.stampinup.net/
Once again life has added some twists and turns but I am back again. Hard to believe we are approaching the end of February already. Boy is the year speeding by fast.
Today I want to share with you a video from Stampin' Up! that shows you how easy it is to create an Easel Card. I love the Wow Factor that comes with an Easel card and they are so much fun to create. They are a great way to display a favorite photo on a card front and the possibilities are only limited by your imagination.
Watch this video for great tips on how to create your Easel Card:
OK, so now that you have seen how amazing the Easel card looks and how easy it is to create, there is no reason not to give it a try yourself. Pick an upcoming birthday, anniversary or other occasion and get creative!
In my next post, I will share my Easel Card that I created for Valentine's Day to help inspire you to create your own masterpiece.
Until Next Time,
Happy Stampin',
Tricia Butts
http://www.triciabutts.stampinup.net/
Wednesday, January 4, 2012
Valentine's Day is a Celebration of Love
Hi Everyone,


Clear-Mount Stamp Set 125462 Price: $27.95
With the new Occasions Mini Catalog starting today, I just wanted to share a quick creative project idea to inspire you ready for Valentine's Day. It's hard to believe that it is only a few weeks away, so there is no time like the present to start creating cards and gifts for the loved ones in your life.
Today's Creative Card Share is a project featured on my Stampin' Up! website Project Gallery here. This beautiful card features the new stamp set, P.S. I Love You, which can be found on page 8 of the new Occasions Mini Catalog (available in both Wood & Clear Mount).
I love the embossed resist technique used to create the heart image and the heart circle stamp makes a wonderful background on the card base. This card also features several new products including the Blushing Bride Smooch Spritz (page 9) and the Calypso Coral Baker's Twine (page 35).

In case you are not familiar with Calypso Coral, it is one of the new In Colors for 2011-2013 and you can find the beautiful ruffled Calypso Coral ribbon in the 2011-2012 Idea Book & Catalog, as well as the other wonderful In Color products.
This card design is simple but has a definite Wow factor to it. It would also make a great birthday, anniversary or thinking of you card. You could create a gorgeous card set featuring this layout and vary the colors for each card for a beautiful gift idea.
I hope you have enjoyed this Creative Card Share I hope it helps inspire you to create a special card for someone special in your life.
Until Next Time.
Happy Stampin',
Tricia Butts
Independent Stampin' Up! Demonstrator

P.S. I Love You Set Quantity: 15
Clear-Mount Stamp Set 125462 Price: $27.95
Wood-Mount Stamp Set 125460 Price: $34.95
Coordinates with the Full Heart, Modern Label, 1" Circle, and 1-3/8" Circle Punches.
Celebrate the New Year with the New 2012 Occasions Mini Catalog
Happy New Year Everyone,
I can't believe it is 2012 already. The last few months have gone by so fast and so much has happened that I have been neglecting my blog. Now that the holidays are over and hopefully things are starting to settle down, I will be hopefully posting more often.
Today is a very exciting day because I can finally show you the new amazing 2012 Occasions Mini Catalog from Stampin' Up! There are so many fantastic new products in this catalog that I know you will just love and it will help you start your new projects for 2012.
Stampin' Up! has once again outdone themselves with fabulous new rubber stamp sets, embellishments, Designer Series Paper packs and so much more. Plus, they have released incredible new Sizzix products that will take your crafting projects to new levels. The New Paper Doily Large Sizzlits Die is so beautiful and delicate and you will love the sample projects featured in the mini catalog. In addition, Stampin' Up! has two Framelits Dies collections (Hearts & Labels) as well as the Adorning Accents Edgelits Dies and coordinating Adorning Accents Textured Impressions Embossing Folders that are simply amazing. There are even stamp sets that work perfectly with each of these new products!

I can't believe it is 2012 already. The last few months have gone by so fast and so much has happened that I have been neglecting my blog. Now that the holidays are over and hopefully things are starting to settle down, I will be hopefully posting more often.
Today is a very exciting day because I can finally show you the new amazing 2012 Occasions Mini Catalog from Stampin' Up! There are so many fantastic new products in this catalog that I know you will just love and it will help you start your new projects for 2012.
Stampin' Up! has once again outdone themselves with fabulous new rubber stamp sets, embellishments, Designer Series Paper packs and so much more. Plus, they have released incredible new Sizzix products that will take your crafting projects to new levels. The New Paper Doily Large Sizzlits Die is so beautiful and delicate and you will love the sample projects featured in the mini catalog. In addition, Stampin' Up! has two Framelits Dies collections (Hearts & Labels) as well as the Adorning Accents Edgelits Dies and coordinating Adorning Accents Textured Impressions Embossing Folders that are simply amazing. There are even stamp sets that work perfectly with each of these new products!

To view these exciting new products and so much more in the new2012 Occasions Mini Catalog, just click here to download your free digital copy. You can also download the free supplies list for the Occasions Mini catalog here. The Supplies list will provide you with the supplies used to create each of the beautiful projects in this wonderful new mini catalog.
So go ahead and download your digital copy of the new 2012 Occasions Mini Catalog and make your plans to transition from the Holidays to the New Year.
Don't forget, Sale-a-bration 2012 starts January 24th and you will have the opportunity to earn fabulous free exclusive Stampin' Up! products when you order at least $50 in Stampin' Up! merchandise. Better yet, host a party/workshop and earn fantastic free Sale-a-bration products in addition to the amazing Hostess Benefits available. Contact me today to learn more.
I am looking forward to sharing new ideas and projects with you in the upcoming weeks to help inspire you with your own creative projects.
Until Next Time.
Stampin' Hugs,
Tricia Butts
Independent Stampin' Up! Demonstrator
Saturday, November 5, 2011
Celebrate Digital Scrapbooking Day with Free Digital Downloads from Stampin' Up!
Hi Everyone,
I know it has been a long time since I have posted, but I just had to let you all know about the fabulous special offer that Stampin' Up! has to celebrate Digital Scrapbooking Day.
Stampin' Up! is offering 4 Free Digital Downloads from November 4-7 that can be used with My Digital Studio software as well as most other design software. These free downloads offer a variety of elements and templates that are perfect for creating quick projects that will look like you spent hours creating them.
So how do you take advantage of this amazing offer? It's really very simple. Just visit http://www.mydigitalstudio.net/ and click on the Digital Scrapbook Day image at the top of the page. All you have to do is follow the instructions provided and complete the simple survey, then download the following Free Digital Downloads:
· So Typefelt Stamp Brush Set
· Neutral Delightful Digital Tape
· Home for the Holidays Ensemble
· Delight in the Day Photobook Template
Want another FREE download? If we get 5,000 new friends to download the content we will give everyone a fifth download. So share MyDigitalStudio.net with your friends today!
These downloads are perfect for the holidays and can be used to create great holiday gifts and cards.
As an example, I want to share with you a digital scrapbook page I created using the 8x8 template from the Neutral Delightful Digital Tape free download. This page was so simple to create but I love the way it turned out.

http://www.facebook.com/#!/TriciaStampingCreations
Don't forget to click the "Like" box to receive regular updates to your newsfeed
I know it has been a long time since I have posted, but I just had to let you all know about the fabulous special offer that Stampin' Up! has to celebrate Digital Scrapbooking Day.
Stampin' Up! is offering 4 Free Digital Downloads from November 4-7 that can be used with My Digital Studio software as well as most other design software. These free downloads offer a variety of elements and templates that are perfect for creating quick projects that will look like you spent hours creating them.
So how do you take advantage of this amazing offer? It's really very simple. Just visit http://www.mydigitalstudio.net/ and click on the Digital Scrapbook Day image at the top of the page. All you have to do is follow the instructions provided and complete the simple survey, then download the following Free Digital Downloads:
· So Typefelt Stamp Brush Set
· Neutral Delightful Digital Tape
· Home for the Holidays Ensemble
· Delight in the Day Photobook Template
Want another FREE download? If we get 5,000 new friends to download the content we will give everyone a fifth download. So share MyDigitalStudio.net with your friends today!
These downloads are perfect for the holidays and can be used to create great holiday gifts and cards.
As an example, I want to share with you a digital scrapbook page I created using the 8x8 template from the Neutral Delightful Digital Tape free download. This page was so simple to create but I love the way it turned out.

All I had to do was add my photo to the photo box and I typed in my journalling in the text box provided for the circle embellishment. The only addition I added was to put "Sam" below the photo using the Schoolbook Serif Alphabet Stamp Brush set download from My Digital Studio (item #118821 Price $7.95). To purchase this download, just visit my Online Store here.
If you would like to see more wonderful ideas, please visit http://www.mydigitalstudio.net/ throughout the weekend as there will be new ideas and tips added to help you get creative. With Thanksgiving just weeks away and Christmas sneaking up on us, now is the best time to start your holiday projects and shopping for gifts.
I hope you all have a wonderful weekend.
Best wishes,
Tricia Butts
P.S. Visit my Facebook Page for updates and ideas
http://www.facebook.com/#!/TriciaStampingCreations
Don't forget to click the "Like" box to receive regular updates to your newsfeed
Subscribe to:
Posts (Atom)