Tuesday, August 11, 2020

ICS August Blog Hop Punch Me Out


It's time to join the ICS August Blog Hop as we showcase punches with this month's Punch Me Out theme. You will be visiting with Stampin' Up! Demonstrators as they share their creative ideas and projects using punches to help inspire you. 
 One of my favorite things about punches, is being able to create beautiful sentiment labels quickly and simply. For my card today, I paired the Everyday Label Punch (item #144668) with the Label Me Fancy Punch (item #151297) to create a a lovely sentiment label to compliment my design. I love the way these two versatile punches layer together and they can both be found in the 2020-2021 Annual Catalog. 
 I really love this technique for creating triangles with designer series paper to create a fun background design, so I decided to try it with the lovely Forever Greenery Designer Series Paper (item #152492). I started with Shaded Spruce cardstock for the card base and added a layer of Whisper White cardstock for the background to the designer series paper. 
For the designer series paper layer, I cut a 5" x 3 3/4" piece of Forever Greenery Designer Series Paper and cut it diagonally from corner to corner in both directions to create four triangles. I flipped two of the opposite triangles to create the pattern for the card design and adhered them to the Whisper White cardstock layer. 
 To create the sentiment label, I punched out one label with the Label Me Fancy Punch from Whisper White cardstock and another label from Shaded Spruce cardstock with the Everyday Label cardstock. I heat embossed the sentiment from the Seaside Notions stamp set (item #149278) onto the Whisper White label with Gold Embossing Powder and attached the label to the Shaded Spruce label to frame it. I added the label to the center of the card design with Stampin' Dimensionals and embellished it with Basic Rhinestones for a touch of bling. I love how this simple sentiment label design adds an elegant touch to this card design. 
Thank you for taking the time to visit my blog today. I hope that my card design will help you to explore the world of punches and all the wonderful ways you can create with them. There are so many great options to try. 

Now it's time to visit Charmane's wonderful blog and see what she has to share with us this month. Just click the Next button below to visit her blog. We would love it if you would leave us a comment and let us know what you enjoyed about our projects. I hope that you enjoy our blog hop. 
 Charmane


If you live in the U.S. and do not already have a Stampin' Up! Demonstrator, please contact me and I would be happy to help you with your creative projects. You may also visit my Online Store to place your order at your convenience and have it shipped directly to you. 
Until Next Time
Happy Stamping,
Tricia Butts
Independent Stampin' Up! Demonstrator
Like What You See? Visit My Online Store Here
Visit My Facebook Business Page for Updates & Ideas
Click here to Contact Me

The New August-December 2020 Mini Catalog Is Here!
Click Below To Visit My Online Store
 Click Here To Shop


Monday, August 10, 2020

Kylie's Demonstrator Training Program Monthly Team Blog Hop August 2020


Welcome to Kylie Bertucci's Demonstrator Training Program Monthly Blog Hop for August. You will be visiting with talented Stampin' Up! Demonstrators from around the world as they share wonderful project ideas to help inspire you. 
My card design today is a clean and simple card design that is easy to create with the Flowers For Every Season Memories & More Card Pack (item #153058) and the coordinating Flowers For Every Season Memories & More Cards & Envelopes (item #153101). I love that these products coordinate with the new 2020-2022 In Colors and make it simple to embellish to create your own unique card design. 
To create this card design, I chose the Cinnamon Cider card base from the Flowers For Every Season Memories & More Cards & Envelopes and added one of the beautiful cards from the Flowers For Every Season Memories & More Card Pack for the focal design of this card. I love that this card pack has designs for all seasons and this pretty Winter themed design works well for a variety of occasions. I used one of the circle dies from the Layering Circles Dies to die cut the center sentiment from the center of the Memories & More card. I wanted to be able to pop up the sentiment so that it stood out more.
Using the Just Jade Gingham Ribbon from the Flowers For Every Season Ribbon Combo Pack (item #153620), I added a piece across the center of the card front and attached the ends on the back with adhesive. I then added the die cut sentiment to the center of the card using Stampin' Dimensionals to pop it over the ribbon. I also tied a bow with the ribbon and attached it to the bottom of the sentiment circle using Mini Glue Dots. 
For a touch of bling, I colored some of the small Basic Pearls with the Dark Just Jade Stampin' Blends Marker and added them to the card front for a touch of bling. I love how easy this card was to assemble and pretty it looks with just a few simple changes to the original card design. These wonderful coordinating products from the 2020-2021 Annual Catalog make it so simple to create fun cards without the stress. 
Thank you for taking the time to visit my blog today. I hope that my card design helps inspire you to create our own wonderful projects for the people in your life. 

Please take the time to visit with my fellow Demonstrators and view their wonderful projects on their blogs. Just click the links in the Roll Call List below to visit them. I hope that you enjoy the rest of our blog hop this month.

If you live in the U.S. and do not already have a Stampin' Up! Demonstrator, please contact me and I would be happy to help you with your creative projects. You may also visit my Online Store to place an order from the comfort of your home and have it delivered directly to you.


Until Next Time
Happy Stamping,
Tricia Butts
Independent Stampin' Up! Demonstrator
Like What You See? Visit My Online Store Here
Visit My Facebook Business Page for Updates & Ideas
Click here to Contact Me

The New August-December 2020 Mini Catalog Is Here!
Click Below To Visit My Online Store
 Click Here To Shop


Last Day To Sign Up!
Celebrate The Everyday Heroes In Your Life
With The August Paper Pumpkin Kit
Click Below To Subscribe By 11:50pm MT August 10th
 Click Here To Subscribe


Sunday, August 9, 2020

2020 Kre8tors August Blog Hop Anniversary

I am so happy you could join us today for the 2020 Kre8tors August Blog Hop as we showcase Anniversary projects to help inspire you. You will be visiting with amazing Stampin' Up! Demonstrators from around the world as they share their ideas and projects. 
 For my Anniversary card, I decided to create a masculine design. I combined the Embrace Each Moment stamp set (item #152594) with the Stitched Be Mine Dies (item #151814) in the 2020-2021 Annual Catalog. For the background, I wanted a rustic feel so I chose one of the designs from the In Good Taste Designer Series Paper (item #152494) with a weathered wood grain look. 
 To create this card design, I started with Real Red cardstock for the card base and I added a layer of the In Good Taste Designer Series Paper for the background. Using a piece of Linen Thread (item #104199), I wrapped it around the designer series paper layer twice and tied a bow on the left side of the card front. I attached the designer series paper layer to the card base with adhesive. 
The hearts were created using the Stitched Be Mine Dies and I die cut one each of Whisper White, Real Red and Silver Foil to create the two focal images. On the White cardstock heart, I stamped the hands image from the Embrace Each Moment stamp set with Early Espresso Classic ink, stamped off once on scrap paper, to lighten the outline. I colored the hands using Dark and Light Petal Pink and Ivory Stampin' Blends Markers and blended the images with the Color Lifter. For the sentiment, I heat embossed the image onto the Real Red cardstock heart with Silver Embossing Powder, 
 To assemble the hearts, I adhered the Whisper White heart on the right side of the card front, over the top of the Linen Thread. I then added the Real Red scalloped heart frame around the outside of the heart. Next, I adhered the Real Red sentiment heart to the left side of the card front so that it slightly overlaps the Whisper White heart. I then added the Silver Foil scalloped heart frame around this heart. To complete the card design, I colored several Basic Rhinestones with the Dark Real Red Stampin' Blends Marker and added them to the card front for a touch of bling. I love how this card turned out and I think it works well as a masculine Anniversary card. 
Thank you for taking the time to visit my blog today. I hope that my card design helps inspire you to explore creating your own beautiful projects for the special people in your life. There are so many amazing products in the 2020-2021 Annual Catalog to help you with your creative projects. 

Now it's time to visit Lisa's blog and see what she has to share with us this month. Just click the Next button below to visit her blog or use the Roll Call List below to find your way. We would love it if you would leave us a comment and let us know what you enjoyed about our projects. I hope you enjoy the rest of our blog hop. 
 Lisa


Roll Call List

If you live in the U.S. and do not already have a Stampin' Up! Demonstrator, please contact me and I would be happy to help you with your creative projects. You may also visit my Online Store to place your orders and have them shipped directly to you. 
Until Next Time
Happy Stamping,
Tricia Butts
Independent Stampin' Up! Demonstrator
Like What You See? Visit My Online Store Here
Visit My Facebook Business Page for Updates & Ideas
Click here to Contact Me

The New August-December 2020 Mini Catalog Is Here!
Click Below To Shop From My Online Store
 Click Here To Visit My Online Store


Time Is Running Out!
Celebrate The Everyday Heroes In Your Life
With The August Paper Pumpkin Kit
Click Below To Subscribe by August 10th
 Click Here To Subscribe


Saturday, August 8, 2020

Colour Combo August 2020 Blog Hop

Welcome to the Colour Combo August Blog Hop as we showcase projects created with this month's color combo of Rich Razzleberry, Mint Macaron and Soft Suede. You will be visiting with talented Stampin' Up! Demonstrators from around the world as they share their ideas and projects to help inspire you. 
 Today's clean and simple card design features the Rooted In Nature stamp set (item #148217) and coordinating Nature's Roots Dies (item #146341) from the 2020-2021 Annual Catalog. I love the organic feel of this design with this color combination. The gold accents add a touch of elegance that steps this design up to the next level.  
 I chose to use Mint Macaron as my card base and added a layer of Soft Suede cardstock as a matte layer to the Very Vanilla cardstock background layer. I embossed the Very Vanilla cardstock with the new Tasteful Textile 3D Embossing Folder (item #152718) to add subtle texture to the background.
The sentiment label was created by heat embossing the sentiment from the Rooted In Nature stamp set onto Very Vanilla cardstock with Gold Embossing Powder. I die cut the label using one of the Stitched So Sweetly Dies (item #151690) and added it to a larger label die cut using the same die set from Soft Suede cardstock. I added two Gilded Gems (item #152478) to the Soft Suede label to add a touch of bling.
For the background design, I stamped two of the trio of leaves with Mint Macaron Classic ink and two of the small leaves with Rich Razzleberry Classic ink, one of which I stamped off once to give a lighter shade. I die cut them out with the coordinating dies from the Nature's Roots Dies and added them to the Very Vanilla cardstock layer with adhesive. Using a small piece of Gold 3/8" Metallic Edge Ribbon (item #144146) I added it to the bottom of the leaf arrangement, towards the center with a Mini Glue Dot. I added the sentiment label to the center of the leaf arrangement with Stampin' Dimensionals to complete the card design. 
Thank you for taking the time to visit my blog today. I hope that you enjoy my card design and I hope it inspires you to give this color challenge a try and experiment with these beautiful colors. 

Now it's time to visit Jo's wonderful blog and see what she has to share with us this month. Just click the Next button below to visit her blog. We would love it if you would leave us a comment and let us know what you enjoyed about our projects. I hope you enjoy the rest of our blog hop. 
 Jo

If you live in the U.S. and do not already have a Stampin' Up! Demonstrator, please contact me and I would be happy to help you with your creative projects. You may also visit my Online Store to place your order and have it shipped directly to you. 
Until Next Time
Happy Stamping,
Tricia Butts
Independent Stampin' Up! Demonstrator
Like What You See? Visit My OnlineStore Here
Visit My Facebook Business Page for Updates & Ideas
Click here to Contact Me


The New August-December 2020 Mini Catalog Is Here!
Click Below To Shop From My Online Store
 Click Here To Visit My Online Store


Time Is Running Out!
Celebrate The Everyday Heroes In Your Life
With The August Paper Pumpkin Kit
Click Below To Subscribe By August 10th
 Click Here To Subscribe


The Joy Of Sets August Blog Hop Reading Is FONTS-amental

Today we are hopping along with The Joy Of Sets August Blog Hop and this month's theme is Reading is FONTS-amental. You will be visiting blogs from around the world as we share our love of Fonts in our projects. 
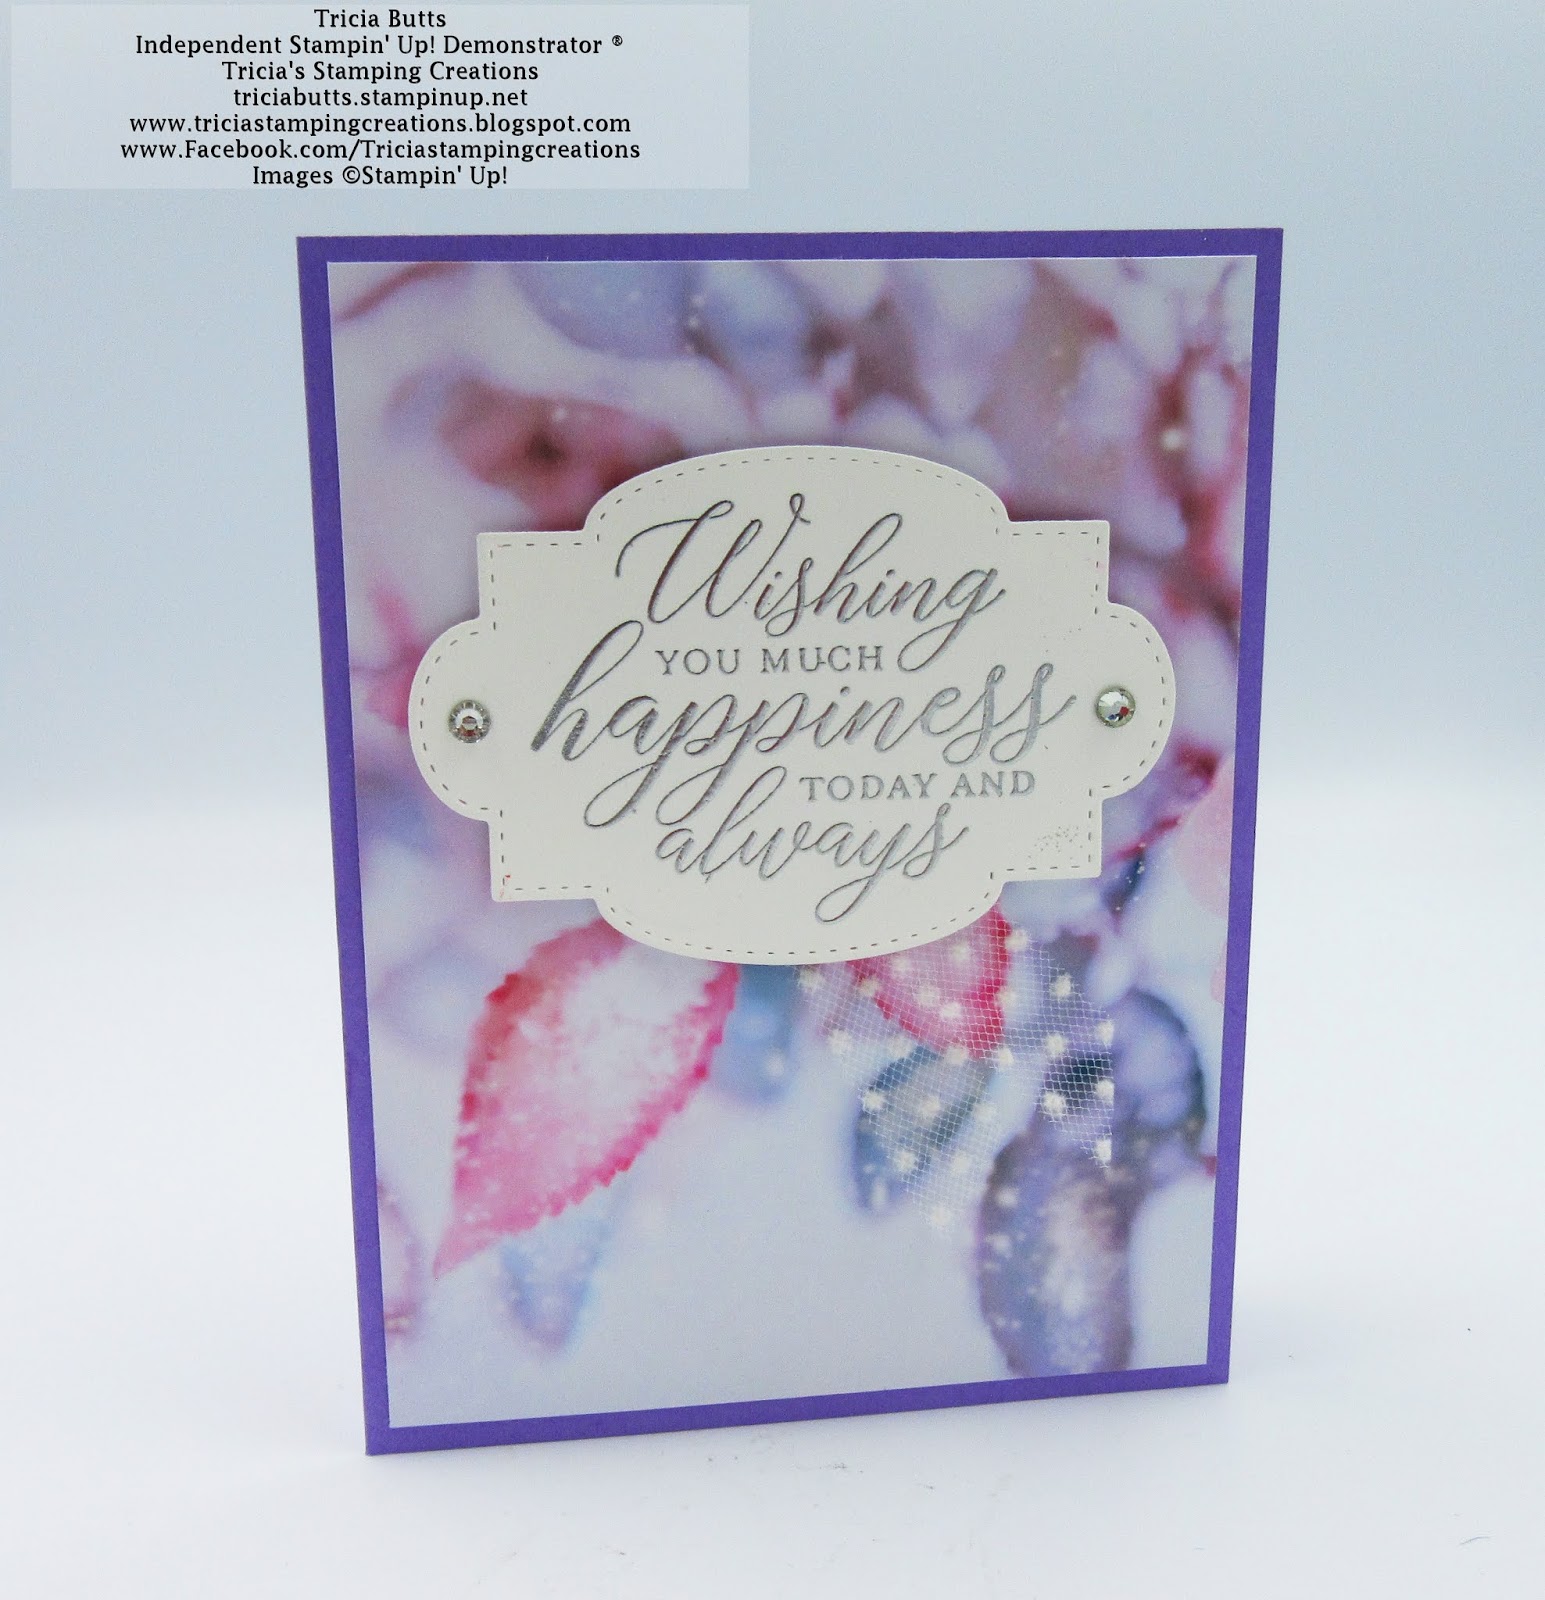
 For me, Fonts are like the personality of a project. By changing the style of the Font you can alter the look and feel of your project and bring it to life. For today's card, I wanted my sentiment to be the main focus of my design and I wanted the style of Fonts to be elegant and classical to compliment the designer series paper. 
 To create my card, I started with Highland Heather cardstock for my card base and I added a piece of the Feels Like Frost 6"x6" Designer Series Paper (item #150444) for the background. I love how the Highland Heather helps bring out the colors in the photo realistic design, to create a soft and pretty card design. I am so happy that this designer series paper has returned and is in the new August-December 2020 Mini Catalog. It is so versatile and works well for so many occasions. 
 The So Sentimental stamp set (item #151691) is one of my favorite sentiment stamp sets because of the large, beautiful images and the stylish Fonts. I love how the different styles of Fonts in each of the sentiments work together to create beautiful sentiments. I chose to use a sentiment that would work for a variety of occasions and heat embossed the image onto a piece of Whisper White cardstock with Silver Embossing Powder. I die cut the sentiment using one of the dies from the coordinating Stitched So Sweetly Dies (item #151690). I love that these products carried over from the Spring Mini Catalog and you can still order both of these products as the So Sentimental Bundle and save 10%. I attached a piece of the Whisper White 5/8" Polka Dot Tulle Ribbon (item #146912) to the back of the bottom of the sentiment label with Mini Glue Dots and attached it to the card front with Stampin' Dimensionals. To complete the design, I added two large Basic Rhinestones to the sentiment label for a touch of bling. I love the simple elegance of this card and how the silver embossing steps up the look of the design to the next level. This card would work well as a birthday, anniversary or even as a simple wedding design. 
Thank you for taking the time to visit my blog today. I hope that my card design helps inspire you to explore the variety of Fonts available to help you create your own beautiful projects. 

Now it's time to visit Narelle's wonderful blog and see what she has created this month. Just click the Next button below to visit her blog or use the Roll Call List below to find your way. We would love it if you would leave us a comment and let us know what you enjoyed about our projects. I hope you enjoy the rest of our blog hop. 
 Narelle


August 2020 Blog Roll
Until Next Time
Happy Stamping,
Tricia Butts
Independent Stampin' Up! Demonstrator
Like What You See? Visit My Online Store Here
Visit My Facebook Business Page for Updates & Ideas
Click here to Contact Me

Friday, August 7, 2020

GSF August Blog Hop Favorite Bundle


Welcome to the Global Stamping Friends (GSF) August Blog Hop as we showcase our favorite bundles from the current Stampin' Up! catalogs. You will be visiting with talented Stampin' Up! Demonstrators from around the world as they share their ideas and projects to help inspire you. 
 It's so hard for me to pick a favorite bundle, but I must admit that I fell in love with the Have A Hoot Bundle (item #155208) from the new August-December 2020 Mini Catalog, the moment I laid eyes on it. The images are adorable and the sentiments are so cute, how can anyone resist. For today's design, I decided to create a Christmas card with this bundle and paired it with the new Winter Snow Embossing Folder (item #153577), which is part of the new Snowflake Splendor Suite in the new mini catalog. 
 I chose Balmy Blue cardstock for the card base and added a layer of Whisper White cardstock for the background, that I embossed using the new Winter Snow Embossing Folder, to add subtle texture. To create the main focal image, I die cut a circle from Whisper White cardstock using the Layering Circles Dies (item #151770). I stamped the owl couple image from the Have A Hoot stamp set (item #153389) onto the circle using Smoky Slate Classic ink to provide the background image and make it easier to line up the die cut images. On a scrap of Whisper White cardstock, I stamped the owl couple image a second time, but this time I used Early Espresso Classic ink. I colored the images using Light Crumb Cake and Light Cinnamon Cider Stampin' Blends Markers to color the owls and Light and Dark Old Olive Stampin' Blends Markers to color the leaves. For the background, I went over the snowflakes with the Light Balmy Blue Stampin' Blends Marker to help them stand out. 
The next step was to die cut the owl couple and the mistletoe with the coordinating Peek A Hoot Dies (item #153573) and added them to the design with Mini Stampin' Dimensionals. Using a slightly larger circle die, I die cut a Balmy Blue circle to layer behind the focal image. I attached the focal image to the card front with Stampin' Dimensionals.  Using the new Snowflake Splendor 1/4" Ribbon (item #153548), I tied a bow and added it to the top of the circle at the top of the mistletoe with a Mini Glue Dot. I colored three of the small Basic Pearls with the Dark Poppy Parade Stampin' Blends Marker and added them to the mistletoe for a pop of color. 
To create the sentiment, I stamped the image with Balmy Blue Classic ink onto Whisper White cardstock and die cut it out with one of the small dies from the Layering Ovals Dies (item #151771). I layered it with a slightly larger oval die cut from Balmy Blue cardstock using the stamp dies. I attached the sentiment label to the card base with Mini Stampin' Dimensionals. To embellish the sentiment, I die cut two of the leaves from Old Olive cardstock using the Peek A Hoot Dies and tucked them underneath the sentiment oval. I embellished them by coloring three more small Basic Pearls that I also colored with the Dark Poppy Parade Stampin' Blends Marker. I love the clean and simple feel of this card design. There are so many wonderful images in the Have A Hoot bundle and I can't wait to create more projects with it. Remember, when you order the bundle, you save 10%. 
Thank you for taking the time to visit my blog. I hope that my card design inspires you to explore the wonderful bundles available from Stampin' Up! to create your own projects. 

Now it's time to visit Jan's beautiful blog and see what she has to share with us this month. Just click the Next button to visit her blog or use the Roll Call List below to find your way. We would love it if you would leave us a comment and let us know what you enjoyed about our projects. I hope that you enjoy the rest of our blog hop. 


 Jan

Blog Hop Roll Call

If you live in the U.S. and do not already have a Stampin' Up! Demonstrator, please contact me and I would be happy to help you with your creative projects. You may also visit my Online Store to place an order 24/7 and have it shipped to your door. 
Until Next Time
Happy Stamping,
Tricia Butts
Independent Stampin' Up! Demonstrator
Like What You See? Visit My OnlineStore Here
Visit My Facebook Business Page for Updates & Ideas
Click here to Contact Me

Start Planning Your Holiday Projects
Click Below To Visit My Online Store
 Click Here To Shop

Celebrate The Everyday Heroes In Your Life
With The August Paper Pumpkin Kit
Click Below To Subscribe By August 10th
 Click Here To Subscribe