Showing posts with label Label Me Fancy Punch. Show all posts

Tuesday, October 26, 2021

Paper Pumpkin Possibilities October Blog Hop Peaceful Christmas

Welcome to the Paper Pumpkin Possibilities October Blog Hop as we showcase alternative project ideas using the Peaceful Christmas Kit. This beautiful card kit has so many wonderful options and you will be visiting with talented Stampin' Up! Demonstrators as they share their ideas and projects to help inspire you.
The cards in this month's kit are simply beautiful, especially the snowy scene in shades of gray and silver. I noticed that the design was on both the front and back of the card base and it gave me and idea to be able to double the number of cards I could create from these five card bases. I cut the back of the card base to create a card front and chose Soft Succulent cardstock for the card base to frame the design. No matter how hard I tried, I couldn't capture the beautiful shimmer of the silver foil stars in my photos. I wanted the pretty scenery to be the main focus of my card design and added a sentiment label created with the Label Me Fancy Punch with Silver embossing to coordinate with the card design.
Products Used:
Paper Pumpkin October 2021 Peaceful Christmas Kit
Label Me Fancy Punch (item #151297)
Soft Succulent Cardstock (item #155776)
Versamark Pad (item #102283)
Metallics Embossing Powders (item #155555)
Simply Elegant Trim (item #155766)
Basic Rhinestone Jewels (item #144220)
Measurements:
Soft Succulent Cardstock
Card Base - 8 1/2" x 5 1/2" (Scored at 4 1/4")
Sentiment Label punched with the Label Me Fancy Punch
Peaceful Christmas Card Base (from the kit)
Card Front (cut from the back of the card base) - 5 1/4" x 4"
This clean and simple card design is a wonderful way to double the number of cards you can create from the five card bases with the shimmery snow scene. With just a few basic supplies, you can create an elegant set of Christmas cards. For the sentiment, I chose one of the images from the exclusive stamp set in the kit and heat embossed it with Silver embossing powder. I used the Silver trim from the Simply Elegant Trim pack and wrapped it around the card front twice and tied it in a knot at the front, towards the bottom of the card front. I attached the sentiment label over the Silver trim with Stampin' Dimensionals included in the kit. I then attached the card front to the Soft Succulent card base with Stampin' Dimensionals to pop it up. To finish off the card design, I added several Basic Rhinestone Jewels to the sky for a touch of bling. The Silver shimmer of this card design is so soft and pretty and the Soft Succulent cardstock adds a touch of color to help make the card front pop.
Thank you for taking the time to visit my blog. I hope that my alternate card design will help inspire you to think outside the box to create your own beautiful projects for the holidays. With just a few simple supplies, it's easy to step up your Christmas cards to send to the people in your life.
Now it's time to visit Charmane's blog and see what wonderful projects she has to share with us. Just click the Next button below to visit her blog. We would love it if you would leave us a comment and let us know what you enjoyed about our projects. I hope you enjoy the rest of our blog hop. 

If you live in the U.S. and do not have a Stampin' Up! Demonstrator, please contact me and I would be happy to help you with your creative projects. You may also visit my Online Store to place your order and have it shipped to you. Not a Paper Pumpkin subscriber? Click the link below to sign up to receive November's wonderful Gifts Galore Kit. 

Until Next Time

Happy Stamping,

Tricia Butts
Independent Stampin' Up! Demonstrator

Like What You See? Visit My Online Store Here

Visit My Facebook Business Page for Updates & Ideas

Click here to Contact Me


Make Your Holiday Treats Special
With The Gifts Galore November Paper Pumpkin Kit
Click Below To Subscribe By November 10th

Celebrate The Holidays
With The July-December 2021 Mini Catalog
Click Below To Visit My Online Store

Explore Your Creativity
With The Kits Collection
Click Below For More Details


Saturday, October 23, 2021

Ink. Stamp. Share. October Monthly Blog Hop Tic Tac Toe Challenge

Welcome to the Ink. Stamp. Share. October Monthly Blog Hop and this month we have a Tic-Tac-Toe Challenge. Our Design Team Members will each choose a row either horizontally, vertically or diagonally to create our project. You will be visiting with talented Stampin' Up! Demonstrators from around the world as they share their ideas and creativity to help inspire you. 
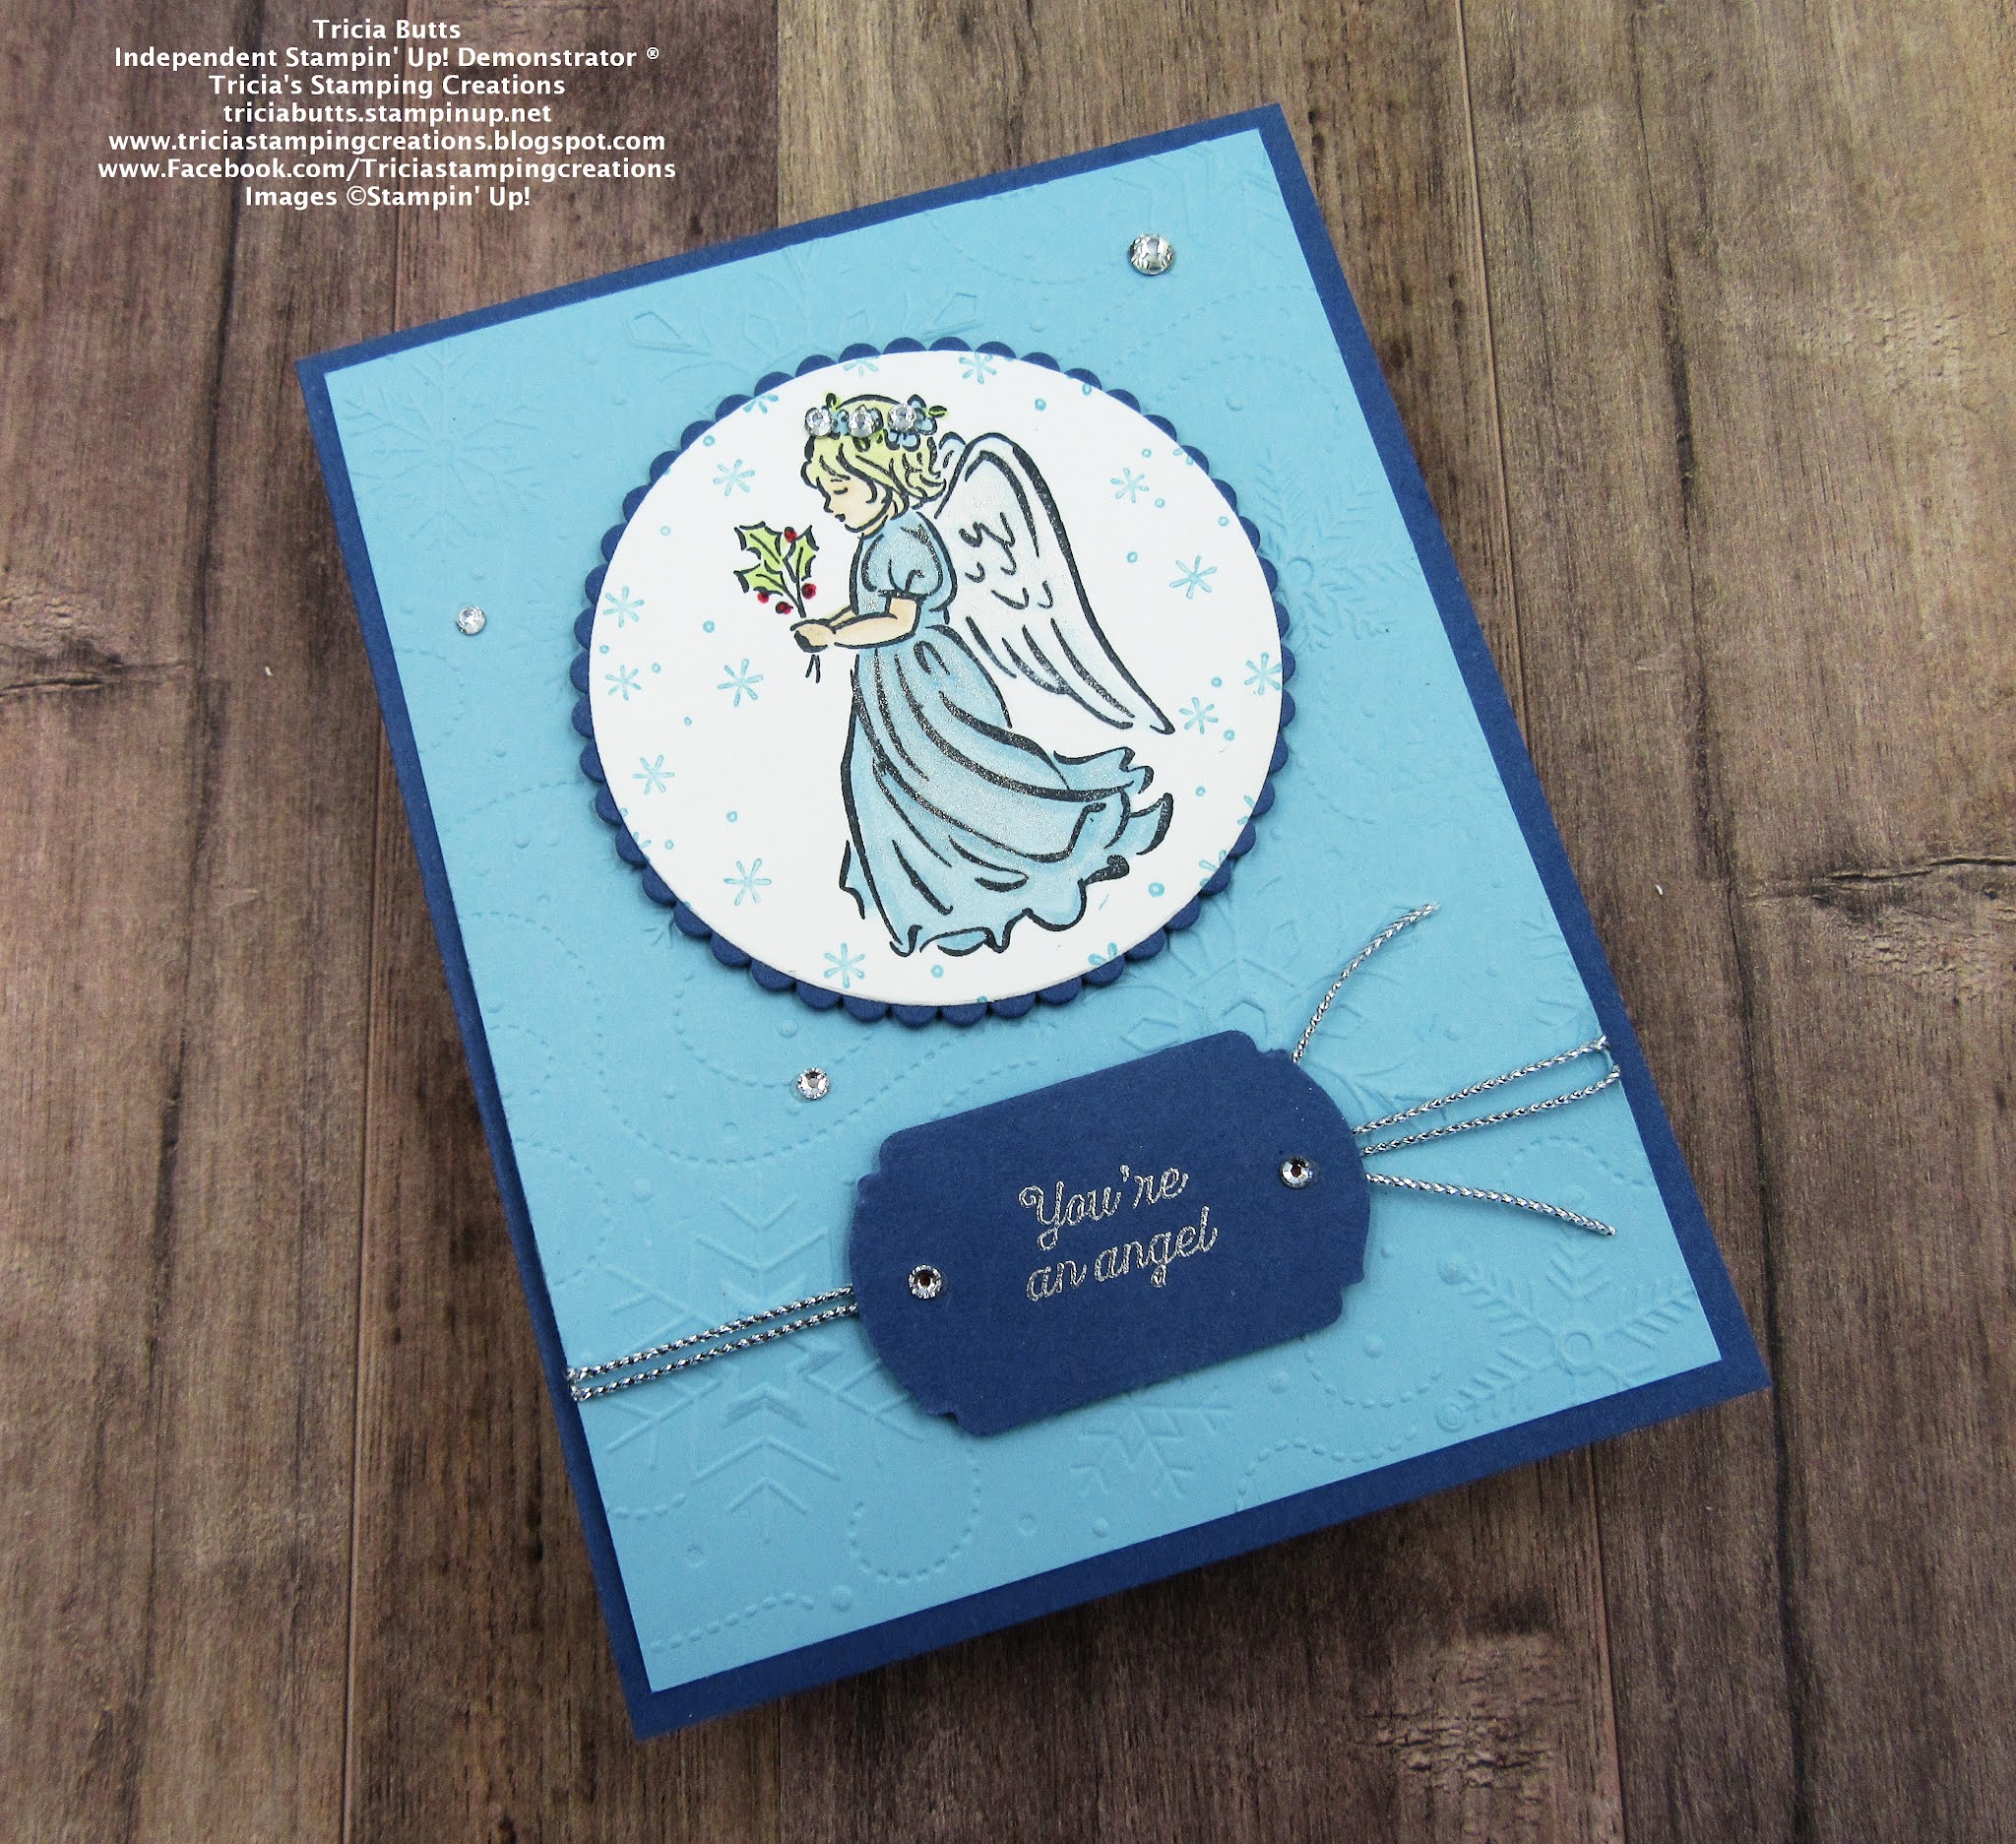
For my card design, I decided to use the top horizontal row from the Tic-Tac-Toe Challenge - Jewels, Circle, Blue. I love to use jewels to embellish my projects and circles are one of my favorite shapes for creating focal images for my designs. Finally, blue is my favorite color so this row seemed like the perfect choice for my card.  I chose The Angels of Peace stamp set from the July-December 2021 Mini Catalog and decided to use the smaller angel image for my design. 
Products Used:
Angels Of Peace stamp set (item #156365)
Wintry 3D Embossing Folders (item #155433)
Layering Circles Dies (item #151770)
Label Me Fancy Punch (item #151297)
Misty Moonlight Cardstock (item #153081)
Balmy Blue Cardstock (item #146982)
Basic White Cardstock (item #159276)
Balmy Blue Classic Ink Pad (item #147105)
Balmy Blue Stampin' Blends Combo Pack (item #154830)
So Saffron Stampin' Blends Combo Pack (item #154905)
Petal Pink Stampin' Blends Combo Pack (item #154893)
Granny Apple Green Stampin' Blends Combo Pack (item #154885)
Real Red Stampin' Blends Combo Pack (item #154899)
Color Lifter (item #144608)
Memento Tuxedo Black Pad (item #132708)
Versamark Pad (item #102283)
Metallics Embossing Powders (item #155555)
Clear Wink Of Stella Glitter Brush (item #141897)
Simply Elegant Trim (item #155766)
Basic Rhinestone Jewels (item #144220)
Stampin' Dimensionals (item #104430)
Measurements:
Misty Moonlight Cardstock
Card Base - 8 1/2" x 5 1/2" (Scored at 4 1/4")
Scalloped Circle die cut with Layering Circles Dies
Sentiment Label punched out with the Label Me Fancy Punch
Balmy Blue Cardstock
Card Front - 5 1/4" x 4"
Basic White Cardstock
White Circle die cut with Layering Circles Dies
This pretty card design features the wonderful Angels Of Peace stamp set and I love the combination of images and sentiments in this stamp set. I paired it with the Snowflakes embossing folder from the Wintry 3D Embossing Folders to create a wonderful texture to the card front. The blues from my line of Tic-Tac-Toe are Misty Moonlight and Balmy Blue and I love they way they look together. I used the Layering Circles Dies for the Circle part of my line and I combined a Misty Moonlight scalloped circle to help frame the Basic White focal circle. I colored the angel image with Stampin' Blends Markers and used Clear Wink of Stella on the image to add a touch of shimmer. I stamped the small snowflake image around the angel with Balmy Blue Classic ink to create a soft background. For the sentiment, I heat embossed the image with Silver embossing powder onto the Misty Moonlight sentiment label and I attached it to the card front with Stampin' Dimensionals over the top of the Silver Trim from the Simply Elegant Trim, which I wrapped around the card front twice and tied with a simple knot. For my jewels, I added Basic Rhinestone Jewels to the card front, sentiment label and in the hair of the angel for a touch of bling. I am so happy with how this card design turned out and that I was able to check off each of the boxes in my row of Tic-Tac-Toe.
Thank you for taking the time to visit my blog today. I hope that my card design will help inspire you to give this Tic-Tac-Toe Challenge a try and see what wonderful projects you can create with it. There are so many great combinations to help you step outside your comfort zone and try something new. 
Now it's time to visit Kim's blog and see what she has to share with us using this month's challenge. Just click the Next button below to visit her blog or use the Roll Call List to find your way. We would appreciate it if you would leave us a comment and let us know what you liked about our projects. I hope you enjoy the rest of our blog hop. 

If you live in the U.S. and do not have a Stampin' Up! Demonstrator, please contact me and I would be happy to help you with your creative projects. You may also visit my Online Store to place your order and have it shipped to you. 

Until Next Time

Happy Stamping,

Tricia Butts
Independent Stampin' Up! Demonstrator

Like What You See? Visit My Online Store Here

Visit My Facebook Business Page for Updates & Ideas

Click here to Contact Me


Make Your Holiday Treats Special
With The Gifts Galore November Paper Pumpkin Kit
Click Below To Subscribe By November 10th

Celebrate The Holidays
With The July-December 2021 Mini Catalog
Click Below To Visit My Online Store

Explore Your Creativity
With The Kits Collection
Click Below For More Details


Tuesday, October 12, 2021

ICS October Blog Hop My Favorite Punch

Welcome to the Inspire. Create. Share. October Blog Hop as we showcase our favorite Stampin' Up! Punches. You will be visiting with talented Stampin' Up! Demonstrators as they share their ideas and projects to help inspire you use punches to create your own wonderful projects.
Stampin' Up! has so many wonderful punches, so it was difficult for me to pick out a favorite. For my design I decided to use two different punches to create this card. The Evergreen Border Punch is part of the Evergreen Elegance Bundle in the 2021-2022 Annual Catalog, which is traditionally a Christmas bundle, but I decided to show how it can be used to create a masculine birthday card. I paired it with the Label Me Fancy Punch for the sentiment and I chose to use Evening Evergreen, Just Jade and Pool Party with a touch of Basic White for my color combination. I love the cool, crisp design of this card and how it reminds me of a Winter scene here in Colorado. 
Products Used:
Handsomely Suited stamp set (item #154444)
Evergreen Border Punch (item #153603)
Label Me Fancy Punch (item #151297)
Stitched So Sweetly Dies (item #151690)
Evergreen Forest 3D Embossing Folder (item #153576)
Evening Evergreen Cardstock (item #155574)
Just Jade Cardstock (item #153079)
Pool Party Cardstock (item #122924)
Basic White Cardstock (item #159276)
Versamark Pad (item #102283)
Basics Embossing Powders (item #155554)
Evening Evergreen 3/8" Open Weave Ribbon (item #155573)
Mini Stampin' Dimensionals (item #144108)
Measurements:
Evening Evergreen Cardstock
Card Base - 8 1/2" x 5 1/2" (Scored at 4 1/4")
Scalloped Rectangle die cut with Stitched So Sweetly Dies
Sentiment Label punched out with Label Me Fancy Punch
Row of trees punched with the Evergreen Border Punch
Just Jade Cardstock
Card Front - 5 1/4" x 4" Embossed with the Evergreen Forest 3D Embossing Folder
Row of trees punched out with the Evergreen Border Punch
Pool Party Cardstock
Rectangle - 3 3/4" x 2 5/8"
Basic White Cardstock
Rectangle - 1" x 3 3/4"
This card design is all about textures and layers. I used the Evergreen Border Punch to punch out a row of Just Jade trees and a row of Evening Evergreen trees. To create the forest, I trimmed the Just Jade trees to a row of 6 and I attached Mini Stampin' Dimensionals behind each of the trees. For the Evening Evergreen trees, I trimmed the trees to a row of 7 trees and cut the 7th tree on the left side so that it looks like the ground sloping away from the trees. I attached the Just Jade trees on top of the Evening Evergreen trees but offset them slightly and raised the Evening Evergreen trees so that they were slightly higher. To create the focal layer, I attached the Basic White strip to the bottom of the Pool Party Rectangle and added a piece of the Evening Evergreen ribbon across the bottom of the Basic White strip and attached it to the back. I adhered the layers of trees to the focal layer so that they overlapped the join of the Basic White strip with the Pool Party layer, lining up the Just Jade trees against the right side. The background layer of Just Jade cardstock was embossed with the Evergreen Forest 3D Embossing Folder to add texture and then I added it to the Evening Evergreen card base. I attached the focal layer to the Evening Evergreen scalloped rectangle and then attached it to the card front. For the sentiment, I heat embossed the image from the Handsomely Suited stamp set with White embossing powder and attached it to the card front so that it overlaps the focal image using Mini Stampin' Dimensionals. I love the peaceful feel of this card design and how it showcases the versatility of the Evergreen Border Punch for more than just Christmas. 
Thank you for taking the time to visit my blog. I hope that my card design will help you to see the versatility of Stampin' Up!'s punches to create wonderful projects. There are so many great options to choose from. 
Now it's time to visit Shirley's wonderful blog and see what favorite punch she has chosen to create with this month. Just click the Next button below to visit her blog. We would love it if you would leave us a comment and let us know what you liked about our projects. I hope you enjoy the rest of our blog hop.


If you live in the U.S. and do not have a Stampin' Up! Demonstrator, please contact me and I would be happy to help you with your creative projects. You may also visit my Online Store to place your order and have it shipped to you.

Until Next Time

Happy Stamping,

Tricia Butts
Independent Stampin' Up! Demonstrator

Like What You See? Visit My Online Store Here

Visit My Facebook Business Page for Updates & Ideas

Click here to Contact Me


Celebrate The Holidays
With The July-December 2021 Mini Catalog
Click Below To Visit My Online Store

Explore Your Creativity
With The Kits Collection
Click Below For More Details


Saturday, October 9, 2021

Colour Combo October Blog Hop

Welcome to the Colour Combo October Blog Hop as we explore the color combination of Coastal Cabana, Basic Gray and Real Red. We have been challenged to create a project using this color combination to help provide you with ideas and projects to inspire you to get creative.
For this month's color challenge, I wanted to create something fun and cheerful. I decided to use the Clever Cats stamp set to create an non-Halloween card and paired it with the Coastal Cabana Designer Series Paper from the Brights 6"x6" Designer Series Paper. I used the Layering Circles Dies to create the focal image and the Label Me Fancy Punch for the sentiment. This clean and simple card design is easy to create is sure to brighten someone's day. 
Products Used:
Clever Cats stamp set (item #156490)
Layering Circles Dies (item #151770)
Floral Heart Dies (item #154306)
Label Me Fancy Punch (item #151297)
Brights 6"x6" Designer Series Paper (item #155228)
Real Red Cardstock (item #102482)
Basic Gray Cardstock (item #121044)
Basic White Cardstock (item #159276)
Basic Gray Classic Ink Pad (item #149165)
Brights Stampin' Write Marker Assortment (item #147157)
Playful Pets Trim Combo Pack (item #152466)
Stampin' Dimensionals (item #104430)
Measurements:
Real Red Cardstock 
Card Base - 8 1/2" x 5 1/2" (Scored at 4 1/4")
Small hearts die cut with the Floral Heart Dies
Basic White Cardstock
Layer 1 - 5 1/4" x 4"
Focal circle die cut with the Layering Circles Dies
Sentiment Label punched out with Label Me Fancy Punche
Basic Gray Cardstock
Scalloped Circle die cut with the Layering Circles Dies 
Label punched out with the Label Me Fancy Punch 
and then cut label in half
Coastal Cabana Designer Series Paper
Background Layer - 5" x 3 3/4"
This cute card is simple to create and is a great way to use the Clever Cats stamp set for a non-Halloween themed card. I love how these colors work together and the diagonal plaid background makes for a fun background. I stamped the cat image and the sentiment with Basic Gray Classic ink onto Basic White cardstock and I colored the box with the Coastal Cabana Stampin' Write Marker. I cut the Basic Gray label in half and attached it behind the sentiment label to create a frame. I attached a piece of Real Red Trim around the bottom of the card front and added the sentiment label over the top with Stampin' Dimensionals. I attached the Basic White focal circle to the Basic Gray Scalloped Circle and attached it to the card front with Stampin' Dimensionals. To decorate the card, I die cut a row of Real Red hearts with the Floral Heart Dies and attached three of them to the focal circle and two of the hearts on either side of the sentiment.
Thank you for taking the time to visit my blog. I hope that my card design will help inspire you to explore creating your own projects with this color combination. There are so many wonderful products to choose from to create fun, colorful cards. 
Now it's time to visit Verity's blog and see what she has created with this month's color challenge. Just click the Next button below to visit her blog. We would love it if you would leave us a comment and let us know what you like about our projects. I hope you enjoy the rest of our blog hop. 


If you live in the U.S. and do not have a Stampin' Up! Demonstrator, please contact me and I would be happy to help you with your creative projects. You may also visit my Online Store to place your order and have it shipped to you.

Until Next Time

Happy Stamping,

Tricia Butts
Independent Stampin' Up! Demonstrator

Like What You See? Visit My Online Store Here

Visit My Facebook Business Page for Updates & Ideas

Click here to Contact Me


Celebrate The Holidays

With The July-December 2021 Mini Catalog

Click Below To Visit My Online Store


Explore Your Creativity
With The Kits Collection
Click Below For More Details