Showing posts with label Special Someone stamp set. Show all posts

Monday, March 8, 2021

Kylie Bertucci's Monthly International Blog Highlights March 2021


Welcome to Kylie Bertucci's Monthly International Blog Highlights as we showcase projects with the theme of Thank You. Join the many talented Stampin' Up! Demonstrators from around the world as they share their wonderful projects and ideas to help inspire you. I hope you will take the time to visit with them and enjoy their creations.
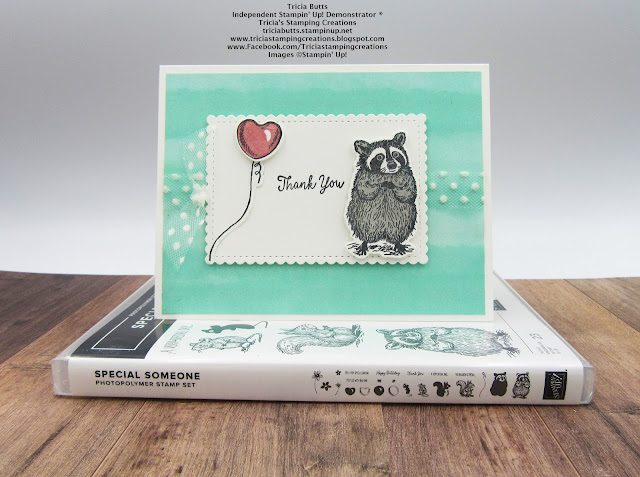
Lately I have been taking a trip down memory lane, creating projects with some old favorites from the 2020-2021 Annual Catalog. Today I have created a sweet clean and simple Thank You card featuring the Special Someone stamp set (item #151643) combined with the Playing With Patterns 6"x6" Designer Series Paper (item #152490). With Spring just around the corner, this stamp set and coordinating dies are perfect for creating fun cards for a variety of occasions.
Products Used:
Special Someone stamp set (item #151643)
Special Day Dies (item #153587)
Stitched So Sweetly Dies (item #151690)
Playing With Patterns 6"x6" Designer Series Paper (item #152490)
Thick Basic White Cardstock (item #159229)
Basic White Cardstock (item #159276)
Memento Tuxedo Black Pad (item #132708)
Rococo Rose Classic Ink Pad (item #150080)
Smoky Slate Classic Ink Pad (item #147113)
Clear Wink Of Stella Glitter Brush (item #141897)
Whisper White 5/8" Tulle Polka Dot Ribbon (item #146912)
Stampin' Dimensionals (item #104430)
Measurements:
Thick Basic White Cardstock
Card Base - 8 1/2" x 5 1/2"
Playing With Patterns Designer Series Paper
Card Front - 5 1/4" x 4"
Basic White Cardstock
Scalloped Rectangle die cut with Stitched So Sweetly Dies
Scrap for stamped and die cut images
The wonderful thing about this card layout is that you can create a variety of designs by changing the designer series paper background layer and images from the stamp set. I love that the stamp set has coordinating dies which fits the Mini Stampin' Cut & Emboss Machine. The two step stamp set makes it easy to color the images with the coordinating stamp image. The Whisper White Tulle Polka Dot Ribbon helps step up the design and I added Clear Wink of Stella to the stamped images for a touch of shimmer and sparkle. This card design is a wonderful way to brighten someone's day and let them know how much you appreciate them. 
Thank you for taking the time to visit my blog today. I hope that my Thank You card will help inspire you to create your own beautiful cards to send out to the people you care about. A card is a wonderful way to reach out to someone and let them know how much you appreciate them.
I would love it if you would vote for my card design this month as part of Kylie's International Blog Highlights. Simply click on the button below to visit her blog and click on the heart to vote for my card design (#45). Don't forget to visit with the other amazing demonstrators participating this month and share the love with them as well. You have the opportunity to vote for 5 cards each day, so make sure you come back during the week to vote. Thank you so much for your support. 

If you live in the U.S. and do not have a Stampin' Up! Demonstrator, please contact me and I would be happy to help you with your creative projects. You may also visit my Online Store to place your order and have it shipped to you. 

Until Next Time

Happy Stamping,

Tricia Butts
Independent Stampin' Up! Demonstrator

Like What You See? Visit My Online Store Here

Visit My Facebook Business Page for Updates & Ideas

Click here to Contact Me


Celebrate Spring
With The January-June 2021 Mini Catalog
Click Below To View The Amazing Products 

Available For A Limited Time
The Hey Chick & Hey Birthday Chick Bundles
Click Below For More Details

Celebrate Life's Milestones 
With The March Paper Pumpkin Kit
Click Below To Subscribe By March 10th


Monday, August 3, 2020

Kylie Bertucci's International Blog Highlights August 2020


Welcome to Kylie Bertucci's Monthly International Blog Highlights for August. Stampin' Up! Demonstrators from around the world are sharing their amazing projects and ideas to help inspire you with your own creations. We hope you enjoy the projects we have to share with you this month. 
 Today I created this fun card design inspired by fellow Demonstrator, Jan Farring. I loved her idea for cutting the designer series paper layer into triangles and then flipping the left and right side triangles to create a quilt style pattern. For my card design, I used of the designs from the beautiful Flowers For Every Season 6"x6" Designer Series Paper (item #152486) and paired it with several of the new 2020-2022 In Color products, which can all be found in the 2020-2021 Annual Catalog.
 To create this card design, I started with a Just Jade cardstock card base and added a 5 1/4" x 4" Whisper White cardstock layer for the base of the background. I cut a piece of 5" x 3 3/4" designer series paper diagonally from the top left corner to the bottom right corner and the rotated it to cut it diagonally the other direction, creating 4 triangles. Leaving the larger two triangles with the floral pattern, I flipped the two side triangles so that the Just Jade pattern was facing up to provide contrast. I then adhered the triangles to the Whisper White cardstock layer, leaving a gap between the triangles that creates a white border to the design. 
For the sentiment, I punched out a label from Misty Moonlight cardstock, using the Everyday Label Punch (item #144668) and then punched out a label from Whisper White cardstock using the Label Me Fancy Punch (item #151297). I heat embossed the sentiment from the Special Someone stamp set (item #151643) using Silver Embossing Powder and adhered the label to the Misty Moonlight label. I colored two of the medium Basic Pearls with the Dark Daffodil Delight Stampin' Blends Marker and added them to the sentiment label for a pop of color. To complete the design, I cut two pieces of Magenta Madness 1/4" Ribbon (item #153623) approx 4 1/4" long and cut the ends diagonally. I attached them to the center of the card front and added the sentiment label over the top with Stampin' Dimensionals. I then added the card front to the Just Jade card base with Stampin' Dimensionals to pop it up. This clean and simple design is a wonderful way to use your designer series paper to create beautiful cards for all occasions. 
Thank you for taking the time to visit my blog today. I hope that my card design will inspire you to explore using Designer Series Paper in your own projects. With so many wonderful designs to choose from, the hardest decision is which one to pick first. 

If you enjoyed my card, please click the button below to vote for my design. I hope you will also take the time to visit my fellow demonstrators and share the love by leaving us a comment letting us know what you enjoyed about our projects. Thank you for your support. 
 Click Here To Vote For My Card


If you live in the U.S. and do not already have a Stampin' Up! Demonstrator, please contact me and I would be happy to help you with your creative projects. You may also visit my Online Store to place your orders and have them shipped directly to you. 

Until Next Time
Happy Stamping,
Tricia Butts
Independent Stampin' Up! Demonstrator
Like What You See? Visit My Online Store Here
Visit My Facebook Business Page for Updates & Ideas
Click here to Contact Me


Today Is The Last Day
To Earn Bonus Days Coupons
Earn A $5 Coupon For Every $50 You Order
July 1st - August 3rd
Redeem Your Coupons August 4th - August 31st
Click Below To Visit My Online Store
 Click Here To Shop


Celebrate The Everyday Heroes In Your Life
With The August Paper Pumpkin Kit
Click Below To Subscribe By August 10th
 Click Here To Subscribe


Get Ready For The Holidays!
The August - December 2020 Mini Catalog
Launches August 4th
Contact Me To Receive Your Free Catalog
 Contact Me