Showing posts with label Special Day Dies. Show all posts

Monday, March 8, 2021

Kylie Bertucci's Monthly International Blog Highlights March 2021


Welcome to Kylie Bertucci's Monthly International Blog Highlights as we showcase projects with the theme of Thank You. Join the many talented Stampin' Up! Demonstrators from around the world as they share their wonderful projects and ideas to help inspire you. I hope you will take the time to visit with them and enjoy their creations.
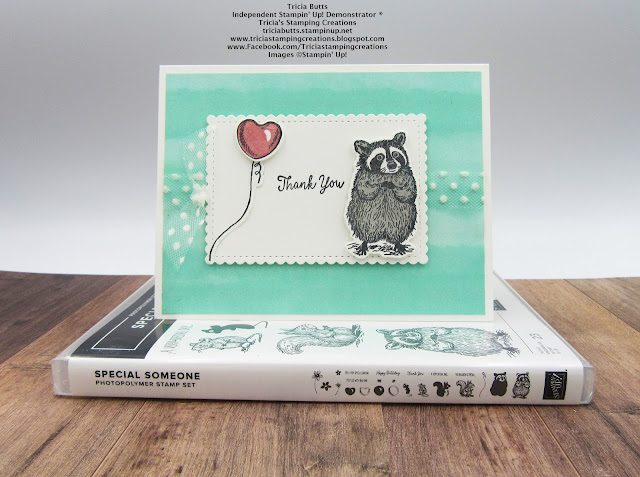
Lately I have been taking a trip down memory lane, creating projects with some old favorites from the 2020-2021 Annual Catalog. Today I have created a sweet clean and simple Thank You card featuring the Special Someone stamp set (item #151643) combined with the Playing With Patterns 6"x6" Designer Series Paper (item #152490). With Spring just around the corner, this stamp set and coordinating dies are perfect for creating fun cards for a variety of occasions.
Products Used:
Special Someone stamp set (item #151643)
Special Day Dies (item #153587)
Stitched So Sweetly Dies (item #151690)
Playing With Patterns 6"x6" Designer Series Paper (item #152490)
Thick Basic White Cardstock (item #159229)
Basic White Cardstock (item #159276)
Memento Tuxedo Black Pad (item #132708)
Rococo Rose Classic Ink Pad (item #150080)
Smoky Slate Classic Ink Pad (item #147113)
Clear Wink Of Stella Glitter Brush (item #141897)
Whisper White 5/8" Tulle Polka Dot Ribbon (item #146912)
Stampin' Dimensionals (item #104430)
Measurements:
Thick Basic White Cardstock
Card Base - 8 1/2" x 5 1/2"
Playing With Patterns Designer Series Paper
Card Front - 5 1/4" x 4"
Basic White Cardstock
Scalloped Rectangle die cut with Stitched So Sweetly Dies
Scrap for stamped and die cut images
The wonderful thing about this card layout is that you can create a variety of designs by changing the designer series paper background layer and images from the stamp set. I love that the stamp set has coordinating dies which fits the Mini Stampin' Cut & Emboss Machine. The two step stamp set makes it easy to color the images with the coordinating stamp image. The Whisper White Tulle Polka Dot Ribbon helps step up the design and I added Clear Wink of Stella to the stamped images for a touch of shimmer and sparkle. This card design is a wonderful way to brighten someone's day and let them know how much you appreciate them. 
Thank you for taking the time to visit my blog today. I hope that my Thank You card will help inspire you to create your own beautiful cards to send out to the people you care about. A card is a wonderful way to reach out to someone and let them know how much you appreciate them.
I would love it if you would vote for my card design this month as part of Kylie's International Blog Highlights. Simply click on the button below to visit her blog and click on the heart to vote for my card design (#45). Don't forget to visit with the other amazing demonstrators participating this month and share the love with them as well. You have the opportunity to vote for 5 cards each day, so make sure you come back during the week to vote. Thank you so much for your support. 

If you live in the U.S. and do not have a Stampin' Up! Demonstrator, please contact me and I would be happy to help you with your creative projects. You may also visit my Online Store to place your order and have it shipped to you. 

Until Next Time

Happy Stamping,

Tricia Butts
Independent Stampin' Up! Demonstrator

Like What You See? Visit My Online Store Here

Visit My Facebook Business Page for Updates & Ideas

Click here to Contact Me


Celebrate Spring
With The January-June 2021 Mini Catalog
Click Below To View The Amazing Products 

Available For A Limited Time
The Hey Chick & Hey Birthday Chick Bundles
Click Below For More Details

Celebrate Life's Milestones 
With The March Paper Pumpkin Kit
Click Below To Subscribe By March 10th


Friday, March 5, 2021

GSF March Blog Hop Sweets & Treats

Welcome to the GSF (aka Global Stamping Friends) March Blog Hop as we explore the theme of Sweets & Treats. You will have the opportunity to visit talented Stampin' Up! Demonstrators from around the world as they share their projects and ideas to help inspire you. 
Today I am sharing a cute treat box for Easter that I created with the Love You Always Treat Boxes (item #154285) from the January-June 2021 Mini Catalog. I used the Hey Chick Birthday Bundle (item #158631) with the Artistry Blooms Designer Series Paper (item #152495) to decorate the box to create a fun, cheerful design. I love the size of these treat boxes and they are great for filling with candy or you can add a small gift. 
Products Used:
Hey Birthday Chick Bundle (item #158631)
Chick Dies (item #158199)
Special Day Dies (item #153587)
Stitched Shapes Dies (item #152323)
Itty Bitty Greetings stamp set (item #151331)
Love You Always Treat Boxes (item #154285)
Artistry Blooms Designer Series Paper (item #152495)
Basic White Cardstock (item #159276)
Basic Rhinestone Jewels (item #144220)
Measurements:
Artistry Blooms Designer Series Paper 
1 piece - 2 1/2" x 3 7/8"
2 pieces - 1 1/4" x 3 7/8"
2 pieces - 1 1/4" x 2 1/2"
Basic White Cardstock
Stitched Circle die cut with Stitched Shapes Dies
Piece for stamped image using the Hey Chick Bundle
Sentiment Bundle die cut with the Special Day Dies
Miscellaneous Scrap Cardstock for Grass and Flowers die cut with the Special Day Dies
Scraps of Designer Series Paper die cut with the Chick Dies for the eggs
The Love You Always Teat Boxes are a great way to create fun gifts without having to stress about creating your own box from scratch. I had so much fun decorating this cute box and chose bright, cheerful colors that work well for Spring and Easter. To decorate the top and sides of the box, I added the Artistry Blooms Designer Series Paper. I colored the chick image with Daffodil Delight, Calypso Coral and Pumpkin Pie Stampin' Blends Markers and I used the several of the dies from the Special Day Dies to create the grass, flowers and sentiment label to decorate the box. For the eggs, I used the eggs die from the Chick Dies and die cut them twice from different scraps of designer series paper to get the fun patterns so that they looked like Easter Eggs. For a touch of bling, I added small Basic Rhinestone Jewels to the centers of the flowers. These boxes work for so many occasions and they are so versatile. 
Thank you for taking the time to visit my blog today. I hope that my treat box will help inspire you to create your own fun projects. There are so many wonderful possibilities to choose from and so many great ways to decorate them.
Now it's time to visit June's wonderful blog and see what she has to share with us this month. Just click on the Next button below to visit her blog or use the Roll Call List below to find your way. Please leave us a comment and let us know what you enjoyed about our project. I hope you enjoy the rest of our blog hop. 

Blog Hop Roll Call

1. Amanda Farlinger

2. Jenn Curtis Charles

3. Jan Musselman

4. Rachel Macleod

5. Tricia Butts

6. June Olsen

7. Kimberley Anne Morris

If you live in the U.S. and do not have a Stampin' Up! Demonstrator, please contact me and I would be happy to help you with your creative projects. You may also visit my Online Store to place your order and have it shipped to you. 

Until Next Time

Happy Stamping,

Tricia Butts
Independent Stampin' Up! Demonstrator

Like What You See? Visit My Online Store Here

Visit My Facebook Business Page for Updates & Ideas

Click here to Contact Me


Get Ready For Spring
With The January-June 2021 Mini Catalog
Click Below To Visit My Online Store

Available For A Limited Time
The Hey Chick & Hey Birthday Chick Bundles
Click Below For More Details


Celebrate Life's Milestones
With The March Paper Pumpkin Kit
Including Free Bonus Stencil Set
Click Below To Subscribe By March 10th


Saturday, March 21, 2020

3D Paper Trimmer March Blog Hop Easter

Welcome to the 3D Paper Trimmer March Blog Hop as we showcase Easter projects created using Stampin' Up!'s Paper Trimmer. I hope you enjoy our projects this month.
 I chose to decorate one of Stampin' Up!'s cute Mini Pizza Boxes (item 144645) to create a fun treat box and I decorated it using the beautiful Pleased As Punch Designer Series Paper (item #153558) from the Product Coordination Release that ends March 31st. I love the pretty Spring colors and soft patterns that work well for this holiday. 
 To decorate the Mini Pizza Box, I cut a strip of 3 1/4" x 12" from the Petal Pink Gingham pattern of the Pleased As Punch Designer Series Paper. I then cut from this strip, one piece measuring 3 1/4" x 3 1/4" and 4 strips measuring 3/4" x 3 1/4" to decorate the top and sides of the box. I attached the side strips using Snail Adhesive and cut around the half circle in the front of the box with Paper Snips. 
For the top of the box, I die cut a strip of Soft Sea Foam cardstock using the grass die from the Special Day Dies (item #153587) and attached it to the bottom of the Petal Pink Gingham square and then attached it to the top of the box. I stamped the bunny image from the Welcome Easter stamp set (item #151559) with Smoky Slate Classic ink onto a scrap of Whisper White cardstock and I colored the image using the Light Smoky Slate Stampin' Blends Marker and the Light Petal Pink Stampin' Blends Marker. I blended both colors to soften them using the Color Lifter. Using Paper Snips, I fussy cut the bunny image out and attached it onto the Petal Pink Gingham square using Stampin' Dimensionals. 

To create the umbrella, I punched out the Balmy Blue umbrella and handle images from the Pleased As Punch Designer Series Paper using the Umbrella Builder Punch (item #151293). I attached the handle to the gingham paper with Snail Adhesive so that the bottom of the handle was hidden behind the bunny. I attached the top of the umbrella to the top of the handle with Mini Stampin' Dimensionals. For the sentiment, I stamped the image from the Itty Bitty Greetings stamp set (item #146667) with Soft Sea Foam Classic ink onto a scrap of Whisper White cardstock and I punched it out using the Classic Label Punch (item #141491). I attached the sentiment to the bottom of the box just below the bunny, using Snail Adhesive. To decorate the sentiment, I added two small flowers that I had left over from another project that were die cut using the Sending Flowers Dies (item #153589), with a Mini Stampin' Dimensional. I added a small Basic Rhinestone to the center of each flower for a touch of bling.
I love how this cute treat box turned out and it can be used for small gifts or to hold candy to give to someone for Easter. The Welcome Easter stamp set has several cute images that you could use to create a variety of designs to give to family and friends.

Now it's time to visit Sigrid's blog and see what wonderful project she has created this month. Just click the Next button below to visit her blog.

Thank you for taking the time to visit my blog today. I hope that you enjoyed my project and I hope it inspires you to create your own fun projects for Easter. If you live in the U.S. and do not already have a Stampin' Up! Demonstrator, please contact me and I would be happy to help you.

Until Next Time
Happy Stamping,
Tricia Butts
Independent Stampin' Up! Demonstrator
Like What You See? Visit My Online Store Here
Visit My Facebook Business Page for Updates & Ideas
Click here to Contact Me