Showing posts with label Fun Fold. Show all posts

Saturday, April 13, 2024

Stamping Inkspirations April Blog Hop Fun Fold Time

Welcome to the Stamping Inkspirations April Blog Hop and this month we have been challenged to create a fun fold but the twist is that it has to be one we have not tried before. It's a great way to have us step outside our comfort zone and share with you some fun projects to help inspire you.
My inspiration for my fun fold design today came from fellow Stampin' Up! Demonstrator, Brenda Quintana, with a version of a Bridge card design that I had not tried before. You can see here video here for more details. I tweaked the placement of the "bridge" layer on my card to fit with the design I had in mind. I chose to use the Lighter Than Air 6"x6" Designer Series Paper for my design and used the coordinating Hot Air Balloon to create the focal images and accents. I wanted to create a fun, cheerful birthday card that would help brighten someone's day. With these pretty pastel colors, I think I managed to achieve that. What do you think?
Products Used:
Hot Air Balloon Bundle (item #162755)
Painted Texture 3D Embossing Folder (item #154317)
Lighter Than Air 6"x6" Designer Series Paper (item #162747)
Thick Basic White Cardstock (item #159229)
Basic White Cardstock (item #159276)
Azure Afternoon Cardstock (item #161719)
Fresh Freesia Cardstock (item #155613)
Gorgeous Grape Cardstock (item #146987)
Gorgeous Grape Classic Ink Pad (item #147099)
Stampin' Dimensionals (item #104430)
Measurements:
Thick Basic White Cardstock
Card Base - 4 1/4" x 11" Scored at 5 1/2"
- cut at 9 1/2" & 7" (Thin section is for the end panel, larger section for the middle panel)
Azure Afternoon Cardstock
Card Front - 4" x 2 1/4" embossed with the Painted Texture 3D Embossing Folder
Basic White Cardstock
Inside Panel - 4 1/4" x 2 3/8"
5 Clouds die cut with the Hot Air Balloon Dies
Fresh Freesia Cardstock
1 Small Banner die cut with the Hot Air Balloon Dies
1 Large Banner die cut with the Hot Air Balloon Dies
Basket die cut with the Hot Air Balloon Dies
Gorgeous Grape Cardstock
Detailed Banner die cut with the Hot Air Balloon Dies
Detailed Basket framework die cut with the Hot Air Balloon Dies
Lighter Than Air Designer Series Paper
2 Side Panels - 1 1/4" x 4" (Striped)
Inside Panel - 5 1/4" x 4" (Blue Background)
Balloon die cut with the Hot Air Balloon Dies (Fresh Freesia Design)
I love creating clean and simple card designs and this applies to fun fold cards as well. As soon as I saw this layout, I knew I had to try it. I love that all the main pieces for the card come from one 4 1/4" x 11" card base and with just 2 cuts and a score line, you have the basics for your fun fold. The fun part is decorating and I felt like the Hot Air Balloon Bundle would be perfect with the coordinating Lighter Than Air 6"x6" Designer Series Paper for creating my card. I chose to place my bridge layer closer to the bottom of the card front to allow room for the balloon die cut to fit in and also to add some clouds in the background. I used the Hot Air Balloon Dies to cut out all the different pieces, including the sentiment banners. I love the contrast between the striped pattern for the side panels and the Azure Afternoon background design. It made me think of rainbows and a blue sky and I thought it was perfect for the idea of a hot air balloon floating through by. For the focal layer, I embossed the Azure Afternoon cardstock with the Painted Texture 3D Embossing Folder to add some texture to the card. I love the contrast with all the pretty colors and the Basic White card base helps make them pop. I used Gorgeous Grape Classic ink to stamp the sentiments for both the front and inside panels.  This was such a fun card to create and I can see myself making more of these Bridge Fun Fold cards in the future. 
Thank you for taking the time to visit my blog. I hope that my fun fold card will help inspire you to explore creating your own beautiful cards and step outside your comfort zone. There are so many options to explore to help spark your creativity.
Now it's time to visit Leonie's blog and see what fun fold she has to share with us. Just click on the Next button to visit her blog or use the Roll Call List to find your way. We would appreciate it if you would leave us a comment and let us know what you liked about our projects. I hope you enjoy the rest of our blog hop. 


Roll Call List

If you live in the U.S. and do not have a Stampin' Up! Demonstrator, please contact me and I would be happy to help you with your creative projects. You may also visit my Online Store to place your order and have it shipped to you. 

Until Next Time

Happy Stamping,

Tricia Butts
Independent Stampin' Up! Demonstrator

Like What You See? Visit My Online Store Here

Visit My Facebook Business Page for Updates & Ideas

Click here to Contact Me


Save Up To 60% On Select Retiring Products
During The Last Chance Products Sale
Click Below To Shop Now

Explore Your Creativity
With The New Online Exclusives Products
Click Below To Visit My Online Store


Wednesday, January 31, 2024

Paper Pumpkin Possibilities January Blog Hop Lovely Lavender

Welcome to the Paper Pumpkin Possibilities January Blog Hop and I am so excited to start off the New Year with the Lovely Lavender Kit. Our wonderful Design Team will be sharing their alternative projects and ideas to help inspire you to get creative. This beautiful kit also coordinates with the Perennial Lavender Suite Collection in the January-April 2024 Mini Catalog to give us even more creative options to explore.
For my card design today, I decided to create one of my favorite fun folds because it is so simple to make and uses mainly supplies from the kit. The only additions are some scraps of cardstock, one of the beautiful Paper Butterfly Accents and the Purple Fine Shimmer Gems from the coordinating Perennial Lavender Suite Collection. This simple Easel card design, uses one of the Crumb Cake card bases, along with some of the elements from the kit and I also used the new Love of Spring Dies for the sentiment label. This die set is the new add-on that coordinates with the January, February and March Paper Pumpkin Kits and is available while supplies last. 

Products Used:
Paper Pumpkin Lovely Lavender Kit 
The Love of Spring Dies (item #164396)
1 3/4" Circle Punch (item #119850)
Highland Heather Cardstock (item #146986)
Basic White Cardstock (item #159276)
Paper Butterfly Accents (item #162612)
Highland Heather Classic Ink Pad (item #147103)
Highland Heather Classic Ink Refill (item #147167)
Versamark Pad (item #102283)
Metallics Embossing Powders (item #155555)
Purple Fine Shimmer Gems (item #162611)
Clear Wink of Stella Glitter Brush (item #141897)
Measurements:
Lovely Lavender Kit
Crumb Cake Card Base - Cut at 1 1/4" & 4 1/4" from the score line down to the bottom (landscape orientation)
Score middle section at 2 1/8"
2 Purple Strips 
Purple Tag
Lost Lagoon Leaves
Basic White Cardstock 
2 Strips - 1" x 4 1/8"
Highland Heather Cardstock
Circle punched out with the 1 3/4" Circle Punch
Sentiment Label die cut with the Love of Spring Dies
To create this pretty fun fold, I chose to use one of the Crumb Cake card bases from the kit and cut the card front side at 1 1/4" & 4 1/4", from the score line down to the bottom (landscape orientation) to create three ]anels. I then scored the center panel at 2 1/8" and folded along the score line to create a mountain fold. I attached the two side panels to the bottom of the card base with adhesive and then added the decorative panels that I created by layering the purple strips from the kit onto strips of Basic White cardstock. For the focal panel, I took the purple decorative tag from the kit and adhered the bottom section to the bottom section of the center panel, making sure to not add any adhesive above the score line. For the butterfly die cut, I used Clear Wink of Stella with a drop of Highland Heather ink refill mixed together to create a watercolor wash look with soft shimmer to the die cut. I attached the butterfly to the 1 3/4" Highland Heather circle and then attached the Lost Lagoon leaves to the right top side, adhering them to the back of the circle. I then added the circle to the tag panel with Stampin' Dimensionals. For the sentiment, I heat embossed the image from the exclusive stamp set with Silver embossing powder onto Highland Heather cardstock and then die cut it out using one of the dies from the Love of Spring Dies. I attached the sentiment label to the center of the bottom of the card base, to create the stopper for the center panel. To finish off the design, I added several of the Purple Fine Shimmer Gems to add some pretty bling to the design. Isn't this a beautiful way to step up the designs in this card kit?
Thank you for taking the time to visit my blog. I hope that my alternative card design will help inspire you to explore all the wonderful possibilities with this kit. The designs are so beautiful and perfect for a variety of occasions. As a Paper Pumpkin subscriber, you can order the Love of Spring Dies from my Online Store, while supplies last. It's a great option to help you step up the designs in the January, February and March Kits as well as any of your other creative projects. 
Please take the time to visit with the Design Team by using the Roll Call List below to see their wonderful projects. I hope you will take a moment to leave us a comment and let us know what you liked about our projects. 

If you live in the U.S. and do not have a Stampin' Up! Demonstrator, please contact me and I would be happy to help you with your creative projects. You may also visit my Online Store to place your order and have it shipped to you. 

Until Next Time

Happy Stamping,

Tricia Butts
Independent Stampin' Up! Demonstrator

Like What You See? Visit My Online Store Here

Visit My Facebook Business Page for Updates & Ideas

Click here to Contact Me


Enjoy Some Springtime Creativity
With The February Sweet Springtime Kit
Click Below To Subscribe By February 10th

Explore Your Creativity In 2024
With The January-April 2024 Mini Catalog
Click Below To Shop Now

Sale-a-bration Is Here!
Earn Exclusive Free Products With A Qualifying Order
Click Below For Details


Friday, December 1, 2023

We Create December Blog Hop Merry Wishes

Let's start the month of December off with some Merry Wishes. This month the We Create Blog Hop will be sharing projects with the theme "Merry Wishes" to help you with your last minute holiday projects. I hope that you will inspired to get creative for the holiday season.
Today's Christmas card is another version of the Book Binding Fold I shared here last weekend. This time I chose more traditional Christmas colors, including the Joy of Christmas Designer Series Paper. I love the watercolor look of this beautiful paper and I chose to use Shaded Spruce for the card base and sentiment circle with a touch of Gold embossing. The ribbon is the Real Red & Gold Dotted Ribbon that is available from the Online Exclusives while supplies last. I thought it added a wonderful festive touch.
Products Used:
Very Best Occasions stamp set (item #159871)
Joy of Noel stamp set (item #161959)
 2 3/8" Circle Punch (item #161354)
Joy of Christmas Designer Series Paper (item #161958)
Shaded Spruce Cardstock (item #146981)
Basic White Cardstock (item #159276)
Versamark Pad (item #102283)
Metallic Embossing Powders (item #155555)
Festive Pearls (item #159963)
Real Red & Gold 3/8" Dotted Ribbon (item #162353)
Tear & Tape Adhesive (item #154031)
Stampin' Dimensionals (item #104430)
Measurements:
Shaded Spruce Cardstock 
Card Base - 4 1/4" x 11" (Scored at 5 1/2" & 6 3/4")
Sentiment Circle punched out with the 2 3/8" Circle Punch
Joy of Christmas Designer Series Paper
Front Panel - 4"x4"
Side Strip - 1" x 4"
Basic White Cardstock
Inside Layer - 4"x4"
I love how using different paper designs can transform a card into something completely differently. For this card design, I used the red and green print for the card front and the reverse wood grain side for the side panel. I love the botanical feel of these designs and how they looked with Shaded Spruce. To step up the design, I heat embossed the sentiment with Gold embossing to add a touch of elegance and the Real Red & Gold Dotted Ribbon adds a wonderful pop of color and texture to the design. For a touch of bling, I used the Red Festive Pearls to create the holly berries on the sentiment. 
Thank you for taking the time to visit my blog. I hope that my card design will help inspire you to create your own beautiful Christmas cards to send to family and friends to celebrate the season. There are so many wonderful possibilities to explore.
Now it's time to visit Libby's blog and see what she has to share with us. Just click on the Next button below to see her wonderful ideas. We would love it if you would leave us a comment and let us know what you liked about our projects. I hope you enjoy the rest of our blog hop.

Roll Call List

If you live in the U.S. and do not have a Stampin' Up! Demonstrator, please contact me and I would be happy to help you with your creative projects. You may also visit my Online Store to place your order and have it shipped to you. 

Until Next Time

Happy Stamping,

Tricia Butts
Independent Stampin' Up! Demonstrator

Like What You See? Visit My Online Store Here

Visit My Facebook Business Page for Updates & Ideas

Click here to Contact Me


Saturday, September 10, 2022

Stamping Inkspirations September Blog Hop Fun Folds Favorites

Welcome to the Stamping Inkspirations September Blog Hop as we share our favorite Fun Fold card designs with you all. Our wonderful Design Team Members will be sharing their beautiful projects and ideas to help inspire you to explore creating your own Fun Fold card designs.
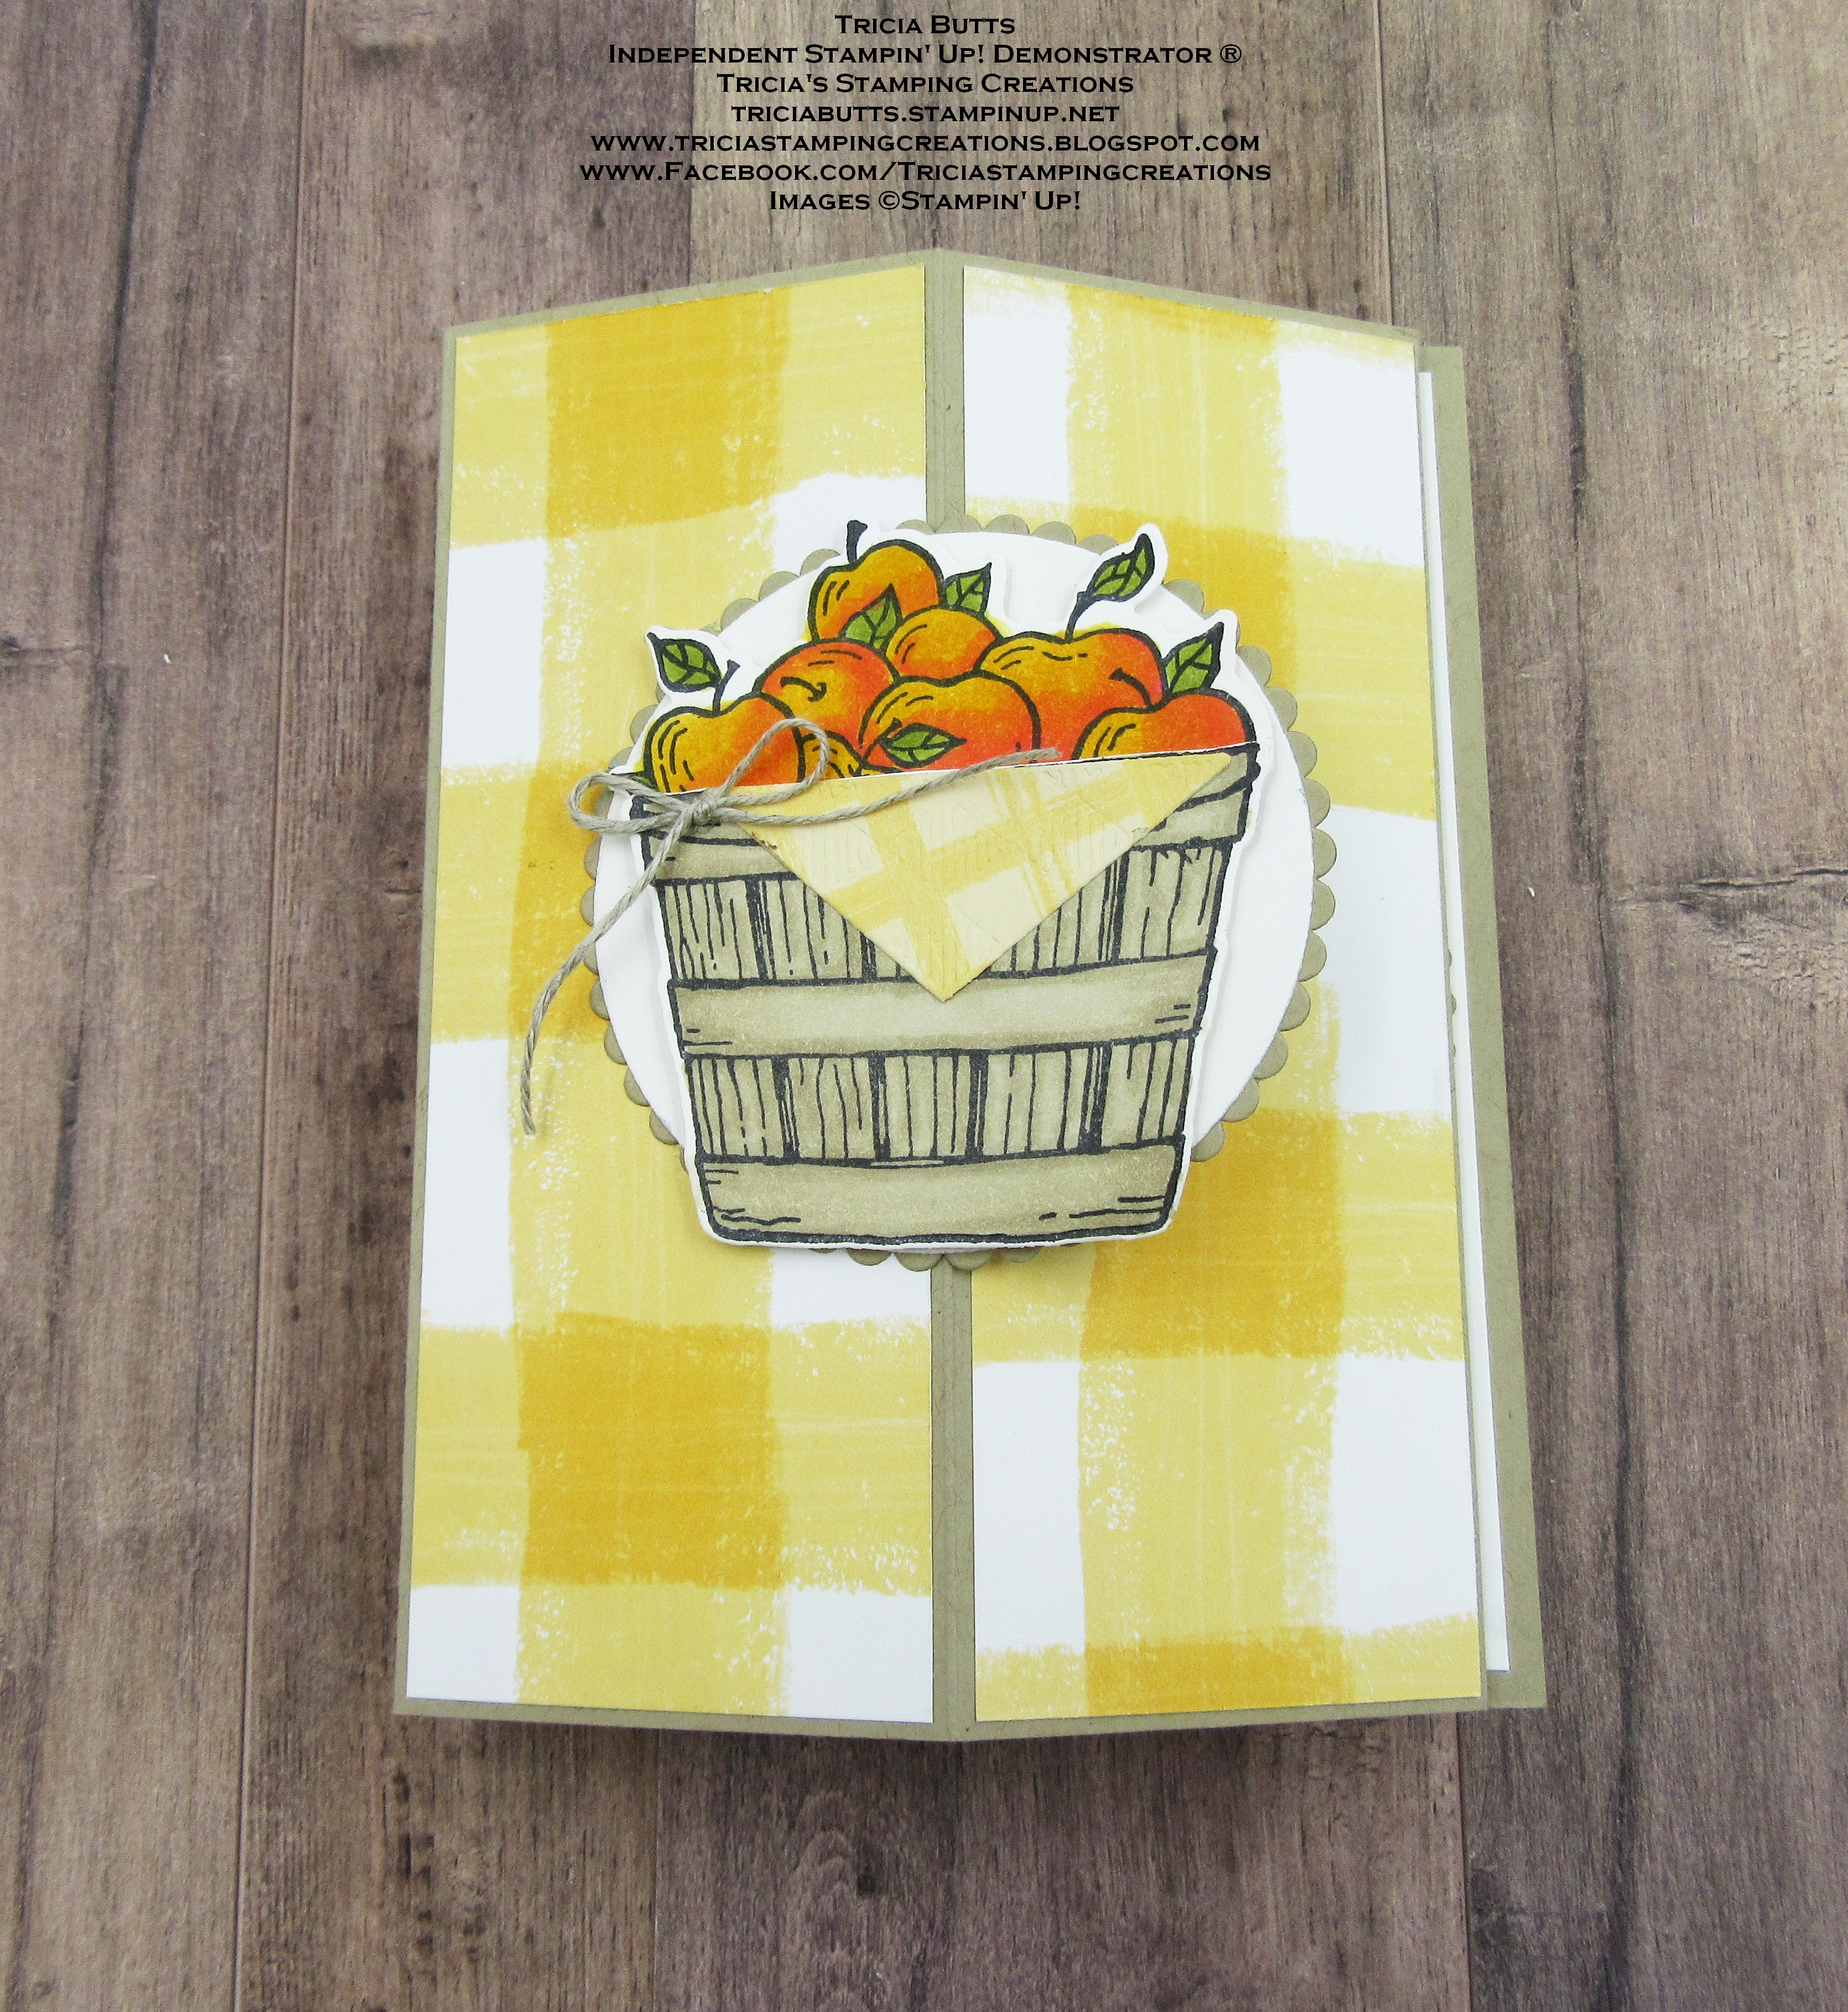
There are so many wonderful Fun Folds to choose from and I love exploring new ideas and techniques to create them. One of my favorite Fun Folds is the Easel card and I recently learned of a new twist from fellow Stampin' Up! Demonstrator, Susan Campfield, called the Vertical Easel card. So for today's Fun Fold design, I chose to create a Fall themed Vertical Easel card using the Cheerful Basket Bundle from the 2022-2023 Annual Catalog combined with the beautiful new Gingham Cottage Designer Series Paper in the July-December 2022 Mini Catalog. I love the warm muted colors of Fall and this was a fun card to design.
Products Used:
Cheerful Basket Bundle
Layering Circles Dies
Double Oval Punch
Gingham Cottage Designer Series Paper
Crumb Cake Cardstock
Old Olive Cardstock
Poppy Parade Cardstock
Basic White Cardstock 
Memento Tuxedo Black Pad
Soft Suede Classic Ink Pad
Crumb Cake Stampin' Blends Combo Pack
Old Olive Stampin' Blends Combo Pack
Poppy Parade Stampin' Blends Combo Pack
Daffodil Delight Stampin' Blends Combo Pack
Linen Thread
Measurements:
Crumb Cake Cardstock
Card Base 8 1/2" x 5 1/2" Scored at 2 1/8" and 4 1/4"
Large Scalloped Circle die cut with Layering Circles Dies
Basic White Cardstock
Large Circle die cut with Layering Circles Dies
Stamped and die cut basket and apples images using Cheerful Basket Bundle
Gingham Cottage Designer Series Paper
1 pieces - 2" x 5 3/8"
Small picnic triangle die cut with the Full Basket Dies
Old Olive Cardstock
4 leaves die cut with the Full Basket Dies
Poppy Parade Cardstock
3 apples die cut with the Full Basket Dies
I have often created Easel cards in the traditional layout but this was the first time that I had tried a vertical style version. I wanted to create a clean and simple Fall themed card and I just love the beautiful colors and designs in the new Gingham Cottage Designer Series Paper. For the focal image, I loved the idea of a basket full of apples that might have been just harvested from the local orchard. I colored the images with Stampin' Blends Markers to create the beautiful colors. The small picnic napkin that peeks out over the side of the basket, was die cut with one of the dies from the Cheerful Basket bundle and I chose to use the reverse side of the designer series paper that I used for the background of the card front panels. For the anchor on the inside of the card, I die cut some leaves and apples and attached them to the layered ovals that I punched out with the Double Oval Punch. I attached it to the right side of the inside panel using Stampin' Dimensionals to pop it up to give the front a place to rest against. I didn't add a sentiment to the front but instead stamped one on the inside of the card. I just love this alternative style for the Easel card and look forward to creating more of these in the future.
Thank you for taking the time to visit my blog. I hope that my card design will help inspire you to explore the wonderful world of Fun Folds and help you find your own favorites to create. 
Now it's time to visit Angie's wonderful blog and see what Fun Fold she has to share with us. Just click the Next button below to visit her blog or use the Roll Call List below to find your way. We would love it if you would leave us a comment and let us know what you liked about our projects. I hope you enjoy the rest of our blog hop. 

Roll Call List

If you live in the U.S. and do not have a Stampin' Up! Demonstrator, please contact me and I would be happy to help you with your creative projects. You may also visit my Online Store to place your order and have it shipped to you. 

Until Next Time

Happy Stamping,

Tricia Butts
Independent Stampin' Up! Demonstrator

Like What You See? Visit My Online Store Here

Visit My Facebook Business Page for Updates & Ideas

Click here to Contact Me


Weekly Deals Are Here During September
Available For A Limited Time
Click Below To View In My Online Store

Perfect Partners Exclusive Die Sets
Available Only While Supplies Last
Click Here For More Details


Friday, September 2, 2022

Global Stamping Friends September Blog Hop Fall Fun Folds

Welcome to the Global Stamping Friends September Blog Hop as we celebrate Fall with Fun Folds. You will be visiting with our talented Design Team members as they share their projects and ideas to help inspire you to create your own beautiful Fall projects.
Fall is just around the corner and I love the warm, muted colors of this season. For my Fun Fold, I decided to create a simple Easel Fold with the Kindest Gnomes Bundle and the beautiful Rustic Harvest Designer Series Paper. I love how versatile the gnomes are and how they can work for any season. This card design would work well for all occasions for people of all ages.
Products Used:
Kindest Gnomes Bundle (item #159626)
Tailor Made Tags Dies (item #155563)
Rustic Harvest Designer Series Paper (item #159633)
Cajun Craze Cardstock (item #119684)
Basic White Cardstock (item #159276)
Thick Basic White Cardstock (item #159229)
Memento Tuxedo Black Pad (item #132708)
Versamark Pad (item #102283)
Basics Embossing Powders (item #155554)
Pale Papaya Stampin' Blends Combo Pack (item #155519)
Calypso Coral Stampin' Blends Combo Pack (item #154881)
Cajun Craze Stampin' Blends Combo Pack (item #154879)
Soft Suede Stampin' Blends Combo Pack (item #154906)
Crumb Cake Stampin' Blends Combo Pack (item #154882)
Bronze/Ivory Stampin' Blends Combo Pack (item #154922)
Daffodil Delight Stampin' Blends Combo Pack (item #154883)
Linen Thread (item #104199)
Measurements:
Cajun Craze Cardstock
Card Base - 5 1/2" x 8 1/2" (Scored at 4 1/4". Cut at 1 1/4" and 4 1/4" from score line to bottom of card front. Score center panel at 2 1/8")
Sentiment Tag die cut with Tailor Made Tags Dies
Rustic Harvest Designer Series Paper
2 - 1" x 4" Strips (Side Panels)
2 - 1 7/8" x 2 3/4" Panels (For the center panels)
Basic White Cardstock
Inside Layer - 5 1/4" x 4'
Thick Basic White Cardstock
Stamped and die cut mushroom and gnome using Kindest Gnomes Bundle
This cute card design was so much fun to create and very simple to assemble. After cutting the card base and folding on the score lines, I attached the layer of Basic White Cardstock to the inside of the card base and then adhered the two side panels to the base of the card with adhesive. I then attached the two Rustic Harvest panels to decorate each side. For the center panel, I attached the two panels of designer series paper above and below the fold line to create the background. I stamped the mushroom and gnome images with Memento Tuxedo Black ink and colored them with Stampin' Blends Markers. I die cut them out with the coordinating dies. For the sentiment tag, I heat embossed the sentiment with White embossing powder and tied a simple bow with Linen Thread through the hole in the tag. I attached the tag to the base of the card with Stampin' Dimensionals to create the anchor point for the easel. To complete the card, I attached the mushroom to the bottom of the center panel on the left side and added the gnome with Stampin' Dimensionals on the right side. I love how this card turned out and the wonderful feeling of Fall with this color combination.
Thank you for taking the time to visit my blog. I hope that my card design help encourage to create your own wonderful Fun Folds to celebrate Fall. There are so many possibilities to explore. 


Now it's time to visit Jan's wonderful blog and see what beautiful Fall Fun Fold she has created for us. Just click the Next button below to visit her blog. We would appreciate it if you would leave us a comment and let us know what you liked about our projects. I hope you enjoy the rest of our blog hop. 


If you live in the U.S. and do not have a Stampin' Up! Demonstrator, please contact me and I would be happy to help you with your creative projects. You may also visit my Online Store to place your order and have it shipped to you. 

Until Next Time

Happy Stamping,

Tricia Butts
Independent Stampin' Up! Demonstrator

Like What You See? Visit My Online Store Here

Visit My Facebook Business Page for Updates & Ideas

Click here to Contact Me


Available While Supplies Last
Perfect Partners Exclusive Die Sets
Click Below For More Details

Weekly Deals Are Here During September
Available For A Limited Time
Click Below To Visit My Online Store