Showing posts with label Rustic Harvest Designer Series Paper. Show all posts

Tuesday, November 1, 2022

We Create November Blog Hop Thankful & Thinking of You

Welcome to the We Create November Blog Hop as we showcase projects with this month's theme of Thankful & Thinking of You. Our wonderful Design Team members will be sharing their projects and ideas to help inspire you to create your own beautiful creations to share with family and friends. 
Today I thought I would share a clean and simple Thinking of You card design featuring the new Framed Florets Dies from the Fitting Florets Collection. I paired them with the beautiful Rustic Harvest Designer Series Paper to create a Fall themed card that would work well as a masculine card design. The leaf focal image is from the Leaf Label & Amber Gem Combo Pack, which is currently out of stock, but should hopefully be available later this month. 
Products Used:
Very Best Occasions stamp set (item #159871)
Framed Florets Dies (item #160523)
Rustic Harvest Designer Series Paper (item #159633)
Early Espresso Cardstock (item #119686)
Brushed Metallic Cardstock (item #153524)
Versamark Pad (item #102283)
Metallics Embossing Powders (item #155555)
Leaf Label & Amber Gem Combo Pack (item #159969)
Linen Thread (item #104199)
Stampin' Dimensionals (item #104430)
Measurements:
Early Espresso Cardstock
Card Base - 8 1/2" x 5 1/2" (Scored at 4 1/4")
Large Detailed Frame & Inner Oval die cut with the Framed Florets Dies
Rustic Harvest Designer Series Paper
Card Front - 4 1/4" x 5 1/2"
Brushed Copper Metallic Cardstock
Medium Frame die cut with the Framed Florets Dies
One of my favorite things about the new Framed Florets Dies, is the way that the oval frames and inserts layer to create so many beautiful combinations. For this card design, I chose to use the largest detailed oval frame and added both the outer frame and the inner oval piece to the card front. I also die cut one of the medium oval frames using the Brushed Copper Metallic Cardstock and added it so that it created an inner frame to the design. For the focal image, I heat embossed the sentiment from the Very Best Occasions stamp set with Copper embossing powder onto the leaf die cut. I embellished it with several of the Amber Gems and a simple Linen Thread bow. I attached the leaf to the Early Espresso Oval with Stampin' Dimensionals to pop it up. I love the simplicity of this card design and the way the Copper accents help to step up the design. This card design would work well for a variety of occasions to send to family and friends.
Thank you for taking the time to visit my blog. I hope that my card design will help inspire you to create your own wonderful projects to share with the people you care about. The new Fitting Florets Collection has a wonderful assortment of products to help you get creative. 
Now it's time to visit Tanya's blog and see what she has to share with us this month. Just click on the Next button below to visit her blog. We would appreciate it if you would leave us a comment and let us know what you liked about our projects. I hope you enjoy the rest of our blog hop. 


If you live in the U.S. and do not have a Stampin' Up! Demonstrator, please contact me and I would be happy to help you with your creative projects. You may also visit my Online Store to place your order and have it shipped to you.

Until Next Time

Happy Stamping,

Tricia Butts
Independent Stampin' Up! Demonstrator

Like What You See? Visit My Online Store Here

Visit My Facebook Business Page for Updates & Ideas

Click here to Contact Me


Add A Touch Of Elegance To Your Projects
With The Fitting Florets Collections Available For A Limited Time
Click Below To View On My Online Store

Get Creative For The Holidays
With The July-December 2022 Mini Catalog
Click Below To Visit My Online Store


Tuesday, October 11, 2022

ICS October Blog Hop My Favorite Punch

Welcome to the ICS October Blog Hop as we showcase our favorite punches currently available from Stampin' Up! Our wonderful Design Team members will be sharing their projects and ideas to help inspire you to explore the wide variety of punches that Stampin' Up! has available in their current catalogs. 
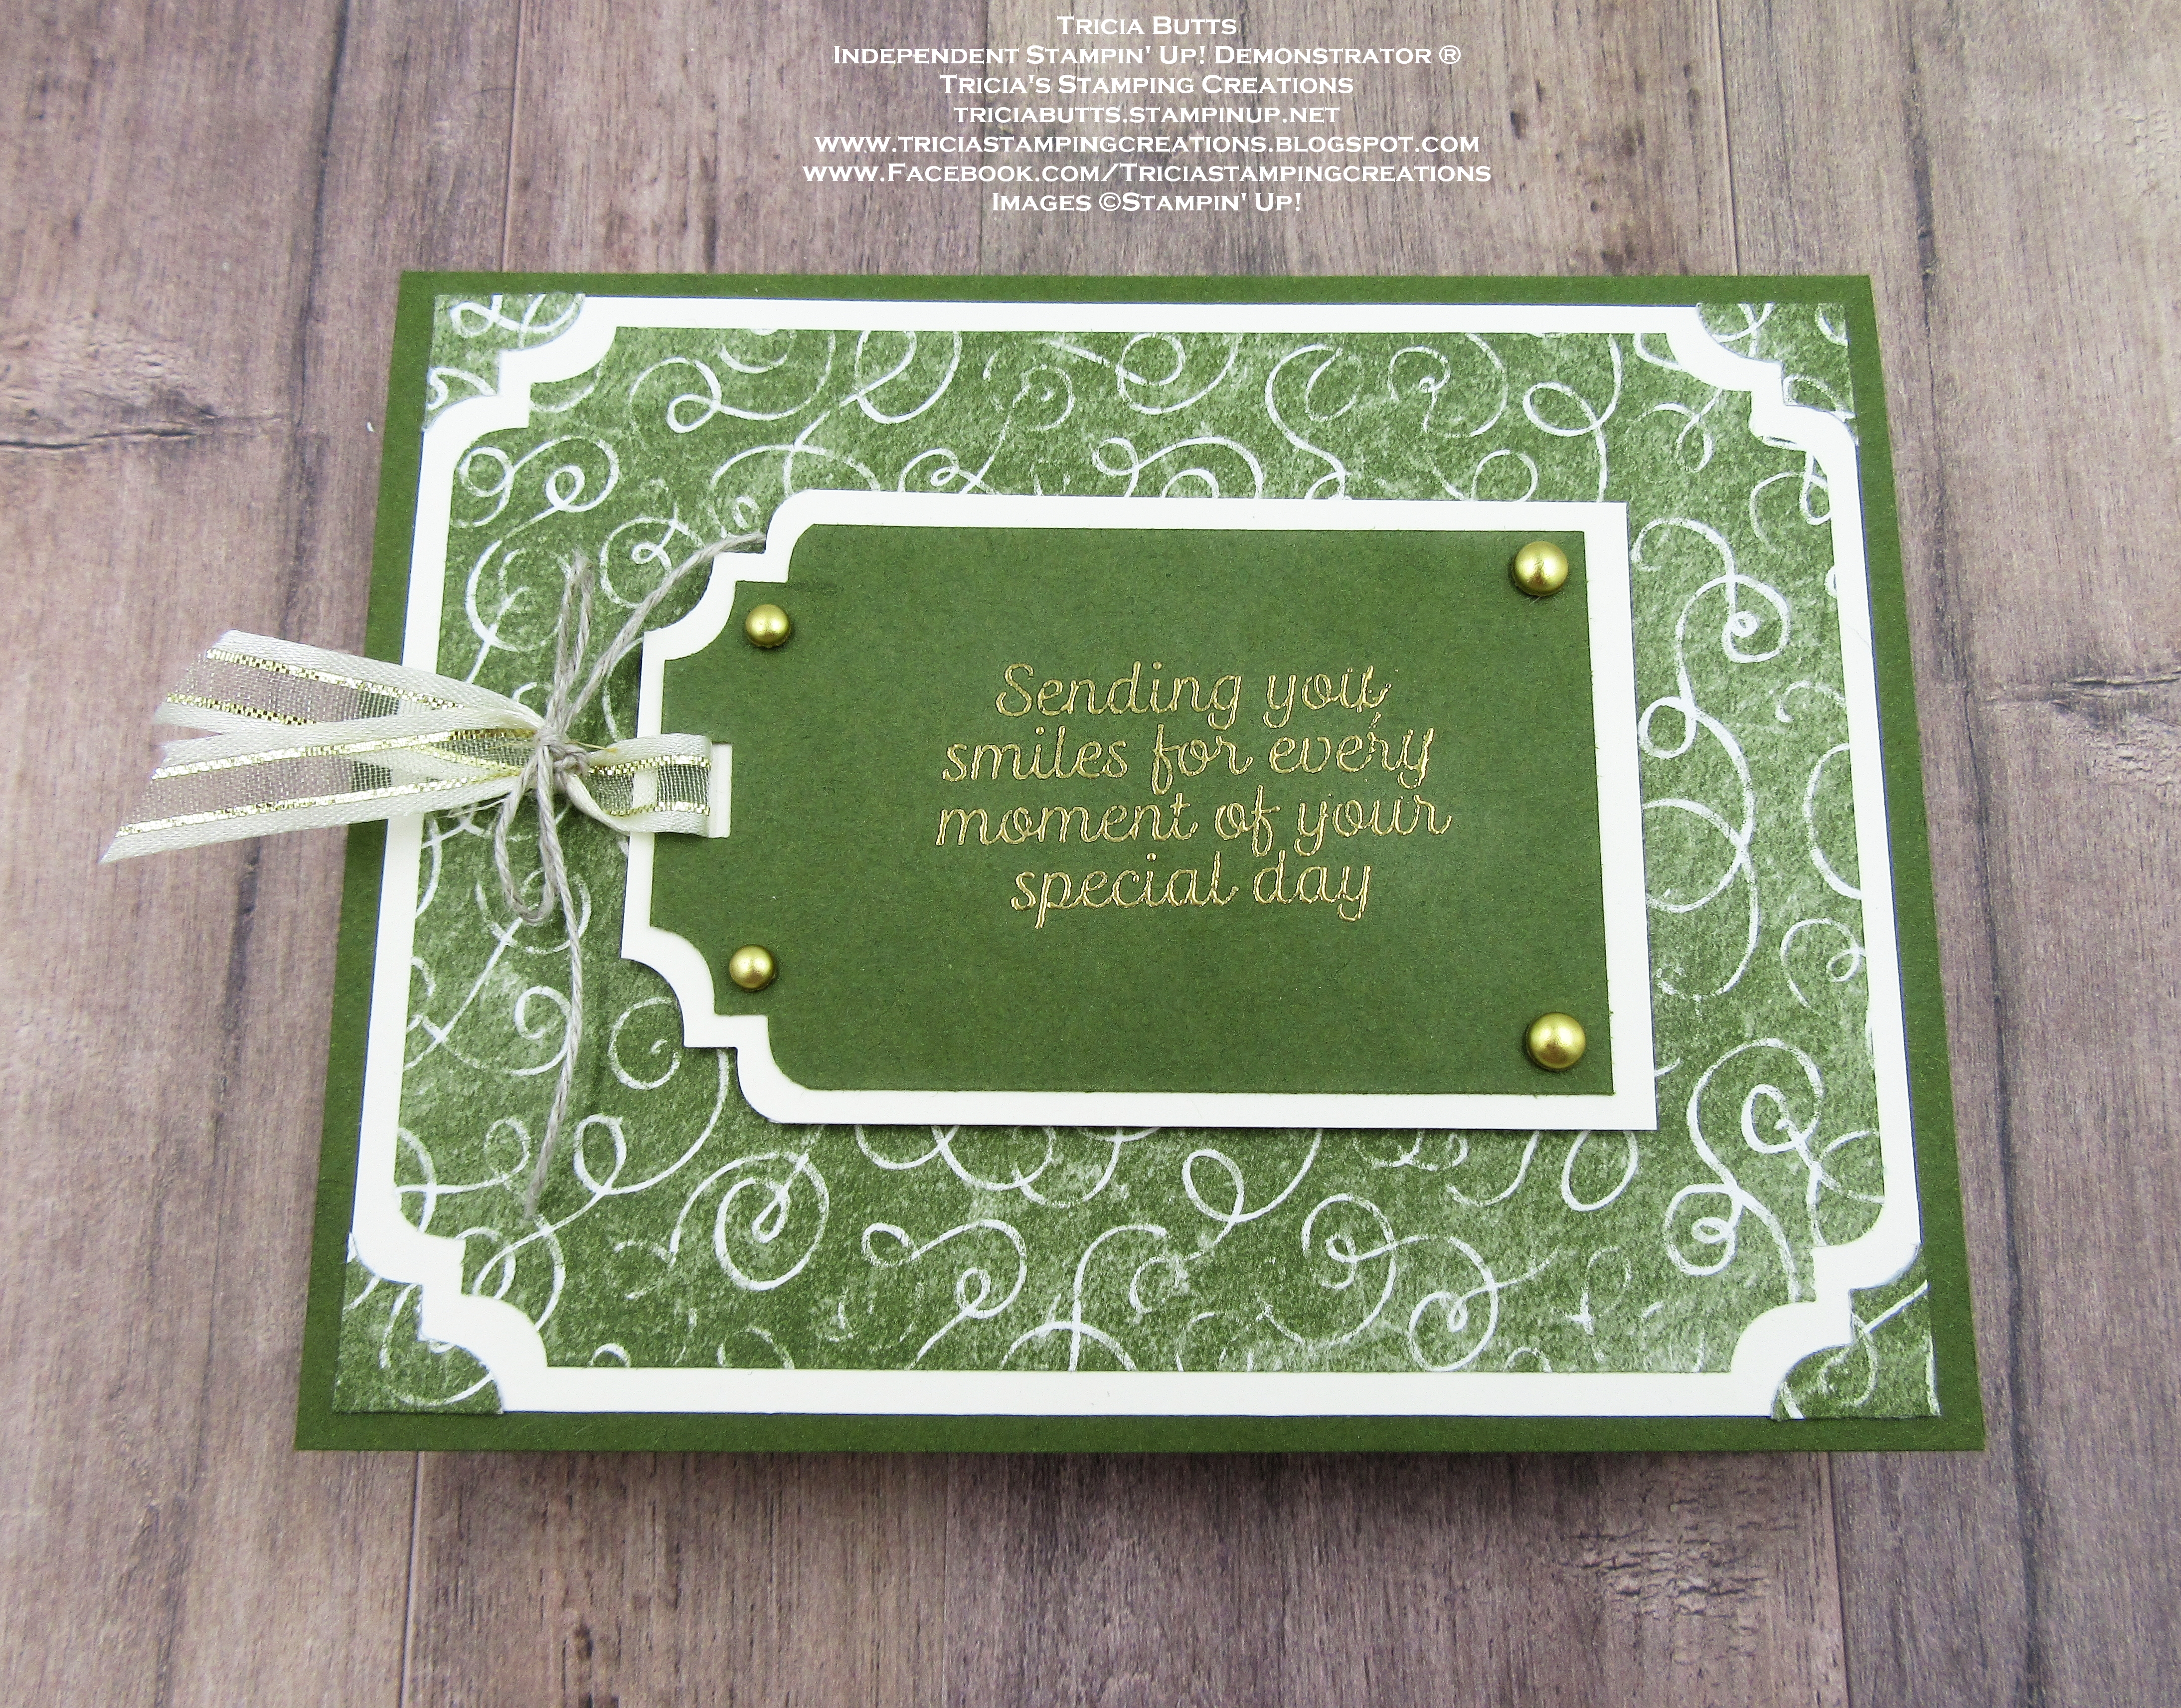
Often when I get asked "What is my favorite (product)?", I struggle to answer, because I have so many favorites. So when I had to choose my favorite punch, I actually chose a punch that I had just received, because at the moment, it is my new favorite. The Very Best Trio Punch is in the July-December 2022 Mini Catalog and I ordered it as part of the Very Best Occasions Bundle. I love how versatile this punch is and I have been exploring new ways to use it to create my projects. For my card design today, I chose to use it as a decorative edge for my card front as well as to create my sentiment tag. As you can see from this clean and simple design, I was able to step up the look of this card by using two out of the three options available with this punch.
Products Used:
Very Best Occasions Bundle (item #159879)
includes the Very Best Trio Punch (item #159878)
Rustic Harvest Designer Series Paper (item #159633)
Mossy Meadow Cardstock (item #133676)
Very Vanilla Cardstock (item #101650)
Versamark Pad (item #102283)
Metallics Embossing Powders (item #155555)
Brushed Metallic Adhesive Backed Dots (item #156506)
Gold 3/8" Satin Edged Ribbon (item #159555)
Linen Thread (item #104199)
Stampin' Dimensionals (item #104430)
Measurements:
Mossy Meadow Cardstock
Card Base - 8 1/2" x 5 1/2" (Scored at 4 1/4")
Sentiment Tag - 2" x 3 1/4"
Very Vanilla Cardstock
Layer 1 - 5 1/4" x 4"
Sentiment Matte Layer - 2 1/4" x 3 1/2"
Rustic Harvest Designer Series Paper
Card Front - 5" x 3 3/4"
This clean and simple all occasion card design, is easy to create using the Very Best Trio Punch. To create the background layer, I used the decorative edge of the punch to punch the corners of the designer series paper layer. I trick to remember with this punch, is that to mimic the same design of the punch on all corners, you should punch the first corner (top left) and then flip the paper over to punch the other side (top right). Then flip the paper back over and repeat for the remaining two corners. Make sure to keep all four of the "corners" to complete the design. The next step is to adhere the designer series paper corners to each of the corners of the Very Vanilla cardstock layer. Once they are in place, you can then attach the larger piece in the center, lining it up so that there is an even border around the edge with the Very Vanilla cardstock. This creates the decorative border for the card design. For the sentiment tag, I heat embossed the sentiment from the Very Best Occasions stamp set with Gold embossing powder onto the Mossy Meadow sentiment label that I had created using the punch. Using a piece of Gold Satin Edged Ribbon, I threaded it through the Very Vanilla cardstock matte layer and then through the Mossy Meadow sentiment label (from back to front) and tied a piece of Linen Thread around the base of the ribbon into a bow. I then attached the Mossy Meadow label to the Very Vanilla matte layer to create a border around the edge. To complete the card design, I attached the sentiment label to the card front with Stampin' Dimensionals and added several Gold Brushed Metallic Adhesive Dots to coordinate with the embossing. This card design can be used for a variety of occasions and is a wonderful way to step up a basic card design with minimal supplies.
Thank you for taking the time to visit my blog. I hope that my card design will help inspire you to try using punches to create your own beautiful projects. Whether you are new to paper crafting or a more experienced crafter, punches are a wonderful way to help step up your projects. 
Now it's time to visit Joni's Blog and see what she has created with her favorite punch. Just click the Next button below to visit her blog. We would appreciate it if you would leave us a comment and let us know what you liked about our projects. I hope you enjoy the rest of our blog hop. 


If you live in the U.S. and do not have a Stampin' Up! Demonstrator, please contact me and I would be happy to help you with your creative projects. You may also visit my Online Store to place your order and have it shipped to you. 

Until Next Time

Happy Stamping,

Tricia Butts
Independent Stampin' Up! Demonstrator

Like What You See? Visit My Online Store Here

Visit My Facebook Business Page for Updates & Ideas

Click here to Contact Me


Get Creative For The Holidays
With The July-December 2022 Mini Catalog
Click Below To Visit My Online Store


Tuesday, September 13, 2022

Inspire. Create. Share. September Blog Hop My Favorite Designer Series Paper

Welcome to the Inspire. Create. Share. September Blog Hop as we showcase our favorite designer series paper, currently available in the 2022-2023 Annual Catalog and July-December 2022 Mini Catalog. We will sharing projects and ideas to help inspire you to explore the many wonderful designs available. 
There are so many wonderful designer series paper designs to choose from, which makes it difficult to pick just one as a favorite. For today's card design, I chose to use one of my new favorites from the July-December 2022 Mini Catalog, the Rustic Harvest Designer Series Paper, which is perfect as we transition into Fall. The beautiful designs and warm colors provide wonderful backgrounds and focal designs for projects and I have chosen one of the designs that is perfect for creating clean and simple cards. 
Products Used:
Peaceful Moments stamp set (item #151595)
Painted Labels Dies (item #151605)
Rustic Harvest Designer Series Paper (item #159633)
Mossy Meadow Cardstock (item #133676)
Basic White Cardstock (item #159276)
Versamark Pad (item #102283)
Metallics Embossing Powders (item #155555)
Brushed Metallic Adhesive Backed Dots (item #156506)
Glitter Washi Tape (item #159973)
Measurements:
Mossy Meadow Cardstock
Card Base - 8 1/2" x 5 1/2" (Scored at 4 1/4")
Sentiment Label die cut with the Painted Labels Dies
Basic White Cardstock
Strip approx. 1/2" x 3" covered with 2 strips of Pumpkin Pie Glitter Washi Tape & die cut with the Painted Labels Dies
This beautiful Fall card focuses on the wonderful floral design of the designer series paper as the background and focal image for the design. I chose to use Mossy Meadow cardstock for the card base and coordinating sentiment label. The sentiment image has been heat embossed with Gold embossing powder and I chose to use several of the small Brushed Metallic Adhesive Backed Dots in each of the corners to embellish the label. For a touch of sparkle and color, I die cut a detailed border using the Painted Labels Dies. To create this border, I layered two pieces of the Pumpkin Pie Glitter Washi Tape side by side on a strip of Basic White cardstock and then die cut it to create the detailed edge. I thought the Pumpkin Pie Glitter Washi Tape coordinated beautifully with one of the flowers in the background to finish off the design. This card layout can be used for a variety of occasions and I love the wonderful sentiments in the Peaceful Moments stamp set that work well with this pretty paper. The Peaceful Moments stamp set is just one of the stamp sets that will be on sale September 15th as part of the 24 Hour Stamp Sale.  
Thank you for taking the time to visit my blog. I hope that my card design will help inspire you to create your own beautiful projects with your favorite designer series paper. There are so many wonderful designs to choose from, suitable for a variety of occasion throughout the year. 
Now it's time to visit Deb's wonderful blog to see what designer series paper she has chosen to share. Just click on the Next button below to visit her blog. We would love it if you would leave us a comment and let us know what you liked about our projects. I hope you enjoy the rest of our blog hop. 


If you live in the U.S. and do not have a Stampin' Up! Demonstrator, please contact me and I would be happy to help you with your creative projects. You may also visit my Online Store to place your order and have it shipped to you. 

Until Next Time

Happy Stamping,

Tricia Butts
Independent Stampin' Up! Demonstrator

Like What You See? Visit My Online Store Here

Visit My Facebook Business Page for Updates & Ideas

Click here to Contact Me


Coming September 15th Only
Save 15% off Select Stamp Sets 
From The 2022-2023 Annual Catalog
Click Below To View The List Of Stamp Sets On Sale

Perfect Partners Exclusive Die Sets
Available Only While Supplies Last
Click Below For More Details

Weekly Deals Are Here During September
Available For A Limited Time
Click Below To Visit My Online Store


Friday, September 2, 2022

Global Stamping Friends September Blog Hop Fall Fun Folds

Welcome to the Global Stamping Friends September Blog Hop as we celebrate Fall with Fun Folds. You will be visiting with our talented Design Team members as they share their projects and ideas to help inspire you to create your own beautiful Fall projects.
Fall is just around the corner and I love the warm, muted colors of this season. For my Fun Fold, I decided to create a simple Easel Fold with the Kindest Gnomes Bundle and the beautiful Rustic Harvest Designer Series Paper. I love how versatile the gnomes are and how they can work for any season. This card design would work well for all occasions for people of all ages.
Products Used:
Kindest Gnomes Bundle (item #159626)
Tailor Made Tags Dies (item #155563)
Rustic Harvest Designer Series Paper (item #159633)
Cajun Craze Cardstock (item #119684)
Basic White Cardstock (item #159276)
Thick Basic White Cardstock (item #159229)
Memento Tuxedo Black Pad (item #132708)
Versamark Pad (item #102283)
Basics Embossing Powders (item #155554)
Pale Papaya Stampin' Blends Combo Pack (item #155519)
Calypso Coral Stampin' Blends Combo Pack (item #154881)
Cajun Craze Stampin' Blends Combo Pack (item #154879)
Soft Suede Stampin' Blends Combo Pack (item #154906)
Crumb Cake Stampin' Blends Combo Pack (item #154882)
Bronze/Ivory Stampin' Blends Combo Pack (item #154922)
Daffodil Delight Stampin' Blends Combo Pack (item #154883)
Linen Thread (item #104199)
Measurements:
Cajun Craze Cardstock
Card Base - 5 1/2" x 8 1/2" (Scored at 4 1/4". Cut at 1 1/4" and 4 1/4" from score line to bottom of card front. Score center panel at 2 1/8")
Sentiment Tag die cut with Tailor Made Tags Dies
Rustic Harvest Designer Series Paper
2 - 1" x 4" Strips (Side Panels)
2 - 1 7/8" x 2 3/4" Panels (For the center panels)
Basic White Cardstock
Inside Layer - 5 1/4" x 4'
Thick Basic White Cardstock
Stamped and die cut mushroom and gnome using Kindest Gnomes Bundle
This cute card design was so much fun to create and very simple to assemble. After cutting the card base and folding on the score lines, I attached the layer of Basic White Cardstock to the inside of the card base and then adhered the two side panels to the base of the card with adhesive. I then attached the two Rustic Harvest panels to decorate each side. For the center panel, I attached the two panels of designer series paper above and below the fold line to create the background. I stamped the mushroom and gnome images with Memento Tuxedo Black ink and colored them with Stampin' Blends Markers. I die cut them out with the coordinating dies. For the sentiment tag, I heat embossed the sentiment with White embossing powder and tied a simple bow with Linen Thread through the hole in the tag. I attached the tag to the base of the card with Stampin' Dimensionals to create the anchor point for the easel. To complete the card, I attached the mushroom to the bottom of the center panel on the left side and added the gnome with Stampin' Dimensionals on the right side. I love how this card turned out and the wonderful feeling of Fall with this color combination.
Thank you for taking the time to visit my blog. I hope that my card design help encourage to create your own wonderful Fun Folds to celebrate Fall. There are so many possibilities to explore. 


Now it's time to visit Jan's wonderful blog and see what beautiful Fall Fun Fold she has created for us. Just click the Next button below to visit her blog. We would appreciate it if you would leave us a comment and let us know what you liked about our projects. I hope you enjoy the rest of our blog hop. 


If you live in the U.S. and do not have a Stampin' Up! Demonstrator, please contact me and I would be happy to help you with your creative projects. You may also visit my Online Store to place your order and have it shipped to you. 

Until Next Time

Happy Stamping,

Tricia Butts
Independent Stampin' Up! Demonstrator

Like What You See? Visit My Online Store Here

Visit My Facebook Business Page for Updates & Ideas

Click here to Contact Me


Available While Supplies Last
Perfect Partners Exclusive Die Sets
Click Below For More Details

Weekly Deals Are Here During September
Available For A Limited Time
Click Below To Visit My Online Store