Showing posts with label Timber 3D Embossing Folder. Show all posts

Wednesday, August 17, 2022

New At SU August Blog Hop Fun Folds For Fall

 
Welcome to the New At SU August Blog Hop as we showcase Fun Folds for Fall. Our wonderful Design Team members will be sharing their ideas and projects to help you get ready for the new season with amazing fun folds. 
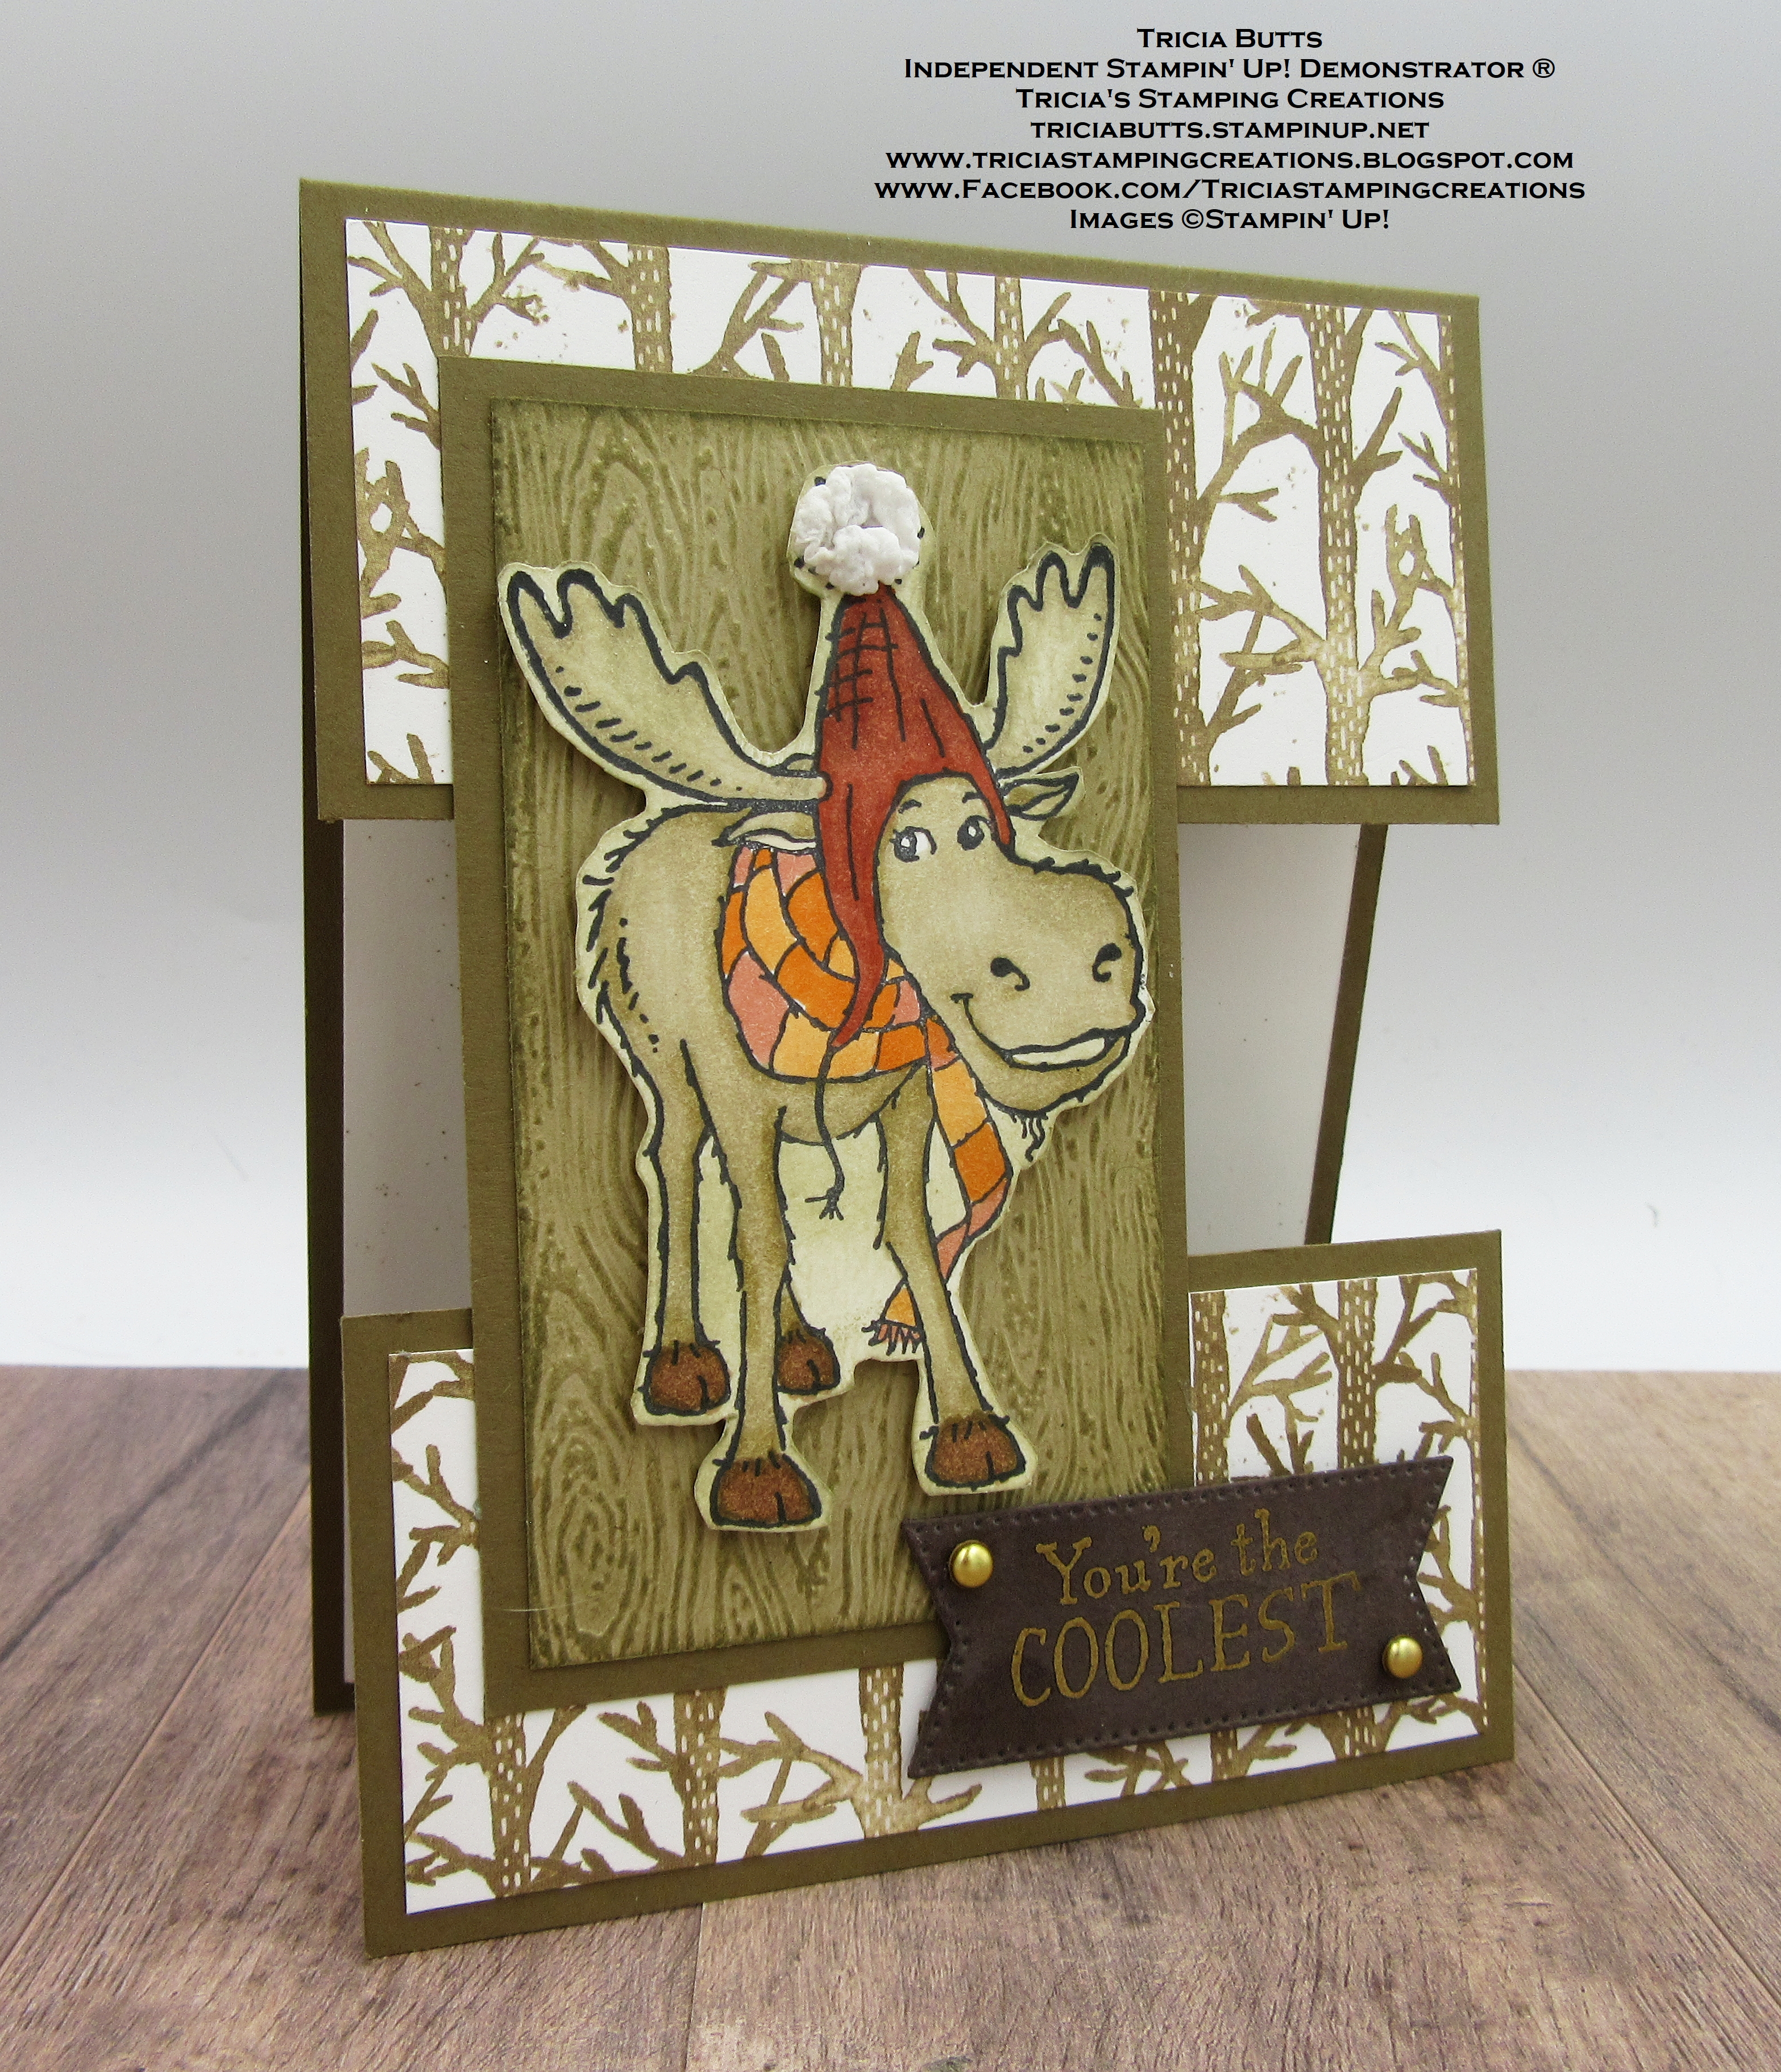
For my fun fold, I chose to create the Split Panel Fun Fold (also called the Open Panel Fun Fold) using the moose image from the All Bundled Up stamp set. There was just something about this adorable guy that made me think of Fall walks in the mountains and he was so much fun to color with Stampin' Blends Markers. For the background panels, I used one of the designs from the Rings of Love Designer Series Paper, which you can earn free with a qualifying order during Sale-a-bration. This card design would work well for a variety of occasions and I think would also be a fun masculine card design. 
Products Used:
All Bundled Up stamp set (item #159824)
Rings of Love Designer Series Paper (item #159939) Sale-a-bration Reward
Stylish Shapes Dies (item #159183)
Timber 3D Embossing Folder (item #156406)
Soft Suede Cardstock (item #115318)
Crumb Cake Cardstock (item #120953)
Early Espresso Cardstock (item #119686)
Basic White Cardstock (item #159276)
Crumb Cake Classic Ink Pad (item #147116)
Memento Tuxedo Black Pad (item #132708)
Versamark Pad (item #102283)
Metallics Embossing Powders (item #155555)
Crumb Cake Stampin' Blends Combo Pack (item #154882)
Soft Suede Stampin' Blends Combo Pack (item #154906)
Pumpkin Pie Stampin' Blends Combo Pack (item #154897)
Cajun Craze Stampin' Blends Combo Pack (item #154879)
Bronze/Ivory Stampin' Blends Combo Pack (item #154922)
Brushed Metallic Adhesive Backed Dots (item #156506)
Snowfall Accents Puff Paint (item #150691)
Sponge Daubers (item #133773)
Mini Stampin' Dimensionals (item #144108)
Measurements:
Soft Suede Cardstock 
Card Base - 4 1/4" x 7 1/2" (Scored at 5 1/2")
Bottom Panel - 4 1/4" x 2"
Center Panel - 4 1/4" x 2 1/2"
Rings Of Love Designer Series Paper
2 Panels - 4" x 1 3/4"
Crumb Cake Cardstock
Center Background Panel - 2 1/4" x 4" Embossed with the Timber 3D Embossing Folder
Basic White Cardstock
Inside Layer - 5 1/4" x 4"
Piece for stamped image of Moose, fussy cut
Early Espresso Cardstock
Sentiment Label die cut with the Stylish Shapes Dies
To create this fun fold design, I added the designer series paper panels to the top section of the Soft Suede card base and the bottom panel. Before assembling, I added the Basic White cardstock layer to the inside of the card to make it easier to line up the bottom panel for the front of the card. I lined up the bottom panel level with the bottom of the card base and attached the center Soft Suede panel to the top of the card base and the bottom card panel. This creates the open or split panel for the card base. To complete the card, I added the embossed layer of Crumb Cake cardstock (that I sponged with Crumb Cake to bring out the embossed details) to the center panel. The colored and fussy cut moose is then attached to this panel with Mini Stampin' Dimensionals and I added Snowfall Accents Puff Paint to the top of the hat and heat set it with my Heat Tool to puff up the paint to create a fun pom-pom. For the sentiment label, I heat embossed the image onto the Early Espresso label with Gold Embossing Powder and added two of the Gold Brushed Metallic Adhesive Backed Dots to finish off the design. I just love how this card turned out and how this simple fun fold steps up the design. 
Thank you for taking the time to visit my blog. I hope that my card design will help inspire you to create your own fun folds to celebrate Fall. Stampin' Up! has so many wonderful products to help spark your creativity. 
Please take the time visit with our wonderful Design Team members by using the Roll Call List below. We would love it if you would leave us a comment and let us know what you liked about our projects. I hope you enjoy our blog hop. 

If you live in the U.S. and do not have a Stampin' Up! Demonstrator, please contact me and I would be happy to help you with your creative projects. You may also visit my Online Store to place your order and have it shipped to you. 

Until Next Time

Happy Stamping,

Tricia Butts
Independent Stampin' Up! Demonstrator

Like What You See? Visit My Online Store Here

Visit My Facebook Business Page for Updates & Ideas

Click here to Contact Me


Time is Running Out
To Take Advantage Of Sale-a-Bration
Click Below For More Details

Get Creative For The Holidays
With The July-December 2022 Mini Catalog
Click Below To Visit My Online Store


Saturday, August 28, 2021

Ink. Stamp. Share. August Monthly Blog Hop July-December 2021 Mini Catalog

Welcome to the Ink. Stamp. Share Monthly Blog Hop and this month we are showcasing products from the new July-December 2021 Mini Catalog. You will be visiting with talented  Stampin' Up! Demonstrators from around the world as they share their ideas and projects to help inspire you. There are so many amazing new products to help you get ready for the upcoming seasons and holidays. 
The July-December 2021 Mini Catalog is one of my favorites because it is full of wonderful products to help us create for the holidays and the upcoming Autumn and Winter seasons. Soon the leaves will be changing here in Colorado and I love the warm, earthy colors of Fall. Today I am sharing this beautiful Fall themed card featuring the Gorgeous Leaves Bundle paired with the Timber 3D Embossing Folder, which adds amazing texture to the background. While I created this card design with Thanksgiving in mind, it could be used for a variety of occasions and would make a great masculine card design. 
Products Used:
Gorgeous Leaves Bundle (item #158609)
Timber 3D Embossing Folder (item #156406)
Through It Together stamp set (item #155796)
Scalloped Contour Dies (item #155560)
Soft Suede Cardstock (item #115318)
Cinnamon Cider Cardstock (item #153078)
Pear Pizzazz Cardstock (item #131201)
Very Vanilla Cardstock (item #101650)
Copper Foil Sheets (item #142020)
Soft Suede Classic Ink Pad (item #147115)
Cinnamon Cider Classic Ink Pad (item #153114)
Pear Pizzazz Classic Ink Pad (item #147104)
Gold Fine Art Floral 3/8" Ribbon (item #154561)
Linen Thread (item #104199)
Stampin' Dimensionals (item #104430)
Mini Glue Dots (item #103683)
Measurements:
Soft Suede Cardstock
Card Base - 8 1/2" x 5 1/2" (Scored at 4 1/4")
Long detailed leaf die cut with the Intricate Leaves Dies 
(in the Gorgeous Leaves Bundle)
Cinnamon Cider Cardstock
Card Front - 5 1/4" x 4" Embossed with the Timber 3D 
Embossing Folder
Very Vanilla Cardstock
Scalloped Rectangle die cut with the Scalloped Contour Dies
Pear Pizzazz Cardstock
Small detailed leaf die cut with the Intricate Leaves Dies 
(in the Gorgeous Leaves Bundle)
Copper Foil Sheet
Detailed large leaf die cut with the Intricate Leaves Dies 
(in the Gorgeous Leaves Bundle)
The secret to this Fall card is the texture and layers that help to build the design. I used the new Timber 3D Embossing Folder from the July-December 2021 Mini Catalog to add texture to the Cinnamon Cider card front layer and attached it to the Soft Suede card base. For the Very Vanilla scalloped rectangle, I stamped the background using the large and small dotty background images. I used Cinnamon Cider Classic ink for the large image in the center and then layered the smaller image with Pear Pizzazz and Soft Suede Classic inks to create a colorful background design. I stamped the sentiment from the Through It Together stamp set with Soft Suede Classic ink, towards to the bottom of the rectangle. I attached the scalloped rectangle to the center of the card front with Stampin' Dimensionals. To create the focal design, I attached a piece of the Fine Art Ribbon to the scalloped rectangle, in a zig zag pattern, over the stamped background. I added the three leaves on top of the ribbon, layering them so that the stems intertwined at the base. I added a small bow created with Linen Thread to the base of the stems with a Mini Glue Dot. Despite all the layering, this card design is relatively flat and is suitable for mailing without extra postage. I love how this card design captures the feeling of Autumn.  
Thank you for taking the time to visit my blog. I hope that my card design will help inspire you to create your own beautiful Fall projects to welcome the new season. There are so many wonderful options to explore in the July-December 2021 Mini Catalog.
Now it's time to visit Mo's wonderful blog and see what she has chosen to showcase for our blog hop. Just click the Next button below to visit her blog or use the Roll Call List to find your way. Please leave us a comment and let us know what you enjoyed about our projects. We appreciate your feedback. I hope you enjoy the rest of our blog hop.

Roll Call
If you live in the U.S. and do not have a Stampin' Up! Demonstrator, please contact me and I would be happy to help you with your creative projects. You may also visit my Online Store to place your order and have it shipped to you.

Until Next Time

Happy Stamping,

Tricia Butts
Independent Stampin' Up! Demonstrator

Like What You See? Visit My Online Store Here

Visit My Facebook Business Page for Updates & Ideas

Click here to Contact Me


Earn Exclusive Free Products

During Sale-a-bration

Click Below For More Details


Explore Your Creativity
With The July-December 2021 Mini Catalog
Click Below To Visit My Online Store

Celebrate Fall
With The Haunts & Harvest September Paper Pumpkin Kit
Click Below To Subscribe By September 10th


Tuesday, August 10, 2021

Punch Techniques Blog Hop

Welcome to the Technique Tuesday Blog Hop and this month our theme is Punches. Hop along with us as we share ideas and techniques to help you incorporate punches into your projects. 
For my card design today, I wanted to show how you can create "windows" to frame focal elements and sentiments to step up your card design. I chose to use the Label Me Lovely Punch to create an opening that would frame a daisy created with the Medium Daisy Punch and an opening created with the Tailored Tag Punch for the sentiment. The color combination I chose was Fresh Freesia, Gray Granite and Basic White for a touch of Gold with the embellishments. The detailed background was created with the new Timber 3D Embossing Folder in the new July-December 2021 Mini Catalog.
Products Used:
Pansy Patch stamp set (item #154999)
Timber 3D Embossing Folder (item #156406)
Label Me Lovely Punch (item #151296)
Medium Daisy Punch (item #149517)
Tailored Tag Punch (item #145667)
Fresh Freesia Cardstock (item #155613)
Gray Granite Cardstock (item #146983)
Basic White Cardstock (item #159276)
Fresh Freesia Classic Stamp Pad (item #155611)
Gilded Gems (item #152478)
Stampin' Dimensionals (item #104430)
Measurements:
Fresh Freesia Cardstock
Card Base - 8 1/2" x 5 1/2" (Scored at 4 1/4")
Two medium daisies punched with the Medium Daisy Punch
Basic White Cardstock
Layer 1 - 5 1/4" x 4"
Gray Granite Cardstock
Layer 2 - 5" x 3 3/4" Embossed with the Timber 3D Embossing Folder
This fun card design is a great way to use your punches. To create the windows, I punched out an opening from the top of the embossed Gray Granite cardstock using the Label Me Lovely Punch and then punched an opening from the bottom using the Tailored Tag Punch. I attached the Basic White cardstock layer to the Fresh Freesia card base and then added the embossed Gray Granite layer to the Basic White layer with Stampin' Dimensionals to pop it up. For the daisy, I punched out two medium size daisies from Fresh Freesia cardstock and I sponged the petals with Fresh Freesia Classic ink. I layered the two daisies, attaching them together with Mini Glue Dots and attached the daisy to the center of the top window with a Stampin' Dimensional. I stamped the Happy Birthday sentiment from the Pansy Patch stamp set in the center of the bottom window using Fresh Freesia Classic ink. To add a touch of bling, I added a large Gilded Gem to the center of the daisy and two small Gilded Gems to the sentiment window to complete the design. I love that the windows protect the daisy and the Gilded Gems so that it can be mailed to a family member or friend to celebrate their special day. 
Thank you for taking the time to visit my blog. I hope that my card design will give you some ideas to help inspire you to use punches in your projects. There are so many wonderful ways to use them. 
Now it's time to visit with the talented Stampin' Up! Demonstrators taking part in today's Blog Hop. Just click the links in the Roll Call List below to see all the amazing projects and ideas they have to share. We would love it if you would leave us a comment and let us know what you enjoyed about our projects.

If you live in the U.S. and do not have a Stampin' Up! Demonstrator, please contact me and I would be happy to help you with your creative projects. You may also visit my Online Store to place your order and have it shipped to you. 

Until Next Time

Happy Stamping,

Tricia Butts
Independent Stampin' Up! Demonstrator

Like What You See? Visit My Online Store Here

Visit My Facebook Business Page for Updates & Ideas

Click here to Contact Me


Earn Free Exclusive Products
During Sale-a-bration
Click Below For More Details

Explore Your Creativity
With The July-December 2021 Mini Catalog
Click Below To Visit My Online Store

Last Day To Sign Up
For The August Paper Pumpkin Kit
Click Below To Subscribe by 11:59pm Mountain Time