Christmas is less than 6 weeks away, so why not join the New At SU November Blog Hop as the Design Team shares projects and ideas to help you dress up giving those gift cards and gift certificates. Take a journey along our hop and see all the wonderful ideas to help spark your creativity. I hope our projects will help spark your creativity.
For my Christmas Gift Card Holder, I chose to use products from the Beary Christmas Suite in the September-December 2023 Mini Catalog. I love the whimsy of the designs in the Beary Christmas Designer Series Paper and I thought it would be perfect for a fun card design. I was inspired by fellow Stampin' Up! Demonstrator, Jessica Taylor, after watching her You Tube video here and created a slightly modified version of her design to create my own.
Products Used:
Beary Cute Bundle (item #162023)
Stylish Shapes Dies (item #159183)
2 3/8" Circle Punch (item #161354)
Beary Christmas Designer Series Paper (item #162015)
Balmy Blue Cardstock (item #146982)
Real Red Cardstock (item #102482)
Basic White Cardstock (item #159276)
Balmy Blue Classic Ink Pad (item #147105)
Versamark Pad (item #102283)
Basics Embossing Powders (item #155554)
Festive Pearls (item #159963)
Tear & Tape Adhesive (item #154031)
Stampin' Dimensionals (item #104430)
Balmy Blue Cardstock
Card Base - 4 1/4" x 11" (Score at 2 1/4" & 5 1/2")
Real Red Cardstock
Card Front Matte - 5 1/4" x 4
Inside Layer Matte - 5 1/8" x 3 7/8"
Sentiment die cut with the Stylish Shapes Dies
Beary Christmas Designer Series Paper
Card Front - 5" x 3 3/4"
Large Bear punched out with the Beary Cute Punch
Small Bear fussy cut with Paper Snips
Basic White Cardstock
Inside Layer - 3 3/4" x 5"
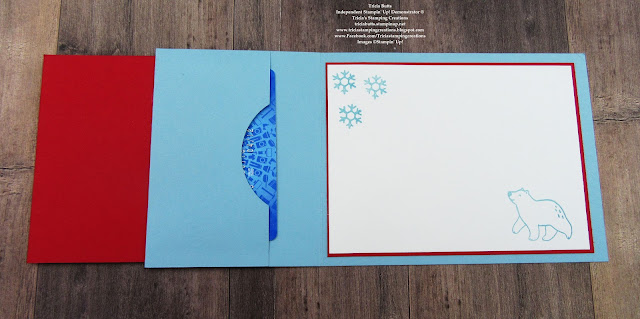
This gift card holder is simple to create and offers so many wonderful possibilities to decorate it and personalize it to suit the person receiving it. From one sheet of 8 1/2" x 11" cardstock, you can create two gift card holders, so it is a great way to create a several designs to have on hand ready for whenever you need them. After scoring the card base at 2 1/4" & 5 1/2", I used the 2 3/8" Circle Punch along the edge of the flap (to make it easier to slide the gift card in and out) before adhering it with Tear & Tape Adhesive to create the pocket for the gift card. To create the card front, I adhered the designer series paper panel to the Real Red cardstock layer. I punched out the larger polar bear from another sheet of the designer series paper, using the Beary Cute Punch. I also fussy cut out one of the small bears to complete the design and added both the bears to the bottom right corner of the card front with Stampin' Dimensionals. For the sentiment, I heat embossed the image from the Beary Cute stamp set using White embossing powder. I used the Stylish Shapes Dies to die cut the sentiment label and adhered it to the top of the card front with Stampin' Dimensionals. I adhered the card front panel to the card base, making sure not to add adhesive on the back of the right side of the card front. For the inside layer, I stamped the snowflakes and small polar bear images onto the Basic White cardstock layer using Balmy Blue Classic ink. I then adhered the layer to the Real Red cardstock matte layer before adhering to the inside of the card, making sure it is hidden behind the card front when it is closed. The only embellishment I added was a small Red Festive Pearl in the center of the bow on the card front.
Thank you for taking the time to visit my blog. I hope that my gift card holder will help inspire you to create your own wonderful projects to send to family and friends for the holidays. There are so many possibilities to explore in the September-December 2023 Mini Catalog.
Please take a trip along our blog hop and visit my fellow Design Team members by clicking on the links in the Roll Call List. We would love it if you would leave us a comment and let us know what you liked about our projects.
If you live in the U.S. and do not have a Stampin' Up! Demonstrator, please contact me and I would be happy to help you with your creative projects. You may also visit my Online Store to place your order and have it shipped to you. Don't forget to take advantage of the Seasonal Sale and save on paper, inks and ribbons, November 14-16th.
Until Next
Time
Happy
Stamping,
Tricia Butts
Independent Stampin' Up!
Demonstrator
Like What You
See? Visit My Online Store Here
Visit My Facebook Business Page for Updates & Ideas
Click here to Contact Me
Stock Up On Your Favorite Products
During The Seasonal Sale November 14-16
Click Below To Start Shopping
New Online Exclusives Products
Now Available While Supplies Last
Click Below To Visit My Online Store
Get Creative For The Holidays
With The September-December 2023 Mini Catalog
Click Below To Shop Now


Wonderful gift card holder, Tricia! This was such a fun collection to create with. Thank's for sharing this!💕
ReplyDeleteThis card could be put together in less time than it takes to pull your boots on- no need to run to the store when you can make it at home with the supplies you have!
ReplyDeleteThis is a great gift card holder to make lots of! Thanks for sharing!
ReplyDeleteThat Beary Christmas Suite is perfect to use for this purpose! It's just the right proportions for a gift card, and so festive!
ReplyDelete