Showing posts with label 2022-2024 In Colors Designer Series Paper. Show all posts

Saturday, April 20, 2024

Stamping With Friends April Blog Hop Retiring 2022-2024 In Colors

Welcome to the Stamping With Friends April Blog Hop as we say farewell to the 2022-2024 In Colors that are retiring soon. These beautiful colors are some of my all time favorites and I will miss them when they are gone. Our wonderful Design Team will be sharing their projects and ideas to help inspire you to get creative with these five amazing colors.
One of my favorite things about the 2022-2024 In Colors is that they work so well together. So I decided to use up some of scraps of designer series paper to create this fun scrappy strip Thank You card using all five of the retiring In Colors. I chose to use the same pattern in each color using 3/4" wide strips and added a sentiment strip of Starry Sky cardstock that coordinates with the card base. I chose to use the new Sweetly Scripted stamp set from the Online Exclusives and heat embossed it with Silver embossing powder to help step up the design. Don't these colors look amazing together?
Products Used:
Sweetly Scripted stamp set (item #163600)
2022-2024 In Colors 6"x6" Designer Series Paper (item #1616450 - Retiring 
Starry Sky Cardstock (item #159263) -  Retiring 
Basic White Cardstock (item #159276)
Versamark Pad (item #102283)
Metallics Embossing Powders (item #155555) - Retiring
2022-2024 In Color Baker's Twine Pack (item #159195) - Retiring
Stampin' Dimensionals (item #104430)
Measurements:
Starry Sky Cardstock
Card Base - 5 1/2" x 8 1/2" (Scored at 4 1/4")
Sentiment Strip - 3/4" x 4"
Basic White Cardstock
Card Front - 5 1/4" x 4"
2022-2024 In Color Designer Series Paper
1 Strip - 3/4" x 4" of each color - Starry Sky, Parakeet Party, Tahitian Tide, Orchid Oasis and Sweet Sorbet
Scrappy Strip cards are so much fun to create and they are a great way to use up your scraps of designer series paper. I love the bright bold colors in the 2022-2024 In Colors and they look amazing together using this technique. I added each strip to the Basic White card front allow a small gap between each strip, including the top and bottom of the card front to create a thin white border between each strip. I think this really helps make the colors pop. For the sentiment, I heat embossed the "A Million Thanks" sentiment from the Sweetly Scripted stamp set using Silver embossing powder to help step up the design. I wrapped a piece of Parakeet Party Baker's Twine around the card front twice and tied a bow on the left side, just below the sentiment strip to finish off the design. I just love how this card design turned out and I think it would work great for so many occasions.


Thank you for taking the time to visit my blog. I hope that my card design will help inspire you to explore these beautiful retiring 2022-2024 In Colors before they disappear. There are so many wonderful ways to combine these coordinating products to create wonderful projects. Remember, these products are only available while supplies last, so don't delay in placing your order to get your favorites.
Please take the time to visit with my fellow Design Team members to see their wonderful projects by clicking on the links in the Roll Call List below We would appreciate it if you would leave us a comment and let us know what you liked about our projects. 

If you live in the U.S. and do not have a Stampin' Up! Demonstrator, please contact me and I would be happy to help you with your creative projects. You may also visit my Online Store to place your order and have it shipped to you. 

Until Next Time

Happy Stamping,

Tricia Butts
Independent Stampin' Up! Demonstrator

Like What You See? Visit My Online Store Here

Visit My Facebook Business Page for Updates & Ideas

Click here to Contact Me


Wednesday, March 8, 2023

ICS March Blog Hop Birthday Bash

It's time to hop along with the ICS March Blog Hop with our theme this month, "Birthday Bash". Birthday cards are one of the most popular cards we create and send to family and friends, so it makes sense to share fun ways to create wonderful cards to celebrate this special occasion. Our Design Team members will be sharing their projects and ideas to help inspire you to create your own beautiful creations to share with the people you love. 
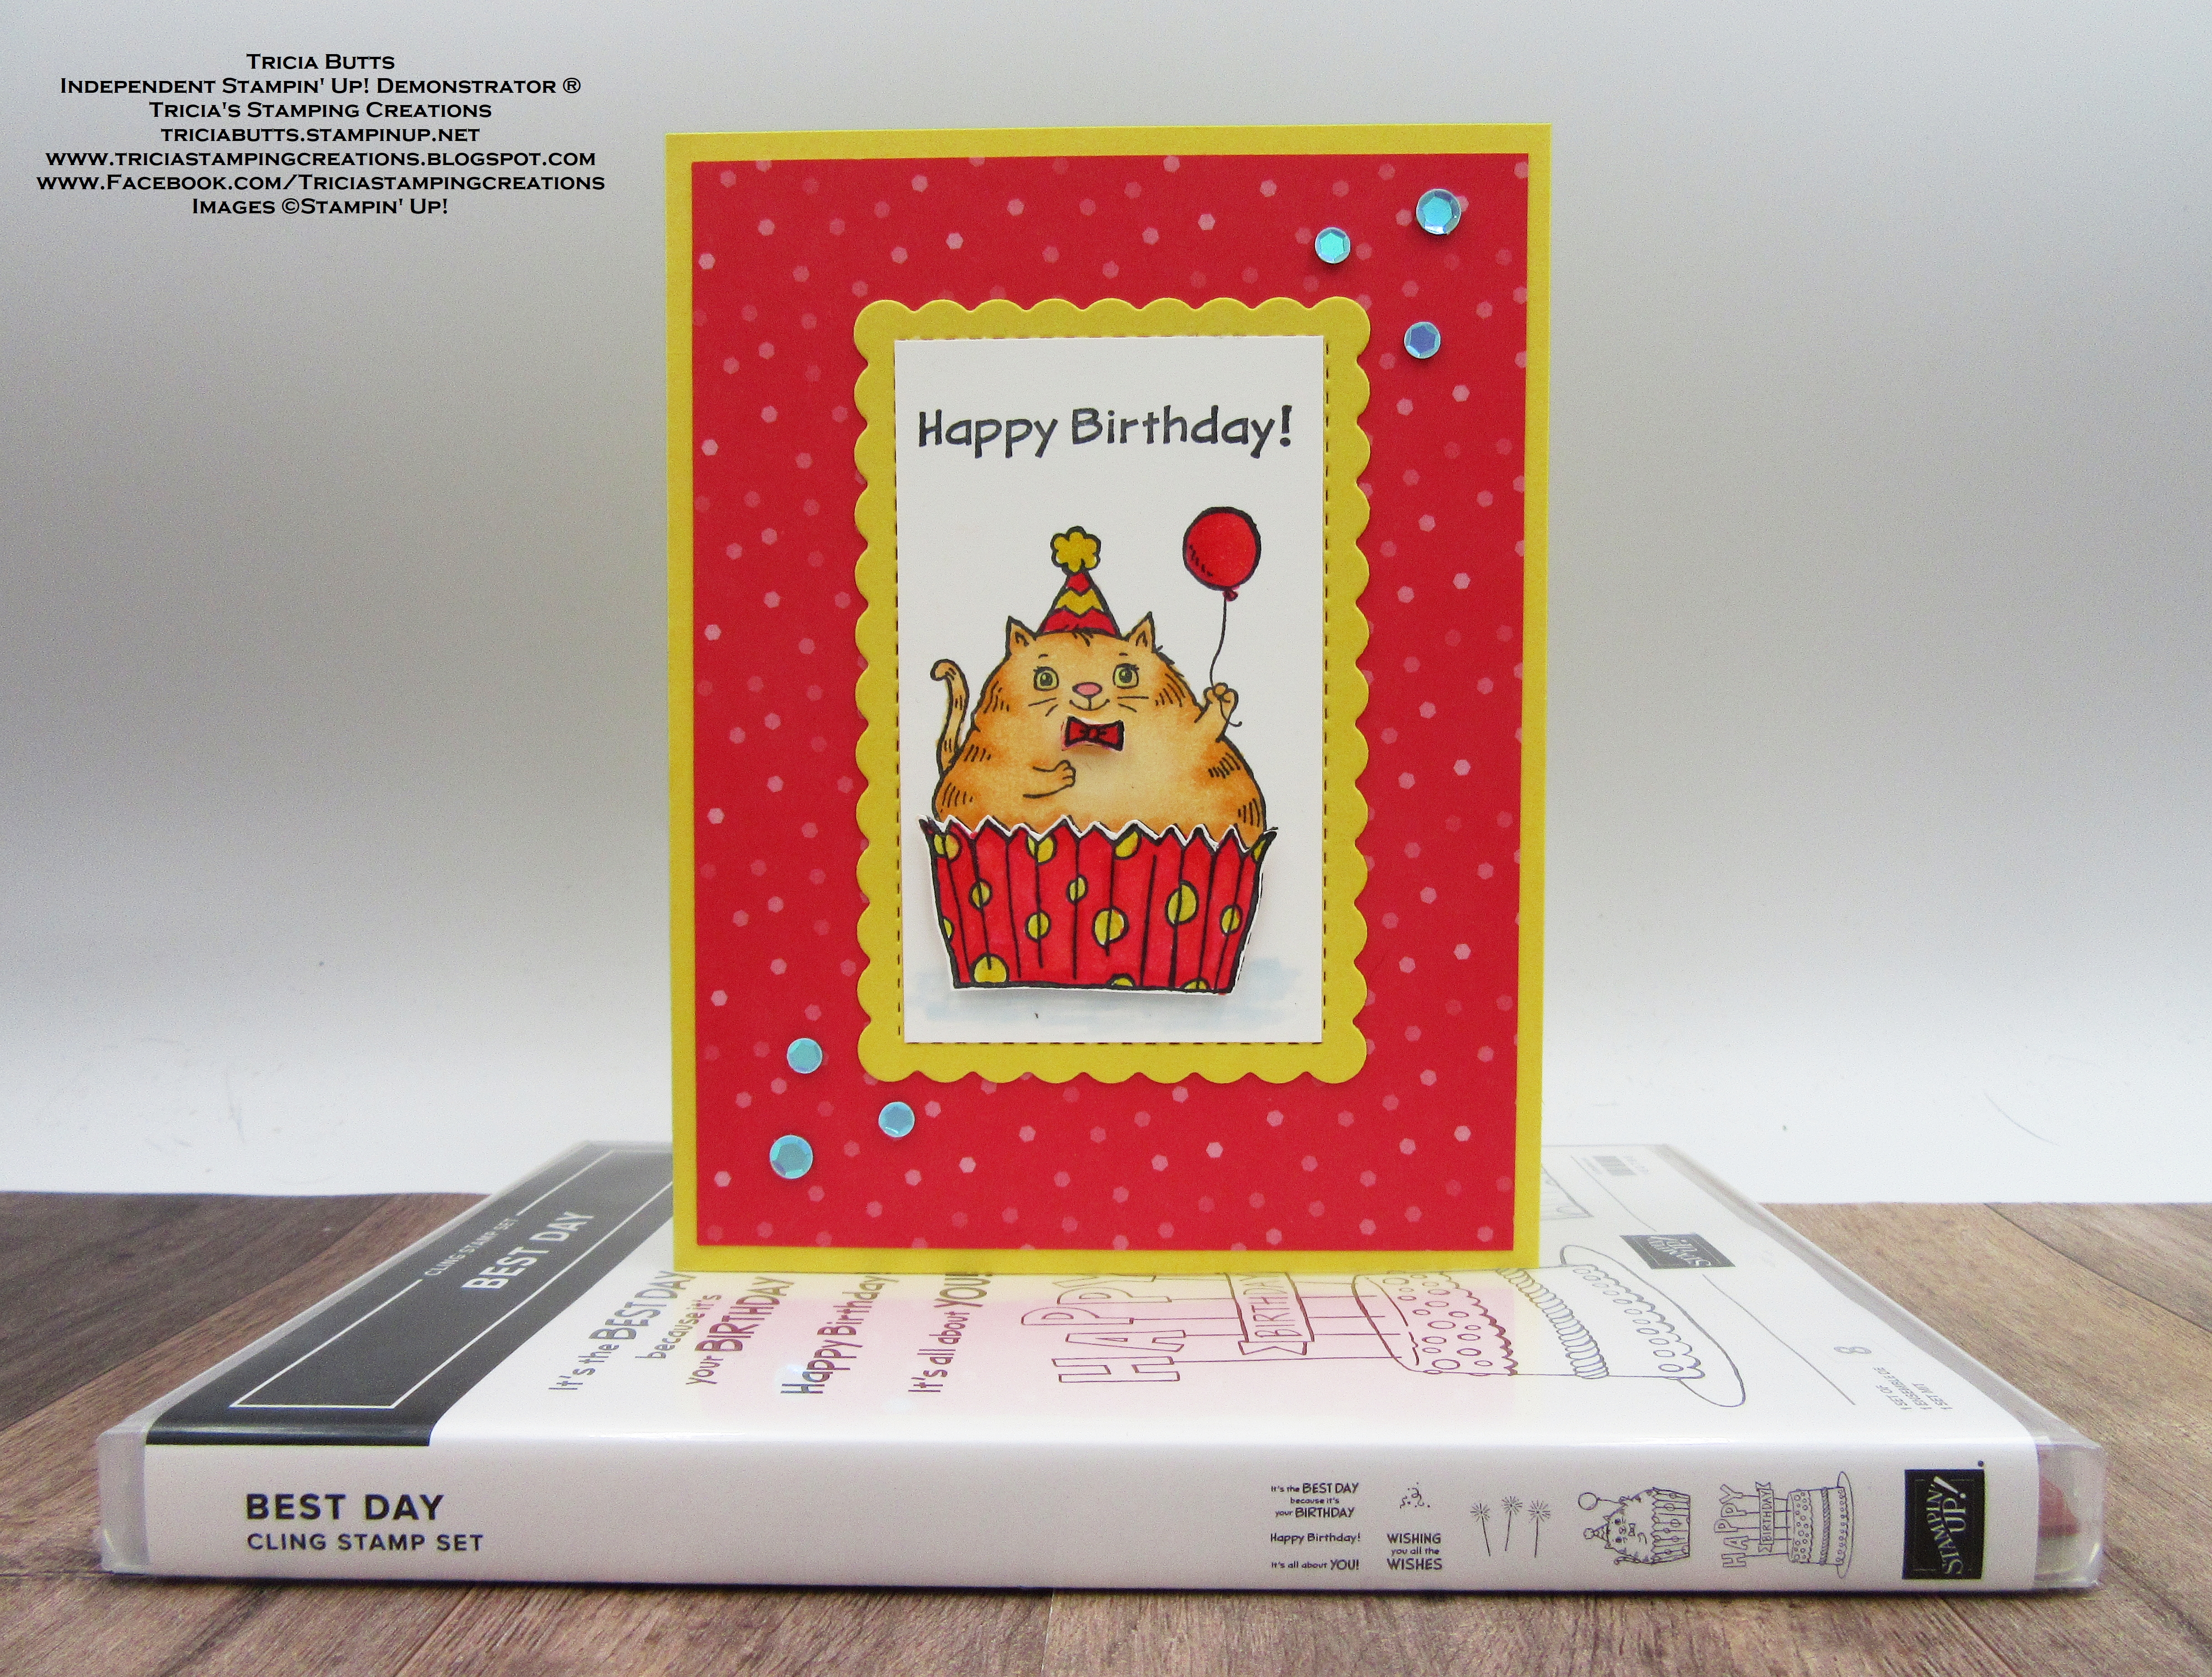
The inspiration for my birthday card today is my son's cat, Toka. He is an adorable fluff ball and I knew as soon as I saw this stamp set that I had to get it because it reminded me of him. Toka is a little on the round and cuddly side, not unlike this adorable feline and I had a lot of fun recreating the color of his fur for this card design. My son's favorite color is red so that was the color inspiration for this design. I love how it turned out and now the challenge will be to put this birthday card somewhere safe until the end of the year and then find it again to give to my son for his birthday. Wish me luck!
Products Used:
Best Day stamp set (item #160798)
Scalloped Contours Dies (item #155560)
2022-2024 In Color 6"x6" Designer Series Paper (item #159253)
Daffodil Delight Cardstock (item #119683)
Basic White Cardstock (item #159276)
Memento Tuxedo Black Pad (item #132708)
Daffodil Delight Stampin' Blends Combo Pack (item #154883)
Pale Papaya Stampin' Blends Combo Pack (item #155519)
Pumpkin Pie Stampin' Blends Combo Pack (item #154897)
Sweet Sorbet Stampin' Blends Combo Pack (item #159224)
Balmy Blue Stampin' Blends Combo Pack (item #154830)
Clear Wink of Stella Glitter Brush (item #141897)
Pastel Adhesive Backed Sequins (item #160387)
Mini Stampin' Dimensionals (item #144108)
Measurements:
Daffodil Delight Cardstock
Card Base - 8 1/2" x 5 1/2" (Scored at 4 1/4")
Scalloped Rectangle die cut with the Scalloped Contour Dies
2022-2024 In Color 6"x6" Designer Series Paper (Sweet Sorbet)
Card Front - 5 1/4" x 4"
Basic White Cardstock
Rectangle - 2 1/16" x 3 3/8"
Stamped and fussy cut cupcake base and bow tie using the Best Day stamp set
For my card design, I wanted a bright and cheerful color combination to help bring my sweet kitty to life. Toka is a beautiful buff ginger tabby cat, so I chose to use Pale Papaya and Pumpkin Pie Stampin' Blends Markers to create the color of his fur. For the card design, I chose Daffodil Delight cardstock for the card base and the frame for the focal design and added Sweet Sorbet Designer Series Paper for a bright splash of color. For the cupcake base and bow tie, I stamped the images separately on a scrap piece of Basic White cardstock with Memento Tuxedo Black ink and colored them with Sweet Sorbet and Daffodil Delight Stampin' Blends Markers before fussy cutting them out with Paper Snips. I attached both the cupcake base and bow tie to the focal image with Mini Stampin' Dimensionals to pop them up, lining them up with the stamped image. I used the Light Balmy Blue Stampin' Blends Marker to add some shadow below the cupcake base to help ground the image. For a touch of bling, I added several Balmy Blue Pastel Adhesive Backed Sequins to finish off this cute birthday card design. 
Thank you for taking the time to visit my blog. I hope that my card design will help inspire you to explore the wonderful products that Stampin' Up! has to offer to help inspire you to create your own beautiful projects. 
Now it's time to visit Sharon's blog and see what wonderful ideas she has to share with us. Just click on the Next button below to visit her blog and see her beautiful projects. We would love it if you would leave us a comment and let us know what you liked about our projects. I hope you enjoy the rest of our blog hop. 


If you live in the U.S. and do not have a Stampin' Up! Demonstrator, please contact me and I would be happy to help you with your creative projects. You may also visit my Online Store to place your order and have it shipped to you. 

Until Next Time

Happy Stamping,

Tricia Butts
Independent Stampin' Up! Demonstrator

Like What You See? Visit My Online Store Here

Visit My Facebook Business Page for Updates & Ideas

Click here to Contact Me


Explore Your Creativity
With The January-April 2023 Mini Catalog
Click Below To Visit My Online Store

Celebrate Paper Pumpkin's 10 Year Anniversary
With The 10 Years Of Growth Kit
Click Below To Subscribe By March 10th

Online Exclusives Are Now Available
While Supplies Last
Click Below To Place Your Order


Saturday, November 19, 2022

Stamping With Friends November Blog Hop CASEing A Demonstrator

Welcome to the Stamping With Friends November Blog Hop with our challenge to "CASE a Demonstrator". What is CASE? It stands for Copy And Share Everything or Copy And Selectively Edit, and is basically a great way to get inspiration when you are creating your own projects. Projects created by Stampin' Up! Demonstrators can provide you with amazing ideas to help spark your creativity. Visit with our Design Team members as they share their ideas and projects to help you get started. 
The hardest part about today's blog hop project, was choosing which Stampin' Up! Demonstrator to CASE. There are so many wonderful, talented demonstrators from around the world that inspire me on a daily basis, and I could have chosen anyone of them for today's project. In the end, I discovered this beautiful Christmas card designed by Australian Demonstrator, Catherine Proctor, and I just knew it was the one I wanted to CASE for this blog hop. You can click here to see Catherine's original post.
For my card design, I chose to use the layout from the original card design to create a bright and cheerful Thank You card. For the colors, I used Starry Sky, Orchid Oasis, Tahitian Tide and Sweet Sorbet from the 2022-2024 In Colors and I love the variety of patterns in the 2022-2024 In Colors 6"x6" Designer Series Paper that helps to add wonderful texture to the design. This beautiful clean and simple card would work well as a masculine Thank You Card to show your appreciation. 
Products Used:
Wildlife Wonder stamp set (item #157923)
Amazing Thanks Dies (item #157816)
Stitched Rectangles Dies (item #151820)
Painted Texture 3D Embossing Folder (item #154317)
2022-2024 In Colors 6"x6" Designer Series Paper (item #159253)
Sweet Sorbet Cardstock (item #159268)
Starry Sky Cardstock (item #159263)
Basic White Cardstock (item #159276)
Sweet Sorbet Classic Ink Pad (item #159216)
2022-2024 In Color Matte Decorative Dots (item #159186)
Mini Stampin' Dimensionals (item #144108)
Measurements:
Sweet Sorbet Cardstock
Card Base - 8 1/2" x 5 1/2" (Scored at 4 1/4")
Thanks Outline die cut with the Amazing Thanks Dies
Starry Sky Cardstock
Detailed Thanks die cut with the Amazing Thanks Dies
Basic White Cardstock
Card Front - 5 1/4" x 4" Embossed with the Painted Textures 3D Embossing Folder
Sentiment Label die cut with the Stitched Rectangles Dies
2022-2024 In Color Designer Series Paper
3/4" x 4" - Orchid Oasis Polka Dot pattern
3/4" x 4" - Tahitian Tide Plaid Pattern
3/4" x 4" - Tahitian Tide Polka Dot Pattern
3/4" x 4" - Starry Sky Stripe Pattern
To create my version of Catherine's card, I chose to use three of the In Colors for the strips to create the background design. I love that the tone on tone patterns add subtle texture to the card front without being overwhelming. For the Basic White cardstock, I wanted to add more texture to the card front, so I embossed it using the Painted Texture 3D Embossing Folder. I arranged the strips and adhered them to the card front in a staggered arrangement similar to the original card design. For the sentiment, I chose to use the Thanks die cuts using the Amazing Thanks Dies. The contrast between the Sweet Sorbet and Starry Sky layers really makes it pop against the card front background and coordinating with the Sweet Sorbet card base. The stamped sentiment from the Wildlife Wonder stamp set, was stamped with Sweet Sorbet Classic ink onto a Basic White Stitched Rectangle. I attached both sentiments using Mini Stampin' Dimensionals to the card front to add some depth and dimension to the design. To finish off the design, I added some Sweet Sorbet and Orchid Oasis Matte Decorative Dots to the card front. I love how this card design turned out and how I was able to take the layout from Catherine's beautiful Christmas card and transform it into this wonderful thank you card. 
Thank you for taking the time to visit my blog. I hope that my card design will help inspire you to try CASEing as a way to spark your creativity and create your own beautiful projects. There are so many possibilities to explore. 
Please take the time to visit with my fellow Design Team members to view their wonderful projects. Just use the Roll Call List below to find your way along our blog hop. We would appreciate it if you would leave us a comment and let us know what you liked about our projects. 

If you live in the U.S. and do not have a Stampin' Up! Demonstrator, please contact me and I would be happy to help you with your creative projects. You may also visit my Online Store to place your order and have it shipped to you. 

Until Next Time

Happy Stamping,

Tricia Butts
Independent Stampin' Up! Demonstrator

Like What You See? Visit My Online Store Here

Visit My Facebook Business Page for Updates & Ideas

Click here to Contact Me


Get Creative For The Holidays
With The July-December 2022 Mini Catalog
Click Below To Visit My Online Store

Create Gift Card Holders For Special Occasions
With The December Paper Pumpkin Kit
Click Below To Subscribe By December 10th


Saturday, September 3, 2022

Stamping With Friends Stand Alone Dies Blog Hop

Welcome to the Stamping With Friends Stand Alone Dies Blog Hop as we showcase the wonderful dies that Stampin' Up! offers in the 2022-2023 Annual Catalog. These dies are not bundled with a particular stamp set and offer you the freedom to explore creating your projects by combining them with other wonderful products. Our creative Design Team members will be sharing their projects and ideas to help inspire you to step outside your comfort zone.
On this hot Summer day, I thought it would be fun to share a cool Winter Birthday card featuring the Dots & Spots Die as my stand alone die, to create this fun background. I paired it with the Yeti To Party Bundle, which is part of the Perfect Partners Promotion and is only available while supplies last during September. I love how the polka dot die cut background gives the look of falling snow for our birthday yeti. To complete the design, I used another stand alone die set, the Tailor Made Tags Dies, for my sentiment tag. This die set is one of my favorites and I love how versatile these dies are. 
Products Used:
Dots & Spots Die (item #159164)
Tailor Made Tags Dies (item #155563)
Yeti To Party Bundle (item #162529)
2022-2024 In Color 6"x6" Designer Series Paper (item #159253)
Starry Sky Cardstock (item #159263)
Orchid Oasis Cardstock (item #159267)
Basic White Cardstock (item #159276)
Tahitian Tide Classic Ink Pad (item #159261
Memento Tuxedo Black Pad (item #132708)
Crumb Cake Stampin' Blends Combo Pack (item #154882)
Pool Party Stampin' Blends Combo Pack (item #154894)
Clear Wink of Stella Glitter Brush (item #141897)
2022-2024 In Color Baker's Twine Pack (item #159195)
White 3/8" Glittered Organdy Ribbon (item #156408)
Iridescent Rhinestone Jewels (item #158130)
Stampin' Dimensionals (item #104430)
Measurements:
Starry Sky Cardstock
Card Base - 5 1/2" x 8 1/2" (Scored at 4 1/4")
Orchid Oasis Cardstock 
Card Front - 5" x 3 3/4" die cut with the Dots & Spots Die
Basic White Cardstock
Layer 1- 5 1/4" x 4"
Sentiment Tag die cut with the Tailor Made Tags Dies
Yeti & ice cream cone stamped and die cut with the Yeti To Party Bundle
2022-2024 In Color Designer Series Paper
Scarf (Tahitian Tide) die cut with Yeti Dies
Present (Sweet Sorbet) stamped and die cut with the Yeti To Party Bundle
This sweet birthday card is so much fun to create and I love the wonderful texture that the Dots & Spots Die adds to the background. With the Basic White cardstock layer showing through the polka dots, it adds a wonderful contrast with the die cut Orchid Oasis cardstock layer. To help make my yeti stand out a little, added a little Light Pool Party Stampin' Blends around the edge of the image and colored his face to bring him to life. I also colored the ice cream cone using the Light Pool Party and the Crumb Cake Stampin' Blends Combo Pack to add a little color to the image. The scarf has been die cut from a scrap of Tahitian Tide Designer Series Paper and I stamped the present image with Tuxedo Black ink onto a scrap of Sweet Sorbet Designer Series Paper before die cutting it with the coordinating die. There is a die in the Yeti Die set that allows you to die cut a slit between the yeti's arm and body so that you can slide the present behind the arm. For the sentiment tag, I stamped the image with Tahitian Tide Classic ink to coordinate with the scarf and add a pop of color. To dress up the tag, I added a piece of the White Glittered Organdy Ribbon through the hole and then tied a piece of Tahitian Tide Baker's Twine around it and tied a bow to finish it off. For a touch of bling, I added two small Iridescent Rhinestone Jewels to the tag and added some Clear Wink of Stella to the yeti and the ice cream to finish off the card. I love how this card design turned out and I am so happy with how the Dots & Spots Die created this beautiful background to bring my card to life. I can see so many wonderful possibilities for creating future projects with this die.
Thank you for taking the time to visit my blog. I hope that my card design will help inspire you to explore creating with these wonderful stand alone dies to create your own beautiful projects. Don't forget to check out the wonderful exclusive dies available during the Perfect Partners promotion available only during September (while supplies last).
It's time to hop along and visit with our amazing Design Team members. Just use the Roll Call List below to visit their blogs and see their wonderful projects. We would love it if you would leave us a comment and let us know what you enjoyed about our projects.

If you live in the U.S. and do not have a Stampin' Up! Demonstrator, please contact me and I would be happy to help you with your creative projects. You may also visit my Online Store to place your order and have it shipped to you. 

Until Next Time

Happy Stamping,

Tricia Butts
Independent Stampin' Up! Demonstrator

Like What You See? Visit My Online Store Here

Visit My Facebook Business Page for Updates & Ideas

Click here to Contact Me 


Perfect Partners Exclusive New Die Sets
Available Only While Supplies Last
Click Below For More Details

Weekly Deals Are Here During September
Available For A Limited Time
Click Below To Visit My Online Store

Create Boo-tiful Treats
With The September Paper Pumpkin Kit
Click Below To Subscribe By September 10th


Tuesday, July 26, 2022

Paper Pumpkin Possibilities July Blog Hop Sending Good Thoughts

Welcome to the Paper Pumpkin Possibilities July Blog Hop as we showcase the Sending Good Thoughts Kit. Our amazing Design Team members will be sharing their wonderful alternative projects to help inspire you to think outside the box.
One of my favorite things about this kit is the nautical theme, which is so perfect for masculine cards. I decided to create my alternative card design using just the exclusive stamp set from this month's kit. For this design, I chose to use Starry Sky designer series paper for the background and paired it with Soft Suede cardstock. I wanted to keep the design fairly simple, so I heat embossed the image and sentiment with Silver embossing powder to help step up the design and I added some Baker's Twine to add a little texture to the design. 
Products Used:
Paper Pumpkin July Sending Good Thoughts Kit
Stylish Shapes Dies (item #159183)
Layering Circles Dies (item #151770)
2022-2024 In Colors 6"x6" Designer Series Paper (item #159253)
Soft Suede Cardstock (item #115318)
Starry Sky Cardstock (item #159263)
Versamark Pad (item #102283)
Metallics Embossing Powders (item #155555)
Baker's Twine Essentials Pack (item #155475)
Stampin' Dimensionals (item #104430)
Measurements:
Soft Suede Cardstock
Card Base - 8 1/2" x 5 1/2" (Scored at 4 1/4")
Large Stitched Circle die cut with the Stylish Shapes Dies
Starry Sky Cardstock
Medium Circle die cut with the Layering Circles Dies
Sentiment Label die cut with the Stylish Shapes Dies 
Starry Sky Designer Series Paper
Card Front - 5 1/4" x 4"
This clean and simple card design is a wonderful example of how you can use the exclusive stamp set to create projects once you have used up the other supplies in this kit. The images and sentiments are perfect for masculine cards as well as all occasion cards. The striped background of the Starry Sky Designer Series Paper adds wonderful texture to the card and helps make the focal image pop. I love the look of the Silver embossing for the ship and the sentiment on the Starry Sky cardstock and I felt it provided enough bling that there was no need for additional embellishments. The Baker's Twine fits in with the nautical theme of this card and just helps to finish off the design. 

Thank you for taking the time to visit my blog. I hope that my card design will help inspire you to create your own alternative projects with this wonderful kit and combining it with your existing supplies. There are so many wonderful possibilities to explore. 

Now it's time to visit June's wonderful blog and see what she has created with this month's kit. Just click on the Next button below to visit her blog. We would love it if you would leave us a comment and let us know what you liked about our projects. I hope you enjoy the rest of our blog hop. 

If you live in the U.S. and do not have a Stampin' Up! Demonstrator, please contact me and I would be happy to help you with your creative projects. You may also visit my Online Store to place your order and have it shipped to you. Don't forget to subscribe by August 10th to receive the August Paper Pumpkin Sweet Sunflowers Kit. Just click the link below to sign up. 

Until Next Time

Happy Stamping,

Tricia Butts
Independent Stampin' Up! Demonstrator

Like What You See? Visit My Online Store Here

Visit My Facebook Business Page for Updates & Ideas

Click here to Contact Me


Enjoy Some Summer Crafting
With The August Paper Pumpkin Kit
Click Below To Subscribe By August 10th