Friday, August 30, 2024

Crafty Collaborations Monochromatic Color Challenge Week 35 - Basic Gray

Welcome to Week 35 of the Crafty Collaborations Monochromatic Color Challenge as we showcase Basic Gray from the Neutrals Collections. This wonderful dark Gray is so versatile and I had so much fun creating my card to showcase this beautiful gray.
For my card, I chose to create a sweet design that would help brighten someone's day. I chose to use the Hearts & Hugs Bundle and paired it with the Everyday Details Dies to create a fun clean and simple card. I used one of the designs from the Neutrals 6"x6" Designer Series Paper to add texture and detail to the background. For the focal image, I used Watercolor Pencils to add soft color and used a Blender Pen to smooth out the pencil lines. The Flirty Flamingo hearts add a wonderful pop of color.
Products Used:
Hearts & Hugs Bundle (item #163667)
Everyday Details Dies (item #162864)
Neutrals 6"x6" Designer Series Paper (item #163773)
Basic Gray Cardstock (item #121044)
Flirty Flamingo Cardstock (item #141416)
Basic White Cardstock (item #159276)
Basic Gray Classic Ink Pad (item #149165)
Watercolor Pencils Assortment 1 (item #161700)
Blender Pens (item #102845)
Iridescent Pearls Basic Jewels (item #158987)
Measurements:
Basic Gray Cardstock 
Card Base - 5 1/2" x 8 1/2" (Scored at 4 1/4")
Basic White Cardstock
Card Front - 5 1/4" x 4"
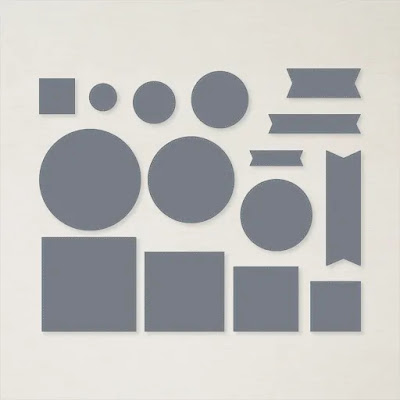
Large Circle die cut with the Everyday Details Dies 
Basic Gray Designer Series Paper
3 strips - 1/4" x 4"
Flirty Flamingo Cardstock
2 small hearts die cut with the Hearts & Hugs Dies
I love creating clean and simple card designs using designer series paper. For this card design, I chose to use one of the designs from the Neutrals 6"x6" Designer Series Paper to created a striped background. I adhered the three strips of designer series paper to the Basic White card front, making sure to space them evenly. For the focal design, I stamped the sentiment and focal image using Basic Gray Classic ink onto the Basic White detailed circle die cut with the Everyday Details Dies. I colored the image using Watercolor Pencils - Basic Gray for the body and Calypso Coral for the ears, nose, hands and feet. Using a Blender Pen I smoothed out the pencil lines to give the image a softer look. I attached the circle to the center of the card front using Stampin' Dimensionals to pop it up. To complete the card design, I added several Iridescent Pearls and three of the Flirty Flamingo hearts that I die cut out with the Hearts & Hugs Dies. 
Thank you for taking the time to visit my blog. I hope that my card design helps you to see the versatility of Basic Gray and encourages you to explore using it in your future projects. There are so many options available to help spark your creativity.
Please take the time to visit this week's Monochromatic Insta Hop to see all the amazing projects showcasing Basic Gray. Just click here to get started. We would love it if you would leave us a comment and let us know what you liked about our projects. I hope you will join us next week to see what color we will be creating with in week 36.

If you live in the U.S. and do not have a Stampin' Up! Demonstrator, please contact me and I would be happy to help you with your creative projects. You may also visit my Online Store to place your order and have it shipped to you. 

Until Next Time

Happy Stamping,

Tricia Butts
Independent Stampin' Up! Demonstrator

Like What You See? Visit My Online Store Here

Visit My Facebook Business Page for Updates & Ideas

Click here to Contact Me


Wednesday, August 28, 2024

Paper Pumpkin Possibilities August Blog Hop Time For Cake

Welcome to the Paper Pumpkin Possibilities August Blog Hop as we showcase alternative project ideas featuring the Time For Cake Paper Pumpkin Kit. Our wonderful Design Team will be sharing their projects and ideas to help inspire you to think outside the box and create your own fun alternative designs. 
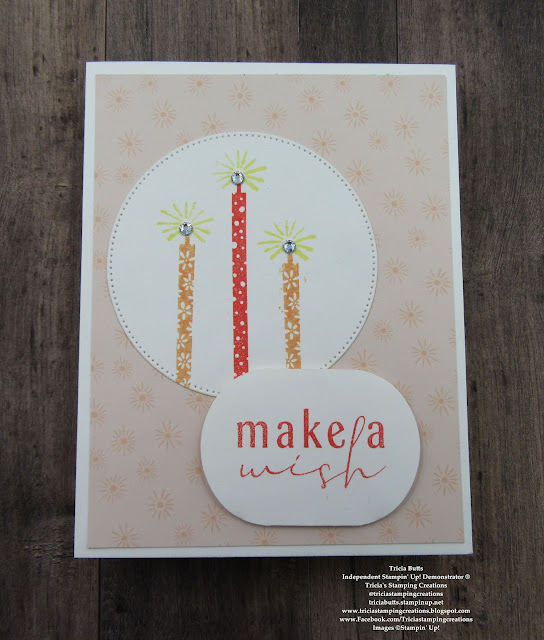
For my card design, I wanted to showcase the wonderful images in the exclusive stamp set included in this month's kit. To create this soft and pretty birthday card, I used one of the Petal Pink card bases included in the kit for my card front and created a focal image using the candles images from the stamp set. This clean and simple design is fresh and fun and a great example of how you can mix and match the images to create your own unique designs.
Products Used:
Paper Pumpkin August 2024 Kit Time For Cake
Stylish Shapes Dies (item #159183)
Modern Oval Punch (item #162234)
Thick Basic White Cardstock (item #159229)
Basic White Cardstock (item #159276)
Flirty Flamingo Classic Ink Pad (item #147052)
Petal Pink Classic Ink Pad (item #147108)
Lemon Lolly Classic Ink Pad (item #161666)
Basic Rhinestone Jewels (item #1144220)
Measurements:
Thick Basic White Cardstock
Card Base - 5 1/2" x 8 1/2" (Scored at 4 1/4")
Basic White Cardstock
Large Circle die cut with the Stylish Shapes Dies
Sentiment Label punched out with the Modern Oval Punch
Time For Cake Kit
Card Front - 5 1/4" x 4" (From Petal Pink Card Base)
To create this fun birthday card, I cut a card front from one of the Petal Pink card bases and attached it to the Thick Basic White card base. To create the focal image, I die cut a large circle from Basic White cardstock using the Stylish Shapes Dies. I stamped the tallest candle image using Flirty Flamingo Classic ink and the two shorter candles with Petal Pink Classic ink, on either side of the taller candle. I stamped the sparkle image on top of each of the candles with Lemon Lolly Classic ink. For the sentiment label, I stamped the image with Flirty Flamingo Classic ink onto Basic White cardstock and then punched it out using the Modern Oval Punch. To assemble the remainder of the card, I attached the circle image to the center of the card front towards the left side and then attached the sentiment label with Mini Stampin' Dimensionals from the kit, slightly overlapping the bottom right curve of the focal circle. For a touch of bling, I added a Basic Rhinestone Jewel to the top of each candle to complete the card design. 
Thank you for taking the time to visit my blog. I hope that my card design will help inspire you to explore using the supplies in this kit for your own alternative designs. There are so many wonderful possibilities available when you think outside the box.
Please take the time to visit with the Design Team and see their amazing alternative projects created with this months' Paper Pumpkin kit. Just click on the links in the Roll Call List below to find your way. We would love it if you would leave us a comment and let us know what you liked about our projects.

If you live in the U.S. and do not have a Stampin' Up! Demonstrator, please contact me and I would be happy to help you with your creative projects. You may also visit my Online Store to place your order and have it shipped to you. Not a Paper Pumpkin subscriber? Click the link below to sign up by September 10th to receive the September Paper Pumpkin Kit, Autumn Abundance. As a subscriber, you can also order the coordinating Every Day Celebrations Dies, as an exclusive perk available to subscribers only. These dies are available only while supplies last.

Until Next Time

Happy Stamping,

Tricia Butts
Independent Stampin' Up! Demonstrator

Like What You See? Visit My Online Store Here

Visit My Facebook Business Page for Updates & Ideas

Click here to Contact Me


Let's Get Ready For Fall
With The Autumn Abundance Paper Pumpkin Kit
Click Below To Subscribe By September 10th

Paper Pumpkin Subscriber Exclusive!
Order The Every Day Celebrations Dies 
Click Below To Shop Now


Friday, August 23, 2024

Crafty Collaborations Monochromatic Color Challenge Week 34 - Cherry Cobbler

Happy Friday everyone. It's time for Week 34 of the Crafty Collaborations Monochromatic Color Challenge. This week we are showcasing Cherry Cobbler from the Regals Collection. I am excited to share with you what I have created using this beautiful red using some Sneak Peek products from the upcoming September-December 2024 Mini Catalog. 
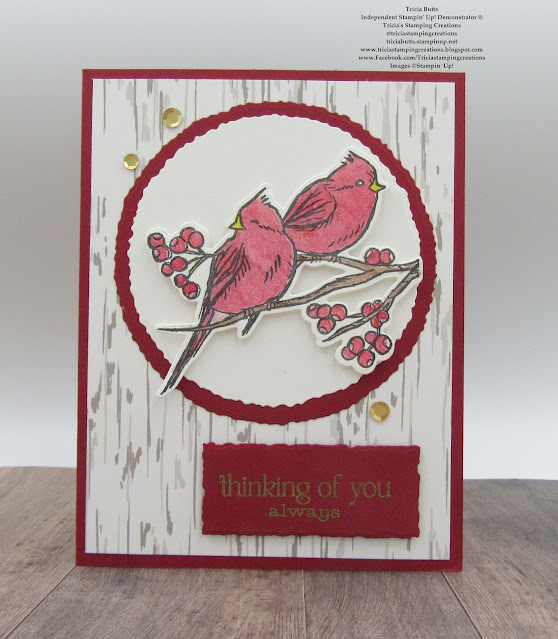
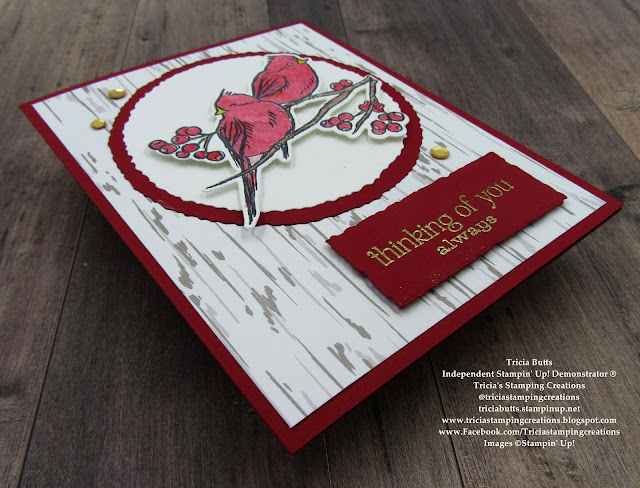
For my card design this week, I chose to create a Thinking of You card design using the new Winterly Treetops Bundle with the Nests of Winter Designer Series Paper. I used Watercolor Pencils to color the image and smoothed out the pencil lines using a Blender Pen to give a soft, watercolor look. I love the texture that the designer series paper adds to the background and helps give it an organic feel. This beautiful clean and simple card design is a wonderful way to let someone know that you care and are thinking of them.
Products Used:
Winterly Tree Tops Bundle (item #164066)
Deckled Circles Dies (item #162286)
Deckled Rectangles Dies (item #159173)
Nests of Winter Designer Series Paper (item #164183)
Cherry Cobbler Cardstock (item #119685)
Basic White Cardstock (item #159276)
Memento Tuxedo Black Pad (item #132708)
Versamark Pad (item #102283)
Metallics Wow Embossing Powders (item #165678)
Watercolor Pencils Assortment 1 (item #161700)
Watercolor Pencils Assortment 2 (item #149014)
Blender Pens (item #102845)
Neutrals Adhesive Backed Sequins (item #161627)
Mini Stampin' Dimensionals (item #144108)
Measurements:
Cherry Cobbler Cardstock
Card Base - 5 1/2" x 8 1/2" (Scored at 4 1/4")
Large Circle die cut with the Deckled Circles Dies
Sentiment Label die cut with the Deckled Rectangles Dies
Basic White Cardstock
Medium Circle die cut with the Deckled Circles Dies
Bird image stamped and die cut with the Winterly Tree Tops Bundle
Nests of Winter Designer Series Paper
Card Front - 5 1/4" x 4"
This beautiful card design showcases how versatile Cherry Cobbler can be. This deep red works well with Gold accents and I love how the Gold embossing pops on the Cherry Cobbler cardstock sentiment label. I used a Cherry Cobbler card base to frame the designer series paper card front and also to frame the focal circle. For the focal image, I stamped the image using Memento Tuxedo Black ink onto Basic White cardstock and the colored the image using Watercolor Pencils. I used a Blender Pen to soften the pencil lines and give the image that wonderful watercolor look. I used the coordinating dies to die cut the image out and attached it to the Basic White circle die cut using Mini Stampin' Dimensionals. To complete the card design, I added several Gold Sequins for a touch of bling. I love how this card design turned out and I think it is the perfect design to send to someone to let them know that they are loved. 
Thank you for taking the time to visit my blog. I hope that my card design helps encourage you to explore using Cherry Cobbler in your projects. This beautiful deep red has a wonderful warmth to it that works well for a variety of occasions all year round. 
Please take the time to visit our Monochromatic Insta Hop this week to see all the amazing projects showcasing Cherry Cobbler. Just click here to get started. We would appreciate it if you would leave us a comment and let us know what you liked about our projects.

If you live in the U.S. and do not have a Stampin' Up! Demonstrator, please contact me and I would be happy to help you with your creative projects. You may also visit my Online Store to place your order and have it shipped to you. 

Until Next Time

Happy Stamping,

Tricia Butts
Independent Stampin' Up! Demonstrator

Like What You See? Visit My Online Store Here

Visit My Facebook Business Page for Updates & Ideas

Click here to Contact Me


Wednesday, August 21, 2024

New At SU August Blog Hop Elevated Embossing Dashing Designs

Welcome to the New At SU August Blog Hop as we showcase embossing folders and elevate them to the next level with fun techniques and designs. Our wonderful Design Team is excited to share their projects and ideas to help you make the most of your embossing folders.
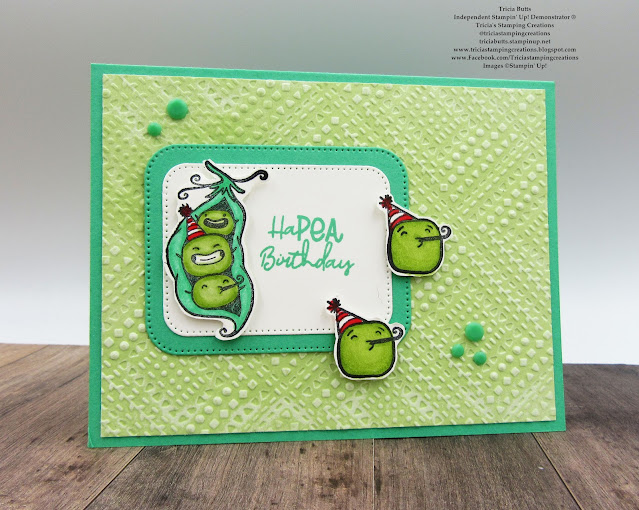
For my card design today, I wanted to create a fun birthday card using the new Sweet Peas stamp set from the 2024-2025 Annual Catalog. To help step up the design, I chose to use the Dashing Designs 3D Embossing Folder to add texture and detail to the background. I chose to use Versamark ink on the inside of the embossing folder and run the Soft Sea Foam cardstock through the Stampin' Cut & Emboss Machine so that the Versamark ink transferred to the raised parts of the embossed design. I then applied Clear embossing powder and heat embossed it to create a slightly glossy shimmer to the background. I love the distressed look it gives to the background which adds to the fun of this card design.
Products Used:
Sweet Peas stamp set (item #163621)
Nested Essentials Dies (item #161597)
Dashing Designs 3D Embossing Folder (item #163483)
Shy Shamrock Cardstock (item #163795)
Soft Sea Foam Cardstock (item #146988)
Shy Shamrock Classic Ink Pad (item #163808)
Basic White Cardstock (item #159276)
Memento Tuxedo Black Pad (item #132708)
Versamark Pad (item #102283)
Basics Wow Embossing Powders (item #165679)
Shy Shamrock Stampin' Blends Combo Pack (item #163825)
Granny Apple Green Stampin' Blends Combo Pack (item #154885)
Poppy Parade Stampin' Blends Combo Pack (item #154958)
2024-2026 In Color Resin Dots (item #163389)
Mini Stampin' Dimensionals (item #144108)
Measurements:
Shy Shamrock Cardstock
Card Base - 5 1/2" x 8 1/2" (Scored at 4 1/4")
Medium Rectangle die cut with the Nested Essentials Dies
Soft Sea Foam Cardstock
Card Front - 5 1/4" x 4" Embossed with the Dashing Designs 3D Embossing Folder 
Basic White Cardstock
Sentiment Label die cut with the Nested Essentials Dies
Peas images stamped with the Sweet Peas stamp set and fussy cut with Paper Snips
I love heat embossing, so I thought it would be fun to use this technique with the embossing folder to help step up the background. After applying the Versamark ink to the front of the inside of the embossing folder, I carefully placed the Soft Sea Foam cardstock inside the folder and gently closed it before embossing it with the Stampin' Cut & Emboss Machine. I noticed that the Versamark ink was heavier in some areas on the card front than others, which meant that when I applied the Clear embossing powder and then heat set it, the background had an uneven look with the glossy shimmer from the embossing powder. I really liked how this gave the embossed layer a distressed look and gave the design a tone on tone look. For the focal layer, I stamped the sentiment with Shy Shamrock Classic ink on the right side of the Basic White sentiment label and adhered it to the Shy Shamrock rectangle layer to frame it before adhering it to the embossed card front. To create the sweet peas images, I stamped them with Memento Tuxedo Black ink onto Basic White cardstock and colored them with Stampin' Blends Markers. Next I fussy cut the images out and added them to the card front using Mini Stampin' Dimensionals. To complete the card design, I added several Shy Shamrock Resin Dots. This cute birthday card is so much fun and is sure to brighten someone's special day.
Thank you for taking the time to visit my blog. I hope that my card design will help inspire you to explore using embossing folders to add texture and detail to your projects. There are so many wonderful techniques you can try to help step up your projects and have some fun. 
Please take the time to visit the Design Team and see their amazing projects by clicking on the links in the Roll Call List below. We would appreciate it if you would leave us a comment and let us know what you liked about our projects.

If you live in the U.S. and do not have a Stampin' Up! Demonstrator, please contact me and I would be happy to help you with your creative projects. You may also visit my Online Store to place your order and have it shipped to you. 

Until Next Time

Happy Stamping,

Tricia Butts
Independent Stampin' Up! Demonstrator

Like What You See? Visit My Online Store Here

Visit My Facebook Business Page for Updates & Ideas

Click here to Contact Me

Friday, August 16, 2024

Crafty Collaborations Monochromatic Color Challenge Week 33 - Garden Green

Welcome to the Crafty Collaborations Monochromatic Color Challenge Week 33 as we showcase Garden Green from the Regals Collection. For today's card design, I wanted to create one of the most difficult types of cards to make - sympathy cards. It is never easy to lose a loved one and a sympathy card is a way to help provide comfort during this difficult time. 
Garden Green is a beautiful medium green and I thought it would be perfect for my sympathy card design. To create the background for my design, I chose to use one of the designs from the Nests of Winter Designer Series Paper, which is a Sneak Peek from the September-December 2024 Mini Catalog. This striped background has an organic feel to it and the soft watercolor look creates a soothing feeling. For the focal design and sentiment, I chose to use the Quiet Reflection stamp set. There is something so peaceful about the images in this stamp set and I love the font for the sentiments. I wanted to keep this design clean and simple so I chose not to use any embellishments to clutter up the design. 
Products Used:
Quiet Reflection stamp set (item #162689)
Deckled Circles Dies (item #162286)
Nested Essentials Dies (item #161597)
Nests of Winter Designer Series Paper (item #164183)*
Garden Green Cardstock (item #102584)
Basic White Cardstock (item #159276)
Garden Green Classic Ink Pad (item #147089)
Stampin' Dimensionals (item #104430)
*Sneak Peek product from the September-December 2024 Mini Catalog
Measurements:
Garden Green Cardstock
Card Base - 5 1/2" x 8 1/2" (Scored at 4 1/4")
Medium Rectangle die cut with the Nested Essentials Dies
Basic White Cardstock
Layer 1 - 5 1/4" x 4"
Small Rectangle die cut with the Nested Essentials Dies
Medium Circle die cut with the Deckled Circles Dies
Nests of Winter Designer Series Paper
Card Front - 5" x 3 3/4"
I often choose to use clean and simple designs for sympathy cards. At a time when someone is going through pain and loss, it can help to bring peace and share love when most needed. For this card design, I felt that Garden Green was a beautiful color to help create a peaceful design with an organic feel to it. The trees in the stamped image have an almost elegant feel to them and I love how this image looks stamped with Garden Green Classic ink. I framed the image with a Garden Green cardstock layer to help frame it against the striped background. For the sentiment, I stamped the image with Garden Green Classic ink onto Basic White cardstock and die cut it out with one of the Deckled Circles Dies. I adhered the focal image to the card front using Stampin' Dimensionals, placing it to the left side and then added the sentiment circle so that it overlapped slightly with the bottom right corner of the image. The finished card showcases this beautiful green by simply using stamps, paper and ink to provide comfort during a difficult time.
Thank you for taking the time to visit my blog. I hope that my card design will help inspire you to use Garden Green to create your own beautiful projects. This beautiful green is perfect for all occasions and for any time of the year. 

Please take the time to visit this week's Monochromatic Insta Hop and see all the amazing projects created with Garden Green. Just click here to get started. We would appreciate it if you would leave us a comment and let us know what you liked about our projects. I hope to see you back next Friday for Week 34 of the Monochromatic Color Challenge. 

If you live in the U.S. and do not have a Stampin' Up! Demonstrator, please contact me and I would be happy to help you with your creative projects. You may also visit my Online Store to place your order and have it shipped to you. 


Until Next Time

Happy Stamping,

Tricia Butts
Independent Stampin' Up! Demonstrator

Like What You See? Visit My Online Store Here

Visit My Facebook Business Page for Updates & Ideas

Click here to Contact Me


Save 15% Off Select Designer Series Paper
From The 2024-2025 Annual Catalog
Click Below To Shop Now


Wednesday, August 14, 2024

ICS August Blog Hop Happy Anniversary


Welcome to our very special ICS August Blog Hop as we celebrate our 10 year anniversary. I was honored to be invited to join this amazing Design Team over 5 years ago and I have loved every minute of this creative journey with such talented Stampin' Up! Demonstrators. To help celebrate this occasion, we will be sharing our projects and ideas with the theme of anniversary to help inspire you. 
Anniversary cards celebrate a special event, so I thought I would create an elegant clean and simple card design using the new Changing Leaves Hybrid Embossing Folder from the Online Exclusives. I love how the embossing folder and coordinating dies work together to add wonderful detail. For my color palette, I chose to use the new 2024-2026 In Color, Summer Splash, paired with Pool Party and Gold accents. For the sentiment, I heat embossed the image from the Sweetly Scripted stamp set, also from the Online Exclusives, to finish off this beautiful card design. 
Products Used:
Sweetly Scripted stamp set (item #163600)
Changing Leaves Hybrid Embossing Folder (item #164138)
Summer Splash Cardstock (item #163797)
Pool Party Cardstock (item #122924)
Gold Foil Sheets (item #132622)
Versamark Pad (item #102283)
Metallics Wow Embossing Powders (item #165678)
Blooming Pearls (item #162238)
Mini Stampin' Dimensionals (item #144108)
Measurements:
Summer Splash Cardstock
Card Base - 5 1/2" x 8 1/2" (Scored at 4 1/4")
Sentiment Strip - 3/4" x 5 1/4"
Pool Party Cardstock
Card Front - 5 3/8" x 4 1/8" Embossed with the Changing Leaves Hybrid Embossing Folder
Gold Foil Sheets
Detailed Gold Leaves die cut with the Changing Leaves Hybrid Embossing Folder Dies
This simply beautiful card focuses on the wonderful texture created by the Changing Leaves Hybrid Embossing Folder combined with the exquisitely detailed Gold foil leaves created with the coordinating dies. I love the way the Pool Party card front pops against the Summer Splash card base. I chose Gold embossing for the sentiment on the Summer Splash sentiment strip to coordinate with the Gold leaves and added several Gold pearls to complete the design.
Thank you for taking the time to visit my blog. I hope that my card design will help inspire you to create your own beautiful projects to celebrate the special milestone events in your life. 
Now it's time to visit Charmane's blog and see what she has created to celebrate our 10 year anniversary. Just click on the Next button to visit her blog. We would love it if you would leave us a comment and let us know what you like about our projects. I hope you enjoy the rest of our blog hop.


If you live in the U.S. and do not have a Stampin' Up! Demonstrator, please contact me and I would be happy to help you with your creative projects. You may also visit my Online Store to place your order and have it shipped to you. 

Until Next Time

Happy Stamping,

Tricia Butts
Independent Stampin' Up! Demonstrator

Like What You See? Visit My Online Store Here

Visit My Facebook Business Page for Updates & Ideas

Click here to Contact Me