Wednesday, October 25, 2023

Demonstrator Training October Blog Hop

Welcome to the Demonstrator Training Blog Hop, organized by Kylie and Bruno Bertucci, to help us share our projects to help inspire you. Our theme each month is Thank You and/or Congratulations and you will have the chance to visit with talented Stampin' Up! Demonstrators from around the world and see their amazing projects. 
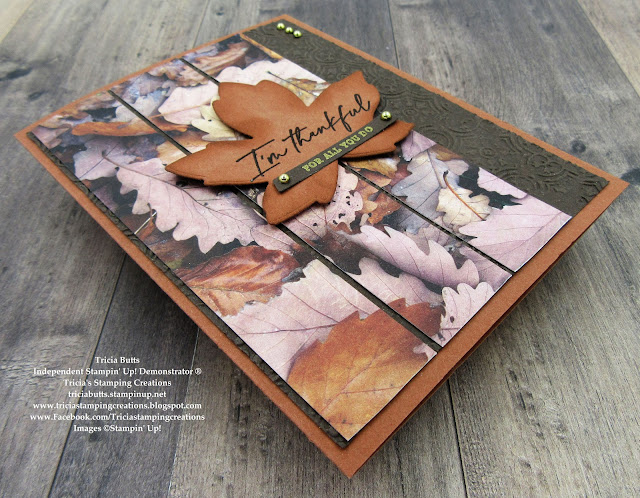
I love creating clean and simple Thank You cards to send to customers to show my appreciation. One of my favorite ways to do this is with designer series paper as the focal image for my card design. For today's card design, I chose to use one of the beautiful designs from the All About Autumn 6"x6" Designer Series Paper which can be found in the September-December 2023 Mini Catalog. I wanted the photo realistic image to be the focus of this beautiful card, so the only thing I added was a sentiment that I created using the Autumn Leaves Bundle. I love how card has a simply Wow factor to it without a lot of fuss. 
Products Used:
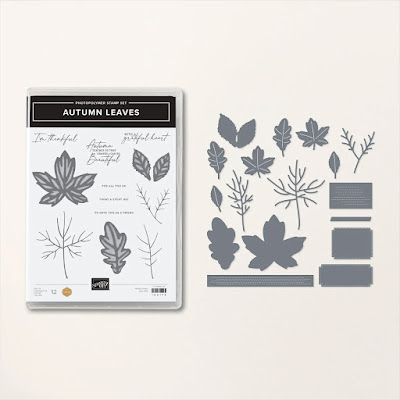
Autumn Leaves Bundle (item #162186)
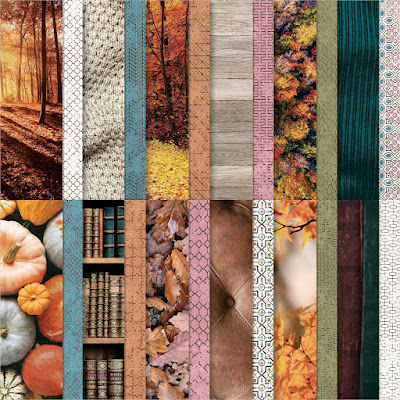
All About Autumn 6"x6" Designer Series Paper (item #162178)
Early Espresso Cardstock (item #119686)
Crumb Cake Cardstock (item #120953)
Versamark Pad (item #102283)
Metallics Embossing Powders (item #155555)
Neutrals Adhesive Backed Sequins (item #161627)
Stampin' Dimensionals (item #104430)

Measurements:
Early Espresso Cardstock
Card Base - 8 1/2' x 5 1/2" (Scored at 4 1/4")
Sentiment Label die cut with the Autumn Leaves Dies
Crumb Cake Cardstock
Small Sentiment Label die cut with the Autumn Leaves Dies
All About Autumn Designer Series Paper 
Card Front - 5 1/4" x 4"
Creating clean and simple cards with designer series paper is really just as it sounds. It's a great way to use up your beautiful paper and let the designs shine as the main focus of the card design. For this particular card, I chose to create a landscape design to make the most of the beautiful Fall leaves for the background. The sentiment has been heat embossed with Gold Embossing Powder onto the Early Espresso sentiment label and attached to the card front with Stampin' Dimensionals. For the smaller sentiment, I stamped the sentiment using Versamark and Early Espresso Classic ink and then heat embossed it using Clear Embossing Powder to give it a glossy finish. I attached the label to the bottom of the larger sentiment, towards the right side. To complete the card design, I added several of the Gold Adhesive Backed Sequins for a touch of bling. One of the things I love about this card design is that it is relatively flat and ready to mail out with normal postage.
Thank you for taking the time to visit my blog. I hope that my card design will provide you with some new ideas to help you create your own beautiful projects to send to family and friends. Sending "paper hugs" is a great way to let people know that you are thinking of them.
Please take a moment to hop along and visit the other Demonstrators participating today by click on the links in the Roll Call List below. We would love it if you would leave us a comment and let us know what you liked about our projects and how we inspired you. 

If you live in the U.S. and do not have a Stampin' Up! Demonstrator, please contact me and I would be happy to help you with your creative projects. You may also visit my Online Store to place your order and have it shipped to you. 

Until Next Time

Happy Stamping,

Tricia Butts
Independent Stampin' Up! Demonstrator

Like What You See? Visit My Online Store Here

Visit My Facebook Business Page for Updates & Ideas

Click here to Contact Me


Celebrate Stampin' Up!'s 35th Anniversary
With Your Choice of Starter Kit
Click Below For More Details

Get Creative For The Holidays
With The September-December 2023 Mini Catalog
Click Below To Visit My Online Store


Wednesday, October 18, 2023

New At SU October Blog Hop Sketch Challenge Heartfelt Hexagon

Welcome to the New At SU October Blog Hop and this month we have a Sketch Challenge to help spark your creativity. Our wonderful Design Team will be sharing their projects and ideas using products from the September-December 2023 Mini Catalog to help inspire you to create your own wonderful projects with this sketch.
For my card, I wanted to create a pretty floral design combining the new Heartfelt Hexagon Bundle with the Abundant Beauty Decorative Masks. I had recently created a project using Shimmery White Embossing Paste colored with Balmy Blue ink and I used the left over paste on a piece of Basic White cardstock for a future project. Today as I was working out my design, I realized that it would make the perfect background for my card design. For the flowers I went with pretty pinks and the leaves are bright green and I love how they pop against the Balmy Blue background. A little Gold embossing for the sentiment and I was able to create a pretty card design using the sketch for today's challenge. 
Products Used:
Heartfelt Hexagon Bundle (item #162889)
Abundant Beauty Decorative Masks (item #162331)
Foursquare Decorative Masks (item #161285)
Balmy Blue Cardstock (item #146982)
Basic White Cardstock (item #159276)
Bubble Bath Classic Ink Pad (item #161664)
Fresh Freesia Classic Ink Pad (item #155611)
Daffodil Delight Classic Ink Pad (item #147094)
Lemon Lime Twist Classic Ink Pad (item #147145)
Parakeet Party Classic Ink Pad (item #159208)
Balmy Blue Ink Refill (item #147168)
Versamark Pad (item #102283)
Metallics Embossing Powders (item #155555)
Shimmery White Embossing Paste (item #145645)
Pastel Adhesive Backed Sequins (item #160387)
Stampin' Dimensionals (item #104330)
Palette Knives (item #142808)
Measurements:
Balmy Blue Cardstock
Card Base - 8 1/2" x 5 1/2" (Scored at 4 1/4")
Strip - 1" x 4"
Basic White Cardstock
3 Flowers created with the Abundant Beauty Decorative Masks
5 Leaves created with the Abundant Beauty Decorative Masks
Sentiment Label stamped and punched out with the Heartfelt Hexagon Bundle
Sometimes when I design cards, I have a set design in mind. Today's card was more of an organic flow as I started with the embossed background and worked forward from there to come up with the finished design. To create the background, I mixed a couple of drops of Balmy Blue ink with some Shimmery White Embossing Paste and applied it over the mask from the Foursquare Decorative Masks onto a piece of Basic White cardstock. Note: the embossing paste dries very quickly, so make sure to clean your masks and palette knives as soon as you are finished with some warm soapy water to remove any traces of the paste before it hardens.
I loved being able to transform these flowers from traditional sunflowers to soft and pretty pink daisies using the Abundant Beauty Decorative Masks. I used a combination of Bubble Bath and Fresh Freesia to create the petals and Daffodil Delight and Lemon Lime Twist for the centers. For the leaves, I used a combination of Lemon Lime Twist and Parakeet Party. I fussy cut the flowers and leaves ready to arrange them on the card front. I stamped small leaves using images from the Heartfelt Hexagon stamp set onto the embossed card front using Parakeet Party Classic ink. I attached the Balmy Blue cardstock strip across the front of the card front and then attached the card front to the Balmy Blue card base. For the sentiment label, I stamped and heat embossed the image with Gold embossing powder and punched it out with the coordinating Heartfelt Hexagon Punch. I added the sentiment to the Balmy Blue strip with Stampin' Dimensionals and then added the flowers and leaves around it to create the final design. To complete the card, I added some Balmy Blue Pastel Adhesive Backed Sequins for a touch of bling. 
Thank you for taking the time to visit my blog. I hope that my card design will help inspire you to create your own beautiful projects to share with family and friends. There are so many wonderful options to explore in the September-December 2023 Mini Catalog.
Please take the time to visit with the Design Team and their wonderful projects by clicking on the links in the Roll Call List. We would appreciate it if you would leave us a comment and let us know what you enjoyed about our projects.
If you live in the U.S. and do not have a Stampin' Up! Demonstrator, please contact me and I would be happy to help you with your creative projects. You may also visit my Online Store to place your order and have it shipped to you. 


Until Next Time

Happy Stamping,

Tricia Butts
Independent Stampin' Up! Demonstrator

Like What You See? Visit My Online Store Here

Visit My Facebook Business Page for Updates & Ideas

Click here to Contact Me


Celebrate Stampin' Up!'s 35th Anniversary
With Your Choice Of Starter Kit
Click Below For More Details

Get Creative For The Holidays
With The September-December 2023 Mini Catalog
Click Below To Visit My Online Store


Sunday, October 15, 2023

Stamptastic Friends October Blog Hop Favorite Coloring Method

Welcome to the Stamptastic Friends October Blog Hop and this month we are showcasing our favorite coloring methods. Stampin' Up! has so many wonderful coloring mediums that it is difficult to choose a favorite. Our Design Team will be sharing their projects and ideas to help convince you that their method is the best. I wonder which method they will choose.
One of my favorite ways to color would have to be using Stampin' Blends Markers. I just love how they blend and the beautiful range of colors that Stampin' Up! offers gives me so many options. I find coloring with Stampin' Blends Markers so relaxing and I couldn't wait to use them to color the giraffe image in the new Festive & Fun stamp set. I paired this cute image with the new Merry Bold & Bright Designer Series Paper to create a bright and cheerful Christmas card. Don't you just love the Fa La La La La in the background design? 
Products Used:
Festive & Fun stamp set (item #162078)
Countryside Corners Dies (item #161471)
Inked & Tiled Punch Pack (item #161167)
Merry Bold & Bright Designer Series Paper (item $161945)
Thick Basic White Cardstock (item #159229)
Basic White Cardstock (item #159276)
Memento Tuxedo Black Pad (item #132708)
Granny Apple Green Stampin' Blends Combo Pack (item #154885)
Lemon Lolly Stampin' Blends Combo Pack (item #161673)
Daffodil Delight Stampin' Blends Combo Pack (item #154883)
Pecan Pie Stampin' Blends Combo Pack (item #161674)
Poppy Parade Stampin' Blends Combo Pack (item #154958)
Fresh Freesia Stampin' Blends Combo Pack (item #155518)
Balmy Blue Stampin' Blends Combo Pack (item #154830)
Shaded Spruce Stampin' Blends Combo Pack (item #154903)
Clear Wink of Stella Glitter Brush (item #141897)
Glossy Dots (item #158827)
Stampin' Dimensionals (item #104430)
Measurements:
Thick Basic White Cardstock
Card Base - 9 1/2" x 5 1/2" (Scored at 4 1/4")
Basic White Cardstock 
Focal background die cut with the Countryside Corners Dies
Giraffe image stamped with Festive & Fun stamp set
Sentiment Strip - 1/2" x 4"
Merry Bold & Bright Designer Series Paper
Card Front - 5 1/4" x 4"
I love creating Christmas cards and the Festive & Fun stamp set is one of my favorites from the September-December 2023 Mini Catalog. It's like a Christmas version of the Zany Zoo Bundle in the 2023-2024 Annual Catalog. I chose to use one of the designs from the Merry Bold & Bright Designer Series Paper to add a wonderful pop of color to the card. The giraffe image from the Festive & Fun stamp set is so much fun to color with Stampin' Blends Markers. For a touch of shimmer, I used Clear Wink of Stella on the ornaments and Santa hat. I used the Countryside Corners Dies to create the background for the giraffe and I fussy cut the image and attached it to the background with Stampin' Dimensionals to pop it up. The sentiment has been stamped on a 1/2" strip of Basic White cardstock using Memento Tuxedo Black ink and I used the star punch from the Inked & Tiled Punch Pack to create the banner for the strip. For a touch of bling, I added several Daffodil Delight Dots to complete this bright and cheerful Christmas card. 
Thank you for taking the time to visit my blog. I hope my card design will help inspire you to try Stampin' Blends Markers to color your images for your projects. They are so much fun to use and I love the vibrant colors and how easy they are to blend. 
Please take a moment to hop along and visit the other Design Team members by clicking on the links in the Roll Call List below. We would appreciate it if you would leave us a comment and let us know what you enjoyed about our projects. 
 
If you live in the U.S. and do not have a Stampin' Up! Demonstrator, please contact me and I would be happy to help you with your creative projects. You may also visit my Online Store to place your order and have it shipped to you. 

Until Next Time

Happy Stamping,

Tricia Butts
Independent Stampin' Up! Demonstrator

Like What You See? Visit My Online Store Here

Visit My Facebook Business Page for Updates & Ideas

Click here to Contact Me


Celebrate Stampin' Up!'s 35th Annivesary
With Your Choice of Starter Kit
Click Below For More Details

Get Creative For The Holidays
With The September-December 2023 Mini Catalog
Click Below To Visit My Online Store


Saturday, October 14, 2023

Stamping Inkspirations October Blog Hop Sketch Challenge

Today we are hopping along with the Stamping Inkspirations October Blog Hop. This month we have a Sketch Challenge and our wonderful Design Team will be sharing their projects and ideas to help inspire you to create your own projects with today's sketch. There are so many different ways to interpret sketches using the products that you have in your own crafting stash.
For my interpretation of this card sketch, I chose to create a Fall themed card design using the Autumn Leaves Bundle and coordinating All About Autumn 6"x6" Designer Series Paper. I chose to use the Fall Leaves design from the designer series paper to create the strips for my background. I love how it adds texture and dimension to the card design. This sketch is a wonderful way to showcase the beautiful designs in this pretty pack of paper. 
Products Used: 
Autumn Leaves Bundle (item #162186)
Distressed Tile 3D Embossing Folder (item #162189)
All About Autumn 6"x6" Designer Series Paper (item #162178)
Copper Clay Cardstock (item #161721)
Early Espresso Cardstock (item #119686)
Early Espresso Classic Ink Pad (item #147114)
Copper Clay Classic Ink Pad (item #161647)
Versamark Pad (item #102283)
Basics Embossing Powders (item #155554)
Metallics Embossing Powders (item #155555)
Festive Pearls (item #159963)
Stampin' Dimensionals (item #104430)
Sponge Daubers (item #133773)
Measurements:
Copper Clay Cardstock 
Card Base - 8 1/2" x 5 1/2" (Scored at 4 1/4")
Large Leaf die cut with the Autumn Leaves Dies
Early Espresso Cardstock
Card Front - 5 1/4" x 4" Embossed with the Distressed Tile 3D Embossing Folder
Sentiment Label stamped & die cut with the Autumn Leaves Bundle
All About Autumn Designer Series Paper
3 Strips - 1" x 5 1/4"
This beautiful card has all the elements for a perfect Fall themed design. For my color palette, I chose to use Copper Clay and Early Espresso to compliment the designer series paper and I added Gold accents to step up the design. To create the card front, I embossed the Early Espresso card front with the Distressed Tile 3D Embossing Folder to add some texture. I attached the three strips of designer series paper to the card front, leaving a small space between each strip to create a thin border. For the focal image, I die cut the large leaf from Copper Clay cardstock using the Autumn Leaves Dies and then I heat embossed the sentiment from the Autumn Leaves stamp set using Versamark and Early Espresso ink combined with Clear embossing powder. I sponged the edges of the leaf die cut with Copper Clay Classic ink using a Sponge Dauber. I attached the leaf to the card front with Stampin' Dimensionals, towards the center. For the small sentiment, I heat embossed the image with Gold embossing powder onto Early Espresso cardstock and used a die from the Autumn Leaves Dies to die cut it out. I attached it to the Copper Clay leaf below the large sentiment. To finish off the design, I added several Gold pearls from the Festive Pearls to the sentiment and the top right side of the embossed card front. 
Thank you for taking the time to visit my blog. I hope that my card design will help inspire you to give this sketch challenge a try and create your own beautiful design. There are so many wonderful options to explore.
Now it's time to visit Danielle's blog and see what she has created with today's sketch. Just click the Next button to visit her blog or use the Roll Call List below to find your way. We would love it if you would leave us a comment and let us know how our projects inspired you. I hope you enjoy today's blog hop. 

Roll Call List

If you live in the U.S. and do not have a Stampin' Up! Demonstrator, please contact me and I would be happy to help you with your creative projects. You may also visit my Online Store to place your order and have it shipped to you. 

Until Next Time

Happy Stamping,

Tricia Butts
Independent Stampin' Up! Demonstrator

Like What You See? Visit My Online Store Here

Visit My Facebook Business Page for Updates & Ideas

Click here to Contact Me


Celebrate Stampin' Up!'s 35th Anniversary
With Your Choice of Starter Kit
Click Below For More Details

Get Creative For The Holidays
With The September-December 2023 Mini Catalog
Click Below To Visit My Online Store


Ink. Stamp. Share. October Showcase Blog Hop

Welcome to the Ink. Stamp. Share. October Showcase Blog Hop as we share our current projects to help inspire you. Our Design Team will be sharing their projects and ideas using current Stampin' Up! products to help spark your creativity.
Stampin' Up! has such beautiful designer series paper and one of my favorite things to do is to create clean and simple card designs that showcase the wonderful designs in these paper packs. My card design today is one of support for a friend who is going through a difficult time. It is a simple way to remind her that I am there for her whenever she needs me. The design I chose from the One Horse Open Sleigh 6"x6" Designer Series Paper gives me a feeling of peace and I felt that it was perfect for the card I wanted to create for my friend. With just a simple sentiment and a couple of Iridescent Rhinestones, my card is complete and ready to send to her, to hopefully provide her with some comfort.
Products Used:
Sweet & Precious stamp set (item #161588)
Something Fancy Dies (item #160424)
One Horse Open Sleigh 6"x6" Designer Series Paper (item $162118)
Night of Navy Cardstock (item #100867)
Versamark Pad (item #102283)
Basics Embossing Powders (item #155554)
Iridescent Rhinestones Basic Jewels (item #158130)
Stampin' Dimensionals (item #104430)
Measurements:
Night of Navy Cardstock
Card Base - 8 1/2" x 5 1/2" (Scored at 4 1/4")
Sentiment Label die cut with the Something Fancy Dies
One Horse Open Sleigh Designer Series Paper
Card Front - 5 1/4" x 4"
This beautiful card is so simple to create and it is a wonderful way to create a lot of cards in a short amount of time. Simply cut and prep your card bases, card fronts and sentiments and then assemble. I chose to emboss my sentiment with White embossing powder onto the Night of Navy sentiment label to make it pop against the card front. The Iridescent Rhinestones add a touch of bling without being overwhelming, to finish off the design. 
Thank you for taking the time to visit my blog. I hope that my card design helps inspire you to create your own beautiful cards to send to your family and friends. Creating clean and simple cards with designer series paper is a wonderful way to share something beautiful with the people you care about. The One Horse Open Sleigh is available in the Online Exclusives section of my Online Store while supplies last. It's a great way to create beautiful cards for the holidays and beyond.
Please take the time to visit our Design Team by using the Roll Call List below to visit their blogs. We would appreciate it if you could leave us a comment and let us know what you liked about our projects. I hope our projects will help inspire you to explore your own creativity.

If you live in the U.S. and do not have a Stampin' Up! Demonstrator, please contact me and I would be happy to help you with your creative projects. You may also visit my Online Store to place your order and have it shipped to you. 

Until Next Time

Happy Stamping,

Tricia Butts
Independent Stampin' Up! Demonstrator

Like What You See? Visit My Online Store Here

Visit My Facebook Business Page for Updates & Ideas

Click here to Contact Me


Celebrate Stampin' Up!'s 35th Anniversary
With Your Choice of Starter Kit
Click Below For More Details

Explore The Amazing Products
Available From The Online Exclusives
Click Below To View In My Online Store