Tuesday, March 28, 2023

Paper Pumpkin Possibilities March Blog Hop Ten Years Of Growth

Welcome to the Paper Pumpkin Possibilities March Blog Hop as we showcase alternative project ideas for the Ten Years Of Growth Kit. This kit is extra special because it celebrates the 10 year anniversary of Paper Pumpkin and I have loved being a part of this wonderful creative journey. Our Design Team members will be sharing their projects and ideas to help inspire you to think outside the box to create your own beautiful designs. 
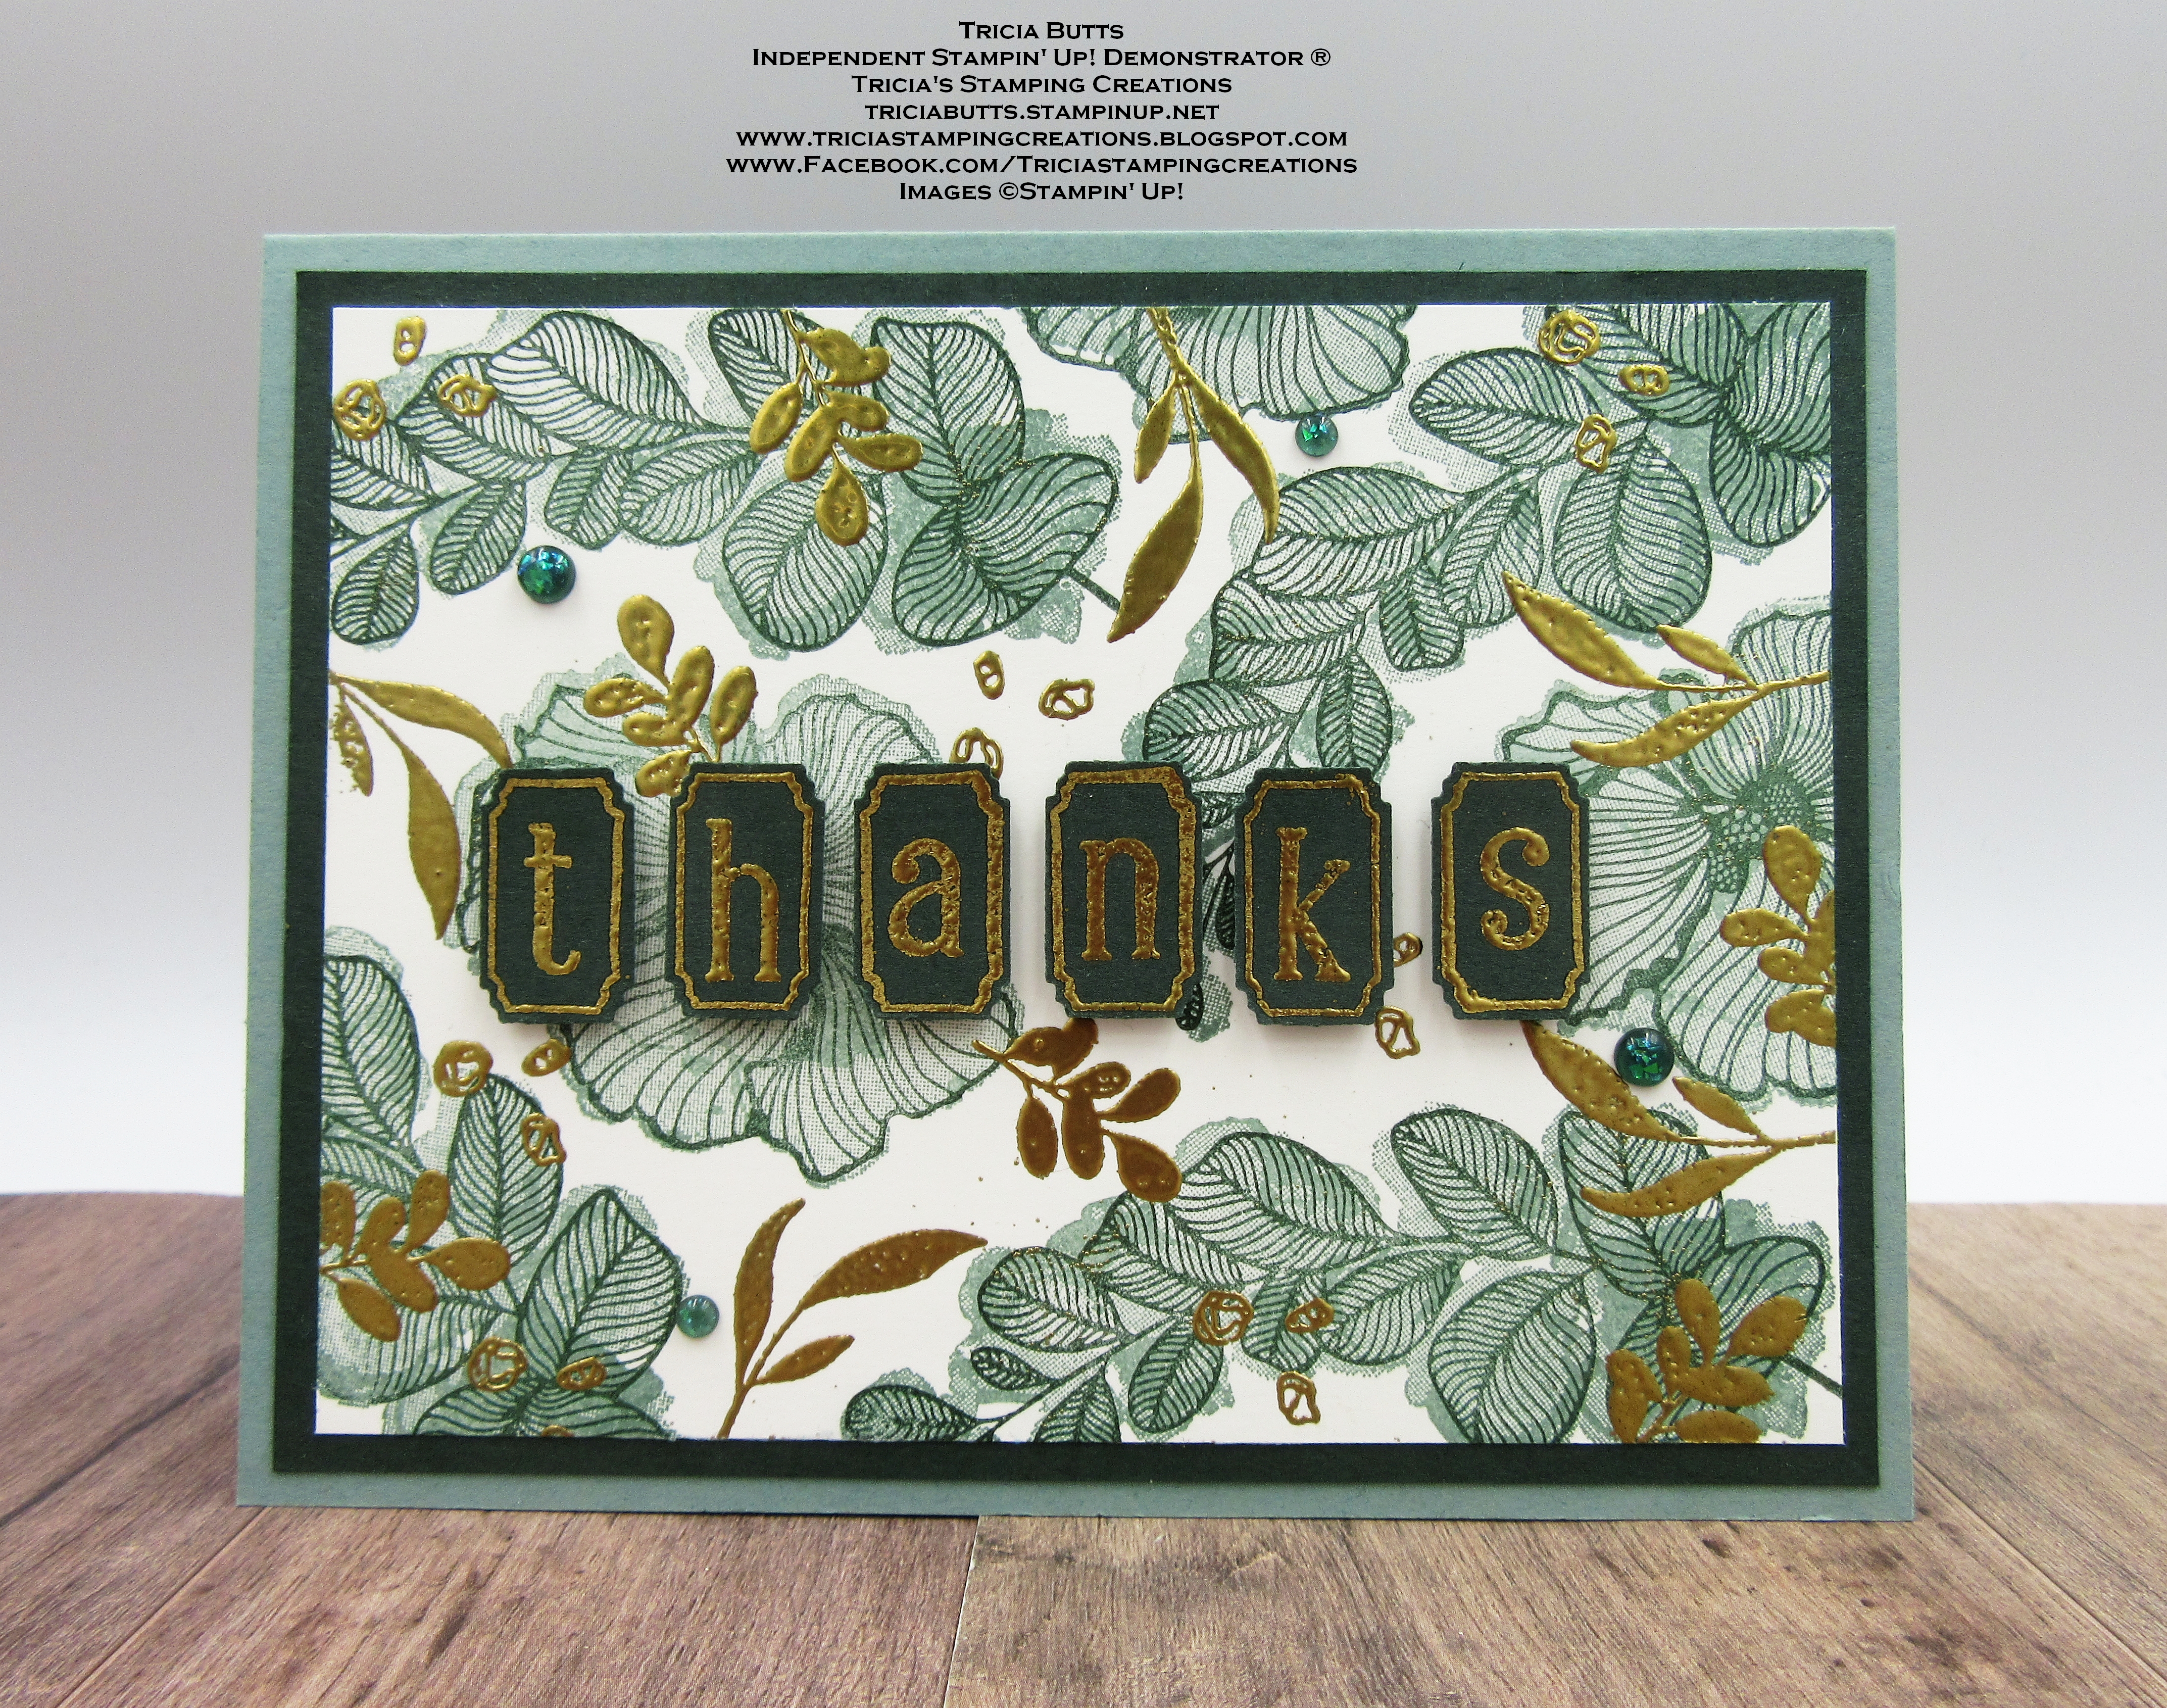
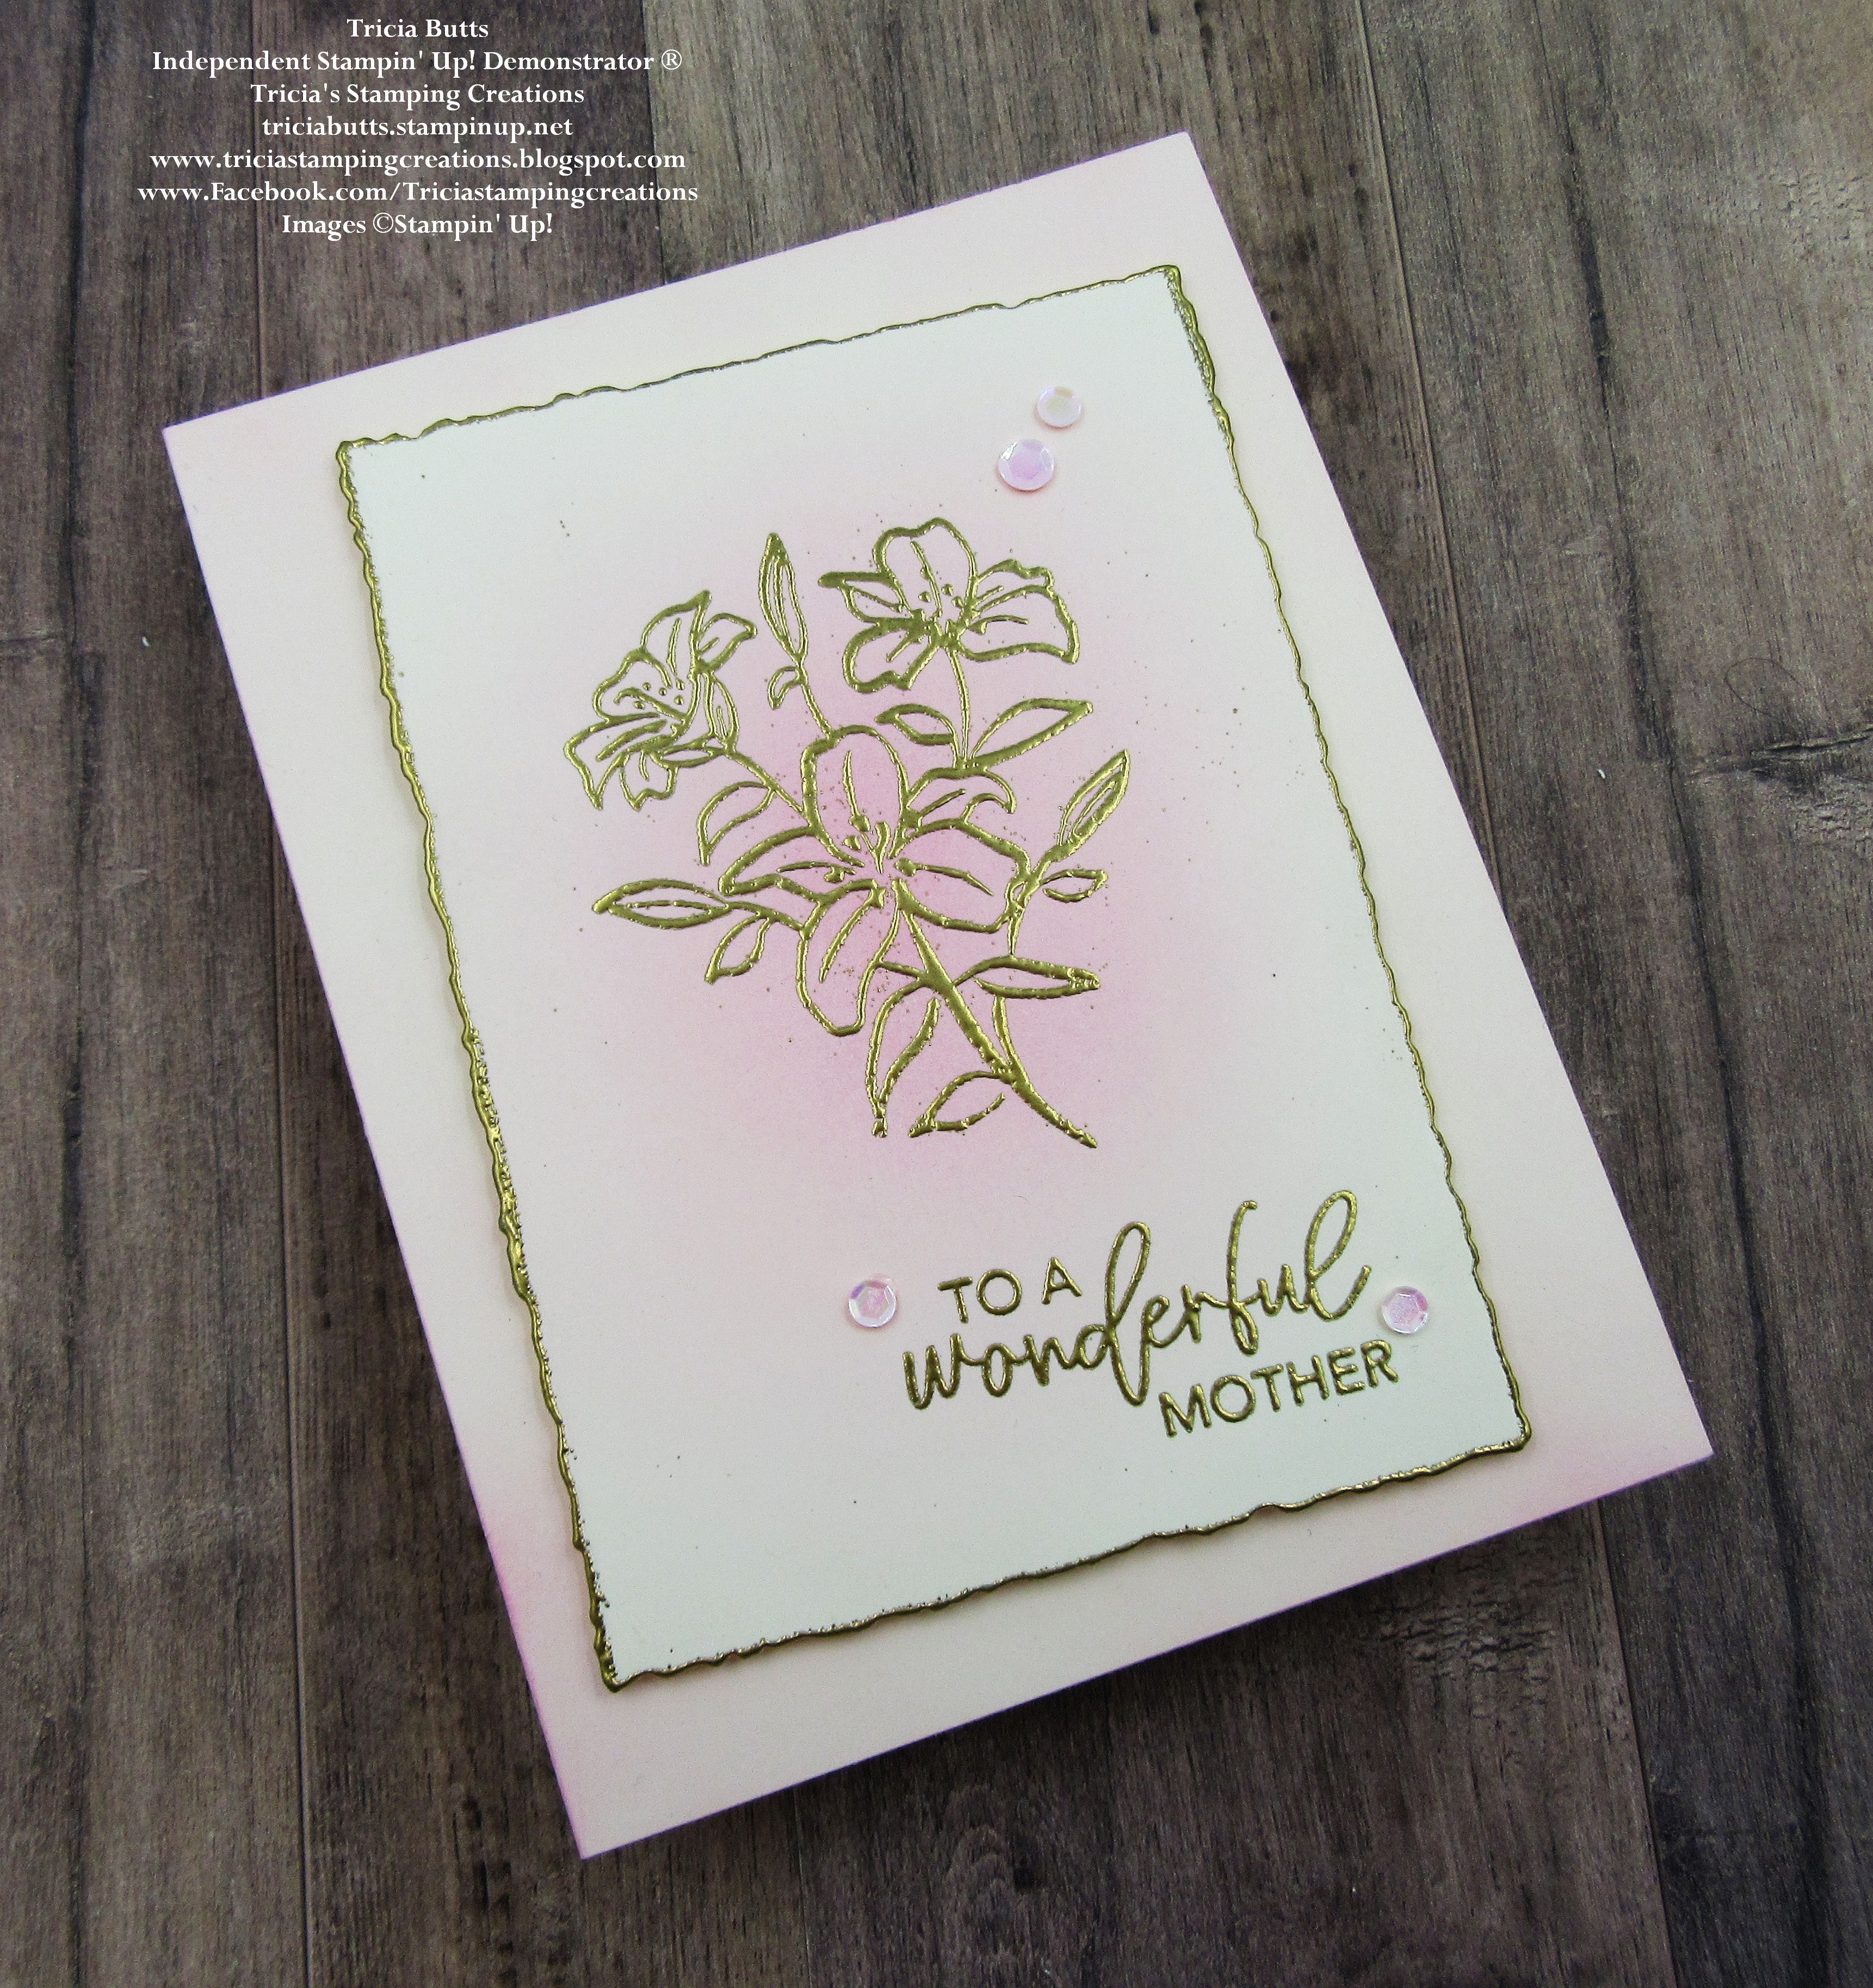
The exclusive stamp sets included in this month's kit are so beautiful and I love the wonderful mix of images and sentiments and how well they work together. So I decided to create a clean and simple card design using an image from the bonus stamp set and the sentiment from the exclusive kit stamp set to create the focal image for my card design. I love to heat emboss with Gold embossing powder, so I used this technique to help step up my card to create an elegant Mother's Day card. The soft background has been created by applying Polished Pink Classic ink with a Blending Brush to add a hint of color to the card design. 
Products Used:
Paper Pumpkin April 2023 Ten Years Of Growth Kit
Deckled Rectangles Dies (item #159173)
Very Vanilla Cardstock (item #101650)
Thick Very Vanilla Cardstock (item #144237)
Polished Pink Classic Ink Pad (item #155712)
Versamark Pad (item #102283)
Metallics Embossing Powders (item #155555)
Pastel Adhesive Backed Sequins (item #160387)
Measurements:
Thick Very Vanilla Cardstock
Card Base - 8 1/2" x 5 1/2" (Scored at 4 1/4")
Very Vanilla Cardstock 
Card Front - die cut with the Deckled Rectangles Dies
This soft and pretty card design is based around two fun techniques - heat embossing and blending with a Blending Brush. Together these techniques help to create a design that is simple yet elegant. To create the soft background, I used a Blending Brush to build soft color to the Very Vanilla cardstock using Polished Pink Classic ink. I did this to the center of the card front layer and to the edges of the card base, leaving some of the Very Vanilla cardstock showing to add contrast to the design. The images and sentiments in both stamp sets are perfect for heat embossing and I love the way the Gold embossing looks on the softly sponged Very Vanilla cardstock. I also added Gold embossing to the deckled edges of the card front by inking up the edges with Versamark ink and then adding Gold embossing powder and heating it. I attached the card front to the card base with the Stampin' Dimensionals included in the kit to step up the design. To finish off the card, I added several Pastel Adhesive Backed Sequins to the card front for a touch of sparkle. This beautiful design can be used for a variety of occasions and you could use a variety of colors for the background to personalize your card. 
Thank you for taking the time to visit my blog. I hope that my card design will show you how simple it is to take elements from this card, like the exclusive stamp sets, to create your own beautiful cards. There are so many wonderful possibilities to explore.
Now it's time to visit Janey's blog and see what wonderful projects she has to share with us this month. Just click on the Next button below to visit her blog. We would love it if you would leave us a comment and let us know what you liked about our projects. I hope you enjoy the rest of our blog hop. 

If you live in the U.S. and do not have a Stampin' Up! Demonstrator, please contact me and I would be happy to help you with your creative projects. You may also visit my Online Store to place your order and have it shipped to you. 

Until Next Time

Happy Stamping,

Tricia Butts
Independent Stampin' Up! Demonstrator

Like What You See? Visit My Online Store Here

Visit My Facebook Business Page for Updates & Ideas

Click here to Contact Me


Create Beautiful Cards 
With The April Paper Pumpkin Kit
Click Below To Subscribe By April 10th


Saturday, March 18, 2023

Stamping With Friends March Blog Hop Anything Goes

Welcome to the Stamping With Friends March Blog Hop and this month our theme is "Anything Goes". I love this kind of theme because it means we have the freedom to let our creativity loose and see where it takes us. Our Design Team Members will be sharing their wonderful projects and ideas to help inspire you and hopefully spark your creativity. 
My card design today was inspired by a card I recently saw created by fellow Stampin' Up! Demonstrator, Susan Campfield, during her Facebook Live. I really loved the layout that she used for her card and decided to CASE it to create my own version. What is CASE? It means Copy And Share Everything or Copy And Selectively Edit, and it's a wonderful way to find inspiration, especially if you are having a creative block. For my card design, I chose to use the Sea Turtles stamp set with the By The Bay 6"x6" Designer Series Paper to create a lovely clean and simple birthday card. 
Products Used:
Sea Turtle stamp set (item #160500)
Go To Greetings stamp set (item #158763)
Something Fancy Dies (item #160424)
By The Bay 6"x6" Designer Series Paper (item #160434)
Night of Navy Cardstock (item #100867)
Basic White Cardstock (item #159276)
Mint Macaron Classic Ink Pad (item #147106)
Night of Navy Classic Ink Pad (item #147110)
Versamark Pad (item #102283)
Metallics Embossing Powders (item #155555)
2021-2023 In Color Opal Rounds (item #159185)
Mini Stampin' Dimensionals (item #144108)
Measurements:
Night of Navy Cardstock
Card Base - 8 1/2" x 5 1/2" (Scored at 4 1/4"_
Sentiment Label die cut with the Something Fancy Dies 
Basic White Cardstock
Layer 1 - 3 1/4" x 4 5/8"
Sea Turtle stamped and fussy cut with Paper Snips
By The Bay Designer Series Paper
4 Strips - 1" x 3"
I love the soft mix of blues and greens in the designer series paper that I chose for the background and I wanted it to really pop on my card design. For this reason, I chose to use Night of Navy cardstock for the card base and I stamped the small school of fish image onto the background with Night of Navy Classic ink to create a tone on tone design. I arranged the 4 strips of designer series paper onto the Basic White Layer and then added the layer to the card base with Mini Stampin' Dimensionals. For the sentiment, I heat embossed the image from the Go To Greetings stamp set using Silver embossing powder, onto a Night of Navy sentiment label die cut with the Something Fancy Dies. I attached the sentiment to the card front with Mini Stampin' Dimensionals towards the bottom right corner. To create the turtle, I stamped the detailed image with Mint Macaron Classic ink onto Basic White cardstock and then flipped the stamp image over to stamp again over the top of the detailed image, making sure to stamp off once on a scrap piece of paper to create the lighter background color. I used Paper Snips to fussy cut the turtle and then attached it to the card front with Mini Stampin' Dimensionals so that it slightly overlaps the sentiment label. I added a touch of sparkle to the turtle by coloring it with Clear Wink of Stella and finished off the card design with several of the 2021-2023 In Color Opal Rounds, using the Soft Succulent and Evening Evergreen gems. This card is so versatile and I think it would make a great masculine design.
Thank you for taking the time to visit my blog. I hope that my card design will help inspire you to get creative with your supplies and create your own beautiful designs. It is so much fun to mix and match different products to create your own unique projects.
Please take the time to visit with my fellow Design Team members and see what they have created this month. Just click on the links in the Roll Call List to visit their blogs and journey along our blog hop. We would love it if you would leave us a comment and let us know what you liked about our projects.

If you live in the U.S. and do not have a Stampin' Up! Demonstrator, please contact me and I would be happy to help you with your creative projects. You may also visit my Online Store to place your order and have it shipped to you. 

Until Next Time

Happy Stamping,

Tricia Butts
Independent Stampin' Up! Demonstrator

Like What You See? Visit My Online Store Here

Visit My Facebook Business Page for Updates & Ideas

Click here to Contact Me


Online Exclusives Now Available
While Supplies Last
Click Below To Place Your Order

Explore Your Creativity
With The January-April 2023 Mini Catalog
Click Below To Visit My Online Store


Wednesday, March 15, 2023

New At SU March Blog Hop Spell It Out Alphabest

Welcome to the New At SU March Blog Hop as we explore the theme, "Spell It Out" showcasing the alphabet and other word related products available from Stampin' Up! Our wonderful Design Team members will be sharing their ideas and projects to help spark your creativity and explore different ways to use these products to create your own beautiful projects.
Alphabet stamp sets are a wonderful way to personalize your projects and are especially helpful when combined with stamp sets that do not have any sentiments. For my card design today, I decided to combine the beautiful Uniquely Artistic stamp set, which is an image only stamp set, with the Alphabest Bundle, to create a uniquely beautiful Thank You card. I love the size and font of the Alphabest stamp set and the Best Label Punch coordinates perfectly to create punched out labels for each individual letter. For my color combination, I chose to use the retiring Soft Succulent and Evening Evergreen with Basic White and touches of Gold embossing. 
Products Used:
Alphabest Bundle (item #158886)
Uniquely Artistic stamp set (item #158935)
Evening Evergreen Cardstock (item #155574)
Soft Succulent Cardstock (item #155776_
Basic White Cardstock (item #159276)
Evening Evergreen Classic Ink Pad (item #155576)
Soft Succulent Classic Ink Pad (item #155778)
Versamark Pad (item #102283)
Metallics Embossing Powders (item #155555)
2021-2023 In Color Opal Rounds (item #159185)
Mini Stampin' Dimensionals (item #144108)
Measurements:
Soft Succulent Cardstock
Card Base - 8 1/2" x 5 1/2" (Scored at 4 1/4")
Evening Evergreen Cardstock
Layer 1 - 5 1/4" x 4"
6 Letters stamped and punched out with the Alphabest Bundle
Basic White Cardstock
Card Front - 5" x 3 3/4"
This clean and simple card design has been stepped up with Gold embossing to give it an elegant touch. I stamped the Basic White card front with images from the Uniquely Artistic stamp set to create a beautiful background design. For the sentiment, I stamped each of the individual letters and with the frame around them, using the Alphabest stamp set and heat embossed them with Gold embossing powder to make them pop against the Evening Evergreen cardstock. I then punched out each individual letter with the Best Label Punch and arranged them on the card front. I attached the letters with Mini Stampin' Dimensionals to give the card some depth and dimension. To complete the card design, I added several Evening Evergreen Opal Rounds for a touch of bling. I love the versatility of the the Alphabest Bundle and how simple it is to create custom sentiments just by stamping and arranging the letters. This wonderful stamp set includes letters, numbers and punctuation as well as some decorative designs to help you dress up your projects. 
Thank you for taking the time to visit my blog. I hope that my card design will inspire you to try using the Alphabest Bundle to step up your projects. There are so many wonderful options available to explore. Have some fun mixing and matching your existing stamp sets to create your own unique designs. 
Now it's time to visit with my fellow Design Team members and see what they have created to share with you. Just click on the links in the Roll Call List below to find your way along our blog hop. We would appreciate it if you would leave us a comment and let us know what you liked about our projects. I hope you enjoy the rest of our blog hop. 

If you live in the U.S. and do not have a Stampin' Up! Demonstrator, please contact me and I would be happy to help you with your creative projects. You may also visit my Online Store to place your order and have it shipped to you. 

Until Next Time

Happy Stamping,

Tricia Butts
Independent Stampin' Up! Demonstrator

Like What You See? Visit My Online Store Here

Visit My Facebook Business Page for Updates & Ideas

Click here to Contact Me


Online Exclusives Now Available
While Supplies Last
Click Below To Place Your Order

Explore Your Creativity
With The January-April 2023 Mini Catalog
Click Below To Visit My Online Store


Saturday, March 11, 2023

Stamping Inkspirations March Blog Hop Technique Challenge Die Cutting

Welcome to the Stamping Inkspirations March Blog Hop as we showcase projects with this month's Technique Challenge - Die Cutting. This technique is a great way to add dimension and detail to your projects and is a favorite for those of us who are not a fan of fussy cutting with Paper Snips. Our wonderful Design Team members will be sharing their projects and ideas to help inspire you to create your own beautiful projects.
There are so many ways to use Die Cutting to create your projects. For my card design today, I decided to show how you can use it to create an intricate background, to cut out stamped images to create my design and for the sentiment label to complete the card. Each one of these can help step up your card design on its own, but together they combine to create a simply Wow design. For this card design, I chose to use the Two Tone Flora Bundle which includes the Two Tone Flora stamp set and coordinating dies. For the sentiment I chose to use one of the Something Fancy Dies to die cut the sentiment from the Go To Greetings stamp set. These products work together beautifully to help create beautiful cards with just a few simple steps. 
Products Used:
Two Tone Flora Bundle (item #160414)
Go To Greetings stamp set (item #158763)
Something Fancy Dies (item #160424)
2022-2024 In Color 6"x6" Glimmer Paper (item #159246)
Sweet Sorbet Cardstock (item #159268)
Basic White Cardstock (item #159276)
Pale Papaya Classic Ink Pad (item  #155670)
Flirty Flamingo Classic Ink Pad (item #147052)
Sweet Sorbet Classic Ink Pad (item #159216)
Sweet Succulent Classic Ink Pad (item #155778)
Soft Sea Foam Classic Ink Pad (item #147102)
Versamark Pad (item #102283)
Metallics Embossing Powders (item #155555)
Iridescent Rinestones Basic Jewels (item #158130)
Mini Stampin' Dimensionals (item #144108)
Measurements:
Sweet Sorbet Cardstock
Card Base - 8 1/2" x 5 1/2" (Scored at 4 1/4")
Sentiment Label die cut with the Something Fancy Dies
Sweet Sorbet Glimmer Paper 
Layer 1 - 5 3/8" x 4 1/8"
Basic White Cardstock
Card Front - 5 1/2" x 4 1/4" Die cut with the Two Tone Flora Dies and trimmed to 5 3/8" x 4 1/8"
Assorted Flowers and leaves stamped and die cut with the Two Tone Flora Bundle
This card design is a great way to showcase the versatility of die cutting. I chose to use a warm, vibrant color palette for my design and I used Sweet Sorbet Glimmer Paper to add sparkle to the background. The intricate background design has been die cut from Basic White cardstock and I layered it over the Sweet Sorbet Glimmer Paper to help bring out the detail in the floral design. For the flowers and leaves, I stamped the images onto Basic White cardstock with a variety of ink colors and then die cut them with the coordinating dies from the Two Tone Flora Bundle. The sentiment was heat embossed with Gold embossing powder and die cut with the narrow die from the Something Fancy Dies. To assemble the card, I added Mini Stampin' Dimensionals behind the large Sweet Sorbet/Flirty Flamingo flower and arranged the smaller flowers and leaves on the card front before adding the the larger flower to the center of the design. I attached the sentiment to the card front, tucking the top right corner underneath the large flower. For a touch of bling, I added Iridescent Rhinestone Basic Jewels to complete the card design. As you can see, this beautiful card design is relatively easy to create thanks to the die cutting of the various elements that bring it to life. 
Thank you for taking the time to visit my blog. I hope that my card design will help inspire you to explore the wonderful technique of Die Cutting to help you step up your projects. There are so many wonderful options available. 
Now it's time to visit Danielle's blog and see what beautiful projects she has to share with us. Just click on the Next button below to visit her blog or use the Roll Call List to find your way. We would appreciate it if you would leave us a comment and let us know what you liked about our projects. I hope you enjoy the rest of our blog hop. 

Roll Call List

If you live in the U.S. and do not have a Stampin' Up! Demonstrator, please contact me and I would be happy to help you with your creative projects. You may also visit my Online Store to place your order and have it shipped to you. 

Until Next Time

Happy Stamping,

Tricia Butts
Independent Stampin' Up! Demonstrator

Like What You See? Visit My Online Store Here

Visit My Facebook Business Page for Updates & Ideas

Click here to Contact Me

Online Exclusives Now Available
While Supplies Last
Click Below To Shop From My Online Store

Explore Your Creativity
With The January-April 2023 Mini Catalog
Click Below To Visit My Online Store


Wednesday, March 8, 2023

ICS March Blog Hop Birthday Bash

It's time to hop along with the ICS March Blog Hop with our theme this month, "Birthday Bash". Birthday cards are one of the most popular cards we create and send to family and friends, so it makes sense to share fun ways to create wonderful cards to celebrate this special occasion. Our Design Team members will be sharing their projects and ideas to help inspire you to create your own beautiful creations to share with the people you love. 
The inspiration for my birthday card today is my son's cat, Toka. He is an adorable fluff ball and I knew as soon as I saw this stamp set that I had to get it because it reminded me of him. Toka is a little on the round and cuddly side, not unlike this adorable feline and I had a lot of fun recreating the color of his fur for this card design. My son's favorite color is red so that was the color inspiration for this design. I love how it turned out and now the challenge will be to put this birthday card somewhere safe until the end of the year and then find it again to give to my son for his birthday. Wish me luck!
Products Used:
Best Day stamp set (item #160798)
Scalloped Contours Dies (item #155560)
2022-2024 In Color 6"x6" Designer Series Paper (item #159253)
Daffodil Delight Cardstock (item #119683)
Basic White Cardstock (item #159276)
Memento Tuxedo Black Pad (item #132708)
Daffodil Delight Stampin' Blends Combo Pack (item #154883)
Pale Papaya Stampin' Blends Combo Pack (item #155519)
Pumpkin Pie Stampin' Blends Combo Pack (item #154897)
Sweet Sorbet Stampin' Blends Combo Pack (item #159224)
Balmy Blue Stampin' Blends Combo Pack (item #154830)
Clear Wink of Stella Glitter Brush (item #141897)
Pastel Adhesive Backed Sequins (item #160387)
Mini Stampin' Dimensionals (item #144108)
Measurements:
Daffodil Delight Cardstock
Card Base - 8 1/2" x 5 1/2" (Scored at 4 1/4")
Scalloped Rectangle die cut with the Scalloped Contour Dies
2022-2024 In Color 6"x6" Designer Series Paper (Sweet Sorbet)
Card Front - 5 1/4" x 4"
Basic White Cardstock
Rectangle - 2 1/16" x 3 3/8"
Stamped and fussy cut cupcake base and bow tie using the Best Day stamp set
For my card design, I wanted a bright and cheerful color combination to help bring my sweet kitty to life. Toka is a beautiful buff ginger tabby cat, so I chose to use Pale Papaya and Pumpkin Pie Stampin' Blends Markers to create the color of his fur. For the card design, I chose Daffodil Delight cardstock for the card base and the frame for the focal design and added Sweet Sorbet Designer Series Paper for a bright splash of color. For the cupcake base and bow tie, I stamped the images separately on a scrap piece of Basic White cardstock with Memento Tuxedo Black ink and colored them with Sweet Sorbet and Daffodil Delight Stampin' Blends Markers before fussy cutting them out with Paper Snips. I attached both the cupcake base and bow tie to the focal image with Mini Stampin' Dimensionals to pop them up, lining them up with the stamped image. I used the Light Balmy Blue Stampin' Blends Marker to add some shadow below the cupcake base to help ground the image. For a touch of bling, I added several Balmy Blue Pastel Adhesive Backed Sequins to finish off this cute birthday card design. 
Thank you for taking the time to visit my blog. I hope that my card design will help inspire you to explore the wonderful products that Stampin' Up! has to offer to help inspire you to create your own beautiful projects. 
Now it's time to visit Sharon's blog and see what wonderful ideas she has to share with us. Just click on the Next button below to visit her blog and see her beautiful projects. We would love it if you would leave us a comment and let us know what you liked about our projects. I hope you enjoy the rest of our blog hop. 


If you live in the U.S. and do not have a Stampin' Up! Demonstrator, please contact me and I would be happy to help you with your creative projects. You may also visit my Online Store to place your order and have it shipped to you. 

Until Next Time

Happy Stamping,

Tricia Butts
Independent Stampin' Up! Demonstrator

Like What You See? Visit My Online Store Here

Visit My Facebook Business Page for Updates & Ideas

Click here to Contact Me


Explore Your Creativity
With The January-April 2023 Mini Catalog
Click Below To Visit My Online Store

Celebrate Paper Pumpkin's 10 Year Anniversary
With The 10 Years Of Growth Kit
Click Below To Subscribe By March 10th

Online Exclusives Are Now Available
While Supplies Last
Click Below To Place Your Order