Tuesday, June 30, 2020

PPP June Blog Hop Box of Sunshine

Welcome to the Paper Pumpkin Possibilities June Blog Hop as we showcase alternative project ideas using the Box of Sunshine Kit. You will be visiting with Stampin' Up! Demonstrators as they share their ideas to help inspire you to create your own gifts of sunshine. 
 Let me just say that I love this kit so much and the bright colors and cheerful elements were such a joy to create with. I decided that my alternative card design would feature mainly items included in this month's kit combined with the new Playful Alphabet Dies from the new 2020-2021 Annual Catalog. 
 For my card design, I chose the beautiful yellow card base from the June Paper Pumpkin kit and I added the Black and White Polka Dot Panel to the card front, placing it toward the right side of the card. I added the Gold embossed Sun die cut from the kit to the top of this panel using the Mini Stampin' Dimensionals also in this kit.
 To create the sentiment on the left side of the card, I die cut the letters to spell Hello from one of the Black and White Polka Dot sentiment panels using the Playful Alphabet Dies (item #152706) using my die cutting machine. I love that the letters fit inside the narrow panel and were able to cut through all the layers so that the backing stayed on the back of each letter. I laid out the die cut letters on the left side of the card front and when I was happy with the placement, I removed the backing from each letter and attached it to the card. I love the way the Black and White Polka Dot letters pop against the vibrant yellow background. 
Using one of the White sentiment labels from the kit, I stamped the Sunshine image from the exclusive stamp set onto the label and attached the label to the bottom of the Black and White Polka Dot panel with Mini Stampin' Dimensionals. I added two of the small sequins from the kit to the sentiment label for a little sparkle and bling to finish it off. I love the bold design of this card and I think it would work well as a masculine or feminine card design to spread sunshine in the world. 
Thank you for taking the time to visit my blog. I hope that my alternative card design will inspire you to explore creating your own projects with this wonderful kit.  Don't be afraid to combine products from the kit with products in the new 2020-2021 Annual Catalog to help you explore new possibilities. 

Now it's time to visit June's blog and see what she has created with this month's kit. Just click the Next button below to visit her blog. We would love it if you would leave us a comment and let us know what you enjoyed about our projects. I hope that you enjoy the rest of our blog hop. 
 June


Until Next Time
Happy Stamping,
Tricia Butts
Independent Stampin' Up! Demonstrator
Like What You See? Visit My Online Store Here
Visit My Facebook Business Page for Updates & Ideas
Click here to Contact Me

Celebrate The Summer With The July Paper Pumpkin Kit
Click Below To Subscribe By July 10th
 Click Here To Subscribe


Take Advantage Of The Summer Nights Add-On  Kit 
Available July 1st While Supplies Last
Contact Me To Place Your Order


Saturday, June 27, 2020

3D Paper Trimmer June Blog Hop New Annual Catalog

It's time to hop with the 3D Paper Trimmer June Blog Hop as we showcase products from the New 2020-2021 Annual Catalog. You will be visiting with wonderful Stampin' Up! Demonstrators from around the world as they share their ideas and projects.
 For my card design today, I decided to showcase the beautiful new 2020-2022 In Colors using the Scrappy Strip technique that I learned from Bruno Bertucci. I love how this technique shows how well these vibrant colors work together to create a fun card design. 
 The card base was created from a piece of Just Jade cardstock cut to 4 1/4" x  11" and scored at 5 1/2" to create a top fold card. The background layer is a piece of Basic Black cardstock cut to 5 1/4" x 4". To create the Scrappy Strip background, I started with a piece of Basic Black cardstock cut to 5" x 3 3/4" as my base to attach the strips. I cut strips of each of the In Colors - Bumblebee, Cinnamon Cider, Just Jade, Magenta Madness and Misty Moonlight, so that were varied in width and angle of the cut. I attached them to the Basic Black base with adhesive so that there was an overhang at each end (the length of the strips were at least 4 1/4" long). 
I trimmed the edges so that the completed Scrappy Strip panel was 5" x 3 3/4" using my Paper Trimmer. To help make the colors pop, I attached this layer to the Basic Black background layer with adhesive. To add dimension to the card, I attached the background layer to the card base using Stampin' Dimensionals.
The sentiment was created using the Hippo Happiness Bundle (item #154080) from the new 2020-2021 Annual Catalog. I heat embossed the sentiment using White Embossing Powder onto a scrap of Basic Black cardstock and die cut it using one of the dies from the Hippo & Friends Die set (item #153585). I attached it to the card front using Mini Stampin' Dimensionals. To create the butterflies, I heat embossed the butterflies onto Bumblebee and Magenta Madness cardstock with White Embossing Powder using an image from the Hippo Happiness stamp set (item #152644) and die cut them using the coordinating die from the same die set. I attached the butterflies to the card front on the top left and bottom right side of the sentiment label to add a 3D element to my card design. I love the Hippo Happiness Bundle for creating fun cards and when you order the bundle, you save 10%, which is great for your crafting budget. 
Thank you for taking the time to visit my blog. I hope that my card design helps inspire you to create your own projects using products from the New Annual Catalog with your Paper Trimmer. There are so many wonderful techniques, like the Scrappy Strip technique, to explore. 

Now it's time to visit Simone's blog and see what wonderful ideas she has to share with us this month. Please click on the Next button below to visit her blog. We would love it if you would leave us a comment and let us know what you enjoyed about our projects I hope that you enjoy the rest of your blog hop. 
 Simone

If you live in the U.S. and do not already have a Stampin' Up! Demonstrator, please contact me and I would be happy to help you with your creative projects. 


Until Next Time
Happy Stamping,
Tricia Butts
Independent Stampin' Up! Demonstrator
Like What You See? Visit My Online Store Here
Visit My Facebook Business Page for Updates & Ideas
Click here to Contact Me


Celebrate The Summer With The July Paper Pumpkin Kit
Click Below To Subscribe By July 10th 
 Click Here To Subscribe


Ink. Stamp. Share June Blog Hop New Products

Welcome to the Ink. Stamp. Share. June Blog Hop as we showcase new products from the new 2020-2021 Annual Catalog. You will be visiting with talented Stampin' Up! Demonstrators from around the world as they share their wonderful projects and ideas to help inspire you. 
 Today my husband and I are celebrating our 28th Wedding Anniversary and I knew when I saw the new Embrace Each Moment stamp set (item #152594) in the new 2020-2021 Annual Catalog, that it was the stamp set I needed to create the Anniversary card I wanted to give to my husband. I love the sketch image designs and the sentiments are beautiful and the one I chose has special meaning for us. 
My love for the new 2020-2022 In Colors continues and I decided to use Just Jade cardstock for my card base and I added a layer of the Misty Moonlight Designer Series Paper from the 2020-2022 In Color 6"x6" Designer Series pack (item #153070) to create the background. I love that this designer series paper gives the look of distressed denim that is perfect for a masculine card design. 
To create my focal design, I stamped the image onto Whisper White cardstock with Soft Suede Classic ink and colored the image using a variety of Stampin' Blends Markers including Petal Pink, So Saffron, Balmy Blue, Misty Moonlight, Just Jade and Soft Suede colors. I die cut the image using one of the Stitched Rectangles Dies (item #151820) and layered it onto a Silver Foil rectangle die cut using a slightly larger die from the same set. 
For the sentiment, I heat embossed the image with Silver Embossing Powder onto a scrap of Whisper White cardstock and die cut it using a circle die from the Layering Circles Dies (item #151770). I also die cut a slightly larger circle from Just Jade cardstock using the same die set and attached the sentiment circle to it with adhesive. Using the Dog Builder Punch (item #148543), I punched out a small heart from Real Red cardstock and added it to the sentiment circle with adhesive.

To assemble the card, I used Stampin' Dimensionals to attach the focal image and circle sentiment to the card front. I love this clean and simple layout for this card design and think it is perfect for my husband as we celebrate our anniversary. 
Thank you for taking the time to visit my blog today. I hope that my card design will help inspire you to explore the wonderful new products in the new Annual Catalog and create your own beautiful projects. For me, creating unique cards for special occasions brings me so much joy and I love seeing the expression on people's faces when they receive a card made especially for them. 

Now it's time to visit Sue's wonderful blog and see what she has to share with us this month. Just click the Next button below to visit her blog or use the Roll Call List to find your way. I hope you enjoy the rest of our blog hop. 
 Sue


Roll Call

If you live in the U.S. and do not already have a Stampin' Up! Demonstrator, please contact me and I would be happy to help you with your creative projects. You can also visit my Online Store to place an order 24/7 and have it shipped directly to you. 


Until Next Time
Happy Stamping,
Tricia Butts
Independent Stampin' Up! Demonstrator
Like What You See? Visit My Online Store Here
Visit My Facebook Business Page for Updates & Ideas
Click here to Contact Me

Celebrate The Summer With The July Summer Nights 
Paper Pumpkin Kit
Click Below To Subscribe by July 10th 
 Click Here To Subscribe


Friday, June 19, 2020

SBTD June Blog Hop New Annual Catalog

It's time to hop along with the SBTD June Blog Hop as we showcase products from the New 2020-2021 Annual Catalog. You will be visiting with Stampin' Up! Demonstrators from around the world as they share their ideas and projects to help inspire you to explore this wonderful new catalog. 
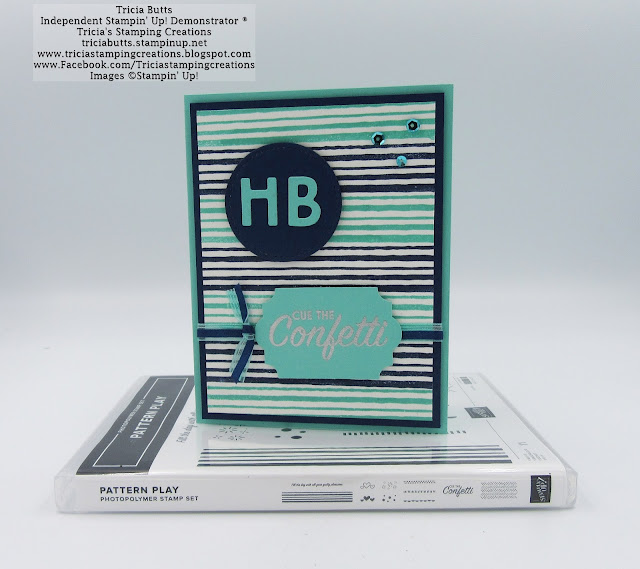
 For my card design today, I chose to showcase the Playing With Patterns Suite from the new 2020-2021 Annual Catalog. I love that the Pattern Play Bundle (item #154087) includes the Playful Alphabet Dies which also include numbers and punctuation symbols that provide so many wonderful options. The coordinating Pattern Play stamp set has wonderful background pattern images that are so much fun to play with.
 To create this card design, I chose Coastal Cabana cardstock for the card base and added a 5 1/4" x4" layer of Night of Navy cardstock to provide a matte for may focal background design. I stamped a 5" x 3 3/4" layer of Whisper White cardstock using the stripes stamp image, alternating between Coastal Cabana and Night of Navy Classic inks to decorate the full panel. 
The circle sentiment was created by using one of the stitched circle dies from the Stitched Shapes Dies to die cut a Night of Navy circle die cut. I die cut the letters H & B using the Playful Alphabet Dies from Coastal Cabana cardstock and attached them to the Night of Navy circle with adhesive. I heat embossed the sentiment for the second label onto Coastal Cabana cardstock using Silver embossing powder and punched it out using the Everyday Label Punch (item #144668).
 To decorate the card, I used the Coastal Cabana Ribbon and layered the Night of Navy Ribbon from the Playing With Patterns Ribbon Combo Pack (item #152468) on top, then added them to the card front. I added the Night of Navy circle to the top of the card front with Stampin' Dimensionals and then layered the Coastal Cabana sentiment label over the top of the ribbon with Stampin' Dimensionals. I tied a knot with the two ribbons and added it to the card front on top of the ribbon next to the Coastal Cabana sentiment label using a Mini Glue Dot. To add a little sparkle, I added 3 of the Pretty Peacock sequins from the Woven Threads Sequin Assortment (item #149498) to the top right corner using Mini Glue Dots. 
Thank you for taking the time to visit my blog today. I hope that my card design helps inspire you to explore the amazing new products in the new 2020-2021 Annual Catalog to create your own beautiful projects. The suites in this catalog make it so simple to create wonderful projects without the stress. 

Now it's time to visit Judi's blog and see what wonderful new products she has to share with us this month. Just click on the Next button below to visit her blog. We would love it if you would leave us a comment and let us know what you enjoyed about our projects. I hope you enjoy the rest of our blog hop.

 Judi


If you live in the U.S. and do not already have a Stampin' Up! Demonstrator, please contact me and I would be happy to help you with your creative projects. Please visit my Online Store to place your order 24/7 and have it shipped directly to you.
 Click Here To Shop From This Suite


Until Next Time
Happy Stamping,
Tricia Butts
Independent Stampin' Up! Demonstrator
Like What You See? Visit My Online Store Here
Visit My Facebook Business Page for Updates & Ideas
Click here to Contact Me

Celebrate Summer With The July Paper Pumpkin Kit
Click Below To Subscribe By July 10th
 Click Here To Subscribe


Wednesday, June 17, 2020

New At SU June Blog Hop Flowers

Welcome to the New At SU June blog hop as we showcase new flower stamps from the new 2020-2021 Annual Catalog. You will be visiting with talented Stampin' Up! Demonstrators as they share their amazing projects to help inspire you. I hope that you enjoy our creative ideas. 
 Today I wanted to showcase the versatile Lovely You Bundle (item #154070) in the New 2020-2021 Annual Catalog. This bundle features the beautiful Lovely You stamp set (item #152525) and coordinating Lovely Labels Pick A Punch (item #152883). When you order both of these products as a bundle, you save 10%. I paired this bundle with several of the amazing new 2020-2022 In Colors. I love how bold and vibrant these colors are and it was fun to experiment with them.
 To create this card design, I started with a Magenta Madness cardstock card base and added a 5 1/4" x 4" layer of Whisper White cardstock to provide contrast between the card base and the focal background. To create the focal background, I cut a 3 3/4" x 5" Whisper White cardstock layer and sponged it with Just Jade, Magenta Madness and Misty Moonlight Classic inks to create a vibrant background.
Using a variety of the stamp images from the Lovely You stamp set, I stamped the background to create a tone on tone look. The leaf image was stamped with Just Jade Classic ink onto the Just Jade sponged background, the floral image was stamped with Magenta Madness Classic ink onto the Magenta Madness sponged area and the flower image was stamped with Misty Moonlight Classic ink onto the Misty Moonlight sponged area. I then stamped several of the small decorative images with Versamark ink all over the background and heat embossed the images using Silver embossing Powder. I love how the silver embossing steps up the design and adds some bling. 
For the sentiment, I stamped the image onto a 3/4" strip of Misty Moonlight cardstock and heat embossed it with Silver embossing powder. I used the Lovely Labels Pick A Punch to create the decorative ends to the sentiment label. I also punched out a slightly larger label from a 1" strip of Magenta Madness cardstock to create the matte layer. I attached the sentiment to the card front using Stampin' Dimensionals to pop it up. To decorate the sentiment, I added two of the Just Jade Enamel Dots from the 2020-2022 In Color Enamel Dots (item #152480) and punch out a small heart from a scrap of Magenta Madness Designer Series Paper using the Dog Builder Punch (item #148543) and attached it to the sentiment label with a Mini Glue Dot. 
 Click Here To View The 2020-2022 In Color Products

Thank you for taking the time to visit my blog today. I hope that my card design will help inspire you to explore the wonderful possibilities available with the new floral stamp sets in this catalog. 

 Now it's time to visit Cheryl's blog and see what she has to share with us this month. Just click on the Next button below to visit her blog or use the Roll Call List below to find your way. We would love it if you would leave us a comment and let us know what you enjoyed about our projects. I hope you enjoy the rest of our blog hop. 
 Cheryl


If you live in the U.S. and do not already have a Stampin' Up! Demonstrator, please contact me and I would be happy to help you with your creative projects.


Until Next Time
Happy Stamping,
Tricia Butts
Independent Stampin' Up! Demonstrator
Like What You See? Visit My Online Store Here
Visit My Facebook Business Page for Updates & Ideas
Click here to Contact Me


Celebrate Summer With The July Paper Pumpkin Kit
Click Below To Subscribe By July 10th 
 Click Here To Subscribe