Showing posts with label Sea Turtle stamp set. Show all posts

Friday, March 1, 2024

Crafty Collaborations Monochromatic Color Challenge Week 9 Tahitian Tide

 
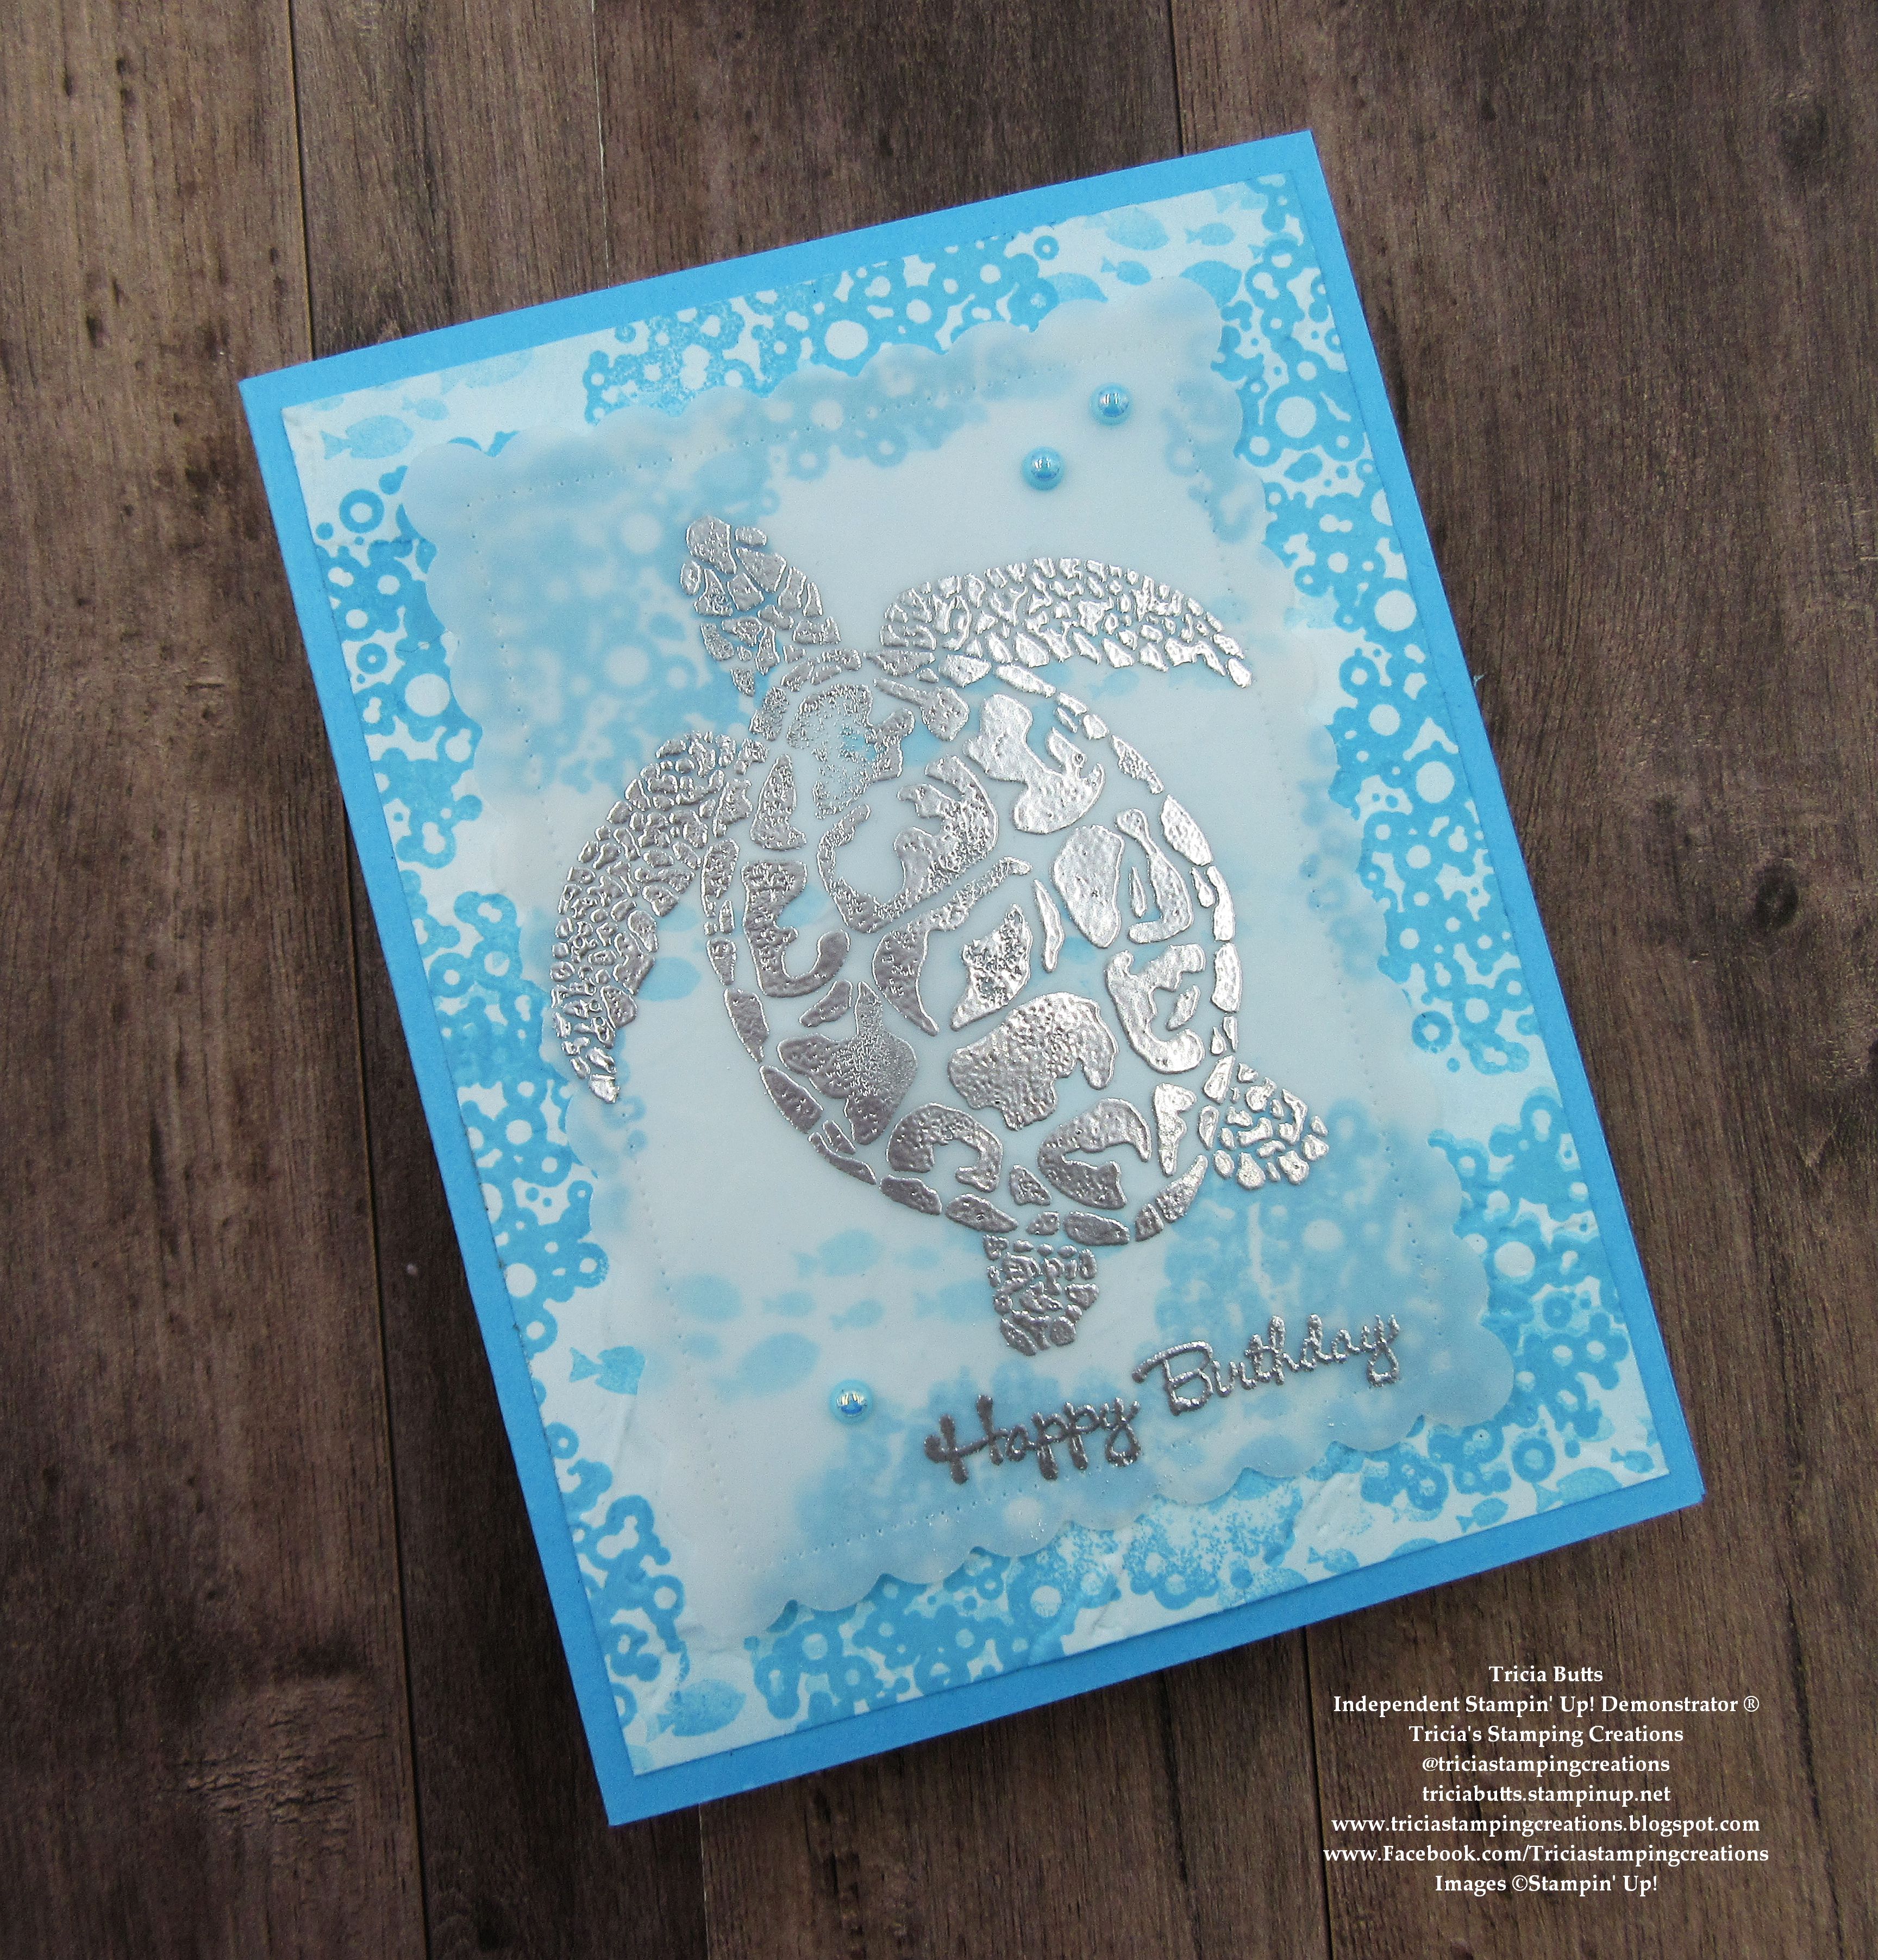
Happy Friday everyone. We are starting off the month of March with the Crafty Collaborations Monochromatic Color Challenge and for Week 9 we are creating with the beautiful Tahitian Tide. This pretty blue lives up to its name with a wonderful tropical feeling to it that has me thinking of holidaying on a tropical island with white sandy beaches and clear blue waters. I guess you could say that this is what influenced me for today's card design.
When I started thinking about swimming in the ocean, I thought about what I might find as I explore and it brought to mind sea turtles and how they glide effortlessly through the water. So, I decided to use the Sea Turtle stamp set from the 2023-2024 Annual Catalog to create my card design, showcasing the wonderful shades of this color using Generational stamping and blending to create this pretty background. I added some texture to the background using the Painted Texture 3D Embossing Folder. I love how Silver embossing looks with blue, so I chose to heat emboss the turtle image and sentiment onto Vellum cardstock to create the focal design. 
Products Used:
Sea Turtle stamp set (item #160500)
Go To Greetings stamp set (item #158763)
Scalloped Contours Dies (item #155560)
Painted Texture 3D Embossing Folder (item #154317)
Tahitian Tide Cardstock (item #159261)
Basic White Cardstock (item #159276)
Vellum Cardstock (item #101856)
Tahitian Tide Classic Ink Pad (item #159210)
Versamark Pad (item #102283)
Metallics Embossing Powders (item #155555)
Blending Brushes (item #153611)
2022-2024 In Color Pearls (item #161621)
Measurements:
Tahitian Tide Cardstock
Card Base - 8 1/2" x 5 1/2" (Scored at 4 1/4")
Basic White Cardstock
Card Front - 5 1/4" x 4"
Vellum Cardstock
Focal Layer die cut with the Scalloped Contours Dies
This card is a fun combination of techniques to help you step your design up to the next level. I love how the Silver embossing on the Vellum cardstock pops against the Tahitian Tide tone on tone stamped background. To create the different layers of color for the background, I started by gently blending Tahitian Tide Classic ink onto the Basic White card front to create a soft blue all over background. I then stamped the bubbles image several times around the edges to add some texture and deeper color. For the fish, I stamped off once and then stamped the image onto the cardstock to create a lighter color that gives the impression that the fish are further back to add some depth to the design. To add some additional texture, I embossed the background layer with the Painted Texture Embossing Folder and I like how it gives the appearance of waves in the water. I added the Vellum cardstock to the card front with adhesive behind the embossed turtle so that it doesn't show up. To finish off the design, I added several Tahitian Tide Pearls for a touch of bling. Isn't it so pretty? I love how this card design showcases how beautiful Tahitian Tide looks. Let me know if you are a fan or not of this amazing color in the comments below.
Thank you for taking the time to visit my blog. I hope that my card design will help inspire you to explore this wonderful blue and use it to create your own beautiful projects. There are so many options to choose from.
Please take a moment to visit this week's Monochromatic Insta Hop and see all the amazing projects created using Tahitian Tide. Just click here to get started. We would love it if you would leave us a comment to let us know what you liked about our projects.

If you live in the U.S. and do not have a Stampin' Up! Demonstrator, please contact me and I would be happy to help you with your creative projects. You may also visit my Online Store to place your order and have it shipped to you. 

Until Next Time

Happy Stamping,

Tricia Butts
Independent Stampin' Up! Demonstrator

Like What You See? Visit My Online Store Here

Visit My Facebook Business Page for Updates & Ideas

Click here to Contact Me


Coming Soon To Online Exclusives!
Amazing New Products To Spark Your Creativity
Check It Out on March 5th

Get Ready For Spring
With The January-April 2024 Mini Catalog
Click Below To Shop Now


Saturday, March 18, 2023

Stamping With Friends March Blog Hop Anything Goes

Welcome to the Stamping With Friends March Blog Hop and this month our theme is "Anything Goes". I love this kind of theme because it means we have the freedom to let our creativity loose and see where it takes us. Our Design Team Members will be sharing their wonderful projects and ideas to help inspire you and hopefully spark your creativity. 
My card design today was inspired by a card I recently saw created by fellow Stampin' Up! Demonstrator, Susan Campfield, during her Facebook Live. I really loved the layout that she used for her card and decided to CASE it to create my own version. What is CASE? It means Copy And Share Everything or Copy And Selectively Edit, and it's a wonderful way to find inspiration, especially if you are having a creative block. For my card design, I chose to use the Sea Turtles stamp set with the By The Bay 6"x6" Designer Series Paper to create a lovely clean and simple birthday card. 
Products Used:
Sea Turtle stamp set (item #160500)
Go To Greetings stamp set (item #158763)
Something Fancy Dies (item #160424)
By The Bay 6"x6" Designer Series Paper (item #160434)
Night of Navy Cardstock (item #100867)
Basic White Cardstock (item #159276)
Mint Macaron Classic Ink Pad (item #147106)
Night of Navy Classic Ink Pad (item #147110)
Versamark Pad (item #102283)
Metallics Embossing Powders (item #155555)
2021-2023 In Color Opal Rounds (item #159185)
Mini Stampin' Dimensionals (item #144108)
Measurements:
Night of Navy Cardstock
Card Base - 8 1/2" x 5 1/2" (Scored at 4 1/4"_
Sentiment Label die cut with the Something Fancy Dies 
Basic White Cardstock
Layer 1 - 3 1/4" x 4 5/8"
Sea Turtle stamped and fussy cut with Paper Snips
By The Bay Designer Series Paper
4 Strips - 1" x 3"
I love the soft mix of blues and greens in the designer series paper that I chose for the background and I wanted it to really pop on my card design. For this reason, I chose to use Night of Navy cardstock for the card base and I stamped the small school of fish image onto the background with Night of Navy Classic ink to create a tone on tone design. I arranged the 4 strips of designer series paper onto the Basic White Layer and then added the layer to the card base with Mini Stampin' Dimensionals. For the sentiment, I heat embossed the image from the Go To Greetings stamp set using Silver embossing powder, onto a Night of Navy sentiment label die cut with the Something Fancy Dies. I attached the sentiment to the card front with Mini Stampin' Dimensionals towards the bottom right corner. To create the turtle, I stamped the detailed image with Mint Macaron Classic ink onto Basic White cardstock and then flipped the stamp image over to stamp again over the top of the detailed image, making sure to stamp off once on a scrap piece of paper to create the lighter background color. I used Paper Snips to fussy cut the turtle and then attached it to the card front with Mini Stampin' Dimensionals so that it slightly overlaps the sentiment label. I added a touch of sparkle to the turtle by coloring it with Clear Wink of Stella and finished off the card design with several of the 2021-2023 In Color Opal Rounds, using the Soft Succulent and Evening Evergreen gems. This card is so versatile and I think it would make a great masculine design.
Thank you for taking the time to visit my blog. I hope that my card design will help inspire you to get creative with your supplies and create your own beautiful designs. It is so much fun to mix and match different products to create your own unique projects.
Please take the time to visit with my fellow Design Team members and see what they have created this month. Just click on the links in the Roll Call List to visit their blogs and journey along our blog hop. We would love it if you would leave us a comment and let us know what you liked about our projects.

If you live in the U.S. and do not have a Stampin' Up! Demonstrator, please contact me and I would be happy to help you with your creative projects. You may also visit my Online Store to place your order and have it shipped to you. 

Until Next Time

Happy Stamping,

Tricia Butts
Independent Stampin' Up! Demonstrator

Like What You See? Visit My Online Store Here

Visit My Facebook Business Page for Updates & Ideas

Click here to Contact Me


Online Exclusives Now Available
While Supplies Last
Click Below To Place Your Order

Explore Your Creativity
With The January-April 2023 Mini Catalog
Click Below To Visit My Online Store