Tuesday, February 23, 2010

Clean & Simple With Circle Circus

Hello Again,
I decided to get in an extra post today to share with you all a simple card I created recently for a class. If I had to describe my style of cardmaking at the moment, I think I would have to say I tend towards clean and simple cards. With a busy family life, I don't get a lot of time to spend making cards, so when I do get the chance I like to create cards that are relatively quick to make but still have a little wow factor when you look at them.
Today's card is another one of those cards that would work for many different occasions as well as being suitable for a masculine or feminine card. I was inspired by a SU demonstrator, Janice Webb, who creates amazing cards. You can see the cards she created here. The stamp set I chose is Stampin' Up's Circle Circus. I love the geometric designs in this set as well as the variety of sizes of the circles.
Now I don't know about you but I am always needing birthday cards at the last minute and usually get caught having to throw one together at a moments notice because I don't have any on hand. So this year I am trying to do better and put together a supply of cards for birthdays and other everyday occasions to help take the pressure off.
For this birthday card I chose from Stampin' Up's In Colors to create this design. The cardstock I chose for the card base is Bermuda Bay and I layered a piece of Soft Suede to provide a contrasting matte for my Whisper White Cardstock.
The design is stamped in Bermuda Bay Classic ink using two of the circle stamps from the Circle Circus stamp set. I chose a large and a small circle of contrasting designs for my design but you could choose which ever stamps appeal to you. To add a little pop to my card I stamped the large circle stamp in Crushed Curry on a scrap piece of Whisper White cardstock and then punched out he center design with a 1 3/8" Circle punch. I then adhered them to the center of two of the large Bermuda Bay circles with snail adhesive, the circle on the outer edge I trimmed flush with the edge of the Whisper White cardstock.
Finally I stamped my sentiment in Soft Suede using the Well Scripted stamp set from the Occasions Mini Catalog.  Isn't this a beautiful stamp set? I see so many wonderful possibilities for card designs using this set in the future. Stay tuned for future posts.
So there you have it. A very simple card that is quick to put together but has a little wow to make it special. I can see this card design working well with other color combinations depending on the occasion and the person you wish to give it to.
Hope you have a great day. Until Next Time.
Stampin' Hugs,
Tricia Butts

Products Used (All Stampin' Up Products):
Stamp Sets: Circle Circus 115778  Price: $28.95 Set Quantity: 10
                    Well Scripted  Clear Mount 118601 Price: $14.95
                                            Wood Mount 117072  Price: $19.95  Set Quantity: 6


Cardstock: Whisper White, Bermuda Bay, Soft Suede
Inks: Bermuda Bay, Crushed Curry
Accessories: 1 3/8" Circle Punch, Snail adhesive

Thinking Green - Not Your Traditional St Patrick's Day Card

Happy Tuesday to you all,
With March fast approaching (can you believe February is almost over?), our thoughts turn to a holiday that I always think of as fun and cheerful. After all, can you look at a Leprachaun without smiling? (I can't).
Here in Denver they have a parade to celebrate St Patrick's Day and for one day, everyone is Irish.  My children all madly search for something green to wear to school to avoid the dreaded pinch, which pleases one of my daughter's because her favorite color is green and she has the perfect excuse to wear as much green as she likes.
So my card share today is a St Patrick's Day card with a big twist. It does not have shamrocks, cute little leprachauns nor a pot of gold. No, it is the most untraditional of St Patrick's Day cards but I think it would qualify as a nice way to share the holiday with a friend.  (I was inspired by a card created by another demonstrator but I can't find the original photo to give her credit. So a big thank you to you and as soon as I find out who you are, I will post to give proper credit.)
For one thing, it is a beautiful green (Stampin' Up's Certainly Celery Designer Series Paper is one of my most favorite Greens) and for the other, the sentiment reminds me of those wonderful Irish sayings that wish you well for the future.

As you know, I love to use my Sizzix Big Shot and with this card I had the opportunity to have some fun. I used the Sizzix Top Note die to cut out a piece of Certainly Celery DSP (isn't it pretty and in a pinch could pass for shamrocks I guess) and then cut out a scalloped bookmark tag with my Sizzix Two Tags die from a piece of Whisper White cardstock. Last but by no means least, I used my Big Shot with the Sizzix Finial Press Embossing Folder to emboss the card base of my Whisper White card, which coordinates beautifully with the designer series paper.
The stamp sets I chose for this card are both Sale-a-bration stamp sets that I love using because they are so versatile. The Circle Frame and Best Wishes stamps are from the Vintage Labels stamp set and work perfectly together. This stamp set is ideal for cards that are classical, elegant or traditional and work just as well for both masculine and feminine cards. 
I stamped the Circle Frame stamp first in Certainly Celery Classic ink on Whisper White cardstock and then lined up the Best Wishes stamp so that it fit in the center using the clear mount stamp set (this set is also available in traditional wood mounted option).  Using the Scalloped Circle punch, I then punched it out. I also punched out another scalloped circle from a piece of Certain Celery cardstock to add as a matte slightly offset to create a flower look. Finally I matted this onto the scalloped end of the bookmark tag to create an additional layer of "petals". 
To finish off the card I stamped a sentiment from the Whimsical Words stamp set (also a Sale-a-bration set) in Certainly Celery Classic ink and applied two gold brads just below the top and bottom points of the top note.
This card would make a wonderful Birthday, Anniversary, Get Well, Sympathy or just a Thinking of You card for a special person in your life. Create a set of this card and give it as a special gift to someone you care about.
Remember, you still have time to take advantage of Sale-a-bration and earn one of the wonderful free products (such as the Vintage Labels stamp set or the Whimsical Words stamp set) with a $50 purchase of Stampin' Up merchandise (excludes S&H and taxes).

Until Next Time,
Stampin' Hugs,
Tricia Butts

Product List (All Stampin' Up Products):
Stamp Sets:
Vintage Labels, Whimsical Words (both Sale-a-bration sets)
Papers:
Whisper White Cardstock, Certainly Celery Cardstock, Certain Celery DSP (designer series paper)
Ink:
Certainly Celery Classic Ink
Accessories:
Sizzix Big Shot, Top Note Bigz die, Two Tags Bigz die, Finial Press Embossing Folder, Scalloped Circle punch, 1 3/8" circle punch, Gold Brads, Snail adhesive.

Friday, February 19, 2010

Thinking Spring to chase away the Winter Chills

Happy Friday everyone,
Well, it is cold and snowing here in Northglenn, Colorado and I am chilled to the bone. So I decided today I would share something that is definitely Spring themed to try and chase away the Winter blues.
I recently participated in a swap with a Valentine's theme with the Luv21stroke decorative painting yahoo group.  I wanted my card to reflect how I can use my paper crafting to emulate a form of decorative painting. 
I love watercoloring with my Stampin' Up Classic ink pads and my blender pen. It is so relaxing and I love the way the colors look on the Very Vanilla Cardstock. The filgree heart is from the I (Heart) Hearts stamp set and I matted it on a Pretty in Pink heart diecut with the new embosslit Scalloped Heart of Hearts which is exclusive to Stampin' Up. I once again used the bouquet of flowers from the Happy Moments Sale-a-bration Stamp set, coloring them with Bashful Blue, Pretty in Pink, Certainly Celery, Barely Banana and Lavender Lace Stampin' Up Classic Inks. The sentiment is from the stamp set Teeny Tiny Wishes stamped in Pretty in Pink classic ink on Very Vanilla cardstock and punched out with the Large Oval punch. To make it pop, I matted it on Pretty in Pink cardstock punched out with the Scalloped Oval punch to match the heart.
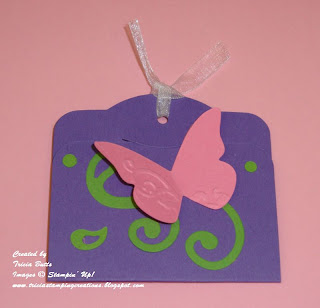
In addition to the card, I added two little gifts for my partner.  When I think of Spring, I think of flowers and butterflies in pretty Spring colors. So with that in mind, I started creating.
One of my most favorite tools in my craft room is my Stampin' Up Sizzix Big Shot. It sits on my counter top ready to be used at a moments notice. I use it all the time and so do my children. It really is the work horse of my craft area.
So, using my Big Shot I went to work creating my partner's special gifts. Both were cut from the Two Tags Sizzix  Bigz die (Stampin' Up exclusive) and I embellished them with the embossed Butterflies from the Sizzix Beautiful Wings Embosslit (it can be found in the new Occasions Catalog) and the Cherry Blossom Embosslit (both SU exclusives).

The tag also uses the Swirls & Scribbles sizzlet to provide the vines. After all, the butterflies need somewhere to rest and the flower needed some greenery to help make it pop.
The ribbon is a piece I found in my ribbon jar and I loved the shimmer it added to the tag. Now I love bling, so I added a faux clear, crystal gemstone with an adhesive back for the center of the flower.
With the bookmark I decided to combine my Big Shot with a little stamping and some punches for good measure.


The vine is stamped with Certainly Celery Classick ink on Whisper White cardstock. This stamp is from the new Vintage Vogue stamp set and provides a nice contrast o the butterflies. I punched the circle with the 1 1/4" circle punch and then matted it  with a 1 3/8" pink circle. Then using purple cardstock punched using the Scalloped Circle punch, I matted the pink circle and applied it to the scallop end of the bookmark.
The butterflies were attached with a small amount of adhesive applied to the stamped circle. By applying the adhesive to the center on the back of each butterfly it allows the wings to be gently folded up to add dimension to the bookmark.  
To finish it all off I stamped the sentiment from the Whimsical Words Sale-a-bration stamp set with Lavender Lace Classic ink. I used two of the remaining butterflies to embellish the bottom part of the bookmark.
So I hope you enjoyed my little piece of Spring time and I hope it inspires you to get creative on this cold, Winter day.
Remember to take advantage of Sale-a-bration and earn a free Sale-a-bration product with every $50 purchase of Stampin' Up merchandise (excludes shipping & handling and taxes). Download your free digital copies of the Stampin' Up catalogs from my side bar here on my blog.

Contact me today to place your order or visit my Stampin' Up website and click Shop Now in the top right corner. Hope you have a great weekend.
Until Next Time.
Stampin' Hugs,
Tricia Butts 

Products Used (Stampin' Up unless otherwise noted):
Stamp Sets:
Happy Moments, Teeny Tiny Wishes, I (heart) Hearts, Vintage Vogue, Whimsical Words
Cardstock:
Whisper White, Very Vanilla, Pretty in Pink, misc. scraps
Inks: Stazon Jet Black, Bashful Blue, Barely Banana, Certainly Celery, Lavender Lace, Pretty in Pink Classic inks
Accessories:
Sizzix Big Shot, Two Tags Bigz die, Beautiful Wings Embosslit, Scalloped Heart of Hearts Embosslit, Swirls Scribbles sizzlit, 1 1/4" Circle Punch, 1 3/8" Circle Punch, Scalloped Circle Punch, Large Oval Punch, Scalloped Oval Punch, snail adhesive, misc. ribbon.

Thursday, February 18, 2010

Three Little Monkeys ......

Hi Everyone,
OK, am I the only one with the rhyme "three little monkeys jumping on the bed..." going through my head when I see this card?  I just love the new Fox & Friends stamp set by Stampin' Up, in the new Occasions Mini catalog.  It is soooo cute and the possibilities are just endless with all the wonderful little animals.
For my card share today, I chose the monkey, because my youngest son is our little monkey and it just seemed like the perfect choice for a future birthday card for him. 
I chose the combination of Dusty Durango, Close to Cocoa and Creamy Caramel to showcase my little mischief makers. The scalloped circles are the perfect frame for these cute little guys and I popped them up on dimensionals to help them stand out a little more.
Hope you enjoy viewing this card as much as I did making it.

Until Next Time,
Stamping Hugs,
Tricia Butts

Product List (All Stampin' Up):

Stamp Sets:
Fox & Friends - Clear Mount Stamp  Set 118565

                           Wood Mount Stamp Set 117020
Price: $14.95     Set Quantity: 7
Teeny Tiny Wishes (Wood Mount) Stamp Set 115370
Price $36.95  Set Quantity: 24

Cardstock: Dusty Durango, Creamy Caramel, Close to Cocoa, Very Vanilla
Ink: Close to Cocoa Classic Ink
Accessories: Scallop Circle Punch, Scallop Edge Punch, 1 3/8" Circle Punch, Word Window Punch, Heart to Heart Punch, Snail adhesive, dimensionals


Tuesday, February 16, 2010

I (Heart) Hearts: Not Your Ordinary, Every Day Set

Hi Everyone,
Well even though Valentine's Day is over for another year, I thought I would share with you some cards I created using one of Stampin' Up's new stamp sets from the Occasions Mini catalog.  Don't have a copy of the new mini? Just click on the link in my sidebar (the litte orange catalog) and you can download a digital copy in just minutes. Or, if you prefer a print copy, please contact me and I will be happy to send you an Occasions mini catalog.
Anyway, for as long as I can remember, hearts have always been my favorite shape. Don't ask me why, but I just love them. So when I first saw the new Stampin' Up set, I (Heart) Hearts, I knew I was in love. This set has 8 different stamps with a total of 10 hearts that are all different in design, shape and size.

Now the obvious use for this set is for Valentine's Day, but this set is also great for birthdays, anniversaries, thinking of you, thank you and love you cards.  Just by changing the colors you use and the way you use the designs can give each card you make a unique look that will bring a smile to the recipient's face.

This first card is a simple card but I love the way the pinking hearts stencilled border frames this one layer card. The hearts provide a clean and simple design and combined with the sentiment from the Sale-a-bration  stamp set, Whimsical Words (love this set), it creates a lovely way to let someone know that you think they are special. (Don't forget, you can earn free Sale-a-bration products like the Whimsical Words stamp set, with a $50 purchase of Stampin' Up products).
The second card I have chosen to share with you today is a Valentine's card, but you could easily change it to reflect another occasion such as a birthday or anniversary card by choosing a different color combination and the appropriate sentiment to finish it off.
In this case, I used one of the hearts from the I (Heart) Hearts stamp set to create a tone on tone background that provides a nice contrast with the strong Whisper White cardstock used in the top half of the card.  The punched hearts are layered on top of scalloped hearts in Pretty in Pink and Real Red that have been created using the new Sizzix Scalloped Heart of Hearts Embosslit, which is a Stampin' Up exclusive die.  The little love heart in vibrant Real Red Classic ink is from the I (Heart) Hearts stamp set and is a cute little embellishment to the center heart. The new Small Hearts punch is the perfect size to punch this little stamped image out. The Valentine's Day sentiment is from the set, Teeny Tiny Wishes, which is a great set for sentiments as it covers just about every kind of sentiment you can think of at just the right size. It works great with the Word Window Punch that I used to punch it out of the Whisper White cardstock.
To finish off the card I used Stampin' Up's versatile Whisper White Organza ribbon tied withh a simple knot bow to add a classic touch.

My final card for today is a simple note card, once again pairing the I (Heart) Hearts stamp set with the Sale-a-bration stamp set Whimsical Words.  Can you tell I also love using my new Pinking Hearts Border punch, which can be found in the new Occasions mini catalog?  The heart I chose for the focal image of this card is the same heart stamp that I used to create the background on my Valentine's card above, showing how these stamps can be used in different ways, depending on the type of card you wish to create.

Don't forget that when you purchase the I (Heart) Heart stamp set between now and February 28th, Stampin' Up will donate $2 to the Red Cross for the Haitian Disaster Relief to help the people of Haiti in their time of need.

Product Name Item # Price

I {Heart} Hearts – clear-mount 118571 $18.95
(block D recommended)

I {Heart} Hearts – wood-mount 117010 $26.95

Contact me today to place your order or visit my Stampin' Up Online Store and click Shop Now to order online, 24/7.  Don't forget you can download a free digital copy of the Occasions Mini Catalog and the Sale-a-bration Catalog from the sidebar of my blog, or contact me and I will be happy to send one to you.

Until Next Time,
Stampin' Hugs,
Tricia Butts

Products Used (All Stampin' Up):
Stamp Sets:
I (Heart) Hearts, Whimsical Words, Teeny Tiny Wishes
Cardstock: Very Vanilla, Whisper White, Real Red, Pretty in Pink
Accessories: Whisper White Organza Ribbon, Big Shot, Sizzix Scalloped Heart of Hearts Embosslits Die, Full Heart Punch, Small Heart Punch, Pinking Hearts Border Punch, Word Window Punch

Monday, February 15, 2010

Soft & Subtle Water Coloring

Hi Everyone,

I hope you all had a wonderful Valentine's Day yesterday.  Today I thought I would share with you a card that is soft and subtle in contrast to the bold reds and pinks of Valentines.

When we think of giving cards, the most popular everyday occasion card is the birthday card.  That being the case, I seldom have one on hand when I need it, which if you think about it, is kind of crazy. So I decided to play with the new  Stampin' Up Sale-a-bration stamp set, Happy Moments (you can earn this set for free with a $50 purchase of Stampin' Up products). 
Now I am a decorative painter at heart, so I love to use the water color techniques to color my cards. With this card I chose to color my images with my classic inks and my blender pen. I used pastel spring colors from the Soft Subtles family including Certainly Celery, Bashful Blue, Barely Banana, Pretty in Pink and Pale Plum. I also added some soft background color using my sponge daubers to add some Pretty in Pink and Bashful Blue.
Now it is not often that I use just one stamp set to create my cards, but with Happy Moments, I had all the elements I needed in this one stamp set - an image for my background, a focal image (the birthday cake) and the sentiment(Happy Birthday).  Plus, if I wanted to make a series of cards to have on hand for birthdays (or any other everyday occasion card), this set would fit the bill as it has several different images and sentiments that mix and match to create a coordinating set of cards. 
What a perfect gift for a special friend or loved one to give a set of personalized cards that they could have on hand to use when they need them.  Change the colors to suit the person you are creating for and get a whole new look to your card set.
I hope this card sparks your creativity.  Please contact me if you have any questions or to place your order with me, and take advantage of Sale-a-bration.

Until next time,
Stamping Hugs,
Tricia Butts

Product list (All Stampin' Up products):
Stamp Sets:
Happy Moments - Clear-Mount Stamp Set  119125   Wood- Mount Stamp Set  118664
The Happy Moments set is a must-have set to create a card for any occasion! This set is FREE with a qualifying purchase or workshop. Available in both wood-mount and clear-mount.

Set Quantity: 7


Cardstock: Bashful Blue, Very Vanilla
Inks:  Black Stazon, Stampin' Up Classic inks in Barely Banana,Bashful Blue, Certainly Celery, Pretty in Pink, Pale Plum
Accessories: Blender Pens, Pinking Hearts Border Punch, Scallop Oval Punch, Large Oval Punch, Sponge Daubers

Tuesday, February 9, 2010

Join Me for My Creative Card Buffet

Hello Everyone and Happy Tuesday,
As usual, the week is flying by and I am trying to play catch up. This Saturday I am having a Card Buffet at my house and I am hoping you will join me for some fun, relaxation and card making.
What is a Card Buffet you ask? It is a card making event where you have a choice of 10 unique, high quality card designs and you can choose to make one of each card design or you may decide to make multiples of your favorite designs.  I have the supplies for the cards pre-cut for you, so all you have to do is follow the simple instructions to put each card together.
The card designs will be suitable for all occasions and you can customize them with your choice of sentiment to suit the type of cards you use the most. There will be a mix of techniques and stamps for you to try, some you may know while others may be new to you.
You pay just $2 per card and there is a minimum of 5 cards required per person. I will have a set number of cards pre-cut, and it will be first come first served,  so I suggest you come early for the best choice of designs.  I will also have a limited number of Valentine's Card designs pre-cut in case you need a last minute Valentine for a loved one.
I will also have on display new card samples that I received during a swap at the Stampin' Up Regional Seminar in Fort Collins last Friday. You will be inspired by the wonderful designs shared by many creative demonstrators and I will be happy to help you if there is a particular design that catches your eye.
Bring along a friend to create cards with you and you will recieve a special little thank you gift. After all, card making is even more fun when shared with a friend.
Don't forget to take advantage of Sale-a-bration and earn free Sale-a-bration Products with a qualifying purchase.  Just order $50 of Stampin' Up Merchandise (excluding Shipping & Handling and Taxes) and you can choose a free product from the Sale-a-bration Mini Catalog.
In addition you will have the chance to win $50 in free Stampin' Up merchandise from the 50/50 Board. The 50/50 Board is a board divided up into 50 squares. Purchase $50 in merchandise and you can choose one square. Purchase $100 in merchandise and you can choose 2 squares, and so on. When all the squares are filled there will be a drawing and one lucky person will be the winner of a gift certificate to purchase $50 in Stampin' Up merchandise.
*Note: Qualifying amounts do not include shipping & handling and taxes. The gift certificate can only be redeemed with me and is not recognised by any other Stampin' Up demonstrator nor can the order be placed directly with Stampin' Up.
So I hope you will join me this Saturday for a few hours of creative fun making wonderful cards that you will be happy to give to your family and friends.
Contact me today to reserve your spot and I will give you directions for Saturday.

Until next time.
Stamping Hugs,
Tricia Butts

Event:  Creative Card Buffet
When:  Saturday, 13th February 2010
Time:  10am - 2pm
Where: My House
              Northglenn, Colorado

Monday, February 8, 2010

A Little Something for Someone Special

Yesterday I shared with you the Letter that I decorated for my Valentine's swap partner. Today I am going to share with you the other little goodies I added to her package to help her feel special for the big heart holiday.

I got the idea for the bookmark after visiting Madeline Morcelo's blog and viewing her tutorial for creating this cute corner bookmark here. In keeping with the Letter theme, I created a monogram for the bookmark using the Letter C from Stampin' Up's Jayne's Type Alphabet and gold embossing powder. The background was created using the Very Vintage Jumbo Wheel from the Occasions Mini Catalog.
I taught this bookmark at a class in January and it is one of my favorite projects to teach.


Now everyone knows that chocolate is as much a part of Valentine's Day as hearts and flowers are. So I created a simple little topper for a ziplock snack bag to give it a little taste of Valentines.
The topper is made from the Top Note die cut with the Big Shot from Real Red Cardstock.  It is decorated with hearts stamped with a stamp from the I (Heart) Hearts Stamp set in the Occasions Mini Catalog using Pretty in Pink Classic ink on Very Vanilla Cardstock. I then  punched the hearts out using the coordinating Heart to Heart punch.
The sentiment is from the stamp set Whimsical Words, which is one of the free Sale-a-bration sets available with a $50 purchase. It is stamped in Pretty in Pink Classic ink on a piece of Very Vanilla Cardstock punched with the Curly Label Punch.  Fill the bag with chocolate and you have a pretty way to dress up a zip lock bag!

Last but by no means least, I created a Valentine's Card to send a short note to my partner.
I got the idea for this card from a wonderful demonstrator by the name of Dawn Griffith. The border is created using the new Pinking Hearts Border Punch on a scrap piece of cardstock to create a stencil. Using this technique you create the border for the top and bottom of the card by applying ink with a sponge dauber in Real Red Classic ink.  The hearts from the I (Heart) Hearts stamp set, were stamped with Pretty in Pink and Real Red ink, slightly off center to allow space for the sentiment, which is from the Whimsical Words stamp set stamped in Basic Black Classic ink.
So there you have it. Three pretty Valentine's gifts created from a few simple supplies that were a lot of fun to make.  The great thing is, anyone can make them and with a few simple changes of color, you can customize these gifts to suit anyone for any occasion. Contact me today and I will be happy to help you design your projects to suit your needs.

Until Next Time,
Stamping Hugs,
Tricia Butts

Supplies Used (All Stampin' Up):
Stamp Sets:
I (Heart) Hearts (found in the Occasions Mini Catalog)
Wood Mount #117010 $26.95   Clear Mount #118571 $18.95
Whimsical Words (Sale-a-bration free set)
Wood Mount #118386    Clear Mount #119119
Jayne's Type Alphabet #114401  $43.95
Circle Circus #115778  $28.95
Very Vintage Jumbo Wheel  #117693 $8.50
Cardstock: Real Red, Pretty in Pink, Very Vanilla, Whisper White
Ink: Real Red, Pretty in Pink, Basic Black, Versamark
Accessories:
Sizzix Big Shot, Sizzix Top Note Die, Sizzix Petal Card die, Trio Flower Punch, Round Tab Punch, 1 1/4" Circle Punch, 1 3/8" Circle Punch, Scallop Circle Punch, Heart to Heart Punch, Curly Label Punch, Pinking Hearts Border Punch, Heat Gun, Gold Embossing Powder.

Order Online 24/7 Here Just click Shop Now 


Sunday, February 7, 2010

C is for Creative: A 3D Project

Hi Everyone,

Recently I had the chance to combine my love of decorative painting with my love of stamping and paper crafting and have a little fun. As a member of Chic-Chicks, a yahoo decorative painting group, I participated in a Valentine's Swap with a twist. We had to decorate the first letter of our partner's name and send it to them. The letter had to be at least 4 inches in size and could be made out of wood, paper mache, chipboard etc. and we had the choice of how we would like to decorate it.

I chose a paper mache letter that I found at a local craft store and painted it with a blue acrylic paint to represent the sky. I then added white clouds to the upper sections of the letter.  To decorate the letter I added leaves cut with my Sizzix leaf sizzlit and the butterflies with the Beautiful Wings Embosslit, both from Stampin' Up.  The flowers were created by stamping the large and small flowers from the Stampin' Up Vintage Vogue stamp set and then cutting them out individually. The colors I used were Stampin' Up classic inks in Real Red and Crushed Curry and I stamped them with the new clear mounted acrylic blocks that Stampin' Up just released in January. The butterflies I highlighted with gold acrylic paint to provide some shimmer and I added some bling to the center of the flowers with adhesive backed faux gemstones.  The end result was a letter that reflected a spring day in a field of flowers. 


Overall, I was really pleased with how it all came together and I am looking forward to exploring this type of creative art in the future.  I managed to find a few more paper mache letters recently and I can't wait to see what inspires me with each of them.

Stamps Used: Vintage Vogue - Clear Mount Stamp 118598

Price: $17.95   Set Quantity: 8


Accessories: Big Shot, Stampin' Up Little Leaves Sizzlit die, Stampin' Up Beautiful Wings Embosslits Die, faux gemstone stickers, misc. acrylic paints, cardstock scraps, Stampin' Up Classic Real Red and Crushed Curry Inks.

All Stampin' Up supplies can be ordered from my online store by visiting my Stampin' Up Website and clicking Shop Now in the top right corner or contact me to place your order.  I am happy to help you.

Until Next Time,
Stampin' Hugs,
Tricia Butts

February and the Roller Coaster Week that Was!

Hi Everyone,
Well February has gotten off to an interesting start with the first week being very much like a roller coaster ride. Now I am not much of a fan of roller coasters, so you will understand what I mean when I say that I hope I don't have another week like that one.

On a high note, I did get to attend the Stampin' Up Regional Seminar in Fort Collins on Friday afternoon and what can I say but, Oh My Gosh!  It was the most amazing, fantastic event I have been to and the people there were just so kind, generous and friendly and the energy in the room was electric. It really made me so glad to be a Stampin' Up Demonstrator. With all the ideas and inspiration shared in that one afternoon, I feel inspired to create all kinds of projects for the upcoming weeks and months.  Just one slight problem: the time to do it. I will have to work on that because I really want to get to work on my wish list of projects that I have sitting on my desk. I will be sharing photos with you as I work my way through my wish list.

Thank you to everyone who sent me well wishes while I was sick last week and I hope that all of that is behind me. While I will still have to have an MRI in the future, both my Doctor and I are hoping that it will just be a routine thing that will confirm his diagnosis and eliminate any other possibilities.  I do have a new appreciation for life and the simplest of things that I am able to do each day that I wasn't able to for that short time. Life truly is precious and I am planning on making the most of each day.

Have a great Sunday everyone and a wonderful week.  Don't forget, Valentine's Day is just around the corner.

Stamping Hugs,
Tricia Butts

P.S. It is not too late to order your supplies for Valentine's Day but you will have to hurry. Place your order online at my website or contact me to place your order with me. I will be happy to help you.