Showing posts with label Alphabest stamp set. Show all posts

Wednesday, March 15, 2023

New At SU March Blog Hop Spell It Out Alphabest

Welcome to the New At SU March Blog Hop as we explore the theme, "Spell It Out" showcasing the alphabet and other word related products available from Stampin' Up! Our wonderful Design Team members will be sharing their ideas and projects to help spark your creativity and explore different ways to use these products to create your own beautiful projects.
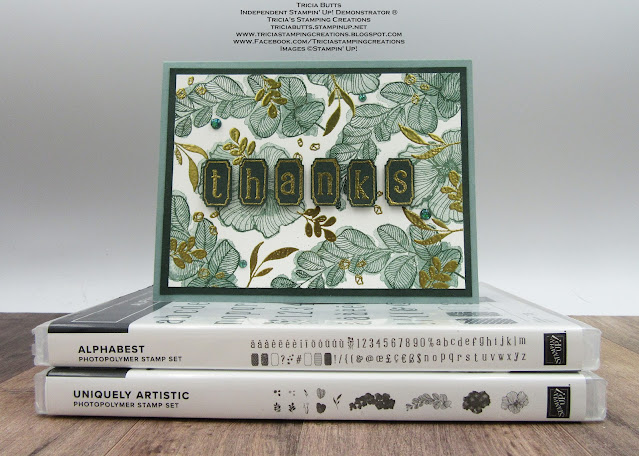
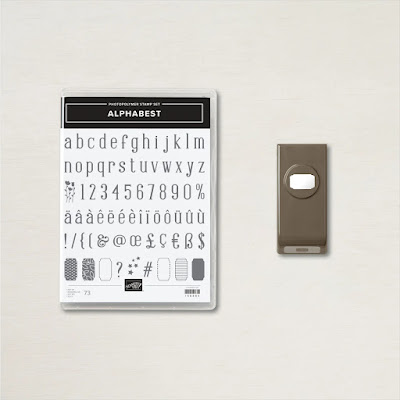
Alphabet stamp sets are a wonderful way to personalize your projects and are especially helpful when combined with stamp sets that do not have any sentiments. For my card design today, I decided to combine the beautiful Uniquely Artistic stamp set, which is an image only stamp set, with the Alphabest Bundle, to create a uniquely beautiful Thank You card. I love the size and font of the Alphabest stamp set and the Best Label Punch coordinates perfectly to create punched out labels for each individual letter. For my color combination, I chose to use the retiring Soft Succulent and Evening Evergreen with Basic White and touches of Gold embossing. 
Products Used:
Alphabest Bundle (item #158886)
Uniquely Artistic stamp set (item #158935)
Evening Evergreen Cardstock (item #155574)
Soft Succulent Cardstock (item #155776_
Basic White Cardstock (item #159276)
Evening Evergreen Classic Ink Pad (item #155576)
Soft Succulent Classic Ink Pad (item #155778)
Versamark Pad (item #102283)
Metallics Embossing Powders (item #155555)
2021-2023 In Color Opal Rounds (item #159185)
Mini Stampin' Dimensionals (item #144108)
Measurements:
Soft Succulent Cardstock
Card Base - 8 1/2" x 5 1/2" (Scored at 4 1/4")
Evening Evergreen Cardstock
Layer 1 - 5 1/4" x 4"
6 Letters stamped and punched out with the Alphabest Bundle
Basic White Cardstock
Card Front - 5" x 3 3/4"
This clean and simple card design has been stepped up with Gold embossing to give it an elegant touch. I stamped the Basic White card front with images from the Uniquely Artistic stamp set to create a beautiful background design. For the sentiment, I stamped each of the individual letters and with the frame around them, using the Alphabest stamp set and heat embossed them with Gold embossing powder to make them pop against the Evening Evergreen cardstock. I then punched out each individual letter with the Best Label Punch and arranged them on the card front. I attached the letters with Mini Stampin' Dimensionals to give the card some depth and dimension. To complete the card design, I added several Evening Evergreen Opal Rounds for a touch of bling. I love the versatility of the the Alphabest Bundle and how simple it is to create custom sentiments just by stamping and arranging the letters. This wonderful stamp set includes letters, numbers and punctuation as well as some decorative designs to help you dress up your projects. 
Thank you for taking the time to visit my blog. I hope that my card design will inspire you to try using the Alphabest Bundle to step up your projects. There are so many wonderful options available to explore. Have some fun mixing and matching your existing stamp sets to create your own unique designs. 
Now it's time to visit with my fellow Design Team members and see what they have created to share with you. Just click on the links in the Roll Call List below to find your way along our blog hop. We would appreciate it if you would leave us a comment and let us know what you liked about our projects. I hope you enjoy the rest of our blog hop. 

If you live in the U.S. and do not have a Stampin' Up! Demonstrator, please contact me and I would be happy to help you with your creative projects. You may also visit my Online Store to place your order and have it shipped to you. 

Until Next Time

Happy Stamping,

Tricia Butts
Independent Stampin' Up! Demonstrator

Like What You See? Visit My Online Store Here

Visit My Facebook Business Page for Updates & Ideas

Click here to Contact Me


Online Exclusives Now Available
While Supplies Last
Click Below To Place Your Order

Explore Your Creativity
With The January-April 2023 Mini Catalog
Click Below To Visit My Online Store


Saturday, October 1, 2022

We Create October Blog Hop Halloween & Harvest

Welcome to the We Create October Blog Hop as we showcase our theme of Halloween & Harvest. With the arrival of Fall, it's fun to create projects for the new season using new color combinations. Our Design Team Members will be sharing their wonderful ideas and projects to help inspire you.
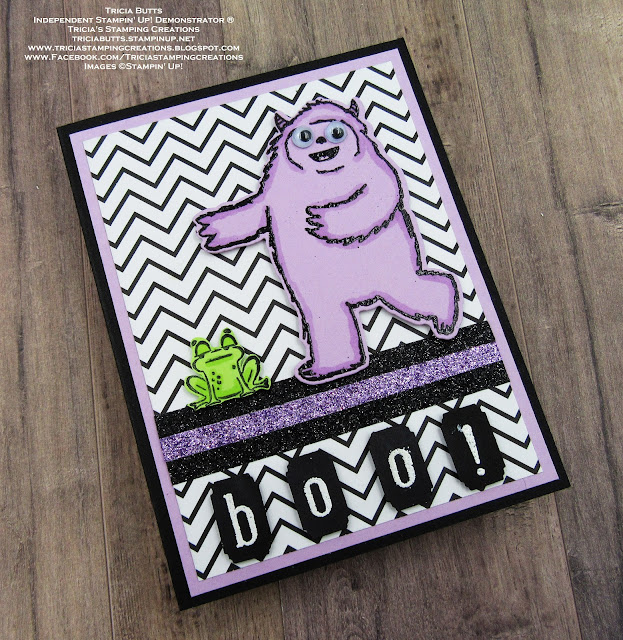
One of my favorite things about Fall is celebrating Halloween. Our family loves to decorate our house and our front yard for the season and even though my kids are too old for trick or treating, we still enjoy the fun traditions of this spooky holiday. For my card design today, I wanted to show how you can take a non-traditional Halloween stamp set like Yeti to Party and create a fun "scary" monster card. For the background, I chose one of the designs from the Black & White Designer Series Paper and I used the Alphabest Bundle to create my sentiment. This fun card design would make a wonderful birthday card for someone who celebrates their special day this month. 
Products Used:
Yeti To Party stamp set (item #159826)
Best Witches stamp set (item #159860)
Alphabest Bundle (item #158886)
Black & White Designer Series Paper (item #159861)
Basic Black Cardstock (item #121045)
Fresh Freesia Cardstock (item #155613)
Parakeet Party Cardstock (item #159259)
Basic White Cardstock (item #159276)
Memento Black Pad (item #132708)
Versamark Pad (item #102283)
Basics Embossing Powders (item #155554)
Fresh Freesia Stampin' Blends Combo Pack (item #155518)
Parakeet Party Stampin' Blends Combo Pack (item #159220)
Glitter Washi Tape (item #159973)
Black Stampin' Dimensionals Combo Pack (item #150893)
Measurements:
Basic Black Cardstock
Card Base - 8 1/2" x 5 1/2" (Scored at 4 1/4")
4 Sentiment Labels punched out with the Best Labels Punch
Fresh Freesia Cardstock
Layer 1 - 5 1/4" x 4"
Stamped Yeti image, fussy cut with scissors
Black & White Designer Series Paper
Card Front - 5" x 3 3/4"
Parakeet Party Cardstock
Stamped frog image using Best Witches stamp set, fussy cut
This cute Halloween card showcases how you can add wonderful splashes of color to a black and white card design. Both the Yeti and the frog were stamped onto colored cardstock to simplify the card design, without the need for coloring. I used the Light Fresh Freesia Stampin' Blends Marker to outline the inside of the Yeti and the Light Parakeet Party Stampin' Blends Marker to outline the inside of the frog image, to add some dimension. For the sentiment, I heat embossed the letters and exclamation point with White embossing powder onto the Black cardstock "tiles" punched out with the Best Label Punch. For a touch of bling, I added three strips of Glitter Washi Tape to the designer series paper layer. To make my monster a little less "scary" I added googly eyes to the image. 
Thank you for taking the time to visit my blog. I hope that my card design will help inspire you to create your own wonderful projects for Fall and Halloween. There are so many wonderful products to explore to help you get creative. 
Now it's time to visit Cheryl's wonderful blog and see what she has to share with us. Just click the Next button below to visit her blog. We would appreciate it if you would leave us a comment and let us know what you liked about our projects. I hope you enjoy the rest of our blog hop.


If you live in the U.S. and do not have a Stampin' Up! Demonstrator, please contact me and I would be happy to help you with your creative projects. You may also visit my Online Store to place your order and have it shipped to you. 

Until Next Time

Happy Stamping,

Tricia Butts
Independent Stampin' Up! Demonstrator

Like What You See? Visit My Online Store Here

Visit My Facebook Business Page for Updates & Ideas

Click here to Contact Me


Create Beautiful Christmas Cards
With The Ho Ho Ho Paper Pumpkin Kit
Click Below To Subscribe By October 10th

Get Creative For The Holidays
With The July-December 2022 Mini Catalog
Click Below To Visit My Online Store
Craft For A Cause
With The Nourish & Flourish Kit
Click Below For More Details