Wednesday, August 30, 2023

Paper Pumpkin Possibilities August Blog Hop Meaningful Flowers

Welcome to the Paper Pumpkin Possibilities August Blog Hop as we showcase the Meaningful Flowers Kit. Our wonderful Design Team will be sharing alternative projects and ideas to help inspire you to think outside the box. 
My alternative card design today features mainly supplies from the kit and has no stamping. Yes, that's right. I didn't stamp anything on this beautiful card. I fell in love with the definition on the back of the lotus flower card base and wanted to make this my card front for my card design. With just a piece of Orchid Oasis cardstock and some Silver Trim, I was able to create a wonderful card design that is simple, uplifting and inspirational. 
Products Used:
Paper Pumpkin August Kit Meaningful Flowers
Orchid Oasis Cardstock (item #159267)
Gold & Silver 1/8" Trim Combo Pack (item #161633)
Mini Glue Dots (item #103683)
Measurements:
Orchid Oasis Cardstock
Card Base - 5 1/2" x 8 1/2" (Scored at 4 1/4")
Meaning Flowers Kit
Card Front (from back of card base in kit) - 5 1/4" x 4"
Vellum Layer
Lotus Die Cut
Have you ever looked at a kit and had the elements speak to you? That's what happened to me when I opened this kit. Orchid Oasis is my favorite color, so I was immediately drawn to the lotus card base and the inspirational definition on the back. I knew that I wanted that definition to be the focus of my card design. I started by auditioning different pieces to create the design, layering the vellum layer above the definition and the lotus die cut on top of the vellum layer. I was stunned at how the vellum transformed the background and gave the design so much dimension and depth. I trimmed the back of the card base to 5 1/4" x 4" and added the vellum layer to the top section using Mini Glue Dots. Using the Stampin' Dimensionals from the kit, I popped up the lotus die cut and added it on top of the vellum layer so that it appears as though the lotus is floating in a lake. I wanted to add a pop of bling to the design, so I chose to add a piece of Silver Trim around the card front to hide the bottom of the vellum layer, just above the definition. I adhered the card front to the card base and then added several of the clear embellishments from the kit, to give the look of water droplets on the leaves and petal of the flower. To say that I love this card would be an understatement. It combines all my favorite things about this kit and is so simple to create. 
Thank you for taking the time to visit my blog. I hope that my card design will help inspire you to explore creating your own alternate projects with the supplies in the Meaningful Flowers Kit. The refill for this beautiful kit (item #163864) is currently available while supplies last for Paper Pumpkin subscribers to order. This is one of those kits that you will want to have extras to create your own beautiful projects.
Please take the time to visit with the Design Team members by clicking on the links in the Roll Call List. We would love it if you would leave us a comment and let us know what you enjoyed about our alternative projects.

If you live in the U.S. and do not have a Stampin' Up! Demonstrator, please contact me and I would be happy to help you with your creative projects. You may also visit my Online Store to place your order and have it shipped to you. 

Until Next Time

Happy Stamping,

Tricia Butts
Independent Stampin' Up! Demonstrator

Like What You See? Visit My Online Store Here

Visit My Facebook Business Page for Updates & Ideas

Click here to Contact Me


Express Love & Gratitude
With The September From The Heart Kit
Click Below To Subscribe By September 10th

Last Days To Save Up To 30% Off
Kits In The Kits Collection
Click Below To Shop Now

Time Is Running Out To Redeem
Your Bonus Days Coupons
Click Below To Start Shopping


Monday, August 21, 2023

Crafty Challenge August Blog Hop Sketch Challenge

Welcome to the Crafty Challenge August Blog Hop as we explore this month's Sketch Challenge. Our Design Team will be sharing their projects and ideas to help inspire you to create your own beautiful cards this today's sketch. Using sketches to create your card designs is a wonderful way to help spark your creativity.
For my card design today, I chose to use the beautiful Inked Botanicals Designer Series Paper and paired it with images from the coordinating Inked & Tiled stamp set to create a pretty Thank You card. I chose to heat emboss the floral image and sentiment with White embossing powder to help make it pop and added leaves created with the Bough Punch to add some texture and dimension. This lovely clean and simple card design is a great example of how you can use today's sketch to create your own card designs.
Products Used:
Inked & Tiled stamp set (item #161158)
Nested Essentials Dies (item #161597)
Bough Punch (item #157711)
Inked Botanicals 6"x6" Designer Series Paper (item #161157)
Calypso Coral Cardstock (item # 122925)
Calypso Coral Classic Ink Pad (item #147101)
Versamark Pad (item #102283)
Basics Embossing Powders (item #155554)
White 3/8" Glittered Organdy Ribbon (item #156408)
Iridescent Rhinestones Basic Jewels (item #158130)
Sponge Daubers (item #133773)
Stampin' Dimensionals (item #104433)
Measurements:
Calypso Coral Cardstock
Card Base - 8 1/2" X 5 1/2" (Scored at 4 1/4")
Sentiment Label die cut with the Nested Essentials Dies
4 Leaves punched out with the Bough Punch
Inked Botanicals Designer Series Paper
Card Front - 5 1/4" x 4", Cut into 3 pieces
- 2" x 4", 1" x 3 1/4" & 3" x 3 1/4"
This clean and simple card design is easy to create and has so many possibilities for embellishing. I cut up the card front into 3 pieces to recreate the sketch and attached the pieces to the card base, leaving a slight border between the pieces to create a contrast with the Calypso Coral card base. The sentiment and floral image have been heat embossed with White embossing powder onto a sentiment label that I die cut with the Nested Essentials Dies. I used a Sponge Dauber and gently added some ink over the embossed images to add a soft shadow and then wiped the excess ink off with a tissue. Using a piece of Glittered Organdy Ribbon, I folded it in half and attached it to the back of the sentiment label. I attached the sentiment label to the card front with Stampin' Dimensionals to pop it up and add dimension to the design. To add some texture to the design, I punched out the two leaves from the Bough Punch twice and then added them so that the stems tucked underneath the sentiment label. To complete the design, I added several Iridescent Rhinestone Jewels for a touch of bling. 
Thank you for taking the time to visit my blog. I hope that my card design will help inspire you to give this sketch a try and see what you can create with the supplies in your stash. There are so many wonderful possibilities to explore to spark your creativity.
Please take the time to hop along our blog hop by using the links in the Roll Call List below. We would appreciate it if you would leave us a comment and let us know how our projects inspired you.

If you live in the U.S. and do not have a Stampin' Up! Demonstrator, please contact me and I would be happy to help you with your creative projects. You may also visit my Online Store to place your order and have it shipped to you. 

Until Next Time

Happy Stamping,

Tricia Butts
Independent Stampin' Up! Demonstrator

Like What You See? Visit My Online Store Here

Visit My Facebook Business Page for Updates & Ideas

Click here to Contact Me


Save Up To 30% Off Kits
In The Kits Collection During August
Click Below To Shop Now

Redeem Your Bonus Coupons & Save
During The Month Of August
Click Below To Visit My Online Store


Sunday, August 20, 2023

Stamptastic Friends August Blog Hop Celebration

Welcome to the Stamptastic Friends August Blog Hop and this month it's all about Celebrations. I love creating cards to help celebrate special occasions for family and friends. Whether it is a birthday, wedding, anniversary, new baby or any of the other milestones in our lives, it is so much fun to create a one of a kind card to recognize that moment. Our wonderful Design Team members will be sharing their projects and ideas to help inspire you to create your own wonderful projects. 
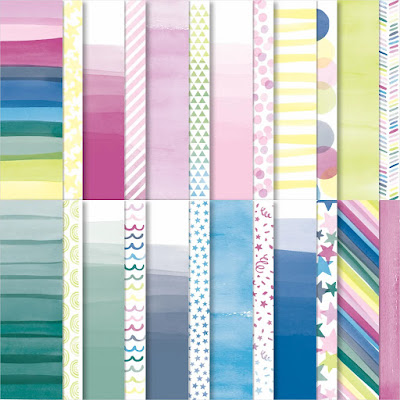
One of my favorite things about making my own cards, is the ability to personalize the card to make it special for the person receiving it. For today's celebration card, I wanted to create a fun and pretty birthday card for someone who loves pinks and purples. I chose to use the Silly Goose stamp set as the images and sentiments are fun and whimsical, perfect for a lighthearted birthday card. For the background, I chose one of the designs from the Bright & Beautiful 6"x6" Designer Series Paper that reminded me of confetti falling. I love that this card design is a celebration of a special day and a wish for a great year ahead.
Products Used:
Silly Goose stamp set (item #160866)
Countryside Corners Dies (item #161471)
Bright & Beautiful 6"x6" Designer Series Paper (item #161449)
Fresh Freesia Cardstock (item #155613)
Bubble Bath Cardstock (item #161718)
Basic White Cardstock (item #159276)
Highland Heather Classic Ink Pad (item #147103)
Fresh Freesia Stampin' Blends Combo Pack (item #155518)
Bubble Bath Stampin' Blends Combo Pack (item #161675)
Lemon Lolly Stampin' Blends Combo Pack (item #161673)
Parakeet Party Stampin' Blends Combo Pack (item #159220)
Pumpkin Pie Stampin' Blends Combo Pack (item #154897)
Balmy Blue Stampin' Blends Combo Pack (item #154830)
Sheer Ribbon Combo Pack (item #161635)
Pastel Adhesive Backed Sequins (item #160387)
Stampin' Dimensionals (item #104430)
Mini Glue Dots (item #103683)
Measurements:
Fresh Freesia Cardstock
Card Base - 8 1/2" x 5 1/2" (Scored at 4 1/4")
Matte Layer die cut with the Countryside Corners Dies
Bubble Bath Cardstock
Sentiment Label die cut with the Countryside Corners Dies 
Basic White Cardstock
Focal Layer die cut with the Countryside Corners Dies 
Bright & Beautiful Designer Series Paper 
Card Front - 5 1/4" x 4"
This soft and pretty card was so much fun to create. The designer series paper background helped set the tone for this card and it gave me the colors for the design. I chose to use Fresh Freesia for the card base and the matte layer and used soft pretty pastels to color the focal image. The Bubble Bath sentiment label and embellishments add a subtle contrast and coordinate with the designer series paper. The Pastel Adhesive Backed Sequins add a touch of sparkle and blend in with the pattern of the designer series paper. The bow at the top of the card helps finish off the design. I hope this pretty birthday card will help brighten someone's special day. 
Thank you for taking the time to visit my blog. I hope my card design will inspire you to explore creating your own beautiful cards to celebrate the special occasions in your life. 
Please take the time to hop along and visit the other Design Team members in our blog hop by clicking on the links in the Roll Call List below. We would appreciate it if you would leave us a comment and let us know what you liked about our projects. I hope you enjoy the rest of our blog hop.

If you live in the U.S. and do not have a Stampin' Up! Demonstrator, please contact me and I would be happy to help you with your creative projects. You may also visit my Online Store to place your order and have it shipped to you. 

Until Next Time

Happy Stamping,

Tricia Butts
Independent Stampin' Up! Demonstrator

Like What You See? Visit My Online Store Here

Visit My Facebook Business Page for Updates & Ideas

Click here to Contact Me 


Save Up To 30% Off Kits
In The Kits Collection During August
Click Below To Shop From My Online Store

Redeem Your Bonus Coupons & Save
During The Month Of August
Click Below To Visit My Online Store


Saturday, August 19, 2023

Stamping With Friends August Blog Hop Shapes

It's time to hop along with the Stamping With Friends August Blog Hop and this month we are exploring shapes to create our projects. Our wonderful Design Team will be sharing their projects and ideas to help inspire you to get creative with shapes. 
Adding shapes to your projects is a great way to add texture and interest to the design. For my card design, I decided to use the Inked & Tiled Punch Pack to step up the sentiment label for my clean and simple card design. I love the way the shapes frame the birthday sentiment to help it stand out and become the focal image for this card design. It's a great way to dress up a card without covering up the pretty designer series paper background.
Products Used:
Inked & Tiled Bundle (item #161168)
Inked Botanicals 6"x6" Designer Series Paper (item #161157)
1 3/4" Circle Punch (item #119850)
Lost Lagoon Cardstock (item #133679)
Pretty Peacock Cardstock (item #150880)
Pool Party Cardstock (item #122924)
Pretty Peacock Classic Ink Pad (item #150083)
Pool Party 3/8" Grosgrain Ribbon (item #160430)
Iridescent Pastel Gems (item #160429)
Stampin' Dimensionals (item #104430)
Measurements:
Lost Lagoon Cardstock 
Card Base - 8 1/2" x 5 1/2" (Scored at 4 1/4")
Circle punched out with the 1 3/4" Circle Punch
Pool Party Cardstock
Sentiment Label punched out with the Inked & Tiled Punch Pack
Pretty Peacock Cardstock
Strip - 3" x 1 1/4" Ends punched with the Inked & Tiled Punch Pack
Inked Botanicals Designer Series Paper
Card Front - 5 1/4" x 4" 
I love creating clean and simple card designs with pretty designer series paper and for this card I wanted to use the Inked Botanicals 6"x6" Designer Series Paper for my background. The pattern I chose has a wonderful monochromatic floral design and I wanted to add a sentiment that would stand out without overwhelming the card design. The punches in the Inked & Tiled Punch Pack coordinate to add wonderful shapes that help frame the birthday sentiment and I love the clean and simple lines they add to the design. I combined them with the 1 3/4" Circle Punch using a combination of Pool Party, Lost Lagoon and Pretty Peacock cardstocks that coordinate with the designer series paper. To create the ends for the Pretty Peacock cardstock strip, I used the cross shaped punch to create the points that coordinate with the star shape of the sentiment label. To finish off the design, I added a piece of Pool Party Grosgrain Ribbon to layer underneath the sentiment and some Iridescent Pastel Gems for a touch of sparkle. As you can see from this card design, shapes can be used to frame sentiments and add a little structure to an otherwise soft and pretty design. 
Thank you for taking the time to visit my blog. I hope that my card design will help inspire you to use shapes to create your own wonderful projects. There are so many options to explore. 
Please take the time to visit my fellow Design Team members by clicking the links in the Roll Call List below. We would love it if you would leave us a comment and let us know what you liked about our projects. I hope you enjoy the rest of our blog hop.

If you live in the U.S. and do not have a Stampin' Up! Demonstrator, please contact me and I would be happy to help you with your creative projects. You may also visit my Online Store to place your order and have it shipped to you. 

Until Next Time

Happy Stamping,

Tricia Butts
Independent Stampin' Up! Demonstrator

Like What You See? Visit My Online Store Here

Visit My Facebook Business Page for Updates & Ideas

Click here to Contact Me


Save Up To 30% Off Kits
In The Kits Collections During August
Click Below To Shop Now


Redeem Your Bonus Days Coupons & Save
During The Month Of August
Click Below To Visit My Online Store


Wednesday, August 16, 2023

New At SU August Blog Hop 2023-2024 Annual Catalog Masterfully Made Suite

Welcome to the New At SU August Blog Hop as we showcase the amazing suites in the 2023-2024 Annual Catalog. Our wonderful Design Team will be sharing their projects and ideas using the products in these suites to help inspire you to create your own beautiful projects.
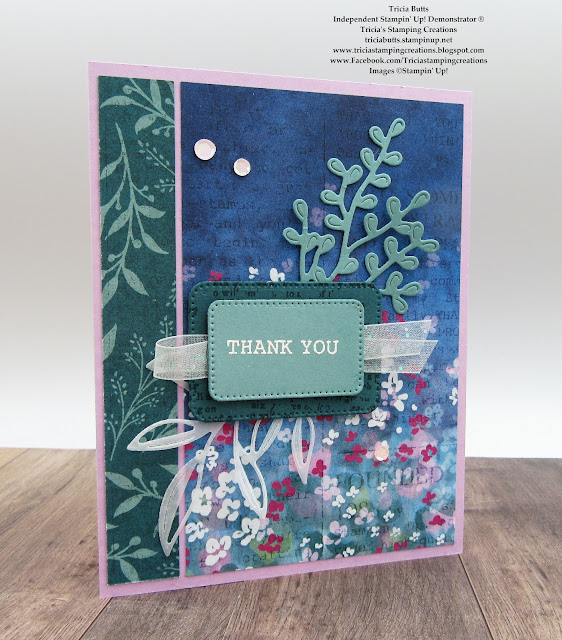
When I think about the Masterfully Made Suite Collection, I think of texture and color. The designs in the Masterfully Made Designer Series Paper are filled with beautiful bright colors and the look of torn paper and distressed backgrounds adds wonderful texture to projects without all the work. I am so excited to share the card design I created with this wonderful suite and hopefully inspire you to take a second look at these amazing products.
Products Used:
Masterfully Made Suite Collection (item #161207)
 - Gorgeously Made Bundle (item #161203)
 - Masterfully Made Designer Series Paper (item #161192)
Nested Essentials Dies (item #161597)
Fresh Freesia Cardstock (item #155613)
Pretty Peacock Cardstock (item #150880)
Lost Lagoon Cardstock (item #133679)
Vellum Cardstock (item #101856)
Pretty Peacock Classic Ink Pad (item #150083)
Versamark (item #102283)
Basics Embossing Powders (item #155554)
Pastel Adhesive Backed Sequins (item #160387)
White 3/8" Glittered Organdy Ribbon (item #156408)
Stampin' Dimensionals (item #104430)
Mini Glue Dots (item #103683)
Measurements:
Fresh Freesia Cardstock
Card Base - 5 1/2" x 8 1/2" (Scored at 4 1/4")
Pretty Peacock Cardstock
Medium Label die cut with the Nested Essentials Dies 
Lost Lagoon Cardstock
Small Label die cut with the Nested Essentials Dies
Detailed Foliage die cut with the Gorgeously Made Dies
Masterfully Made Designer Series Paper
Card Front - 5 1/4" x 4" cut into 2 pieces 3/4" x 5 1/4" 
& 3 1/4" x 5 1/4"
For my card today, I wanted to show how the products in this suite coordinate to help create wonderful designs. For the background, I chose one of the designs from the Masterfully Made Designer Series Paper and cut it into 2 pieces to showcase both sides of this pretty sheet of paper. I adhered them to the Fresh Freesia card base, making sure to leave a small space between the two pieces to create the look of a border. To add texture to the card design, I die cut the large foliage die cut from Lost Lagoon cardstock and the large leaf from Vellum cardstock. I trimmed both pieces to fit on the front of the larger panel and adhered them with Mini Glue Dots. For the sentiment, I heat embossed the image with White embossing powder onto the Lost Lagoon label. For the Pretty Peacock label, I stamped the script textured image with Pretty Peacock Classic ink to create a tone on tone background. I added a piece of the White Glittered Organdy Ribbon to the back of the Lost Lagoon label and then used Stampin' Dimensionals to attach it to the Pretty Peacock label. I attached the labels over the center of the foilage die cuts using Stampin' Dimensionals, hiding the stems. To complete the card design, I chose to add some bling. I didn't have the Adhesive Backed Sequins Trio from the suite, so I used the pink sequins from the Pastel Adhesive Backed Sequins instead to add a touch of sparkle. I love how these products coordinate to create this beautiful card and wonderful texture to the design.
Thank you for taking the time to visit my blog. I hope that my card design will help inspire you to explore the wonderful products in the Masterfully Made Suite Collection. There are so many possibilities to create your own beautiful projects.
Please take the time to visit with the rest of the Design Team by clicking on the links in the Roll Call List. We would love it if you would leave us a comment and let us know what you liked about our projects. 

If you live in the U.S. and do not have a Stampin' Up! Demonstrator, please contact me and I would be happy to help you with your creative projects. You may also visit my Online Store to place your order and have it shipped to you. 

Until Next Time

Happy Stamping,

Tricia Butts
Independent Stampin' Up! Demonstrator

Like What You See? Visit My Online Store Here

Visit My Facebook Business Page for Updates & Ideas

Click here to Contact Me


Order The Masterfully Made Suite Collection
With Just One Click
Visit My Online Store To Place Your Order

Save Up To 30% Off Kits
In The Kits Collection During August
Click Below To Shop Now

Redeem Your Bonus Days Coupons & Save
During The Month Of August
Click Below To Visit My Online Store