Tuesday, October 25, 2022

Paper Pumpkin Possibilities October Blog Hop Ho Ho Ho

Welcome to the Paper Pumpkin Possibilities October Blog Hop as we showcase alternative projects created with the Ho Ho Ho Christmas Card Kit. Our talented Design Team members will be sharing their alternative projects and ideas to help inspire you to think outside the box using supplies from this kit.
This month's Paper Pumpkin is probably one of my favorites and I love that it's a Christmas card kit. The card designs in this kit are amazing, so I wanted to show an alternative card design using the exclusive stamp set from this kit. The Santa and reindeer silhouette stamp is one of my favorites and I knew I wanted it to be my focal design for my card. I created a window for my design using the Layering Circles Dies and embossed the background using the Snowflake embossing folder from the Wintry 3D Embossing Folders. 
Products Used:
Paper Pumpkin October Ho Ho Ho Card Kit
Layering Circles Dies (item #151770)
Stylish Dies (item #159183)
Wintry 3D Embossing Folders (item #155433)
Orchid Oasis Cardstock (item #159267)
Starry Sky Cardstock (item #159263)
Basic White Cardstock (item #159276)
Orchid Oasis Classic Ink Pad (item #159214)
Versamark Pad (item #102283)
Basics Embossing Powders (item #155554)
Wonderful Snowflakes (item #156340)
Iridescent Pearls Basic Jewels (item #158987)
Blending Brushes (item #153611)
Measurements:
Orchid Oasis Cardstock
Card Base - 8 1/2" x 5 1/2" (Scored at 4 1/4")
Sentiment Label die cut with the Stylish Shapes Dies
Starry Sky Cardstock 
Card Front - 5 1/4" x 4" 
Basic White Cardstock
Background Layer - 5" x 3 3/4"
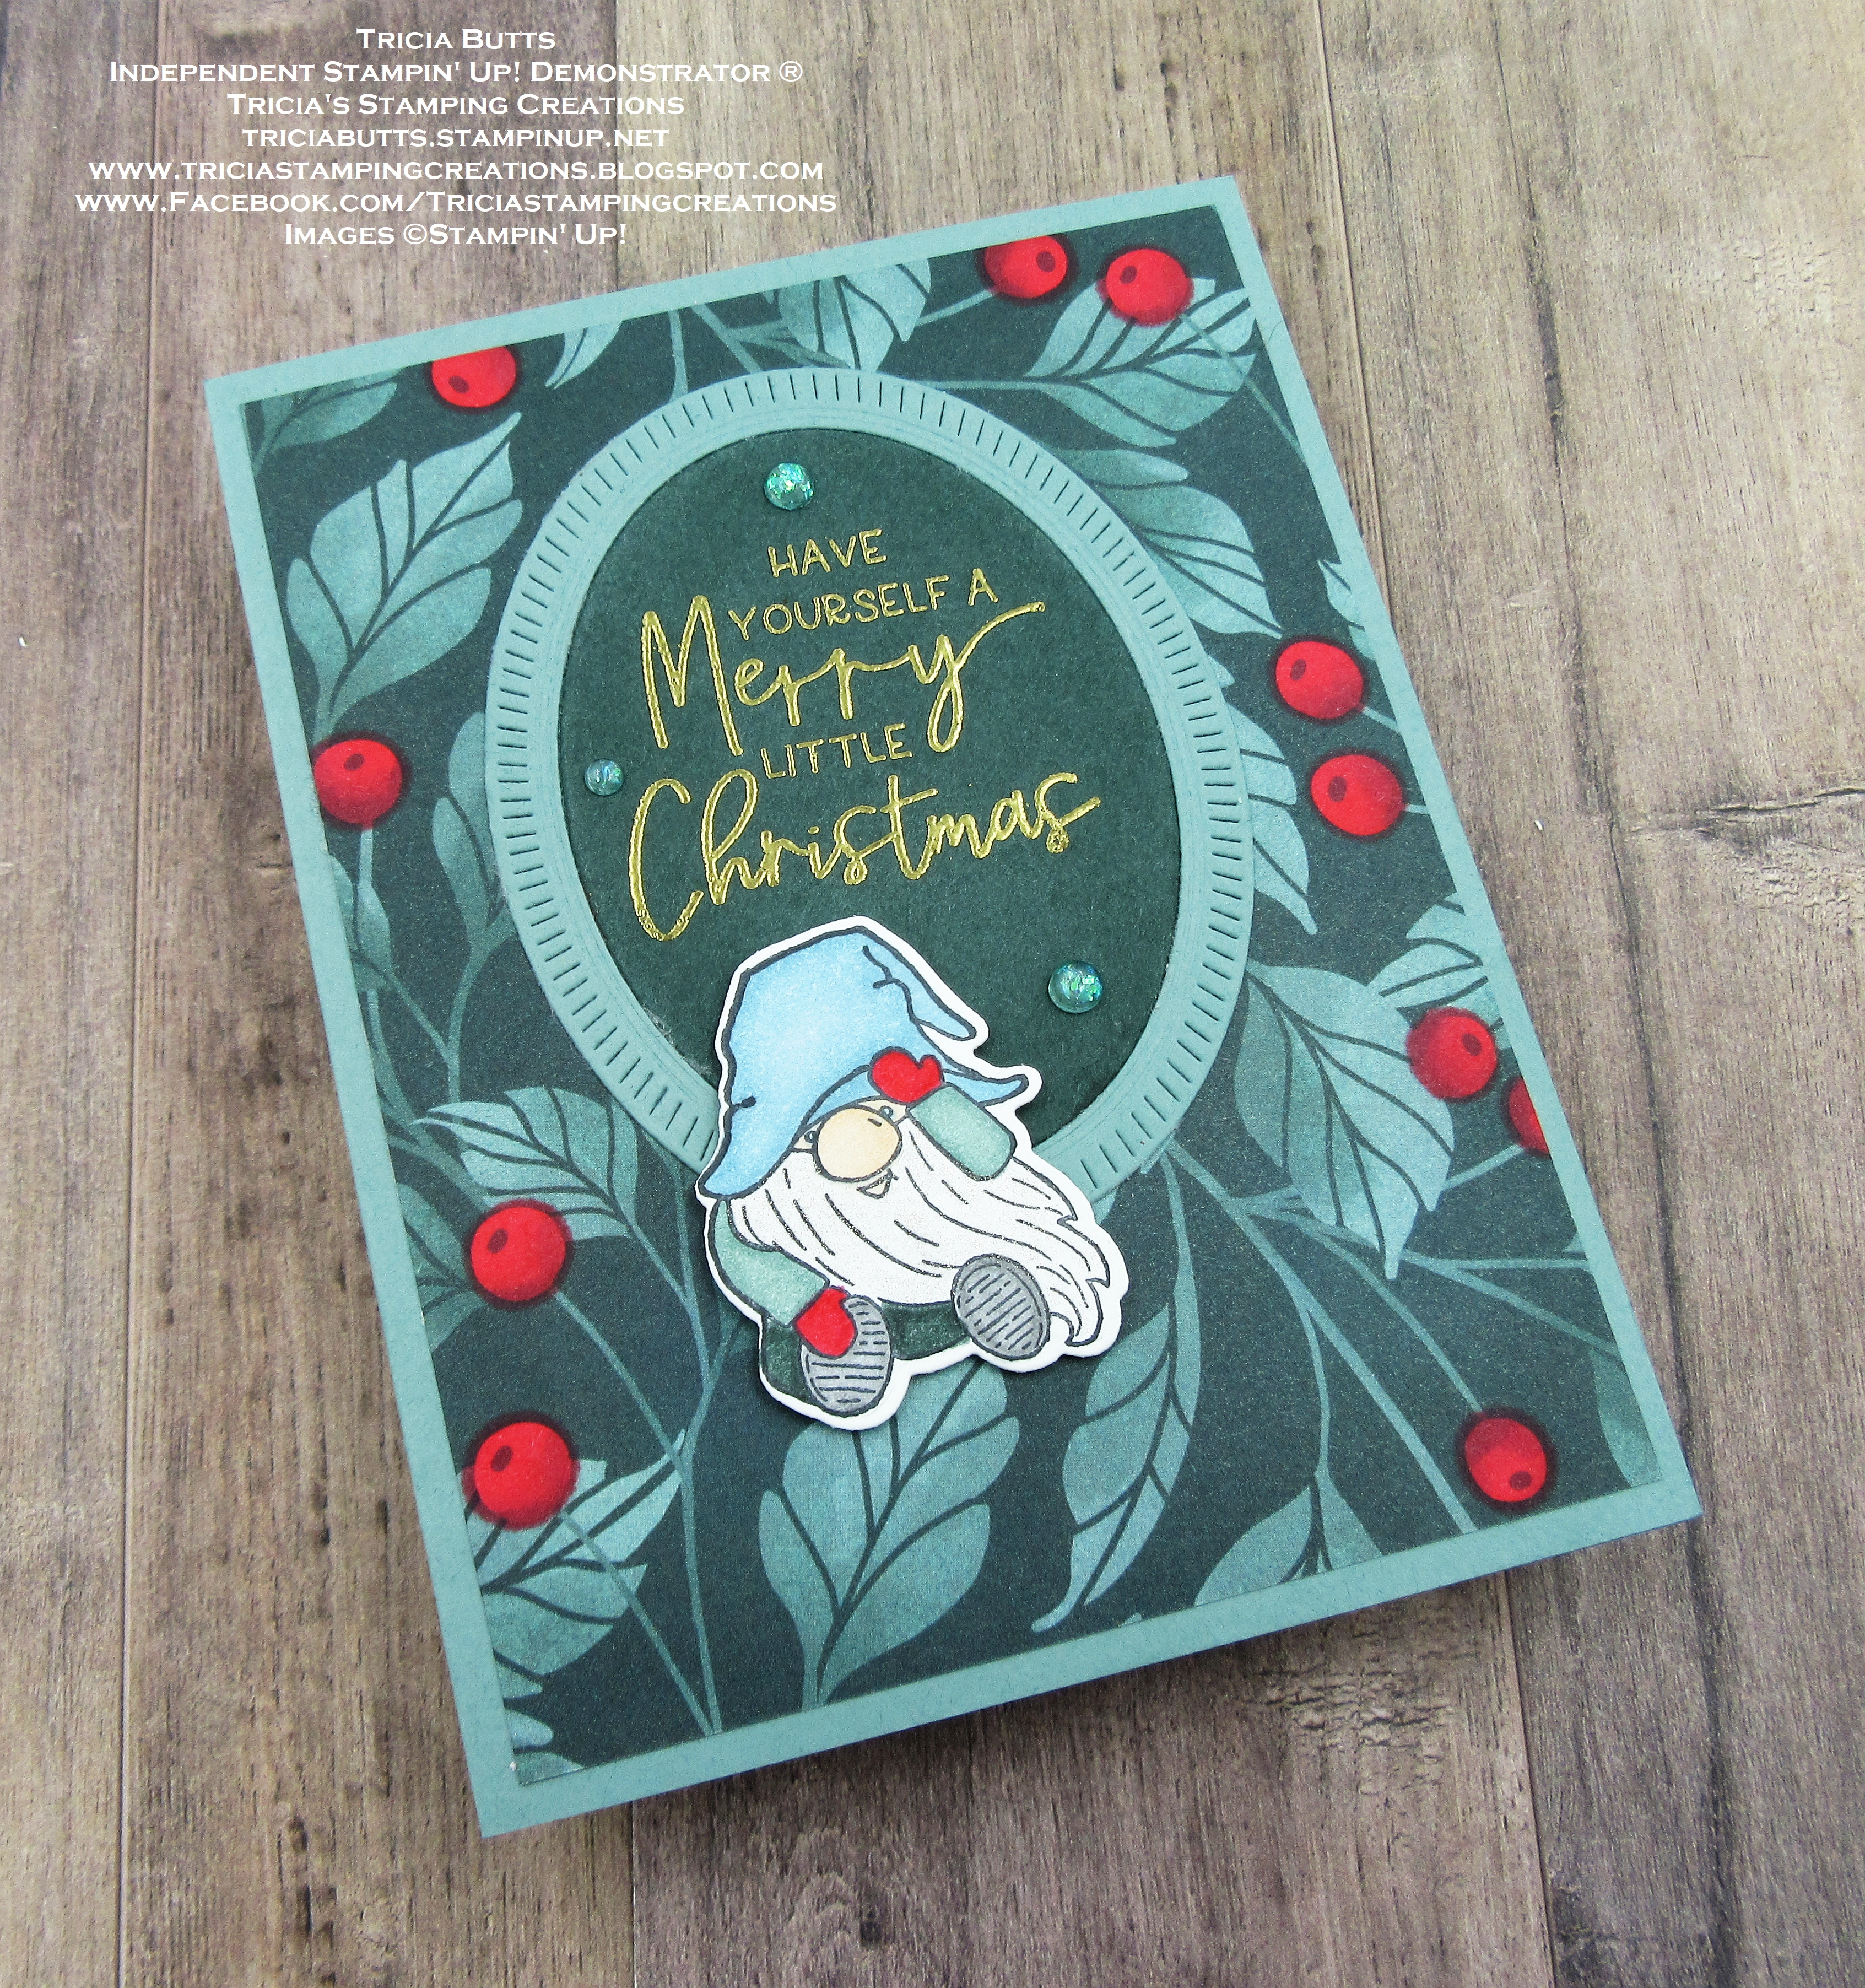
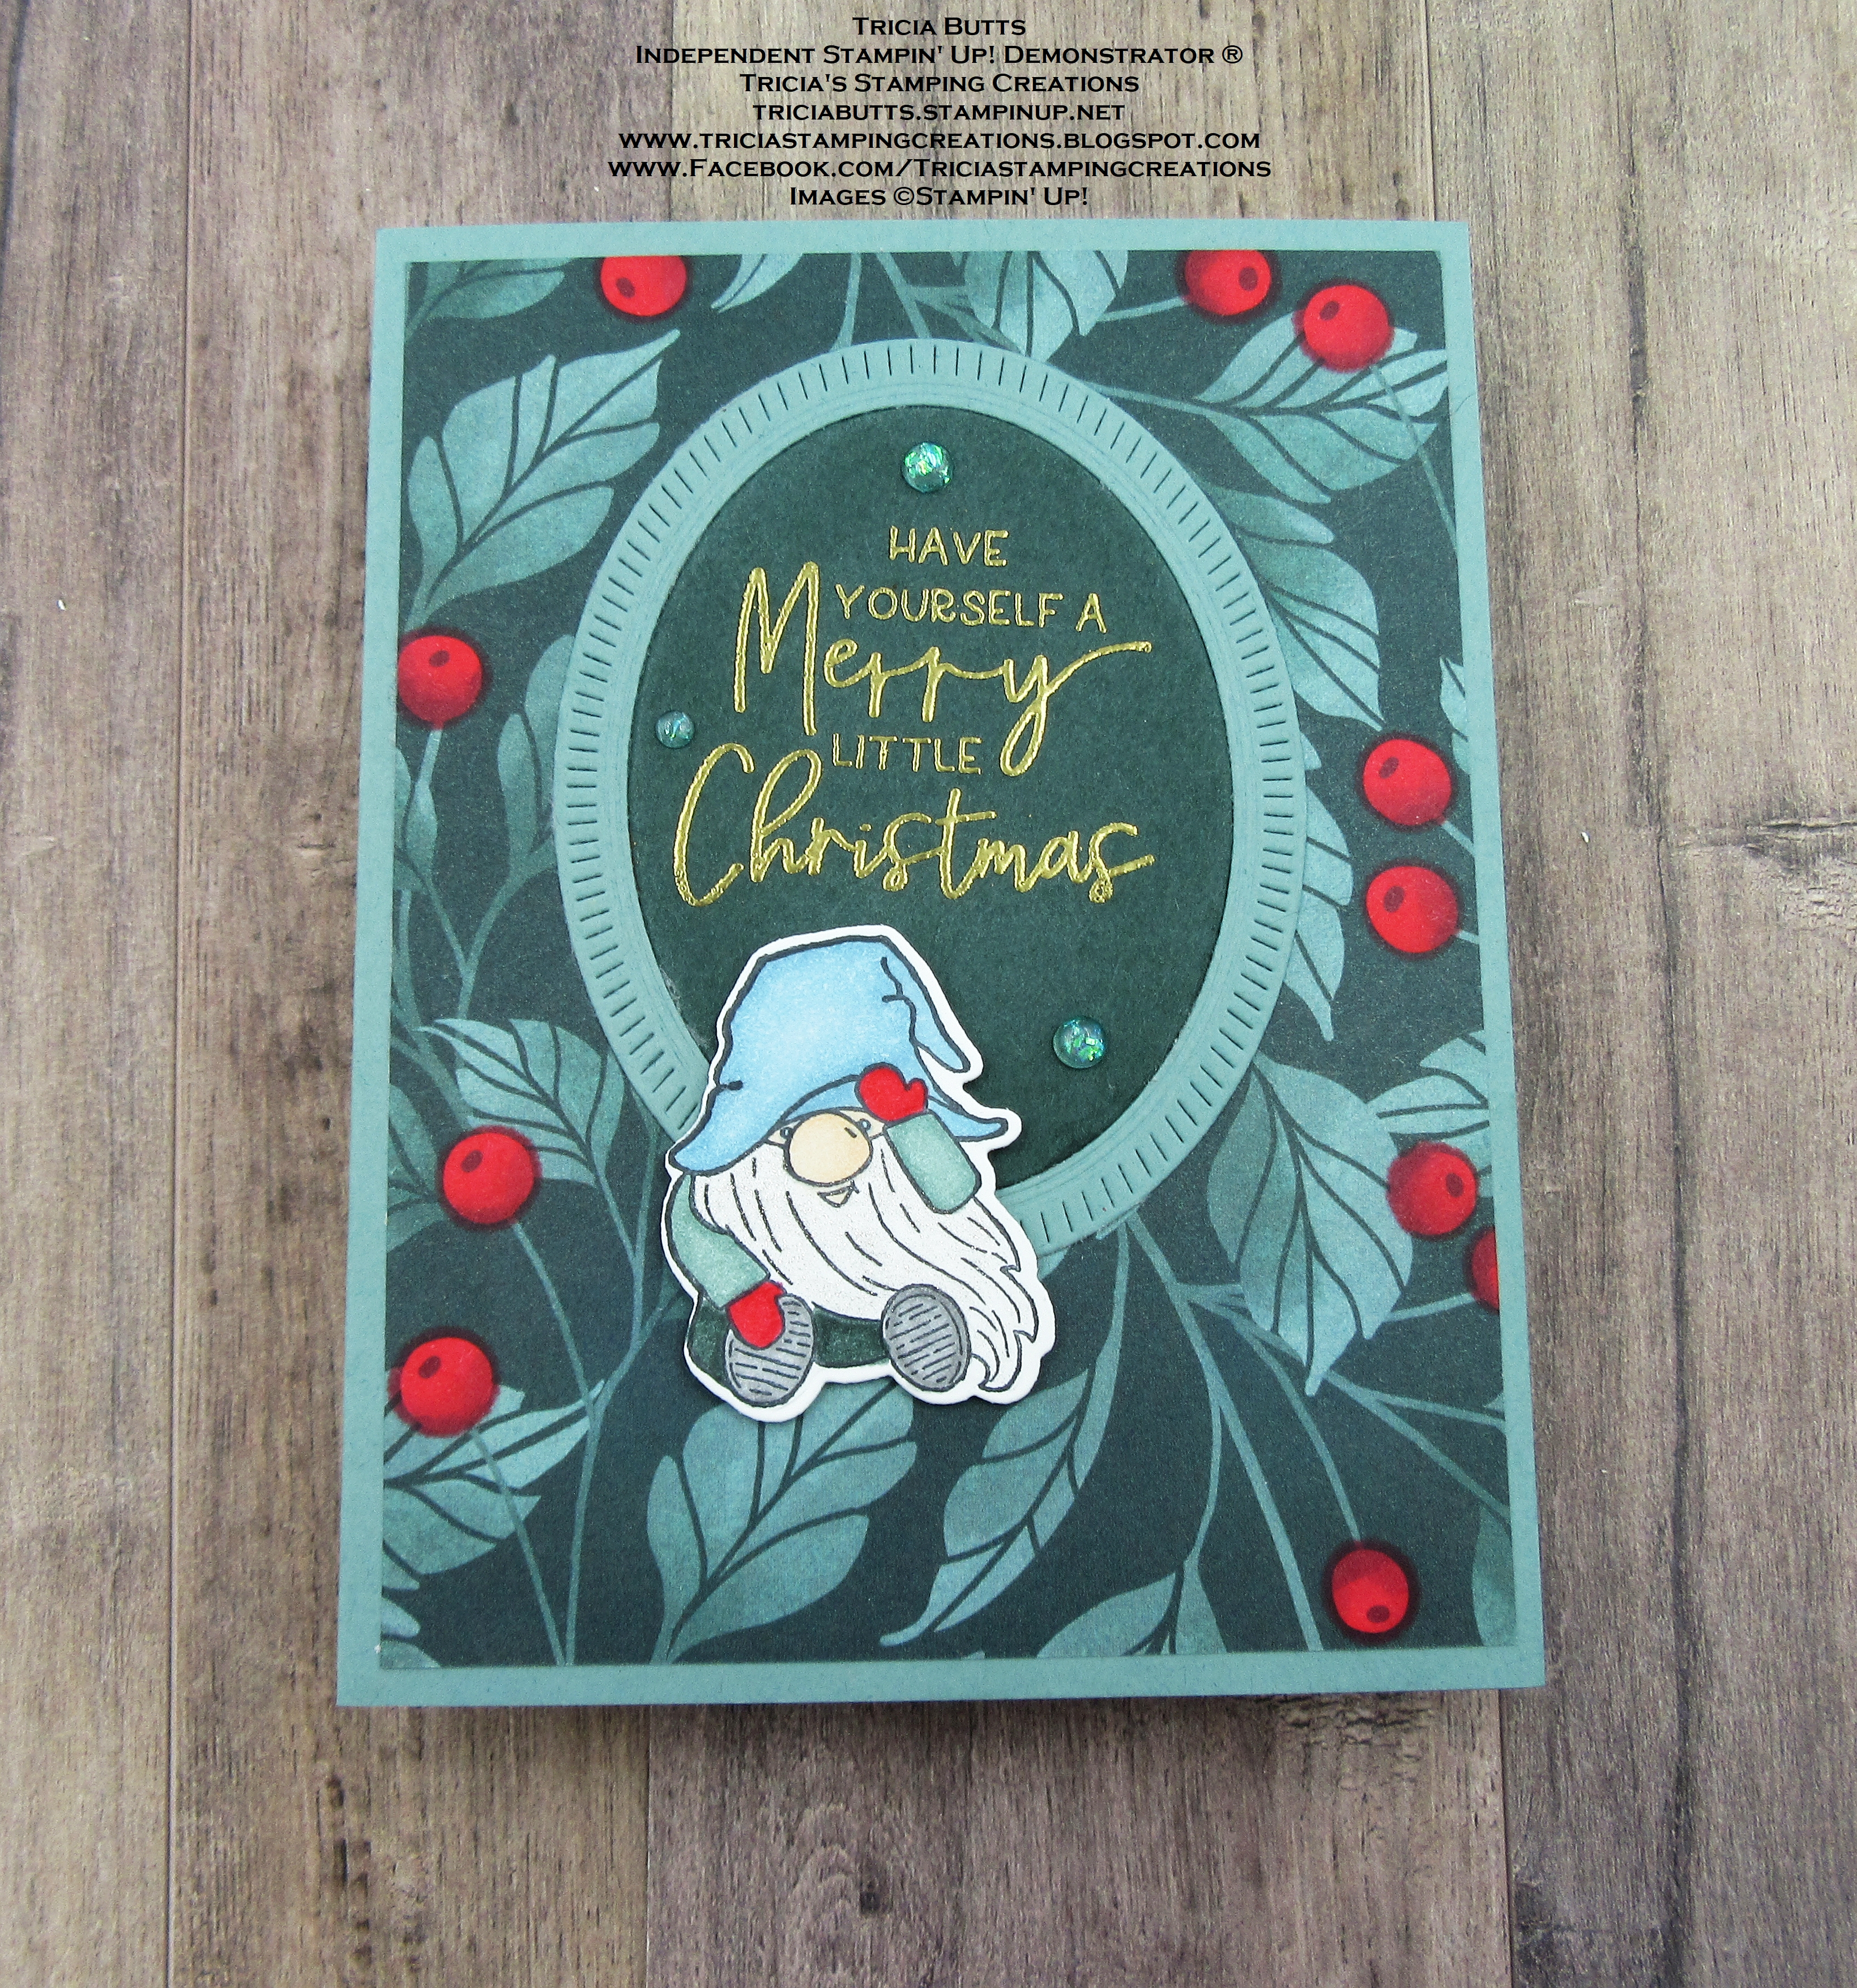
The wonderful thing about creating your own Christmas cards is that you get to choose your own colors and your own designs. Instead of the more traditional red and green color combination, I decided to create my card in shades of blue. I love how Orchid Oasis and Starry Sky look together, so I chose these colors for my card and used Orchid Oasis Classic ink to sponge the sky background on the Whisper White cardstock layer. I used my Stamparatus to stamp the Santa and reindeer image with Versamark and heat embossed the image with Black embossing powder. For the card front, I die cut the window using the largest Circle Die from the Layering Circles Dies. I also embossed the background using the Snowflakes embossing folder from the Wintry 3D Embossing Folders to add texture to the card front. For the sentiment, I heat embossed the image with White embossing powder onto the sentiment label die cut with the Stylish Shapes Dies. I cut the left side so that it had a straight edge to line up with the left side of the card front and popped it up with Stampin' Dimensionals. To embellish the card, I added one of the Wonderful Snowflake Die Cuts so that it overlapped the window area and I added several Iridescent Pearls for a touch of bling. I love the simplicity of this card design and how it showcases the stamped image. 
Thank you for taking the time to visit my blog. I hope that my card design will help inspire you to create your own beautiful projects using the exclusive stamp set from this kit.
Now it's time to visit Terri's blog and see what she has created with this kit. Just click on the Next button below to visit her blog. We would appreciate it if you would leave us a comment and let us know what you liked about our projects. I hope you enjoy the rest of our blog hop. 

If you live in the U.S. and do not have a Stampin' Up! Demonstrator, please contact me and I would be happy to help you with your creative projects. You may also visit my Online Store to place your order and have it shipped to you. 

Until Next Time

Happy Stamping,

Tricia Butts
Independent Stampin' Up! Demonstrator

Like What You See? Visit My Online Store Here

Visit My Facebook Business Page for Updates & Ideas

Click here to Contact Me


Create Beautiful Christmas Tags For The Holidays 
With The From The North Pole Paper Pumpkin Kit
Click Below To Subscribe By November 10th


Join The Stampin' Up! Family
Get $155 In Stampin' Up! Products For Just $99
In Your Starter Kit During October
Click Below For More Details


Monday, October 24, 2022

Kylie Bertucci's International Blog Highlights Winners Blog Hop October 2022

I am so excited to be a part of Kylie's International Highlight Top 10 Winners Blog Hop for October. You will have the opportunity to visit with incredibly talented Stampin' Up! Demonstrators as they share their beautiful projects and ideas to inspire you to get creative. I want to say a big thank you to all of you who voted for my card this month and giving me the opportunity to take part in this blog hop. I appreciate the support so much and hope you will enjoy our Thank You project ideas this month. 
Here in Colorado, we are enjoying the beautiful colors of Fall, so I thought I would use this as my inspiration for today's Thank You card design. I love creating clean and simple card designs using designer series paper. For today's card, I chose to use one of the designs from the Celebrate Everything Designer Series Paper, which is a Host Reward you can earn for free with a qualifying order/party. I paired it with the Framed Florets Bundle, which will be available for customers to order beginning November 1st. 
Products Used:
Framed Florets Bundle (item #162407) Available November 1st
Celebrate Everything Designer Series Paper (item #159913) Host Reward
Brushed Metallic Cardstock (item #153524)
Granny Apple Green Cardstock (item #146990)
Basic White Cardstock (item #159276)
Versamark Pad (item #102283)
Metallics Embossing Powders (item #155555)
Linen Thread (item #104199)
Brushed Metallic Adhesive Backed Dots (item #156506)
Mini Glue Dots (item #103683)
Measurements:
Granny Apple Green Cardstock
Card Base - 8 1/2" x 5 1/2" (Scored at 4 1/4")
Oval Frame die cut with the Framed Florets Dies
Celebrate Everything Designer Series Paper
Card Front - 5 1/4" x 4"
Basic White Cardstock
Sentiment Oval die cut with the Framed Florets Dies
Brushed Copper Cardstock
2 Detailed Leaves die cut with the Framed Florets Dies
The design I chose for the background for this card design has wonderful bright colors that work beautifully for a Thank You card. I like that this design works well for a masculine card and I kept the embellishments simple to reflect that. The Copper embossing for the sentiment and Copper die cut leaves coordinate to help step up the design without being over the top. This simple layout is easy to duplicate with other supplies to create a variety of card designs to suit all occasions. 
Thank you for taking the time to visit my blog today. I hope that my Thank You card will help inspire you to create your own beautiful projects to share with family and friends. Sending a handmade card to someone is a wonderful way to show how much you care and can really brighten someone's day.
Please take the time to hop through and visit with our talented Winners by using the Roll Call List below. We would love it if you would leave us a comment and let us know how much you enjoyed our projects. I hope you enjoy the rest of our blog hop.

If you live in the U.S. and do not have a Stampin' Up! Demonstrator, please contact me and I would be happy to help you with your creative projects. You may also visit my Online Store to place your order and have it shipped to you. 

Until Next Time

Happy Stamping,

Tricia Butts
Independent Stampin' Up! Demonstrator

Like What You See? Visit My Online Store Here

Visit My Facebook Business Page for Updates & Ideas

Click here to Contact Me


Join The Stampin' Up! Family
Get $155 in Stampin' Up! Products For Just $99
In Your Starter Kit During The Month of October
Click Below For More Details

Get Creative For The Holidays
With The July-December 2022 Mini Catalog
Click Below To Visit My Online Store


Saturday, October 22, 2022

Stamping With Friends Christmas Cards Blog Hop

Welcome to the Stamping With Friends Christmas Cards Blog Hop as we help inspire you to create your own beautiful cards for the Holidays. Our Design Team members will be sharing their beautiful projects and ideas to help spark your creativity.
One of my favorite things about being a Demonstrator, is the opportunity to take advantage of new products early. For today's card design, I had fun with the new Fittings Florets Collection, which will be available to customers November 1st, but Demonstrators can order it early during the month of October. This beautiful collection consists of a Sneak Peek of a new bundle from the January-June 2023 Mini Catalog, along with exclusive designer series paper, embellishments and a bonus stamp set that will only be available while supplies last. With these fabulous new products, you can create projects all through the year for so many occasions.
Products Used:
Fitting Florets Collection (item #163129) Available November 1st
- Framed & Festive stamp set (item #160888)
- Framed Florets Dies (item #160623)
- Fitting Florets Designer Series Paper (item #161814)
Kindest Gnomes Bundle (item #159626)
Soft Succulent Cardstock (item #155776)
Evening Evergreen Cardstock (item #155574)
Basic White Cardstock (item #159276)
Memento Tuxedo Black Pad (item #132708)
Versamark Pad (item #102283)
Metallics Embossing Powders (item #155555)
Soft Succulent Stampin' Blends Combo Pack (item #155521)
Evening Evergreen Stampin' Blends Combo Pack (item #155517)
Balmy Blue Stampin' Blends Combo Pack (item #154830)
Sweet Sorbet Stampin' Blends Combo Pack (item #159224)
Smoky Slate Stampin' Blends Combo Pack (item #154904)
Petal Pink Stampin' Blends Combo Pack (item #154893)
Clear Wink of Stella Glitter Brush (item #141897)
2021-2023 In Color Opal Rounds (item #159185)
Stampin' Dimensionals (item #104430)
Measurements:
Soft Succulent Cardstock
Card Base - 8 1 /2" x 5 1/2" (Scored at 4 1/4")
Oval Frame die cut with the Framed Florets Dies
Evening Evergreen Cardstock
Sentiment Oval die cut with the Framed Florets Dies
Fitting Florets Designer Series Paper
Card Front - 5 1/4" x 4"
Basic White Cardstock
Stamped & die cut Gnome image with the Kindest Gnomes Bundle
This pretty clean and simple Christmas card has a whimsical feel with the addition of the cute little gnome. One of my favorite color combinations for Christmas is Soft Succulent and Evening Evergreen and I just love the pop of color that the Sweet Sorbet berries add to this card design. The designer series paper has white berries as part of the design but I decided to color them with the Light Sweet Sorbet Stampin' Blends Marker to give it more of a Christmas feel. I am a big fan of ovals, so I was so excited to get the new Framed Florets Dies with the beautiful oval options that layer so beautifully together. I chose Soft Succulent for the detailed frame and Evening Evergreen for the sentiment, tying in with the colors in the designer series paper. I love how the Gold embossing of the sentiment from the Framed & Festive stamp set pops against the Evening Evergreen cardstock and it gives the card design a classically elegant look. This stamp set has so many wonderful sentiments for the holidays and I just love the combination of fonts. For the gnome, I colored the image using Stampin' Blends Markers to add a pop of color against the card front. To finish off th design, I added several Soft Succulent Opal Rounds to the sentiment label for a touch of bling. This card design was so much fun to create and I love how versatile this new collection of products is for creating projects not only for the holidays but throughout the year. 
Thank you for taking the time to visit my blog. I hope that my card design will help inspire you to create your own beautiful Christmas cards to send to family and friends. If you would like to explore the Fitting Florets Collection, contact me to learn how you can add it to your Starter Kit this month to get a jump start on your holiday card making and so much more.
Now it's time to visit with my fellow Design Team members and see their beautiful Christmas card designs. Just click on the links in the Roll Call List to find your way along our blog hop. We would appreciate it if you would leave us a comment and let us know what you liked about our projects. I hope you enjoy the rest of our blog hop. 

If you live in the U.S. and do not have a Stampin' Up! Demonstrator, please contact me and I would be happy to help you with your creative projects. You may also visit my Online Store to place your order and have it shipped to you. 

Until Next Time

Happy Stamping,

Tricia Butts
Independent Stampin' Up! Demonstrator

Like What You See? Visit My Online Store Here

Visit My Facebook Business Page for Updates & Ideas

Click here to Contact Me


Get Creative For The Holidays
With The July-December 2022 Mini Catalog
Click Below To Visit My Online Store

Join The Stampin' Up! Family
Get $155 Worth Of Products For Just $99
In Your Starter Kit In October
Click Below For Details


Wednesday, October 19, 2022

New At SU October Blog Hop Simple To Stepped Up Stamping Christmas Season

Welcome to the New At SU October Blog Hop as we showcase this month's theme "Simple to Stepped Up Stamping". Our Design Team members will be sharing projects that showcase simple, casual and avid projects to show how you can step up your projects. 

For my examples of Simple to Stepped up Stamping, I chose to create 3 Christmas cards using the Season of Christmas stamp set. I love that the images in this stamp set work well for all 3 types of cards. 
Simple Stamping
This clean and simple card design is all about paper, stamps and ink. I stamped the pinecones with Crumb Cake and Soft Suede Classic inks using the two-step stamping technique and added some pine needles with Soft Succulent Classic ink. The colors are very simple - Soft Succulent, Evening Evergreen and Very Vanilla, to create simple layers. This would be a great masculine Christmas card. 

Casual 
I took my layout from the first card and stepped it up by using Soft Succulent Designer Series Paper for the background and added some heat embossing in Gold embossing powder, for the sentiment and detail on the stamped focal image. I also added some simple embellishments with the Gold Satin Edge Ribbon and Basic Pearls colored with the Light Cherry Cobbler Stampin' Blends Marker.

Avid
This is my over the top card design, taking elements from the first two cards and stepping them up again. This time I die cut the stamped pinecones, pine needles, leaves and berries with the coordinating Seasonal Labels Dies to decorate the sentiment label, which is the focal image for this card design. I also embossed the background layer using the Fern 3D Embossing Folder to add texture and I added a bow and Gold Brushed Metallic Adhesive Dots to embellish the design. 

Thank you for taking the time to visit my blog. I hope that my projects will inspire you to explore stepping up your own projects from simple to casual or avid. There are so many options to explore.
Please take the time to visit with my fellow Design Team members to see the wonderful projects they have to share. Just click on the links in the Roll Call List below to continue along our blog hop. We would appreciate it if you would leave us a comment and let us know what you liked about our projects. I hope you enjoy the rest of our blog hop.

If you live in the U.S. and do not have a Stampin' Up! Demonstrator, please contact me and I would be happy to help you with your creative projects. You may also visit my Online Store to place your order and have it shipped to you. 

Until Next Time

Happy Stamping,

Tricia Butts
Independent Stampin' Up! Demonstrator

Like What You See? Visit My Online Store Here

Visit My Facebook Business Page for Updates & Ideas

Click here to Contact Me


Get Creative For The Holidays
With The July-December 2022 Mini Catalog
Click Below To Visit My Online Store


Wednesday, October 12, 2022

Around The World On Wednesday October Blog Hop Sketch 102 Challenge

Welcome to the Around The World On Wednesday October Blog Hop and this month we have a Sketch Challenge to share with you. Our amazing Design Team members will be sharing their projects and ideas to help inspire you. 
For my interpretation of the sketch, I flipped the card design from portrait to landscape and then mirrored the layout, to create my card design. I chose to use the Cottage Rose Bundle and the coordinating Abigail Rose Designer Series Paper for my design and added a little texture with the Timeworn Type 3D Embossing Folder. The color combination I chose features warm, Fall-like colors that work well for a birthday card for this time of year. 
Products Used:
Cottage Rose Bundle (item #159048)
Abigail Rose Designer Series Paper (item #159037)
Layering Circles Dies (item #151770)
Floral Gallery Dies (item #154316)
Timeworn Type 3D Embossing Folder (item #156505)
Early Espresso Cardstock (item #119686)
Pale Papaya Cardstock (item #155668)
Soft Sea Foam Cardstock (item #146988)
Very Vanilla Cardstock (item #101650)
Pale Papaya Classic Ink Pad (item #155668)
Soft Sea Foam Classic Ink Pad (item #147102)
Memento Tuxedo Black Pad (item #132708)
Versamark Pad (item #102283)
Metallics Embossing Powders (item #155555)
Pale Papaya Stampin' Blends Combo Pack (item #155519)
Soft Sea Foam Stampin' Blends Combo Pack (item #154902)
Daffodil Delight Stampin' Blends Combo Pack (item #154883)
Clear Wink of Stella Glitter Brush (item #141897)
Baker's Twine Essentials Pack (item #155475)
Sponge Daubers (item #133773)
Stampin' Dimensionals (item #104430)
Mini Glue Dots (item #103683)
Measurements:
Early Espresso Cardstock 
Card Base - 8 1/2" x 5 1/2" (Scored at 4 1/4")
2 detailed die cuts created using Cottage Flowers Dies
Large Circle die cut with Layering Circles Dies
Abigail Rose Designer Series Paper
Card Front - 5 1/4" x 4"
Pale Papaya Cardstock
Small Circle die cut with the Layering Circles Dies
Soft Sea Foam Cardstock
Medium Circle die cut with the Layering Circles Dies
Very Vanilla Cardstock
Floral image stamped and die cut with Cottage Rose Bundle
Sentiment Label die cut with the Floral Gallery Dies
This beautiful birthday card is all about the wonderful floral design in the bottom left corner and the sketch layout was a great way to help me piece it all together. I stamped and die cut the floral image and colored it with Stampin' Blends Markers to bring the image to life. The three circles were all embossed with the Timeworn Type 3D Embossing Folder and I sponged ink onto the edges and raised areas of the Pale Papaya and Soft Sea Foam circles to bring out the detail. The detailed floral elements were die cut from Early Espresso cardstock and attached to the two smaller circles and I heat embossed the sentiment with Gold embossing powder onto the Very Vanilla sentiment label to help step up the design. The small bow on the top corner of the sentiment label has been tied with Very Vanilla Baker's Twine and I added some Clear Wink of Stella to the floral design to add a touch of sparkle. The beautiful designer series paper background layer really helps make the floral image pop and the Early Espresso card base frames the card design perfectly. I love how this card design turned out and how much fun it was to try this sketch layout. 
Thank you for taking the time to visit my blog. I hope that my card design will help inspire you to create your own projects using this sketch layout. Sketches can be a wonderful way to spark your creativity. 
Now it's time to visit Teri's blog and see what she has create with this sketch challenge. Just click on the Next button to visit her blog or use the Roll Call List below to find your way. We would appreciate it if you would leave us a comment and let us know what you liked about our projects. I hope you enjoy the rest of our blog hop. 


If you live in the U.S. and do not have a Stampin' Up! Demonstrator, please contact me and I would be happy to help you with your creative projects. You may also visit my Online Store to place your order and have it shipped to you. 

Until Next Time

Happy Stamping,

Tricia Butts
Independent Stampin' Up! Demonstrator

Like What You See? Visit My Online Store Here

Visit My Facebook Business Page for Updates & Ideas

Click here to Contact Me


Get Creative For The Holidays
With The July-December 2022 Mini Catalog
Click Below To Visit My Online Store