Saturday, February 26, 2022

Ink. Stamp. Share. March Monthly Blog Hop Sketch Challenge

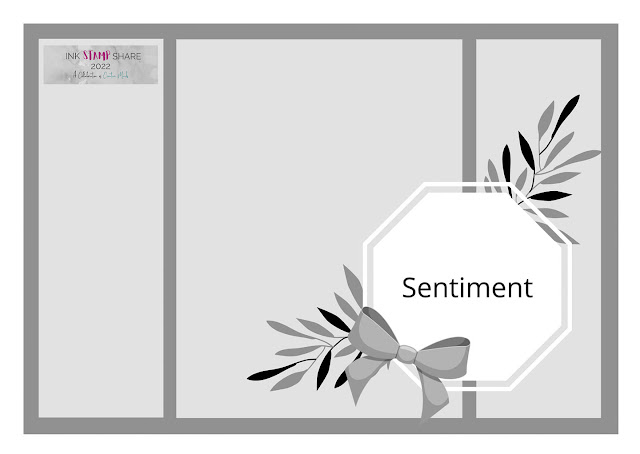
It's time to hop along with the Ink. Stamp. Share. March Monthly Blog Hop with a sketch challenge. You will be visiting with our talented Design Team Members as they share their ideas and projects based on the sketch design below to help inspire you. 

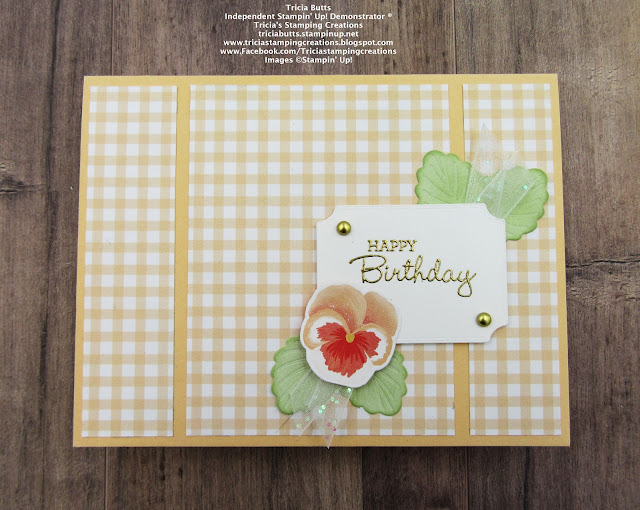
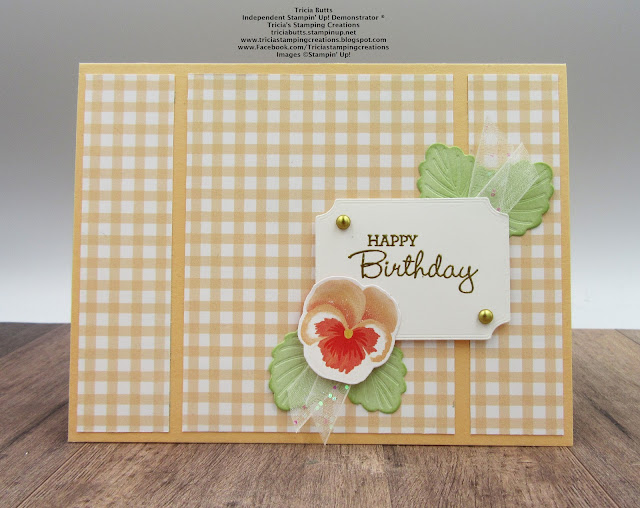
I love participating in Sketch Challenges as it gives me a road map to help me design my card. For this challenge, I chose to use products from the Pansy Petals Suite to create a Spring themed Birthday card. This layout really fits with my style of clean and simple and I love how the pansy elements fit with the sketch to create this pretty card design. The sentiment label was die cut with the Tasteful Labels Dies, which is a wonderful staple for classically elegant designs.
Products Used:
Pansy Patch Bundle (item #155674)
Pansy Petals Designer Series Paper (item #155807)
Tasteful Labels Dies (item #152886)
Pale Papaya Cardstock (item #155668)
Soft Sea Foam Cardstock (item #146988)
Basic White Cardstock (item #159276)
Soft Sea Foam Classic Ink Pad (item #147102)
Versamark Pad (item #102283)
Metallics Embossing Powders (item #155555)
White 3/8" Glittered Organdy Ribbon (item #156408)
Brushed Metallic Adhesive-Backed Dots (item #156506)
Stampin' Dimensionals (item #104430)
Mini Glue Dots (item #103683)
Sponge Daubers (item #133773)
Measurements:
Pale Papaya Cardstock
Card Base - 8 1/2" x 5 1/2" (Scored at 4 1/4")
Pansy Petals Designer Series Petal
Card Front - 3 pieces 
2 strips - 1" x 4" 1 piece - 3" x 4"
Pansy die cut with Pansy Dies
Basic White Cardstock
Sentiment Label die cut with Tasteful Labels Dies
Soft Sea Foam Cardstock
4 leaves die cut with Pansy Dies 
This pretty clean and simple card design showcases the beautiful Pansy Petals Suite in the 2021-2022 Annual Catalog. I used a piece of the Pansy Petals Designer Series Paper to create the card front. Tip: to create the 3 panels, first cut a piece of the designer series paper to measure 5" x 4", then measuring along the 5" side, cut 1" strips from each end, leaving a 3" piece in the middle. Then it is simple to line up the pieces of the designer series paper on the front of the card base and adhere them, making sure the edges line up straight. For the sentiment, I heat embossed the Happy Birthday sentiment with Gold embossing powder and adhered it to the card front towards the right side of the card. I die cut one of the Pale Papaya small pansies from the designer series paper using the Pansy Dies and adhered it to the bottom left corner of the sentiment label. 
To create the leaves, I die cut 4 small leaves from Soft Sea Foam cardstock and sponged them with Soft Sea Foam Classic ink using a Sponge Dauber. I added two of the leaves underneath the pansy and added the other two leaves at the top right corner of the sentiment label. To embellish the card, I added White Glittered Organdy Ribbon underneath the sentiment label on top of the leaves at the top right and bottom left corners. To complete the card design, I added two small Brushed Gold Dots from the Brushed Metallic Adhesive-Backed Dots.  
Thank you for taking the time to visit my blog. I hope that my card design will help inspire you to create your own beautiful cards using this sketch challenge as a starting point for your creativity. Stampin' Up! has so many wonderful suites to choose from that will provide you with coordinating products to help take the stress out of creating your design.
Now it's time to visit with our talented team members as they share their wonderful projects. Please click on the Next or Previous to continue with our blog hop or use the Roll Call List to find your way. We would love it if you would leave us a comment and let us know what you liked about our projects. I hope you enjoy the rest of our blog hop.

If you live in the U.S. and do not have a Stampin' Up! Demonstrator, please contact me and I would be happy to help you with your creative projects. You may also visit my Online Store to place your order and have it shipped to you. 

Until Next Time

Happy Stamping,

Tricia Butts
Independent Stampin' Up! Demonstrator

Like What You See? Visit My Online Store Here

Visit My Facebook Business Page for Updates & Ideas

Click here to Contact Me


Final Days!
Sale-a-Bration ends February 28th
Click Below For More Details

Jump Start Your Spring Projects
With The January-June 2022 Mini Catalog
Click Below To Visit My Online Store

Explore New Possibilities
With The March Beyond The Horizons Paper Pumpkin Kit
Click Below To Subscribe By March 10th

Sunday, February 20, 2022

Kre8tors February Blog Hop Sale-a-Bration

Welcome to the 2022 Kre8tors February Blog Hop as we showcase products from the Sale-a-bration Catalog. You will be visiting with talented Stampin' Demonstrators as they share their ideas and projects to help inspire you. With just over a week to go, now is the perfect time to get creative with your favorite Sale-a-Bration products. 
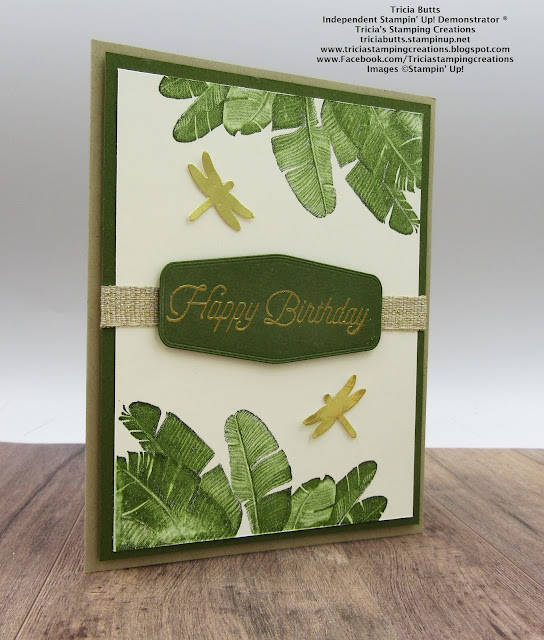
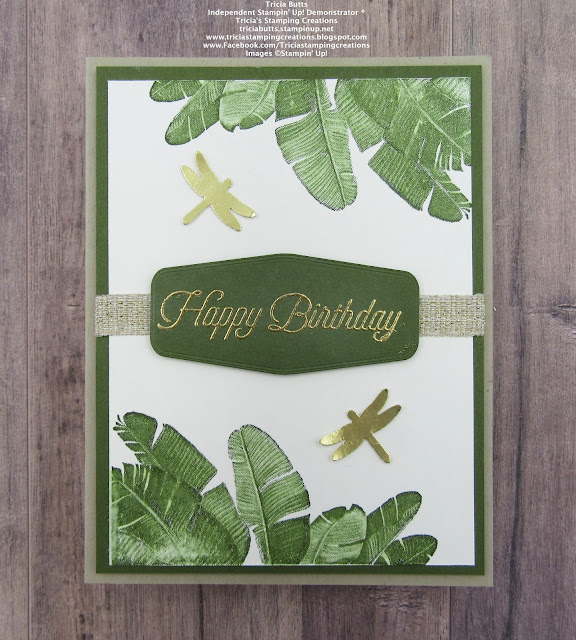
Masculine cards can often be challenging, so when I saw the Island Vibes stamp set, I knew it was perfect for this type of card. I paired it with the Special Moments stamp set to create a clean and simple design using Mossy Meadow, Crumb Cake and Very Vanilla with Gold accents to step up the design. The Island Vibes stamp set is a Level 1 Sale-a-Bration Reward that can be earned free with a qualifying $50 order and the Special Moments stamp set is a Level 2 Sale-a-Bration Reward that can be earned free with a qualifying $100 order. 
Products Used:
Island Vibes stamp set (item #158096) 
Level 1 Sale-a-Bration Reward
Special Moments stamp set (item #158081) 
Level 2 Sale-a-Bration Reward
Tasteful Labels Dies (item #152886)
Dragonflies Punch (item #154240)
Crumb Cake Cardstock (item #120953)
Mossy Meadow Cardstock (item #133676)
Very Vanilla Cardstock (item #101650)
Gold Foil Sheets (item #132622)
Mossy Meadow Classic Ink Pad (item #147111)
Versamark Pad (item #102283)
Metallics Embossing Powders (item #155555)
Blender Pens (item #102845)
Gold 3/8" Fine Art Ribbon (item #154561)
Stampin' Dimensionals (item #104430)
Mini Glue Dots (item #103683)
Measurements:
Crumb Cake Cardstock
Card Base - 8 1/2" x 5 1/2" (Scored at 4 1/4")
Mossy Meadow Cardstock
Layer 1 - 5 1/4" x 4"
Sentiment Label die cut with the Tasteful Labels Dies
Very Vanilla Cardstock
Card Front - 5" x 3 3/4"
The detailed leaves image in the Island Vibes stamp set is perfect for creating the background to this card design. I stamped the Very Vanilla cardstock layer twice with Mossy Meadow Classic ink, once across the top and once across the bottom. I used a Blender Pen to color the leaves using the ink from the stamped images. I layered the Very Vanilla stamped layer onto the Mossy Meadow cardstock and added a piece of the Gold Fine Art Ribbon around the middle of the card front. I heat embossed the sentiment from the Special Moments stamp set with Gold embossing powder onto the Mossy Meadow sentiment label and added it to the card front over the ribbon with Stampin' Dimensionals. To embellish the card design, I punched out two small dragonflies from Gold Foil with the Dragonflies Punch and added them to the card front with Mini Glue Dots. To finish off the card, I added the card front to the Crumb Cake card base with Stampin' Dimensionals to add dimension. 
Thank you for taking the time to visit my blog. I hope that my card design will help inspire you to explore the amazing Sale-a-bration products you can earn free with a qualifying order. There are so many wonderful possibilities. Sale-a-bration ends February 28th, so don't forget to place your order soon to avoid disappointment.
Now it's time to visit Sharon's blog and see what Sale-a-Bration product she is showcasing. Just click the Next button to visit her blog or use the Roll Call List below to find your way. We would appreciate it if you would leave us a comment and let us know what you liked about our projects. I hope you enjoy the rest of our blog hop. 

If you live in the U.S. and do not have a Stampin' Up! Demonstrator, please contact me and I would be happy to help you with your creative projects. You may also visit my Online Store to place your order and have it shipped to you. Remember you have until February 28th to take advantage of Sale-a-bration when you place a qualifying order. 

Until Next Time

Happy Stamping,

Tricia Butts
Independent Stampin' Up! Demonstrator

Like What You See? Visit My Online Store Here

Visit My Facebook Business Page for Updates & Ideas

Click here to Contact Me


Take Your Creativity To The Next Level
With The March Paper Pumpkin Kit
Click Below To Subscribe By March 10th

Time Is Running Out
To Take Advantage Of Sale-a-Bration
Click Below For More Details

Explore Your Creativity
With The January-June 2022 Mini Catalog
Click Below To Visit My Online Store

Saturday, February 19, 2022

Stamping With Friends February Blog Hop Fancy Fold Birthday Card

It's time to hop along with the Stamping With Friends Fancy Fold Birthday Blog Hop as we share fun and creative projects to help spark your creativity. You will be visiting with our talented Design Team Members as they share their beautiful projects and ideas to inspire you to create your own wonderful birthday cards for the special people in your life. 
While looking for a fun fold design, I found this cute idea on You Tube created by fellow Stampin' Up! Demonstrator, Alisa Tilsner. I loved the interactive feature of this design and I thought that the Hey Chick Birthday stamp set would be perfect for my card design today. I paired it with the Sale-a-Bration Level 1 Reward, Sunshine & Rainbows 6"x6" Designer Series Paper, to create a pretty background.
Products Used:
Hey Birthday Chick stamp set (item #154464)
Birthday Chick Dies (item #158200)
Sunshine & Rainbows 6"x6" Designer Series Paper (item #158126) Level 1 Sale-a-Bration Reward
Layering Circles Dies (item #151770)
Pool Party Cardstock (item #122924)
Magenta Madness Cardstock (item #153080)
Basic White Cardstock (item #159276)
Magenta Madness Classic Ink Pad (item #153117)
Memento Tuxedo Black Pad (item #132708)
So Saffron Stampin' Blends Combo Pack (item #154905)
Daffodil Delight Stampin' Blends Combo Pack (item #154883)
Pumpkin Pie Stampin' Blends Combo Pack (item #154897)
Pool Party Stampin' Blends Combo Pack (item #154894)
Magenta Madness Stampin' Blends Combo Pack (item #153106)
Color Lifter (item #144608)
Iridescent Rhinestones Basic Jewels (item #158130)
Measurements:
Pool Party Cardstock
Card Base - 5 1/2" x 8 1/2" (Scored at 4 1/4")
Hinge Strip - 1" x 4" Score at 1")
Sunshine & Rainbows Designer Series Paper
Card Front 5 1/4" x 4" die cut with Layering Circles Dies 
Circle die cut with Layering Circles Dies
Basic White Cardstock
Inside Layer - 5 1/4" x 4"
This cute fun fold is great for people of all ages and I love how interactive it is. It is simple to create starting with a basic card base with a window in the front and when you open up the card, it reveals the hinge attached to the focal image. For my card design, I chose Pool Party cardstock for the card base and the hinge and I chose to use the pretty Sunshine & Rainbows 6"x6" Designer Series Paper to create the card front and backgrounds for the focal images. The images are from the Hey Birthday Chick stamp set and the coordinating Birthday Chick Dies, both from the 2021-2022 Annual Catalog. It was fun to pull out these old favorites and show them some love. I colored the images with Stampin' Blends Markers and I die cut the sentiment from Magenta Madness cardstock. To create the window opening, I placed the layer of designer series paper on the front of the card base and die cut the circle using the Layering Circles Dies. I removed the Pool Party cardstock circle and designer series paper circle and adhered the card front to the front of the card base, lining up the layers with the circle openings.
To create the hinge, I took a 1" x 4" piece of Pool Party cardstock and scored it at 1" to create the hinge. Placing the Pool Party cardstock circle inside the opening of the card front, I positioned the long side of the hinge behind the back of the circle and adhered it. I then attached the short side of the hinge to the back of the Basic White inside layer and then attached it to the inside of the card base. I added both of the designer series paper circles to the front and back of the Pool Party circle, hiding the hinge piece on the back of the circle. I added the die cut chick to the front of the circle with Mini Stampin' Dimensionals and the small chick to the back of the circle with adhesive. Moving the hinged circle out of the way, I stamped the sentiments with Magenta Madness Classic ink through the front circle opening so that it lines up. I attached the die cut sentiment to the bottom right corner of the card front and embellished the card with Iridescent Rhinestone Basic Jewels for a touch of bling. I love how this simple card design has that hidden Wow factor when you open up the card. 
Thank you for taking the time to visit my blog. I hope that my card design will help inspire you to create your own beautiful birthday cards and try stepping them up with a fun fold. There are so many wonderful options to explore.
Now it's time to visit Betty's blog and see what wonderful fun fold she has to share with us. Just click the Next button to visit her blog or use the Roll Call List below to find your way. We would love it if you would leave us a comment and let us know what you liked about our projects. I hope you enjoy the rest of our blog hop. 

Roll Call

If you live in the U.S. and do not have a Stampin' Up! Demonstrator, please contact me and I would be happy to help you with your creative projects. You may also visit my Online Store to place your order and have it shipped to you. 

Until Next Time

Happy Stamping,

Tricia Butts
Independent Stampin' Up! Demonstrator

Like What You See? Visit My Online Store Here

Visit My Facebook Business Page for Updates & Ideas

Click here to Contact Me 


Get Creative
With The March Paper Pumpkin Kit
Click Below To Subscribe By March 10th

Time Is Running Out
To Earn Exclusive Free Products
Click Below To Learn More About Sale-a-Bration

Explore Your Creativity
With The January-June 2022 Mini Catalog
Click Below To Visit My Online Store


Wednesday, February 16, 2022

New At SU February Blog Hop Seas The Day Bundle

Welcome to the New At SU February Blog Hop as we showcase products from the January-June 2022 Mini Catalog. Our talented Design Team Members will share their projects and ideas to help inspire you to get creative with these amazing new products.
One of my favorite bundles in the January-June 2022 Mini Catalog would have to be the Seas The Day Bundle. I love the ocean and this bundle has wonderful images and sentiments that are perfect for creating seaside themed projects. I paired it with the Simply Marbleous 6"x6" Designer Series Paper, which is one of the Level 1 Sale-a-Bration Rewards you can earn free with a qualifying $50 order. I love how the different textures combine to create the look of under the sea. 


Products Used:
Seas The Day Bundle (item #157858)
Simply Marbleous 6"x6" Designer Series Paper (item #158128) Sale-a-Bration Level 1 Reward
Misty Moonlight Cardstock (item #153081)
Basic White Cardstock (item #159276)
Calypso Coral Classic Ink Pad (item #147101)
Bumblebee Classic Ink Pad (item #153116)
Cajun Craze Classic Ink Pad (item #147085)
Versamark Pad (item #102283)
Metallics Embossing Powders (item #155555)
Clear Wink of Stella Glitter Brush (item #141897)
Iridescent Rhinestones Basic Jewels (item #158130)
Measurements:
Misty Moonlight Cardstock
Card Base - 8 1/2" x 5 1/2" (Scored at 4 1/4")
Simply Marbleous Designer Series Paper
Balmy Blue Sheet - 5 1/4" x 4"
Coastal Cabana Sheet - 5 1/4" x 4" die cut with the Sea Dies
Basic White Cardstock
Octopus, crab & 2 starfish stamped and die cut with the Seas The Day  Bundle
To create the background for this card design, I took a piece of the Coastal Cabana designer series paper and die cut the large background design. I then layered it onto a piece of the Balmy Blue designer series paper to creat the look of water in the background. I stamped the octopus with Calypso Coral, the crab with Cajun Craze and the two starfish with Bumblebee Classic inks onto Basic White cardstock and then die cut them with the coordinating dies. Using Clear Wink of Stella, I colored the stamped images to give the a touch of shimmer. I heat embossed the sentiment with Silver embossing powder onto the Balmy Blue designer series paper layer, towards the top right corner of the opening, to allow room for the octopus. I added the octopus to the card front so that the legs intertwined with the seaweed in the background. I added the crab to the bottom right corner and the starfish to the bottom left and top right of the card front. For the card base, I chose Misty Moonlight cardstock to make the card front pop. I added Iridescent Rhinestones for a touch of bling to finish off the card design. I love how this card turned out and how the Simply Marbleous Designer Series Paper adds texture to this design. 
Thank you for taking the time to visit my blog. I hope that my card design will help inspire you to explore the wonderful Seas The Day Bundle from the January-June 2022 Mini Catalog. There are so many amazing possibilities to create with it and combine it with other Stampin' Up! products. If you would like to earn the Simply Marbleous Designer Series Paper for free, remember to place a qualifying order by February 28th.
Now it's time to visit Diane's blog to see what amazing projects she has to share with us. Just click on the Next button to visit her blog or use the Roll Call List below to find your way. We would appreciate it if you would leave us a comment and let us know what you like about our projects. I hope you enjoy the rest of our blog hop. 

February 2022 New at SU! Roll Call:  January-June Mini Catalog

Gifted Hands, Ink! - Let's Set Sail

Carterie Plus - New Horizons Designer Series Paper  

Stamping Scene - Amazing Silhouettes and Flowering Flowers

Stamping the Cape - In the Moment

Moore Fun Stamping - Soaring Swallows

Stampin’ Scrapper - Hello Ladybug

Stamping Flair - Paradise Palms

Playing with Papercrafting - Grassy Grove

De Kijkkast - Flowering Tulips

Tricia’s Stamping Creations - Seas the Day

24/7 Inspiration - Cactus Cuties

Creative Juice by Loni - Daffodil Daydream

The Flying Stamper - Hello Ladybug

Joni in the Spotlight Stamping - Oceanfront

If you live in the U.S. and do not have a Stampin' Up! Demonstrator, please contact me and I would be happy to help you with your creative projects. You may also visit my Online Store to place your order and have it shipped to you. 

Until Next Time

Happy Stamping,

Tricia Butts
Independent Stampin' Up! Demonstrator

Like What You See? Visit My Online Store Here

Visit My Facebook Business Page for Updates & Ideas

Click here to Contact Me


Time Is Running Out
To Earn Exclusive Free Sale-a-Bration Products
Click Below For More Details

Explore Your Creativity
With The January-June 2022 Mini Catalog
Click Below To Visit My Online Store

Get Ceative
With The Beyond The Horizon March Paper Pumpkin Kit
Click Below To Subscribe By March 10th