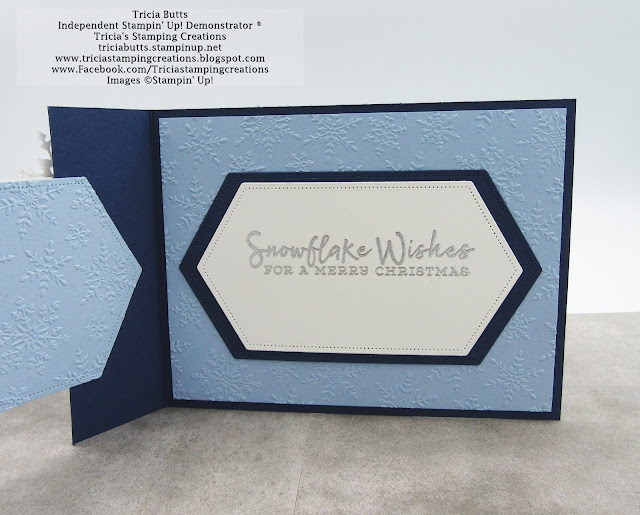
For my fancy fold card design, I chose to use products from the amazing Snowflake Splendor Suite. I love the way all of these beautiful products coordinate together to make creating projects so much easier. For my card design, I chose to use the Snowflake Wishes Bundle (item #155172) combined with the Snowflake Splendor Designer Series Paper (item #153512) for a non-traditional frosty Christmas card.
Products Used:
Snowflake Wishes Bundle (item #155172)
Snowflake Splendor Designer Series Paper (item #153512)
Winter Snow Embossing Folder (item #153577)
Blue Adhesive Backed Gems (item #153547)
Basic Rhinestones (item #144220)
Stitched Nested Label Dies (item #149638)
Silver Foil Sheets (item #132178)
Night of Navy cardstock (item #100867)
Seaside Spray cardstock (item #150883)
Whisper White cardstock (item #100730)
Measurements:
Night of Navy card base - 4 1/4' x 11" (Scored at 5 1/2")
Cut at 1 1/2" after the score mark on one side to create top flap
Cut 1/2" x 4 1/4" piece from remaining piece of Night of Navy for bottom piece
Snowflake Splendor DSP - 2 pieces 1 1/4" x 4"
Seaside Spray inside card layer - 4" x 5 1/4" (embossed with the Winter Snow Embossing Folder
Extra Seaside Spray, Whisper White and Night of Navy cardstock for die cut layers
Silver Foil to die cut snowflakes
This fancy fold is simple to assemble and the focal layer has been die cut using dies from the So Many Snowflakes Dies and Stitched Nested Labels Dies. I covered the back of the focal layer with a die cut layer of Seaside Spray cardstock that I embossed with the Winter Snow Embossing Folder. The sentiments from the Snowflake Wishes stamp set have been heat embossed with Silver Embossing Powder to coordinate with the Silver Foil die cut snowflakes. I used the Blue Adhesive Backed Gems to embellish the silver snowflakes and the small Basic Rhinestones to embellish the Night of Navy snowflake detail of the frame on the focal image. I used Tear & Tape Adhesive to attach the focal layer to the top flap and bottom layer of the card front. I wanted to make sure that I had a strong adhesive that would hold the card front together. I love how this card came together to create a sparkly Christmas design for someone special.
Thank you for taking the time to visit my blog today. I hope that my card design will inspire you to try this fun fold technique and create your own beautiful cards for the people you love. There are so many wonderful Stampin' Up! products to explore to help you with your creativity.
Now it's time to visit Darla's blog and see what wonderful fun fold technique she has to share with us. Just click on the Next button below to visit her blog. We would love it if you would leave us a comment and let us know what you enjoyed about our projects. I hope you enjoy the rest of our blog hop.
If you live in the U.S. and do not already have a Stampin' Up! Demonstrator, please contact me and I would be happy to help you with your creative projects. You may also visit my Online Store to place your order and have it shipped to you.
Until Next
Time
Happy
Stamping,
Tricia Butts
Independent Stampin' Up! Demonstrator
Independent Stampin' Up! Demonstrator
The New Stampin' Cut & Emboss Machine
Is Now Available!
Click Below To Order
Join My Team
Enjoy The Wonderful Benefits
As A Stampin' Up! Demonstrator
Click Below For More Details
The August-December 2020 Mini Catalog
Is Now Available
Start Planning Your Holiday Projects
Click Below To Visit My Online Store


A great card...will have to try your fancy fold !
ReplyDeleteLove your card! Great fun fold and it all is so very pretty!
ReplyDeleteBeautiful! I love how you used the die cuts in this card!
ReplyDeleteWhat a neat idea! I love how it stands up when it's open!!!
ReplyDeleteTricia cute design. I love how you used the Stitched Nested Dies.
ReplyDeleteThis is a beautiful and happy card!
ReplyDeleteVery pretty!!
ReplyDeleteSO pretty and frosty - like your layout!
ReplyDelete