Friday, December 20, 2019

SBTD December Blog Hop Anything But A Card

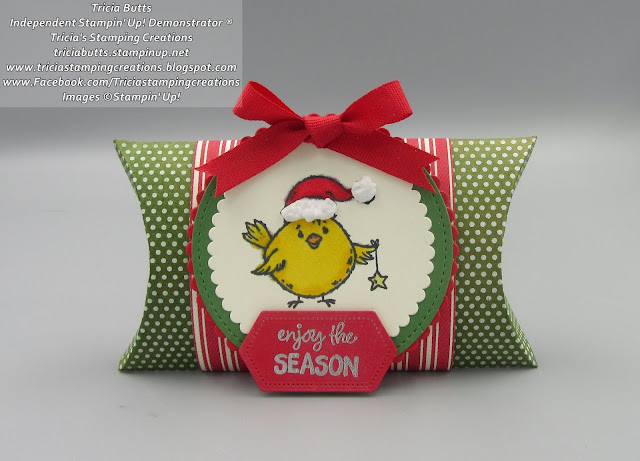
It's time to hop along with the SBTD December Blog Hop as we showcase this month's theme, Anything But a Card. This month I chose to create a fun gift giving idea featuring the Kraft Pillow Boxes (item #147018) in the 2019-2020 Annual Catalog. These wonderful premade boxes are perfect for making small gifts special with just a few extra touches.
To decorate this sweet little gift box, I started by coloring the box using Garden Green Classic ink and sponging it all over to create a more festive look. I added a 3" x7 1/2" strip of the Real Red striped designer series paper, from the Toile Tidings Designer Series Paper (item #150432) from the 2019 Holiday Catalog, around the middle of the box for a fun Holiday look. 
The focal image was created using a variety of circle die cuts. I die cut the largest scallop circle from Real Red cardstock and the smaller scallop circle from Very Vanilla cardstock using dies from the Layering Circles Dies (item #141705) and the medium circle from Garden Green cardstock using a die from the Stitched Shapes Dies (item #145372). I stamped the cute little Christmas chick from the Birds of A Feather stamp set (item #150571) onto the Very Vanilla scallop circle using Memento Tuxedo Black ink and colored it in with Real Red, Daffodil Delight and Pumpkin Pie Stampin' Blends Markers. To add a little texture, I added some Snowfall Accents Puff Paint (item #150691) to the chick's hat.  
To create the sentiment, I die cut a small label using the Stitched Nested Labels Dies (item #149638) from Real Red cardstock. I stamped the sentiment from the Birds of A Feather stamp set with Versamark ink and heat embossed it using Silver Embossing Powder. I attached the sentiment label to the bottom of the circles using Mini Stampin' Dimensionals. 
Using Mini Stampin' Dimensionals, I attached the circle focal image to the designer series paper on the pillow box. To finish off the design, I added a bow created with the Real Red 3/8" Cotton Ribbon to the top of the circle, attaching it with Mini Glue Dots. I just love how the traditional Christmas colors look together and it gives this little gift box an old fashioned country feel. 
I hope that you have enjoyed my Christmas gift box and I hope it inspires you to take a look a the wonderful premade treat boxes included in Stampin' Up!'s amazing catalogs. With just a little embellishing, you can create your own fun designs to create gifts for all seasons. If you live in the U.S. and do not already have a demonstrator, please contact me and I would be happy to help you.

Now it's time to visit Judi's blog and see what wonderful ideas she has to share with us this month. Please click on the Next button to visit her blog. I hope that you enjoy the rest of our blog hop. Please leave us a comment to let us know what you like about our projects.  


Until Next Time
Happy Stamping,
Tricia Butts
Independent Stampin' Up! Demonstrator
Like What You See? Visit My Online Store Here
Visit My Facebook Business Page for Updates & Ideas

Click here to Contact Me


Wednesday, December 18, 2019

What's New at SU Blog Hop New Catalogs Sneak Peek

Welcome to the What's New at SU Blog Hop as we share Sneak Peeks from the New January-June 2020 Mini Catalog and 2020 Sale-a-bration Catalog. You will be visiting with Stampin' Up! demonstrators from around the world as we share our projects and ideas to help inspire you.
 My Sneak Peek project features products from the Parisian Blossoms Suite in the new January-June 2020 Mini Catalog which will be available beginning January 3rd, 2020. My card design features the wonderful Parisian Beauty Bundle (item #153778) combined with the detailed Parisian Flourish 3D Embossing Folder (item #151474). I love the romantic feel to this suite and I am so happy to share this card design with you today.
 The card base was created with Petal Pink cardstock and I added a layer of Pool Party cardstock that I embossed with the Parisian Flourish 3D Embossing Folder to create the wonderful texture to the card front. I stamped the Eiffel Tower image from the Parisian Beauty stamp set (item #151466) with Versamark ink onto a piece of Whisper White cardstock and heat embossed it with Shimmer Black Embossing Powder. I die cut the image using the coordinating die from the Parisian Dies (item #151463). Both the stamp set and coordinating dies can be ordered as a bundle to save 10%.

The oval frame was created from Petal Pink cardstock using the large oval from the Layering Ovals Dies and I layered an oval of Whisper White cardstock that I die cut using the largest oval from the Stitched Shapes Dies. I stamped the Whisper White oval with one of the script images from the stamp set using Pool Party Classic ink, stamping off once to create a softer look to the background. I attached the oval to the card front with Snail Adhesive and attached the Eiffel Tower image using Mini Stampin' Dimensionals. To complete the card I die cut the Merci sentiment using the die from the Parisian Dies from Black Foil and attached it to the bottom of the card front. I added a bow created with the Basic Black 1/2" Satin Ribbon (item #146280) to the left side of the oval using Mini Stampin' Dimensionals. 
Thank you for taking the time to visit my blog today. I hope that my card design will inspire you to take a look at the wonderful products in the Parisian Blossom Suite to create your own amazing projects. If you live in the U.S. and do not already have a demonstrator, please contact me and I would be happy to help you.

Now it's time to visit Linda's blog and see what wonderful ideas she has to share with us from the new catalogs. Just click the Next button to visit her blog or click the Previous button to visit Margriet's blog for her wonderful project. You can also use the Roll Call List to help you find your way. I hope you enjoy our blog hop this month. 


Roll Call 

Until Next Time
Happy Stamping,
Tricia Butts
Independent Stampin' Up! Demonstrator
Like What You See? Visit My Online Store Here
Visit My Facebook Business Page for Updates & Ideas

Click here to Contact Me

The Clearance Rack Has Been Updated. Save Up To 60% On Discontinued Products While Supplies Last

Stock Up On Your Favorite 2019 Holiday Catalog Products Before They Disappear

 So Many Beautiful Products To Choose From While Supplies Last

Monday, December 16, 2019

Kylie's Demonstrator Training Program Monthly Blog Hop December 2019

Welcome to Kylie's Demonstrator Training Program December Blog Hop as we share projects to help inspire you. We are a group of Stampin' Up! demonstrators sharing a common goal to build strong, creative businesses that provide support and inspiration to our customers with Kylies' wonderful training program. I hope that you will find our project ideas helpful as you journey along our blog hop.
 My card design today is a very special Christmas card that I created for a friend of my son. My son and his friends wanted to do something special for their friend and I was honored to be asked to create the card they would all sign to give to him. 

I started with a Cherry Cobbler cardstock card base and added a layer of designer series paper from the Come To Gather Designer Series Paper pack (item #150454) from the 2019 Holiday Catalog.
 My son's friend loves pandas, so I used the image from the Wildly Happy stamp set (item #149408) from the 2019-2020 Annual Catalog to create the focal image. I stamped the image with Memento Tuxedo Black ink onto Whisper White card stock and die cut it with one of the dies from the Stitched Nested Labels Dies (item #149638).  I colored the image with Dark Smoky Slate and Light Basic Black Stampin' Blends Markers. I also stamped another image onto a scrap of Thick Whisper White cardstock and fussy cut the head, arm and paw and colored these pieces as well. To cover up the baby panda, I cut a small piece of Cherry Cobbler Designer Series Paper from the Regals 6"x6" Designer Series Paper Pack (item #149616) to create a gift that would cover that part of the stamped image. I attached the gift to the image using Snail adhesive and attached the arm, head and paw with Mini Stampin' Dimensionals so that they overlap the gift. Using the Gold 1/4" Shimmer Ribbon (item #152156), I tied a small bow and added it to the top of the gift with a Mini Glue Dot.
 To create the sentiment, I stamped the image from the Cup of Christmas stamp set (item #150491) onto a strip of Cherry Cobbler cardstock with Versamark ink and heat embossed it with Shimmer White embossing powder. I attached the sentiment underneath the panda on the label, with Mini Stampin' Dimensionals. 

For the inside of the card design, I used the group of meerkats image and sentiment from the new The Gangs All Meer stamp set, which is one of the wonderful choices you can earn for free during Sale-a-bration, beginning January 3rd, 2020. I stamped the images with Early Espresso Classic ink and colored the meerkats with a variety of Stampin' Blends Markers. My son loved this, as it represented his group of friends giving the gift.
I hope that you have enjoyed my card design today and I hope that it shows you how you can customize a card to make it unique for someone special. It's one of my favorite things about creating my own cards for people and it provides so many wonderful creative possibilities.  If you live in the U.S. and do not already have a demonstrator, please contact me and I would be happy to help you.
Thank you for taking the time to visit my blog today. I hope you will take the time to visit the other blogs listed below and enjoy the projects they have to share this month. Just click on the names in the blog hop list below to find your way along our blog hop. 

Until Next Time
Happy Stamping,
Tricia Butts
Independent Stampin' Up! Demonstrator
Like What You See? Visit My Online Store Here
Visit My Facebook Business Page for Updates & Ideas

Click here to Contact Me