Saturday, June 29, 2019

Ink. Stamp. Share. June Blog Hop 3D

It's time to hop with the Ink. Stamp. Share. June Blog Hop and this month we are focusing on 3D projects to help inspire you to get creative. You will be visiting with Stampin' Up! demonstrators from all over the world as they share their ideas. I hope you enjoy our blog hop this month. 
 Today I decided to create a simple treat pouch using one of the Kraft Pillow Boxes (item #147018) and I decorated it with the Back On Your Feet Cling stamp set (item #149385) from the new 2019-2020 Annual Catalog. We often make treats for birthdays and other special occasions but I thought that it would be nice to create a treat to help cheer someone up who is having a tough time. 
I used one of the smaller oval dies from the Stitched Shapes Dies (item #152323) to cut an opening at the top of the pillow box to create a handle. I tied a piece of Call Me Clover Grosgrain Ribbon (item #146951) to the handle to create a box to decorate.

I stamped the turtle image onto a piece of Whisper White cardstock with Memento Tuxedo Black ink and colored the image using Stampin' Blends Markers. I then punched out the image using the 2 1/4" Circle Punch and layered it onto a circle die cut from Call Me Clover cardstock using a circle die from the Stitched Shapes Dies. For the final layer, I die cut a scalloped circle from Whisper White cardstock using the Layering Circles Dies (item #141705). 

To create the sentiment, I stamped the image onto a scrap of Whisper White cardstock using Call Me Clover Classic ink and created the look of a banner using the Tailored Tag Punch (item #145667). I added a piece of Call Me Clover cardstock behind the sentiment banner that has been punched out using the Classic Label Punch (item #141491) that I cut in half and attached to the back of the banner using Snail Adhesive. 

Thank you for taking the time to visit my blog today. I hope that you enjoy my project and I hope that it will help you come up with your own fun ideas. If you live in the U.S. and do not already have a demonstrator, please contact me and I would be happy to help you. 

Now it's time to visit Stacey and see what she has to share with us this month. Please click the Next button below to visit her blog or use the Roll Call List below to find your way along our hop. 


Until Next Time
Happy Stamping,


Tricia Butts
Independent Stampin' Up! Demonstrator
Like What You See? Visit My Online Store Here
Visit My Facebook Business Page for Updates & Ideas


Tuesday, June 25, 2019

Paper Pumpkin Possibilities Blog Hop A Little Smile

Welcome to the Paper Pumpkin Possibilities Blog Hop featuring the June kit, A Little Smile. This kit was created to help us all share a little love with a smile through random acts of kindness. It's amazing the difference a handmade card can make in someone's life. Today we will be sharing alternative ideas that you can create using supplies from this fun kit that is perfect for Summer. 
I love the beach feel to this month's kit and it immediately drew me to the new Seaside Notions Cling stamp set (item #149278) as a great way to use the supplies in this kit to create a fun ocean themed card. The coordinating colors in this kit are perfect for a masculine card so I chose to create my alternative card design with this in mind.
 For the card base, I chose to use Coastal Cabana cardstock and used Crumb Cake cardstock to create the matte for the focal point of this card design. The background of the focal design was created by taking one of the small note cards and cutting it in half to separate the colorful watercolor front part of the card from the back half of the card. I attached the front section of the note card to the Crumb Cake cardstock layer to create the look of being under the sea with the sand along the bottom.
 I embossed the card base using the High Seas 3D Embossing Folder (item #149577) to create the look and texture of waves. The sea horse image was stamped onto Pretty Peacock cardstock using Versamark ink and I heat embossed it with the new Shimmer White Embossing powder (item #149511). It's hard to see from the photos, but the shimmer and sparkle of the embossing powder really pops against the Pretty Peacock cardstock. I fussy cut the sea horse out using my Paper Snips. 
To embellish the focal panel, I added two of the seaweed die cuts from the kit to the watercolor piece and attached the sea horse on top. On the opposite side I added one of the sparkly sand dollar die cuts from the kit and the attached the panel to the card front with Stampin' Dimensionals. Using Mini Stampin' Dimensionals, I attached the bottom of the tail of the sea horse to the card front. 
For the sentiment, I stamped one of the sentiments from the exclusive stamp set in the kit, onto the label, also from the kit, using the Coastal Cabana ink spot (you guessed it, also included in the kit). To decorate the sentiment, I used some of the twine from the kit and wrapped it around each end of the label. I added some Snail Adhesive to the back of the label to hold the twine in place. 

I love how simple it was to convert the smaller size card included in this kit into a full size card, while still making use of  a lot of the supplies in the kit. The Seaside Notions Cling stamp set and High Seas 3D Embossing Folder both coordinate beautifully with this kit to provide even more options for creating alternative projects. 

Thank you for taking the time to visit my blog to day. I hope that my card design helps you see the amazing possibilities available with this kit and how you can pair it with products in the 2019-2020 Annual Catalog. If you live in the U.S. and you do not already have a demonstrator, please contact me and I would be happy to help you. 

Now it's time to visit Candy's blog and see what she has created for us this month. Just click the Next button below to visit her blog. I hope you enjoy the rest of our blog hop. 
Until Next Time
Happy Stamping,

Tricia Butts
Independent Stampin' Up! Demonstrator
Like What You See? Visit My Online Store Here
Visit My Facebook Business Page for Updates & Ideas

Refill kits for the June Paper Pumpkin Kit are available while supplies last as a perk to Paper Pumpkin Subscribers. 

I am so excited about July's kit which will coordinate with 3 new product suites in the new 2019-2020 Annual Catalog. You won't want to miss this amazing card kit with supplies to create 9 mailable cards.

Friday, June 14, 2019

SBTD Something Old & Something New Blog Hop

Welcome to the SBTD Something Old & Something New Blog Hop. This month we are sharing ideas and projects to help you pair up new products from the new 2019-2020 Annual Catalog with old favorites that have carried over from past catalogs. 
 My card design today features the new Wildly Happy Cling stamp set (item #149408) paired with the Layering Circles Dies (item #141705) and Stitched Shapes Dies (item #152323) from the 2019-2020 Annual Catalog. I thought it would be fun to pair a new stamp set with some old favorite die sets.
 My card base was created from Rococo Rose cardstock, one of the new 2019-2021 In Colors. It works beautifully with Very Vanilla and Blushing Bride cardstock. I embossed the layer of Blushing Bride cardstock using the Tufted 3D Embossing Folder to create a quilted look to the background. 
The bunnies image has been stamped onto a Very Vanilla cardstock circle die cut using the dies from the Layering Circles Dies. I stamped the image with Early Espresso Classic ink and colored the background and inside of the ears using the Stampin' Blends Markers. I layered the colored image onto a circle of Very Vanilla cardstock that I punched out using the 2 1/4" Circle Punch and then layered it onto a circle die cut from Blushing Bride cardstock using the Stitched Shapes Dies. The last layer was created from Rococo Rose cardstock using one of the Scalloped Circle dies from the Layering Circles Dies. I attached the image to the card front with Stampin' Dimensionals. 
The sentiment was stamped with Rococo Rose Classic ink onto a scrap of Very Vanilla cardstock and punched out using the Story Label Punch. Using the Rococo Rose Light Stampin' Blend Marker,  I colored a piece of the Very Vanilla Lace Trim and attached it to the card front. I attached the sentiment label on top of the lace using Stampin' Dimensionals. To embellish the sentiment, I colored two of the smallest Basic Pearls with the Rococo Rose Light Stampin' Blends Marker and attached them to the label. 

I love the soft and pretty look to this card design and I think it makes a wonderful baby card for a little girl. By changing the colors for this card, you could create a card design suitable for a baby boy or keep it neutral so that it isn't gender specific. 
Thank you for taking the time to visit my blog today and I hope that my card design helps inspire you to mix and match your old favorites with some new products from the 2019-2020 Annual Catalog. If you live in the U.S. and do not already have a demonstrator, please contact me and I would be happy to help you.

Now it's time to visit Courtenay's blog and see what she has to share with us this month. Just click the Next button below to visit her blog. I hope that you will take the time to hop along our blog hop this month and we would appreciate you leaving us a comment. 

Until Next Time
Happy Stamping,


Tricia Butts
Independent Stampin' Up! Demonstrator
Like What You See? Visit My Online Store Here
Visit My Facebook Business Page for Updates & Ideas


Wednesday, June 12, 2019

Colour Combo June Blog Hop

It's time to hop with the Colour Combo June Blog Hop and this month we have been challenged to create a project using Gray Granite, Poppy Parade and Daffodil Delight. You will be visiting with Stampin' Up! Demonstrators from around the world, sharing their projects and ideas to help inspire you with your own creative projects. 
 My card design today features a wonderful stamp set that you can earn for Free when you host a qualifying party. New Wonders stamp set (item #149426) is just one of the amazing Stampin' Rewards Host stamp sets available to choose from. I just love the beautiful fairy images in this stamp set and the sentiments are wonderful. 
I chose to use Gray Granite cardstock for my card base and added a layer of Poppy Parade cardstock to add a bright pop of color to frame the Whisper White card front. I stamped the fairy image onto the Whisper White cardstock with Memento Tuxedo Black ink and colored in the image using Poppy Parade Light and Dark, Daffodil Delight Light and Dark and Gray Granite Light and Dark Stampin' Blends Markers. I used the Petal Pink Light Stampin' Blend Marker for her face. To add a touch of shimmer, I colored over the image with Clear Wink of Stella. 
To create the daisy in the bottom corner, I stamped the large daisy image from the Daisy Lane stamp set (item #149325), twice onto Daffodil Delight cardstock with Versamark ink and heat embossed the images with Whisper White embossing powder. I punched out both images using the Daisy Punch. I then stamped the medium size daisy image using Daffodil Delight Classic ink onto Whisper White cardstock and punched them out using the Medium Daisy Punch. I layered the images on top of each other to create the daisy. I stamped the fern image twice onto the card front using Gray Granite Classic ink to create the background for the daisy and then attached the flower on top using a Stampin' Dimensional. I added Clear Wink of Stella to the Daffodil Delight stamped petals for a touch of shimmer.  For the center of the Daisy, I added a Clear Faceted Gem to add some sparkle. 
To finish off the card design, I stamped the sentiments onto the card front using Gray Granite Classic ink and added Basic Rhinestones for a little added bling. 

This card was so much fun to create and I loved combining these two stamp sets together to create the design. I hope that my card design helps inspire you to create your own magical creations. If you live in the U.S. and do not already have a demonstrator, please contact me and I would be happy to help you. 
Now it's time to visit Bettina's blog and see what she has to share with us this month. Click the Next button below to visit her blog and don't forget to hop along the rest of our blog hop. I hope you enjoy our projects this month. 
Until Next Time
Happy Stamping,


Tricia Butts
Independent Stampin' Up! Demonstrator
Like What You See? Visit My Online Store Here
Visit My Facebook Business Page for Updates & Ideas


Tuesday, June 11, 2019

What's New at SU Blog Hop New Catalog


Welcome to the June What's New at SU Blog Hop and this month we are celebrating the New 2019-2020 Annual Catalog. You will be visiting with Stampin' Up! demonstrators around the world as they share fun projects created with new products from this wonderful catalog. 
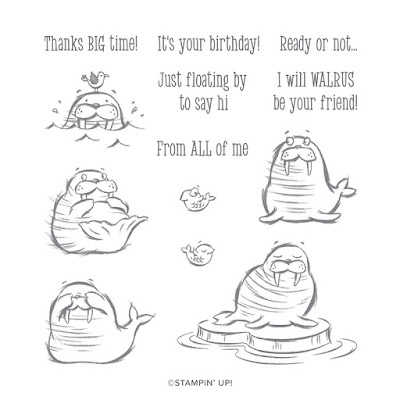
 Today I thought I would share the adorable We'll Walrus Be Friends Cling stamp (item #149367). This set has the cutest images and the sentiments are a perfect fit for the images and to create fun and thoughtful card designs. 
 For my color combination, I chose Coastal Cabana cardstock for my card base and I added a layer of Smoky Slate cardstock to help make the Pool Party cardstock card front pop. I embossed the Pool Party cardstock with the new High Seas 3D Embossing Folder (item #149577) and outlined the embossing with Clear Wink of Stella to create the look of sunlight reflecting off the waves. 
For the focal image, I stamped it with Memento Tuxedo Black ink and colored it with Stampin' Blends Markers. I punched it out with the 2" Circle Punch and layered it onto the Coastal Cabana starburst circle punched out with the Starburst Punch. I then popped it up with Stampin' Dimensionals and added it to a Smoky Slate cardstock circle die cut with the Layering Circles Dies. 
For the sentiment, I heat embossed it with Silver embossing powder onto Coastal Cabana cardstock and punched it out using the Story Label Punch. I then layered it with a layer of Smoky Slate cardstock punched out with the same punch. I added the sentiment on top of a piece of Whisper White Flax Ribbon, using Stampin' Dimensionals. To finish off the card, I added Basic Rhinestones for a touch of bling.
I just love how this card turned out and can't wait to use this stamp set again. It is so much fun to work with. I hope that you enjoy this card as much as I did creating it.  If you live in the U.S. and do not already have a demonstrator, please contact me and I would be happy to help you. 

Now it's time to hop over to Loni's blog to see what she has to share with us. Just click the Next button below to visit her blog. I hope you enjoy our blog hop this month. 


Margriet

Until Next Time
Happy Stamping,

Tricia Butts
Independent Stampin' Up! Demonstrator
Like What You See? Visit My Online Store Here
Visit My Facebook Business Page for Updates & Ideas

Contact me for more information