Showing posts with label Reindeer Dies. Show all posts

Saturday, November 18, 2023

Stamping With Friends November Blog Hop Anything Christmas

Welcome to the Stamping With Friends November Blog Hop as we celebrate Anything Christmas. Our wonderful Design Team will be sharing their projects and ideas to help you get in the spirit of the season to create your own beautiful cards and projects to share with family and friends. 
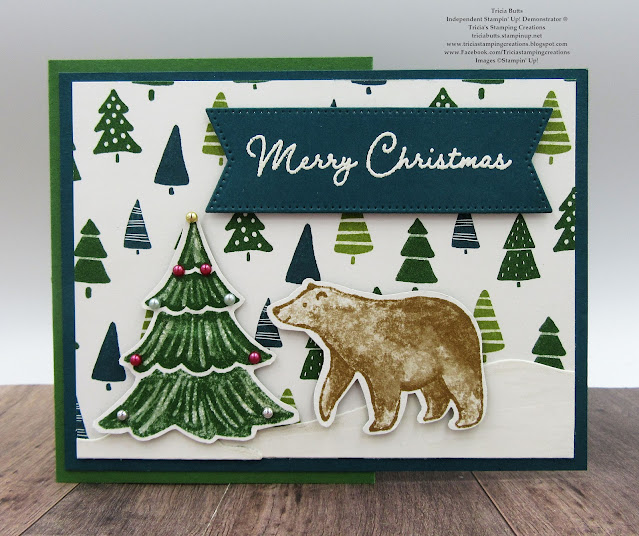
Gift cards are a wonderful idea for the holidays but it can be a bit boring to just put them in an envelope with a normal card. That's why I love creating fun and festive gift card holders for the holidays and today I have another cute design to help spark your creativity. You may remember this card that I created here using the Beary Christmas Suite and I wanted to create another version of this type of gift card holder using the A Walk In The Forest Designer Series Paper to show how versatile this design can be. This beautiful designer series paper is part of Stampin' Up!'s Craft For A Cause and for every pack of A Walk In The Forest Designer Series Paper that is sold, $3 will be donated to the Marines Toys For Tots Charity. 
Products Used:
Beary Cute Bundle (item #162023)
Reindeer Dies (item #159727)
Stylish Shapes Dies (item #159183)
2 3/8" Circle Punch (item #161354)
A Walk In The Forest Designer Series Paper (item #162377)
Garden Green Cardstock (item #102584)
Pretty Peacock Cardstock (item #150880)
Basic White Cardstock (item #159276)
Pecan Pie Classic Ink Pad (item #161665)
Versamark Pad (item #102283)
Basics Embossing Powders (item #155554)
Clear Wink of Stella Glitter Brush (item #141897)
Festive Pearls (item #159963)
Tear & Tape Adhesive (item #154031)
Stampin' Dimensionals (item #104430)
Measurements:
Garden Green Cardstock
Card Base - 4 1/4" x 11" (Score at 2 1/4" & 5 1/2")
Pretty Peacock Cardstock
Card Front - 5 1/4" x 4"
Inside Card Matte - 3 7/8" x 5 1/8"
Sentiment Label die cut with the Stylish Shapes Dies
Basic White Cardstock
Inside Card Layer - 5" x 3 3/4"
A Walk In The Forest Designer Series Paper
Card Front - 5" x 3 3/4"
Christmas Tree fussy cut
Bear punched out with Beary Cute Punch
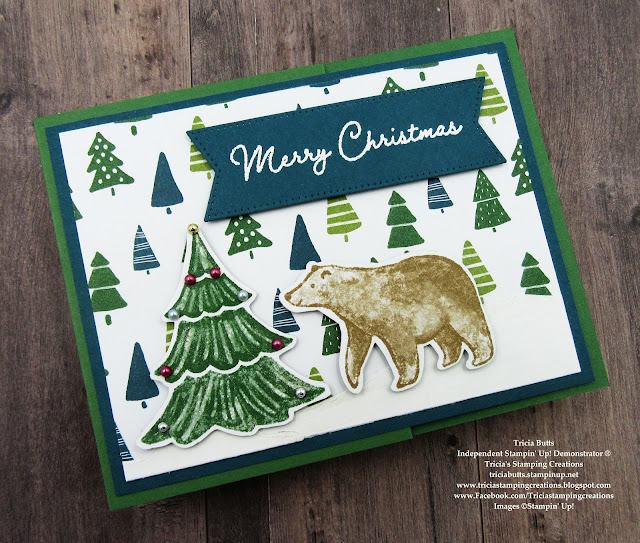
I feel like I have become a bit addicted to creating these gift card holders. I love how easy it is to transform the base into a variety of designs to help make each one special. For this gift card holder, I used one of the A Walk In The Forest designs for the card front and fussy cut out the tree and punched out the bear with the Beary Cute Punch from a different sheet to create the focal image. I also added some snowbanks along the bottom of the card front to help ground the tree and the bear. I added some Clear Wink of Stella to the snow to give it a little sparkle and also to the tree. For the sentiment, I heat embossed the image with White embossing powder onto the Pretty Peacock label and added it to the card front with Stampin' Dimensionals. To decorate the tree, I added some Festive Pearls to give the appearance of ornaments. To create the basic gift card holder, I used the 2 3/8" Circle Punch to create the opening on the end of the card base that holds the gift card. I used Tear & Tape to create the pocket. I added the front panel to the front section of the base, making sure to not add adhesive beyond the half way point. For the inside of the card, I stamped the bear with Pecan Pie Classic ink onto the Basic White insert and then attached it to the Pretty Peacock layer before adding it inside the card. I just love how this cut gift card holder turned out. I think it would be perfect for a masculine card as well.
Thank you for taking the time to visit my blog. I hope that my gift card holder will help inspire you to create your own beautiful projects to send to family and friends for the holidays. There are so many wonderful options to explore in the September-December 2023 Mini Catalog. Remember, for every pack of A Walk In The Forest Designer Series Paper sold, $3 will be donated to the Marines Toys For Tots Charity as part of Stampin' Up!'s Making A Difference Craft For A Cause program. Simply place your order by visiting my Online Store to support this worthy charity. 
Please take a moment to visit with the other Design Team members during our blog hop today by clicking on the links in the Roll Call List below. We would appreciate it if you would leave us a comment and let us know what you enjoyed about our projects. 

If you live in the U.S. and do not have a Stampin' Up! Demonstrator, please contact me and I would be happy to help you with your creative projects. You may also visit my Online Store to place your order and have it shipped to you. 

Until Next Time

Happy Stamping,

Tricia Butts
Independent Stampin' Up! Demonstrator

Like What You See? Visit My Online Store Here

Visit My Facebook Business Page for Updates & Ideas

Click here to Contact Me


New Online Exclusives Products
Available Now While Supplies Last
Click Below To Shop Now

Get Creative For The Holidays
With The September-December 2023 Mini Catalog
Click Below To View These Wonderful Products


Saturday, July 8, 2023

Stamping Inkspirations July Blog Hop Color Challenge

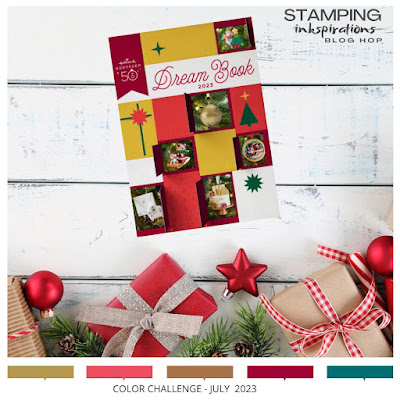
Welcome to the Stamping Inkspirations July Blog Hop and this month we have a special Color Challenge to share with you. The colors for this month's Color Challenge have been inspired by the cover of the 2023 Hallmark Dream Book, which is celebrating 50 years of Hallmark Keepsake Ornaments. Click here to see the PDF. I know that my family has a few special Hallmark ornaments that we have collected over the years, so I am excited to take part in this challenge. We have the choice to use the 3-5 of the colors from the image below, including Wild Wheat, Sweet Sorbet, Pecan Pie, Cherry Cobbler and Pretty Peacock, or we can choose to create our own Color Challenge from any of the images inside the Dream Book. I am excited to see what my fellow Design Team members will choose to create. 
For this Color Challenge I decided to create a Christmas card featuring all 5 of the colors featured in the above image. I wanted to create a pretty Winter scene using the Regal Reindeer stamp set and coordinating Reindeer Dies for my design. These colors work together beautifully and I love that this scene has an almost Scandinavian feel to it. While the dominate colors are Pretty Peacock, Cherry Cobbler and Basic for the card base and layers, the other colors were used to color the images using Stampin' Blends Markers. I decided not to add a sentiment to the front, but instead added the verse and sentiment to the inside layer. 
Products Used:
Regal Reindeer Stamp set (item #159722)
Reindeer Dies (item #159727)
Pretty Peacock Cardstock (item #150880)
Cherry Cobbler Cardstock (item #119685)
Basic White Cardstock (item #159276)
Pretty Peacock Classic Ink Pad (item #150083)
Memento Tuxedo Black Pad (item #132708)
Pecan Pie Stampin' Blends Combo Pack (item #161674)
Pretty Peacock Stampin' Blends Combo Pack (item #161676)
Cherry Cobbler Stampin' Blends Combo Pack (item #154880)
Wild Wheat Stampin' Blends Combo Pack (item #161661)
Sweet Sorbet Stampin' Blends Combo Pack (item #159224)
Clear Wink of Stella Glitter Brush (item #141897)
Blender Pens (item #102845)
Festive Gems (item #159963)
Measurements:
Pretty Peacock Cardstock
Card Base - 8 1/2" x 5 1/2" (Scored at 4 1/4")
Cherry Cobbler Cardstock
Layer 2 - 5" x 3 3/4" 
Basic White Cardstock
Layer 1 - 5 1/4" x 4"
Focal Layer - 4" x 3"
Inside Layer - 5 1/4" x 4"
Reindeer & child stamped and die cut with the Reindeer Dies
Snow Banks die cut with the Reindeer Dies
This Winter themed Christmas card has a series of layers to help create a frame for the focal design. I love the bold look that the Pretty Peacock, Basic White and Cherry Cobbler layers provide for this design. For the focal layer, I stamped and die cut the child and reindeer images and then colored them with Stampin' Blends Markers to bring them to life. I love that Wild Wheat has the look of vintage gold and I used it to color the bells and harness. I used Pecan Pie to color the reindeer and used a combination f the other colors to color the remainder of both images. For the background of the focal layer, I stamped the trees on either side with Pretty Peacock Classic ink and then used a Blender Pen to gently color the trees using the ink from the outline to blend into the white areas. For the base of the layer, I die cut several snowbank pieces from Basic White cardstock and attached them to the layer. Using Clear Wink of Stella, I a colored the snowbanks to make it look like glistening snow. To complete the card front, I adhered the images of the child and reindeer so that it looks like the child is feeding the reindeer and apple. The only embellishment is several Gold Pearls on the reindeer to replicate the bells.
For the inside of the card, I added a layer of Basic White cardstock and I stamped the verse and sentiment using Pretty Peacock Classic ink. I also stamped the tree image on either side of the bottom of the layer. I love how this beautiful card turned out and how well these colors worked together.
Thank you for taking the time to visit my blog. I hope that enjoy my card design and that it inspires you to explore using this Color Challenge to create your own beautiful projects. 
Now it's time to visit Aurelie's blog and see what she has created for this color challenge. Just click on the Next button below to visit her blog or use the Roll Call List to find your way. We would love it if you would leave us a comment and let us know what you liked about our projects. I hope you enjoy the rest of our blog hop. 

Roll Call List

If you live in the U.S. and do not have a Stampin' Up! Demonstrator, please contact me and I would be happy to help you with your creative projects. You may also visit my Online Store to place your order and have it shipped to you. 

Until Next Time

Happy Stamping,

Tricia Butts
Independent Stampin' Up! Demonstrator

Like What You See? Visit My Online Store Here

Visit My Facebook Business Page for Updates & Ideas

Click here to Contact Me


Bonus Coupons Are Back
Earn A $5 Coupon For Every $50 You Spend
Redeem Your Coupons In August
Click Below To Start Shopping

New Online Exclusive Products
Available Now While Supplies Last
Click Below To Visit My Online Store

Last Chance To Sign Up
For The July Paper Pumpkin Kit
Click Below To Subscribe By July 10th