Showing posts with label Nature's Sweetness Specialty Designer Series Paper. Show all posts

Friday, January 31, 2025

Crafty Collaborations Monochromatic Color Challenge 2025 Week 5 - Pumpkin PIe

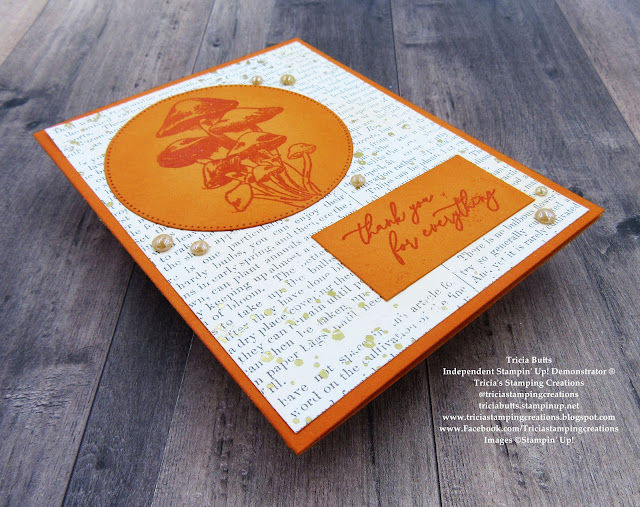
Welcome to Week 5 of the 2025 Monochromatic Color Challenge and this week we are showcasing Pumpkin Pie from the Brights Collection. I must admit that this is a color I don't use very often so this was a fun challenge to create a clean and simple design that shows how versatile this color can be.
I love heat embossing, so for today's card design, I wanted to create a tone on tone look to for the focal image and sentiment using Clear embossing powder. To help make the images pop a little more, I added some Pumpkin Pie Classic ink around the edges of the circle and sentiment label with a Blending Brush to create some depth and dimension. I also added some soft color to the designer series paper background to give it a distressed, vintage feel that also helps bring out the Gold embossed detail. This card design has a wonderful clean and simple elegance to it that works well for a variety of occasions.
Products Used:
Inspirationational Sketches stamp set (item #162684)
Stylish Shapes Dies (item #159183)
Nature's Sweetness Specialty Designer Series Paper (item #162616)
Pumpkin Pie Cardstock (item #105117)
Pumpkin Pie Classic Ink Pad (item #147086)
Versamark Pad (item #102283)
Basics Wow Embossing Powders (item #165679)
Blending Brushes (item #153611)
Champagne Iridescent Dots (item #162824)
Measurements:
Pumpkin Pie Cardstock
Card Base - 8 1/2" x 5 1/2" (Scored at 4 1/4")
Large Circle die cut with the Stylish Shapes Dies
Sentiment Label - 2 1/4" x 1 1/8"
Nature's Sweetness Specialty Designer Series Paper
Card Front - 5 1/4" x 4"
If you have been following me for a while, you know how much I love creating clean and simple card designs using designer series paper. Recently I rediscovered Nature's Sweetness Specialty Designer Series Paper from my crafting stash and I just love the simple elegance of the beautiful gold embossing on the designs in this paper pack. For today's card, I chose the design that has a newsprint feel to it with subtle Gold embossed splatters and I applied Pumpkin Pie Classic ink softly over the card front to give it just a hint of color. This helps bring out the Gold splatters and gives the card design more of a vintage feel. The Clear embossing of the focal image and sentiment add a wonderful contrast to the card design and I love the subtle glossy look that the embossing powder adds. For a touch of bling, I added several of the Champagne Iridescent Dots that coordinate perfectly with the other elements of this card design. 
Thank you for taking the time to visit my blog. I hope that my card design will inspire you to explore using Pumpkin Pie to create your own beautiful card designs. As you can see, there is so much more to this color than Halloween and Fall and I just love the versatility of this beautiful orange. 
Please take a moment to check out this week's Monochromatic Insta Hop to see all the amazing projects featuring Pumpkin Pie. Just click here to get started. We would appreciate it if you would leave us a comment and let us know what you liked about our projects. I hope you will join me next Friday to see what color we will showcase for Week 6. 

If you live in the U.S. and do not have a Stampin' Up! Demonstrator, please contact me and I would be happy to help you with your creative projects. You may also visit my Online Store to place your order and have it shipped to you. 

Until Next Time

Happy Stamping,

Tricia Butts
Independent Stampin' Up! Demonstrator

Like What You See? Visit My Online Store Here

Visit My Facebook Business Page for Updates & Ideas

Click here to Contact Me


Friday, January 24, 2025

Crafty Collaborations Monochromatic Color Challenge 2025 Week 4 - Petunia Pop

Happy Friday everyone, it's time for Week 4 of the Crafty Collaborations Monochromatic Color Challenge 2025. This week we are showcasing Petunia Pop, one of the 2024-2026 In Colors. I love this bright and beautiful color and how it has that perfect mix of pink and purple to help brighten up our creative projects.
For today's card design, I decided to play with some old favorites in my stash. I chose to use one of the designs from the Nature's Sweetness Specialty Designer Series Paper for my card front and paired it with the Something Fancy stamp set and coordinating Something Fancy Dies to create the sentiment. To create this design, I added some color with the Petunia Pop Classic ink and a Blender Pen to color in the Gold embossed flowers as well as some soft background color using a Blending Brush. I love how the Petunia Pop helps bring this beautiful paper to life to create a soft and pretty card design.
Products Used:
Something Fancy stamp set (item #160416)
Something Fancy Dies (item #160424)
Nature's Sweetness Specialty Designer Series Paper (item #162616)
Petunia Pop Cardstock (item #163801)
Petunia Pop Classic Ink Pad (item #163811)
Versamark Pad (item #102283)
Metallics Wow Embossing Powders (item #165678)
Petunia Pop 3/8" Bordered Ribbon (item #163785)
Blooming Pearls (item #162238)
Blender Pens (item #102845)
Blending Brushes (item #153611)
Stampin' Dimensionals (item #104430)
Measurements:
Petunia Pop Cardstock
Card Base - 5 1/2" x 8 1/2" (Scored at 4 1/4")
Sentiment Label die cut with the Something Fancy Dies
Nature's Sweetness Specialty Designer Series Paper
Card Front - 5 1/4" x 4"
I love creating pretty card designs with designer series paper and this card design is no exception. The Gold embossed design is the perfect way to step up the card and when you add a bit of color to the design, it takes it to a whole new level. I love using Blender Pens to "color" images using ink. It's a wonderful way to be able to control the intensity of the color you add to your images. To soften the background, I applied a light layer of Petunia Pop using a Blending Brush, which helps bring out the detail of the Gold embossed images. The combination of these two techniques is a great way to add some color and interest to your designer series paper. For the sentiment, I heat embossed the image from the Something Fancy stamp set with Gold embossing powder to coordinate with the designer series paper layer. The sentiment label was die cut with the coordinating Something Fancy Dies and I layered it over a piece of the Petunia Pop Bordered Ribbon that I added to provide some texture and contrast to the card front. The Gold Blooming Pearls add the perfect finishing touch to the sentiment label to help tie everything together.
Thank you for taking the time to visit my blog. I hope that my card design will inspire you to explore using Petunia Pop in your creative projects. There are so many wonderful products you can use to create your own unique designs. I love that Petunia Pop has a variety of coordinating products that makes it easier to mix and match to create fun and pretty card designs.
Please take a moment to visit this week's Monochromatic Insta Hop to see all the amazing projects featuring Petunia Pop. You can get started by clicking here. We would love it if you would leave us a comment and let us know what you liked about our projects.

If you live in the U.S. and do not have a Stampin' Up! Demonstrator, please contact me and I would be happy to help you with your creative projects. You may also visit my Online Store to place your order and have it shipped to you. 

Until Next Time

Happy Stamping,

Tricia Butts
Independent Stampin' Up! Demonstrator

Like What You See? Visit My Online Store Here

Visit My Facebook Business Page for Updates & Ideas

Click here to Contact Me


Saturday, March 9, 2024

Stamping Inkspirations March Blog Hop Technique Challenge - Etching

Welcome to the Stamping Inkspirations March Blog Hop and this month we have a Technique Challenge to share with you. We will be sharing projects created using the Etching technique to help inspire you. Our Design Team is looking forward to showing you all the wonderful possibilities using this technique.
I must admit, I had not heard of this technique before this month's challenge, so I was a little nervous about how to approach using this technique. I was fortunate enough to watch this video on You Tube by Debbie Yeomans that shared how to use this technique using line images. When I looked through the stamp sets that I had, I couldn't find an image that I thought would work well for this technique, so I instead chose to use one of the beautiful images from the Nature's Sweetness Specialty Designer Series Paper as my focal design. This beautiful paper can be found in the January-April 2024 Mini Catalog and it is part of the Nature's Sweetness Suite Collection. I also used the Notes of Nature stamp set, which is also part of this suite, to add the sentiment and detail with Gold embossing. I love the simple elegance created using this technique with Watercolor Pencils and the way it adds a touch of color to the design. I have discovered that Etching is a lot of fun and can be very relaxing and therapeutic. I hope my card design will help inspire you to give it a try. 
Products Used:
Notes of Nature stamp set (item #162630)
Nature's Sweetness Specialty Designer Series Paper (item #162616)
Pecan Pie Cardstock (item #161717)
Watercolor Pencils Assortment 1 (item #161700)
Versamark Pad (item #102283)
Metallics Embossing Powders (item #155555)
Festive Pearls (item #159963)
Measurements:
Pecan Pie Cardstock
Card Base - 5 1/2" x 8 1/2" (Scored at 4 1/4")
Nature's Sweetness Specialty Designer Series Paper 
Card Front - 5 1/4" x 4"
This beautiful card design has a simple elegance to it and once you learn the basics to this technique, you will find that there are so many wonderful ways to use it to create your projects. Etching is a way to add texture and in this case color as well, using small lines to the image. I wanted to add color to the focal image and I love that this technique gave me the ability to a hint of color using Watercolor Pencils to add the etched lines. For the leaves, I chose to use Old Olive, the the seed pods I chose to use Pecan Pie and for the small blossoms I chose to use Daffodil Delight. As you can see, this small lines give the different elements of the image depth and dimension and help them to come alive. I didn't want to overpower the simplicity of this design, so I chose to heat emboss the sentiment with Gold embossing powder towards the bottom right of the card front and then added some Gold splatter detail that I also heat embossed. The stamp images from the Notes of Nature stamp set coordinated perfectly with this image to help me complete the design. I layered the card front onto a Pecan Pie card base and added Gold Pearls to the center of the flowers to finish off the design. 
Thank you for taking the time to visit my blog. I hope that my card design will inspire you to try this wonderful technique. There are so many wonderful possibilities to explore to create your own beautiful projects. Etching is a great way to add texture, depth and dimension to your designs and even a hint of color if you choose. As I have discovered, there really is no right or wrong way to do this technique. Just have fun and enjoy the experience. 
Now it's time to visit Leonie's blog and see what she has created with this month's technique challenge. Just click the Next button below to visit her blog or use the Roll Call List to find your way. We would appreciate it if you would leave us a comment and let us know what you liked about our projects. I hope you enjoy the rest of our blog hop.

Roll Call List

If you live in the U.S. and do not have a Stampin' Up! Demonstrator, please contact me and I would be happy to help you with your creative projects. You may also visit my Online Store to place your order and have it shipped to you. 

Until Next Time

Happy Stamping,

Tricia Butts
Independent Stampin' Up! Demonstrator

Like What You See? Visit My Online Store Here

Visit My Facebook Business Page for Updates & Ideas

Click here to Contact Me


Explore The Amazing New Products
Just Added To The Online Exclusives
Click Below To View Them In My Online Store

Get Creative For Spring
With The January-April 2024 Mini Catalog
Click Below To Shop Now