Showing posts with label Nature's Prints Bundle. Show all posts

Saturday, April 8, 2023

Ink. Stamp. Share. April Showcase Blog Hop

Welcome to the Ink. Stamp. Share. April Showcase Blog Hop as we share projects and ideas that we are currently working on. While I am waiting for my preorder to arrive full of great new products from the 2023-2024 Annual Catalog, I have been keeping busy showing some love to some old favorites before they retire.
One of my favorite cards to create are clean and simple designs using designer series paper. There is something so beautiful about letting the design on a pretty piece of paper be the star of the show. One of my favorite designer series paper packs in the 2022-2023 Annual Catalog would have to be the Pretty Prints Designer Series Paper. The combination of beautiful colors and botanical designs just makes my heart happy and I am so sorry to see it retire. So I decided to create a clean and simple card using one of the Bermuda Bay sheets to create my card design. I used Basic White for the sentiment and the layer to frame the designer series paper to make it pop and bring it to life. This style of card works so well for so many occasions and it is a great way to create a lot of beautiful cards in a short amount of time.
Products Used:
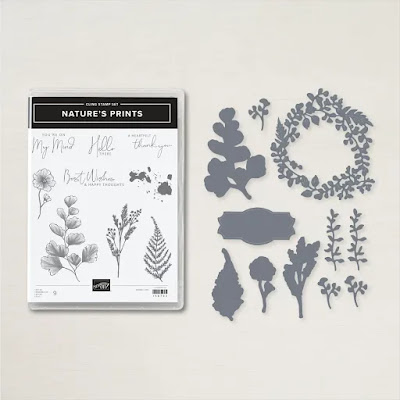
Nature's Prints Bundle (item # 158801)
Pretty Prints Designer Series Paper (item #159245) Retiring
Bermuda Bay Cardstock (item #131197) Retiring
Basic White Cardstock (item #159276)
Bermuda Bay Classic Ink Pad (item #147096)
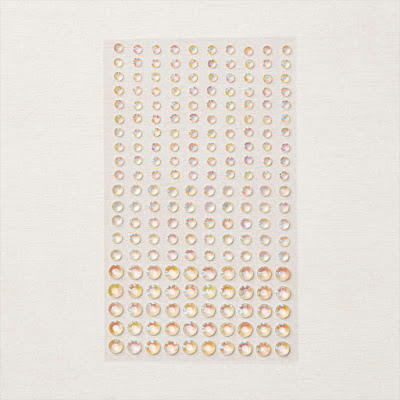
Iridescent Rhinestones Basic Jewels (item #158130)
Stampin' Dimensionals (item #104430)
Measurements:
Bermuda Bay Cardstock 
Card Base - 8 1/2" x 5 1/2" (Scored at 4 1/4")
Basic White Cardstock
Layer 1 - 5 1/4" x 4"
Sentiment Label stamped & die cut with the Nature's Prints Bundle
Pretty Prints Designer Series Paper
Card Front - 5" x 3 3/4"
To create this card, I started with a Bermuda Bay cardstock card base to coordinate with the designer series paper layer. I added the focal layer to the Basic White cardstock to create a frame and then added it to the card base using Stampin' Dimensionals. For the sentiment label, I stamped the sentiment with Bermuda Bay Classic ink onto the Basic White cardstock label and added it to the card front with Stampin' Dimensionals. To finish off the design, I added several Iridescent Rhinestones for a touch of bling. This layout would work well with so many of the retiring designer series paper packs, so make sure to check out the Last Chance Sale to stock up on your favorites. 
Thank you for taking the time to visit my blog. I hope that my card design will inspire you to show some love to your retiring favorites and maybe even encourage you to take a look at the many wonderful products on the Last Chance Sale List to see if there is anything you just can't live without. Remember, these retiring products are available only while supplies last, so don't wait too long to place your order.
Now it's time to visit with my fellow Design Team members and see what they have been working on lately. Just use the Roll Call List below to visit their blogs and show them some love by leaving a comment and letting us know what you liked about our projects. We appreciate your feedback.

If you live in the U.S. and do not have a Stampin' Up! Demonstrator, please contact me and I would be happy to help you with your creative projects. You may also visit my Online Store to place your order and have it shipped to you. 

Until Next Time

Happy Stamping,

Tricia Butts
Independent Stampin' Up! Demonstrator

Like What You See? Visit My Online Store Here

Visit My Facebook Business Page for Updates & Ideas

Click here to Contact Me


Save Up To 60% Off Select Retiring Products
From The Last Chance Retirement Lists
Available Only While Supplies Last
Click Below To Order From My Online Store


Saturday, November 19, 2022

Stamping Inkspiration November Blog Hop Clean & Simple Color Challenge

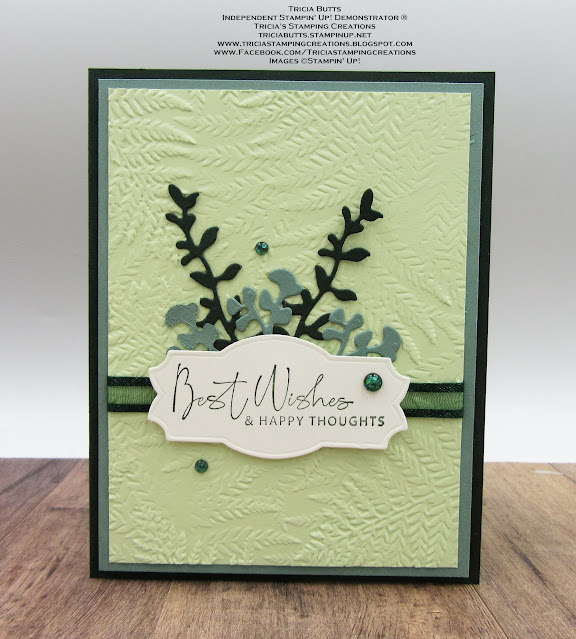
Welcome to the Stamping Inkspiration November Blog Hop as our Design Team takes part in a Clean & Simple Color Challenge. This month we have been challenged to create a Clean & Simple project featuring colors from this month's Color Challenge, including Granny Apple Green, Soft Sea Foam, Pear Pizzazz, Garden Green, Evening Evergreen and Soft Succulent. You will have the chance to visit with our talented Design Team members as they share their projects and ideas to help inspire you.
Clean and simple is one of my favorite styles of card making and I had a lot of fun coming up with a color combination with the choice of greens for this color challenge. I chose to use Evening Evergreen, Soft Succulent and Soft Sea Foam and added Basic White for my sentiment label. I love the way these colors work together to create a soft and soothing card design. 
Products Used:
Nature's Prints Bundle (item #158801)
Fern 3D Embossing Folder (item #158804)
Evening Evergreen Cardstock (item #155574)
Soft Succulent Cardstock (item #155776)
Soft Sea Foam Cardstock (item #146988)
Basic White Cardstock (item #159276)
Evening Evergreen Classic Ink Pad (item #155576)
Evening Evergreen 3/8" Open Weave Ribbon (item #155573)
2021-2023 In Color Opal Rounds (item #159185)
Stampin' Dimensionals (item #104430)
Measurements:
Evening Evergreen Cardstock
Card Base - 5 1/2" x 8 1/2" (Scored at 4 1/4")
2 Long Leaf Stems die cut with the Natural Prints Dies
Soft Succulent Cardstock
Layer 1 - 5 1/4" x 4"   
3 small leaf clusters die cut with the Natural Prints Dies
Soft Sea Foam Cardstock
Card Front - 5" x 3 3/4" Embossed with the Ferns 3D Embossing Folder 
Basic White Cardstock
Sentiment Label die cut with the Natural Prints Dies
This pretty clean and simple card is a wonderful blend of green tones and textures. I chose to emboss the Soft Sea Foam layer to give it soft texture for the background with the lovely Ferns 3D Embossing Folder. I die cut the detailed leaves and arranged them on the card front so that it would appear as though they were growing out of the top of the sentiment label. The Basic White sentiment adds a nice contrast to the layers of green and the Evening Evergreen Ribbon helps step up the design. I stamped the sentiment with Evening Evergreen Classic ink onto the Basic White label and popped it up over the ribbon and the bottom of the stems using Stampin' Dimensionals. To complete the card design, I added Evening Evergreen Opal Rounds to decorate the card front. This card design would work well for a variety of occasions just by changing the sentiment. 
Now it's time to visit Teri's blog and see what she has created to share with us. Just click the Next button below or use the Roll Call List to find your way. We would appreciate it if you would leave us a comment and let us know what you liked about our projects. I hope you enjoy the rest of our blog hop.

Roll Call List

If you live in the U.S. and do not have a Stampin' Up! Demonstrator, please contact me and I would be happy to help you with your creative projects. You may also visit my Online Store to place your order and have it shipped to you. 

Until Next Time

Happy Stamping,

Tricia Butts
Independent Stampin' Up! Demonstrator

Like What You See? Visit My Online Store Here

Visit My Facebook Business Page for Updates & Ideas

Click here to Contact Me 


Get Creative For The Holidays
With The July-December 2022 Mini Catalog
Click Below To Visit My Online Store

Create Gift Card Holders For All Occasions
With The December Paper Pumpkin Kit
Click Below To Subscribe By December 10th


Wednesday, June 1, 2022

We Create June Blog Hop My New Favorite Things

It's time to celebrate a new month with the We Create June Blog Hop and this month we are showcasing our Favorite New Things. With the new 2022-2023 Annual Catalog in full swing, we have had a chance to get familiar with the amazing new products in this catalog and find our favorite new products. Our Design Team will be sharing their projects and ideas to help inspire you to explore this wonderful catalog and discover your own favorite products. 
Choosing a new favorite from the 2022-2023 Annual Catalog has been a fun task and while there is one clear favorite, I also thought I would share some of the other products that are high on my list. My absolute must have from this catalog would have to be the Stylish Shapes Dies. I find myself using them all the time and have become a must have in my creative collection. Coming in a close second would have to be the new 2022-2024 In Colors and I love that there are so many coordinating products in this catalog that make it easier to plan my projects. For this card design, I also chose the Nature's Prints Bundle, another one of my go-to products that works well for a variety of occasions. The card design I chose to create is a wonderful combination of these products and they can be used in a variety of ways to create so many beautiful designs. 
Products Used:
Nature's Bundle (item #158801) New
Stylish Shapes Bundles (item #159183) New
Pretty Prints Designer Series Paper (item #159245) New
Lovely Layers 3 3/4" x 5" Vellum (item #158919) New
Sweet Sorbet Cardstock (item #159268) New 2022-2024 In Color
Calypso Coral Cardstock (item #122925)
Petal Pink Cardstock (item #146985)
Versamark Pad (item #102283)
Basics Embossing Powders (item #155554)
Pearl Basic Jewels (item #144219)
Baker's Twine Essentials Pack (item #155475)
Stampin' Dimensionals (item #104430)
Measurements:
Sweet Sorbet Cardstock
Card Base - 8 1/2" x 5 1/2" (Scored at 4 1/4")
Sentiment Stitched Circle die cut with the Stylish Shapes Dies
Pretty Prints Designer Series Paper
Card Front - 5 1/4" x 4"
Calypso Coral Cardstock
Two large stems die cut with the Natural Prints Dies (Bundle)
Petal Pink Cardstock
Three small stems die cut with the Natural Prints Dies (Bundle)
Lovely Layers Vellum 
Stitched Square die cut with the Stylish Shapes Dies 
This beautiful card is all about delicate layers and coordinating colors. I chose my color combination of Sweet Sorbet, Calypso Coral, Petal Pink and Basic White from the colors in the Pretty Prints Designer Series Paper I chose for the background. This beautiful paper also coordinates with the Nature's Prints Bundle and I die cut the detailed stems using the coordinating dies to add texture and layers to the design. The softness of the vellum provides a wonderful frame around the sentiment label and I love the stitched detail on the die cuts. For the sentiment, I heat embossed the image with White Embossing Powder for a touch of elegance. To finish off the card design, I embellished the label with Basic Pearls and added a bow tied with White Baker's Twine.  This card design can be created using any of the beautiful designs in this pretty paper pack with the coordinating colors listed. 
Thank you for taking the time to visit my blog. I hope that my card design will help inspire you to explore the amazing new products in the 2022-2023 Annual Catalog and discover your own new favorites. If you are like me, it will be hard to pick just one favorite. 
Now it's time to visit Tanya's blog and see what she has created with her new favorite things. Just click on the Next button below to visit her blog. We would love it if you would leave us a comment and let us know what you liked about our projects. I hope you enjoy the rest of our blog hop. 


If you live in the U.S. and do not have a Stampin' Up! Demonstrator, please contact me and I would be happy to help you with your creative projects. You may also visit my Online Store to place your order and have it shipped to you. 

Until Next Time

Happy Stamping,

Tricia Butts
Independent Stampin' Up! Demonstrator

Like What You See? Visit My Online Store Here

Visit My Facebook Business Page for Updates & Ideas

Click here to Contact Me


Create & Save With The Kits Collection
Buy One, Get One 50% Off
Click Below To Visit My Online Store


Get Creative For The Summer
With The June Paper Pumpkin Kit
Click Below To Subscribe By June 10th

Stock Up On Your Favorite Retiring Products
From The January-June 2022 Mini Catalog
Click Below To Visit My Online Store


Sunday, May 15, 2022

Kre8tors May Blog Hop 2022-2023 Annual Catalog

It's time to hop along with the Kre8tors May Blog Hop as we showcase products from the new 2022-2023 Annual Catalog. There are so many wonderful new products and our Design Team is excited to share their projects and ideas to help inspire you to explore this amazing new catalog. 
One of my favorite things about a new catalog is the pretty new designer series paper. For today's card, I decided to create my card with one of the designs from the Tea Boutique 6"x6" Designer Series Paper, to create a beautiful clean and simple card design. I paired it with the Nature's Prints Bundle, which has wonderful sentiments for a variety of occasions and great coordinating dies to make life easier. This card design has a wonderful Spring feel to it and with just a little embellishing, is easy to create.
Products Used:
Nature's Prints Bundle (item #158801) New
Tea Boutique 6"x6" Designer Series Paper (item #158659) New
Crumb Cake Cardstock (item #120953)
Basic White Cardstock (item #159276)
Versamark Pad (item #102283)
Metallics Embossing Powders (item #155555)
Fresh Freesia 3/8" Open Weave Ribbon (item #155615)
2021-2023 In Color Opal Rounds (item #159185) New
Mini Stampin' Dimensionals (item #144108)
Measurements:
Crumb Cake Cardstock
Card Base - 8 1/2" x 5 1/2" (Scored at 4 1/4")
Tea Boutique Designer Series Paper
Card Front - 5 1/4" x 4"
Basic White Cardstock 
Sentiment Label die cut with the Natural Prints Dies
This pretty card design is so simple to create and with all the beautiful designs in this paper pack, you can create a wonderful variety of cards for all occasions. I chose to use Crumb Cake cardstock for my card base to help make the designer series paper layer pop. I heat embossed the sentiment with Silver embossing powder to take the card design to the next level and added a piece of Fresh Freesia Open Weave Ribbon beneath the sentiment label to help it stand out against the background. The pretty new 2021-2023 In Color Opal Rounds have a wonderful sparkle to them and I added three of the Fresh Freesia Opal Rounds to add a touch of bling to complete the card design. This card design is a great example of how you can mix and match different products from different suites, to create beautiful cards. 
Thank you for taking the time to visit my blog. I hope that my card design will inspire you to explore the wonderful new products in this amazing new catalog to help you create your own beautiful projects.
Now it's time to visit Jacqui's blog and see what she has to share with us. Just click the Next button to visit her blog or use the Roll Call List below to find your way. We would appreciate it if you would leave us a comment and let us know what you liked about our projects. I hope you enjoy the rest of our blog hop. 

Roll Call List

If you live in the U.S. and do not have a Stampin' Up! Demonstrator, please contact me and I would be happy to help you with your creative projects. You may also visit my Online Store to place your order and have it shipped to you. 

Until Next Time

Happy Stamping,

Tricia Butts

Independent Stampin' Up! Demonstrator

Like What You See? Visit My Online Store Here

Visit My Facebook Business Page for Updates & Ideas

Click here to Contact Me


Explore The Amazing New Products
In The New 2022-2023 Annual Catalog
Click Below To Visit My Online Store


Take Advantage Of The In Color Starter Kit Promotion
During The Month Of May
Click Below For More Details


Saturday, May 7, 2022

Colour Combo May Blog Hop

Welcome to the Colour Combo May Blog Hop as we explore using different color combinations to help us step outside of our comfort zone. This month we have been challenged to create a project using Crushed Curry, Polished Pink and Blushing Bride. Our Design Team members will be sharing their projects and ideas to help inspire you to try this fun color combination. 
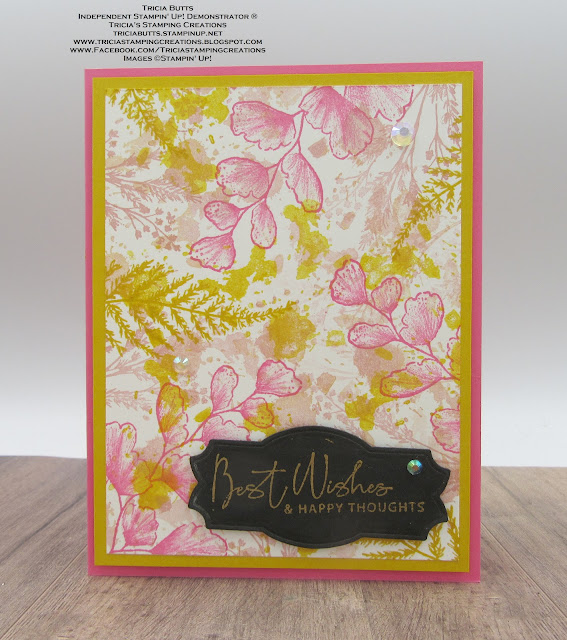
For my card, I decided to focus on using just the Nature's Prints Bundle from the new 2022-2023 Annual Catalog to create my design. I used several of the images from the stamp set to create the background using all three of the colors and then chose one of the sentiments to heat emboss with Gold embossing powder onto a Basic Black cardstock label die cut with the coordinating dies. I kept the embellishments very simple, using the Iridescent Rhinestone Basic Jewels to add a touch of sparkle. I love how these colors combined to create the background for this clean and simple card design.
Products Used:
Nature's Prints Bundle (item #158801) New
Polished Pink Cardstock (item #155710)
Crushed Curry Cardstock (item #131199)
Basic White Cardstock (item #159276)
Basic Black Cardstock (item #121045)
Polished Pink Classic Ink Pad (item #155712)
Crushed Curry Classic Ink Pad (item #147087)
Blushing Bride Classic Ink Pad (item #147100)
Versamark Pad (item #102283)
Metallics Embossing Powders (item #155555)
Clear Wink Of Stella Glitter Brush (item #141897)
Iridescent Rhinestone Basic Jewels (item #158130)
Stampin' Dimensionals (item #104430)
Measurements:
Polished Pink Cardstock
Card Base - 8 1/2" x 5 1/2" (Scored at 4 1/4")
Crushed Curry Cardstock
Layer 1 - 5 1/4" x 4"
Basic White Cardstock
Card Front - 5" x 3 3/4"
Basic Black Cardstock
Sentiment Label die cut with the Natural Prints Dies (Bundle)
This clean and simple card design really showcases these beautiful colors. The images have a wonderful organic feel to them and I love how the colors and images blend together to create a beautiful background. I used Clear Wink of Stella to color the leaves of the large Polished Pink image to help blend the ink and add a touch of shimmer. The splotches in Crushed Curry and Blushing Bride Classic inks were stamped off once to create a lighter shade to fill in some of the white space, adding soft, subtle color to the design. The Gold embossing sentiment on the Basic Black label adds a touch of elegance to the design and I love how the Basic Black pops against the colorful background. I chose the Iridescent Rhinestones to add a subtle touch of bling that enhances the card design rather than competing.  
Thank you for taking the time to visit my blog. I hope that my card design will help inspire you to give this pretty color combination a try to create your own wonderful projects. 
Now it's time to visit Annette's blog and see what beautiful projects she has to share with us. Just click the Next button to visit her blog. We would appreciate it if you would leave us a comment and let us know what you liked about our projects. I hope you enjoy the rest of our blog hop. 


If you live in the U.S. and do not have a Stampin' Up! Demonstrator, please contact me and I would be happy to help you with your creative projects. You may also visit my Online Store to place your order and have it shipped to you. 

Until Next Time

Happy Stamping,

Tricia Butts
Independent Stampin' Up! Demonstrator

Like What You See? Visit My Online Store Here

Visit My Facebook Business Page for Updates & Ideas

Click here to Contact Me 


Get Creative
With The New 2022-2023 Annual Catalog 
Click Below To Visit My Online Store

Take Advantage Of The In Color Starter Kit Promotion
During The Month Of May
Click Below For More Details

Explore The Amazing New 2022-2024 In Colors
With The May Paper Pumpkin Kit
Click Below To Subscribe By May 10th